はじめに
社内コミュツールとしてSlackが導入され、社内のコミュニケーションが多少なりとも活性化してきました。
SlackのAppやワークフロービルダーを使って既存プロセスを楽にしようと考える人も出てきて、ツールが変われば人も変わるなーと実感しています。
そんな中でも依頼は「社内メール」という文化は残っており、最後は誰かがメールを送らないといけません。。。
なのでSlackで簡素化した申請プロセスの申請内容をSlackから社内メールに自動送信するようにしてみました。
環境
今回は以下の環境を利用しました。
Slack(Outgoing Webhook)
Sendgrid
Google Apps Script(Node.js)
順番に設定内容を記載します。
1.Slack
チャンネルで特定のキーワードに対して反応するOutgoing Webhookを設定します。
Outgoing WebhookはSlackのApp管理ページから「App ディレクトリを検索」で検索できます。
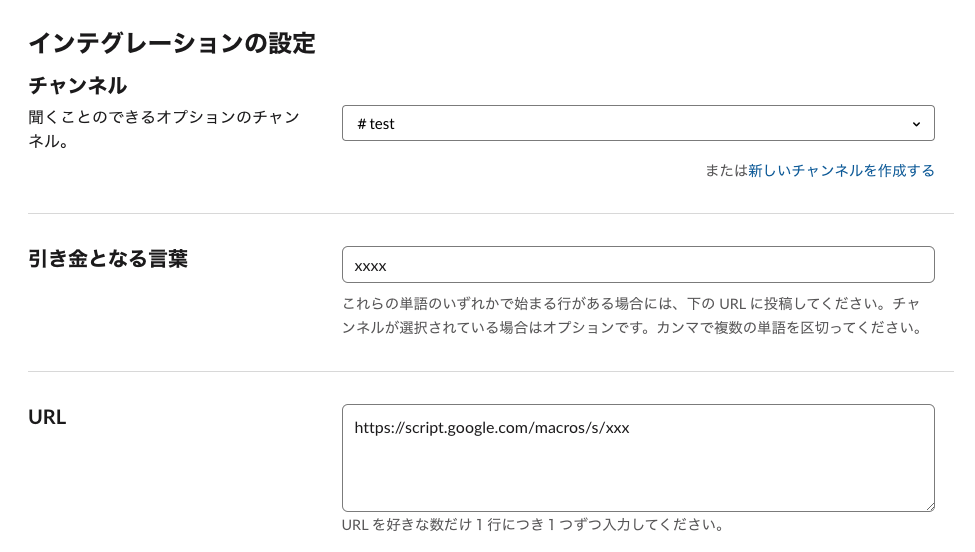
1-1.設定内容
チャンネル:Outgoing Webhookを動かすチャンネルを指定します。
プライベートチャンネルは指定できませんでした。
引き金となる言葉:トリガーとなるキーワードを指定します。
URL:あとで作るGoogle Apps ScriptのCurrent web app URL:を指定します。
2.Sendgrid
メール配送はSendgridを使いました。
https://sendgrid.kke.co.jp/
詳細は割愛しますが、必要となるのはAPIキーです。
ダッシュボートの「Settings」-「API Keys」でKeyを作成してください。
注意:Keyは作成時しか表示されません。
3.Google Apps Script
Slackの投稿を受け取ってメールを送信するスクリプトはGoogle Apps Scriptに構築しました。
3-1.環境変数
環境変数は以下を設定します。
環境変数の設定はGoogle Apps Scriptの「ファイル」-「プロジェクトのプロパティ」-「スクリプトのプロパティ」から設定できます。
■VERIFY_TOKEN
検証用トークンです。自身で設定したOutgoing WebhookからのPOSTかどうか検証します。
これを設定しないとどこからでもPOSTできるようになってしまいます。
設定値はOutgoing Webhookの設定ページにあるTokenを指定します。
■SEND_GRID_ENDPOINT
SendgridのURLを指定します。
https://api.sendgrid.com/v3/mail/send
■SEND_GRID_API_KEY
Sendgridのダッシュボードで取得したAPIキーを指定します。
3-2.スクリプト
doPost(POST、Verify処理)と、sendMail(メール送信処理)の2つに分けています。
メールのto,subject,from_name,fromはご自身の環境に合わせて設定してください。
PropertiesService.getScriptProperties().getProperty('XXX')で環境変数を取得しています。
function doPost(e) {
  var verify_token = PropertiesService.getScriptProperties().getProperty('VERIFY_TOKEN');
  if (verify_token != e.parameter.token) {
    throw new Error("invalid token.");
  }

  var message = e.parameter.text;
  sendEmail(message);
}

function sendEmail(message){
  var sendgrid_endpoint = PropertiesService.getScriptProperties().getProperty('SEND_GRID_ENDPOINT');
  var sendgrid_apikey = PropertiesService.getScriptProperties().getProperty('SEND_GRID_API_KEY');
  var to = "送信先メールアドレス";
  var subject = "メールタイトル";
  var from_name = "送信者名";
  var from = "送信元メールアドレス";

  var body = {
    "personalizations": [
      {
        "to": [
          {
            "email": to
          }
        ],
        "subject": subject
      }
    ],
    "from": {
      "email": from,
      "name" : from_name
    },
    "content": [
      {
        "type": "text/html",
        "value": message
      }
    ]
  }
  var payload = JSON.stringify(body);
  UrlFetchApp.fetch(sendgrid_endpoint, {
    method: 'POST',
    headers: { "Content-Type": 'application/json',
             "Authorization": "Bearer "+ sendgrid_apikey},
    payload: payload
  });
}
3-3.有効化
Google Apps Scriptのメニューの「公開」-「ウェブ アプリケーションを導入…」からスクリプトを有効化します。
Who has access to the app:はAnyone, even anonymousを選択してください。

こちらに出力されるCurrent web app URL:を 1-1.のURLに指定します。
これで設定は完了です。
4.動作確認
Outgoing Webhookで設定したチャンネルで引き金となる言葉を投稿して、内容がメールで送信されるか確認します。
うまく送信されない場合は各設定値と、Google Apps Scriptのログを確認してみてください。
最後に
Slack投稿をメールに自動送信してみました。
今回はVerifyのためにtokenを使いましたが、Verifyすら不要であれば変数なしでもいけそうです。
セキュリティには十分注意して使いましょう。
