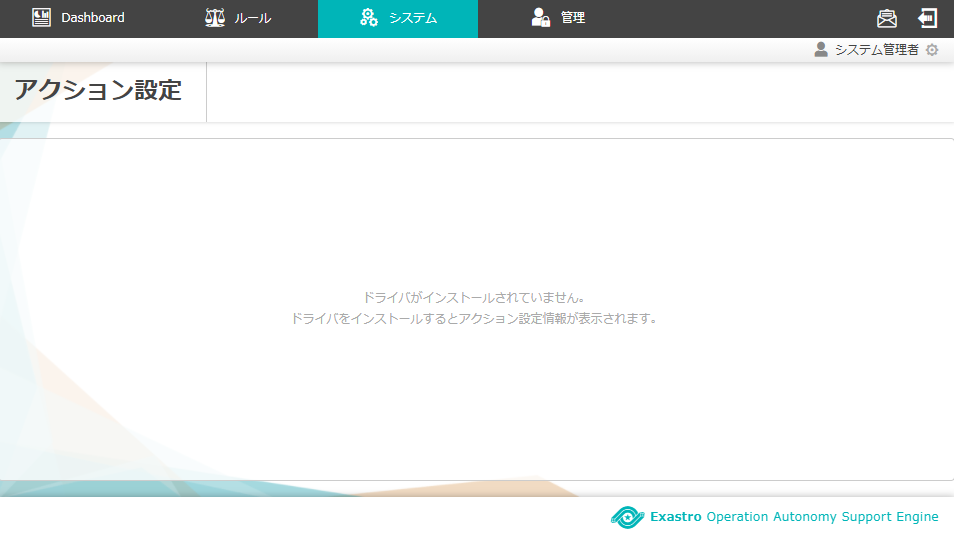
まずは Exastro OASE について調べてみた
1. Exastro OASE って何よ?
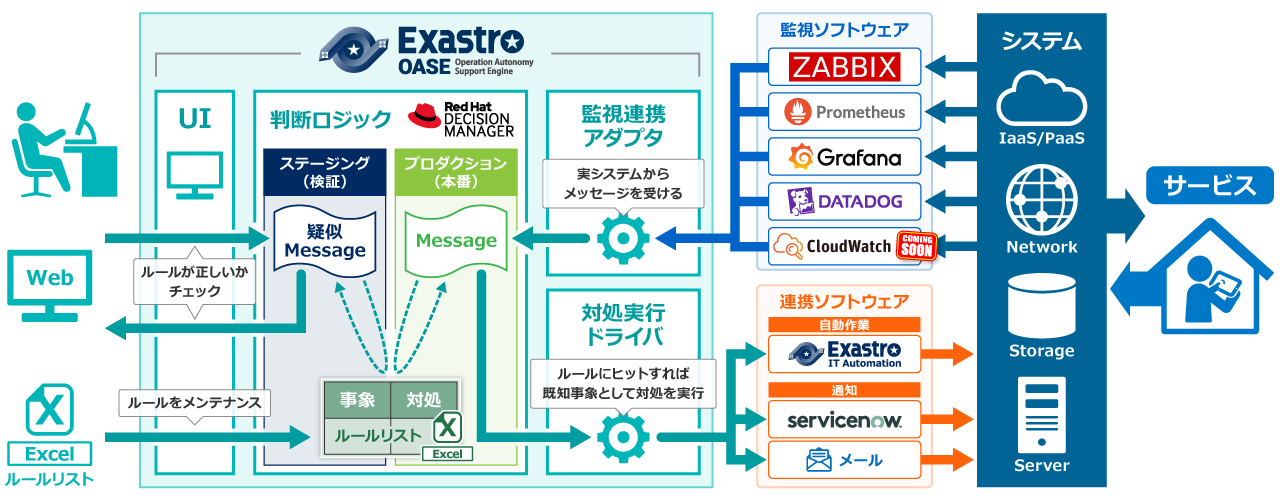
「Exastro OASE はシステム運用の自立化・効率化・省力化を支援するためのOSSです。」
とのことで、平たくいえば、システムの運用を楽チンにしてくれるOSSってことみたいです。
OASE の読み方は「オアーゼ」です。
2. Exastro OASE って誰得なの?
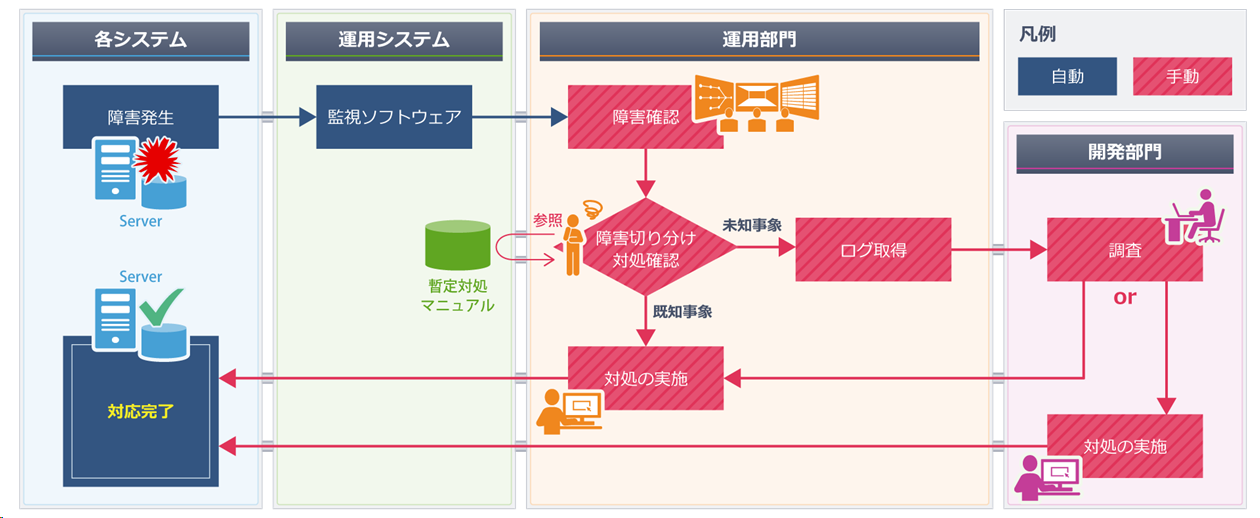
障害発生時には、上図のような対応フローが多いと思います。
問題が起こったときに、いかに迅速かつ確実に復旧できるかがポイントとなります。
OASE でできるのは、この「障害切り分け・対処確認」と「対処の実施(暫定復旧作業)」といった初期対応の部分です。
「障害切り分け・対処確認」と「対処の実施(暫定復旧作業)」を OASE により自動化することで、サービス復旧までの時間を短縮できます。
また、「未知事象」が発生した場合は、通知を受け取ることが可能です。
受け取った通知を元に障害切り分けルールと対処の実施(暫定復旧作業)を増やしていくことで、次第に運用者の対応が減っていくので運用コストを抑える効果も期待できます。
3. Exastro OASE の機能をざっくり見てみよう
もう少し OASE の機能について見てみます。
外部連携機能
OASE は単体では機能しません。
監視機能を持ちませんし、障害発生時のアクションを実行する機能も持っていません。
代わりに、OASE は他のシステムと連携することで監視からアクションまでの一連の処理を実施します。
OASE の構成としては、主に
- 監視システムからのアラートを受け取る__監視アダプタ__
- 受け取ったアラートをルールに従って推論する__デシジョンテーブル__
- 推論の結果を元にアクションをキックするための__ドライバ__
によって構成されています。
Ver. 1.2 までは監視ソフトウェアには ZABBIX、アクション部分の処理には Exastro IT Automation (ITA) と連携できたようですが、Ver. 1.3 からは Prometheus と連携できるようになったようです。今後この辺の連携機能も更に拡充されていくようです。
テスト実行
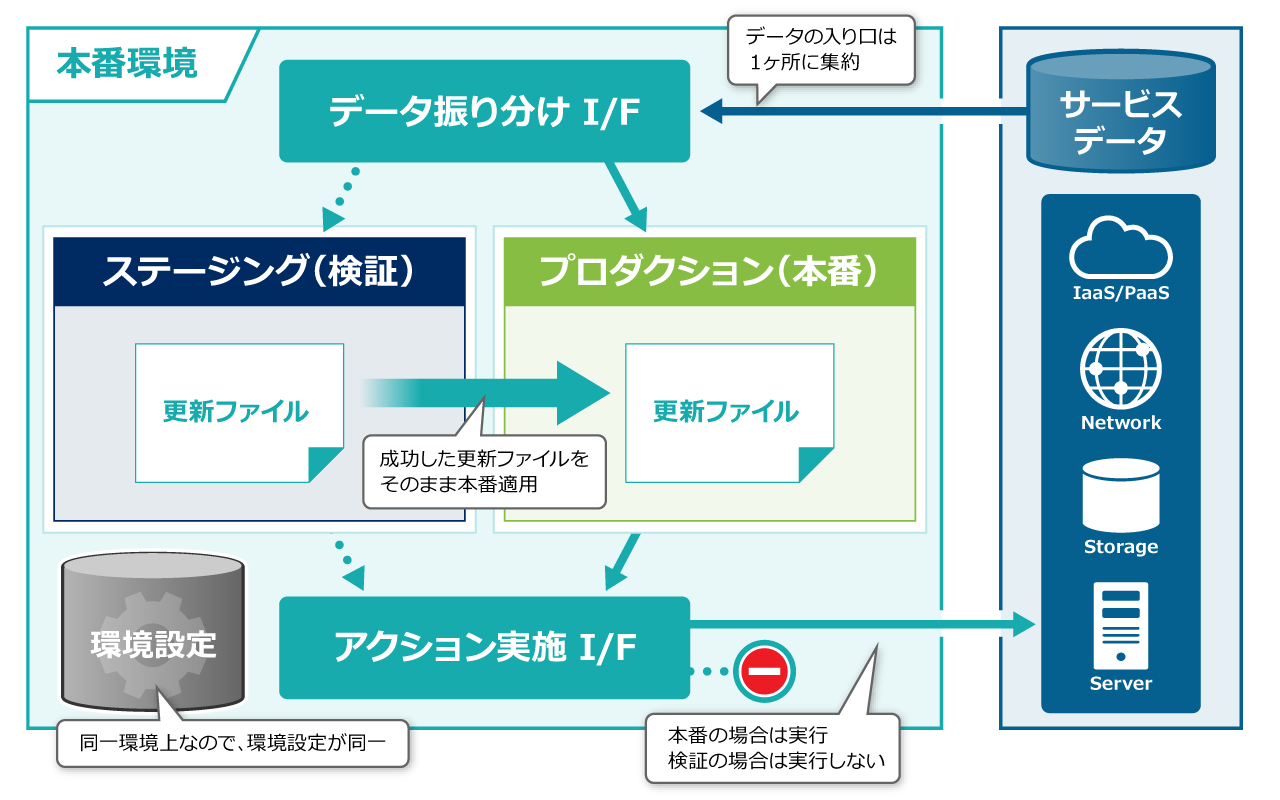
障害が発生する度にルールを追加すると記載しましたが、本番環境にテストもせずにアクションを導入することは通常ありえません。
必ず検証環境などで事前にテストを行ってから導入すると思います。
OASE では、検証環境を内部に持っており、アラート検知からアクション実行までのテストを本番に影響を与えることなく実施可能です。
これにより、安心して継続的なルールの管理を行うことが可能となります。
【本題】Exastro OASE を最速でインストールしてみる
OASE のことはだいたいわかったところで、本題の Exastro OASE をインストールしていこうと思います。
今回の作業範囲は、
-
OASE のインストール
-
ZABBIX アダプタのインストール
-
ITA ドライバのインストール
※ITA = Exastro IT Automation
です。
基本的には公式ページのマニュアルを参考に進めて行きます。
1. システム構成
今回は、すべての機能を1台のサーバ上に構築するオールインワンの構成となります。
サーバにアクセスするために必要な通信として、HTTP(S) があるので、必要に応じて通信できるように設定しておきましょう。
コンポーネント
OASE のドキュメントを見るとオールインワン(シングル)型の構成は下図のようになるようです。
ふむふむ、インストーラーを実行するとこれらのコンポーネントが展開されるんですね。
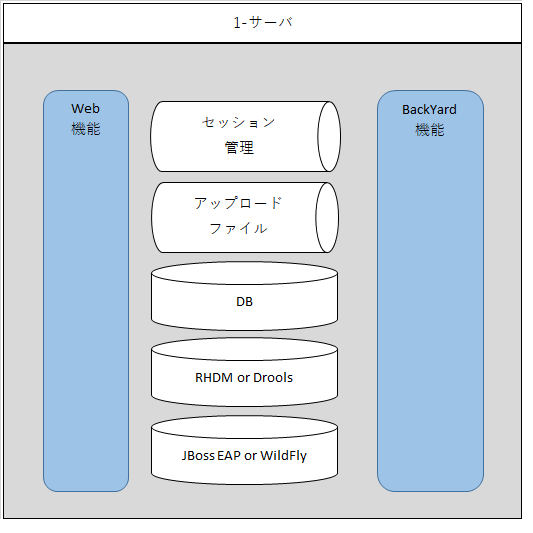
※図は公式マニュアルより転載。
サーバ・システム
デシジョンテーブルのサイズとか数が増えてくると参考値以上のスペックが必要かもしれませんが、今回は検証なので、まぁダイジョブでしょ。。。
| 項目 | マニュアルの記載値(参考値) | 本稿における構成 |
|---|---|---|
| CPU | 6コア | 6コア |
| メモリ | 8GB | 8GB |
| ディスク | 90GB | 100GB |
| OS | RHEL系ディストリ | CentOS 7 |
通信要件
オールインワンの型の構成では、自端末から OASE サーバまでの接続が HTTP(S) で通信できれば問題ないようです。
オールインワンでなく、各コンポーネントが分離された構成の場合は、別途下記の通信の確認が必要です。
| From | To | プロトコル |
|---|---|---|
| 端末 | Web | http(s) [80,443/tcp] |
| BackYard | RHDM | http [8080/tcp] |
| Web | BackYard | tcp [50001/tcp] |
2. インストール作業
今回は、オールインワン構成となります。
下記の手順では、OASE のインストール先のサーバを OASE サーバと記載します。
2.1. OASE のインストール
2.1.1. 事前準備
ロケール(言語)の設定
# ロケールのインストール
localedef -f UTF-8 -i ja_JP ja_JP.UTF-8

# ロケール設定の投入
cat << _EOF_ >> /etc/profile
export LANG="ja_JP.UTF-8"
export LANGUAGE="ja_JP:ja"
export LC_ALL="ja_JP.UTF-8"
_EOF_

# ロケール設定の反映
source /etc/profile
タイムゾーンを設定
# タイムゾーンの変更
timedatectl set-timezone Asia/Tokyo
詳細・実行例
# 現在のタイムゾーンの確認
LANG=C timedatectl status | grep "Time zone"
       Time zone: UTC (UTC, +0000)

# タイムゾーンの変更
timedatectl set-timezone Asia/Tokyo

# 変更後のタイムゾーンの確認
LANG=C timedatectl status | grep "Time zone"
       Time zone: Asia/Tokyo (JST, +0900)
自ホスト名の名前解決を確認
# 自ホスト名に対して PING 到達の確認
ping {OASE サーバのホスト名}
詳細・実行例
# 自ホスト名に対して PING 到達の確認(ホスト名が exastro-oase の場合)
ping exastro-oase
PING exastro-oase (172.22.0.3) 56(84) bytes of data.
64 bytes from exastro-oase (172.22.0.3): icmp_seq=1 ttl=64 time=0.051 ms
64 bytes from exastro-oase (172.22.0.3): icmp_seq=2 ttl=64 time=0.048 ms
64 bytes from exastro-oase (172.22.0.3): icmp_seq=3 ttl=64 time=0.051 ms
64 bytes from exastro-oase (172.22.0.3): icmp_seq=4 ttl=64 time=0.041 ms
必要パッケージのインストール
# wget と gcc をインストール
yum -y install wget gcc
詳細・実行例
yum -y install wget gcc
読み込んだプラグイン:fastestmirror, langpacks
Determining fastest mirrors
* base: centos.usonyx.net
* extras: ftp-srv2.kddilabs.jp
* updates: ftp-srv2.kddilabs.jp
base | 3.6 kB 00:00:00
extras | 2.9 kB 00:00:00
updates | 2.9 kB 00:00:00
(1/3): extras/7/x86_64/primary_db | 236 kB 00:00:00
(2/3): updates/7/x86_64/primary_db | 8.0 MB 00:00:00
(3/3): base/7/x86_64/primary_db | 6.1 MB 00:00:01
パッケージ wget-1.14-18.el7_6.1.x86_64 はインストール済みか最新バージョンです
依存性の解決をしています
--> トランザクションの確認を実行しています。
---> パッケージ gcc.x86_64 0:4.8.5-39.el7 を 更新
--> 依存性の処理をしています: gcc = 4.8.5-39.el7 のパッケージ: libquadmath-devel-4.8.5-39.el7.x86_64
--> 依存性の処理をしています: gcc = 4.8.5-39.el7 のパッケージ: gcc-c++-4.8.5-39.el7.x86_64
--> 依存性の処理をしています: gcc = 4.8.5-39.el7 のパッケージ: gcc-gfortran-4.8.5-39.el7.x86_64
---> パッケージ gcc.x86_64 0:4.8.5-44.el7 を アップデート
--> 依存性の処理をしています: libgomp = 4.8.5-44.el7 のパッケージ: gcc-4.8.5-44.el7.x86_64
--> 依存性の処理をしています: cpp = 4.8.5-44.el7 のパッケージ: gcc-4.8.5-44.el7.x86_64
--> 依存性の処理をしています: libgcc >= 4.8.5-44.el7 のパッケージ: gcc-4.8.5-44.el7.x86_64
--> トランザクションの確認を実行しています。
---> パッケージ cpp.x86_64 0:4.8.5-39.el7 を 更新
---> パッケージ cpp.x86_64 0:4.8.5-44.el7 を アップデート
---> パッケージ gcc-c++.x86_64 0:4.8.5-39.el7 を 更新
---> パッケージ gcc-c++.x86_64 0:4.8.5-44.el7 を アップデート
--> 依存性の処理をしています: libstdc++-devel = 4.8.5-44.el7 のパッケージ: gcc-c++-4.8.5-44.el7.x86_64
--> 依存性の処理をしています: libstdc++ = 4.8.5-44.el7 のパッケージ: gcc-c++-4.8.5-44.el7.x86_64
---> パッケージ gcc-gfortran.x86_64 0:4.8.5-39.el7 を 更新
---> パッケージ gcc-gfortran.x86_64 0:4.8.5-44.el7 を アップデート
--> 依存性の処理をしています: libquadmath = 4.8.5-44.el7 のパッケージ: gcc-gfortran-4.8.5-44.el7.x86_64
--> 依存性の処理をしています: libgfortran = 4.8.5-44.el7 のパッケージ: gcc-gfortran-4.8.5-44.el7.x86_64
---> パッケージ libgcc.x86_64 0:4.8.5-39.el7 を 更新
---> パッケージ libgcc.x86_64 0:4.8.5-44.el7 を アップデート
---> パッケージ libgomp.x86_64 0:4.8.5-39.el7 を 更新
---> パッケージ libgomp.x86_64 0:4.8.5-44.el7 を アップデート
---> パッケージ libquadmath-devel.x86_64 0:4.8.5-39.el7 を 更新
---> パッケージ libquadmath-devel.x86_64 0:4.8.5-44.el7 を アップデート
--> トランザクションの確認を実行しています。
---> パッケージ libgfortran.x86_64 0:4.8.5-39.el7 を 更新
---> パッケージ libgfortran.x86_64 0:4.8.5-44.el7 を アップデート
---> パッケージ libquadmath.x86_64 0:4.8.5-39.el7 を 更新
---> パッケージ libquadmath.x86_64 0:4.8.5-44.el7 を アップデート
---> パッケージ libstdc++.x86_64 0:4.8.5-39.el7 を 更新
---> パッケージ libstdc++.x86_64 0:4.8.5-44.el7 を アップデート
---> パッケージ libstdc++-devel.x86_64 0:4.8.5-39.el7 を 更新
---> パッケージ libstdc++-devel.x86_64 0:4.8.5-44.el7 を アップデート
--> 依存性解決を終了しました。
依存性を解決しました
======================================================================================================================================
Package アーキテクチャー バージョン リポジトリー 容量
======================================================================================================================================
更新します:
gcc x86_64 4.8.5-44.el7 base 16 M
依存性関連での更新をします:
cpp x86_64 4.8.5-44.el7 base 5.9 M
gcc-c++ x86_64 4.8.5-44.el7 base 7.2 M
gcc-gfortran x86_64 4.8.5-44.el7 base 6.7 M
libgcc x86_64 4.8.5-44.el7 base 103 k
libgfortran x86_64 4.8.5-44.el7 base 301 k
libgomp x86_64 4.8.5-44.el7 base 159 k
libquadmath x86_64 4.8.5-44.el7 base 190 k
libquadmath-devel x86_64 4.8.5-44.el7 base 54 k
libstdc++ x86_64 4.8.5-44.el7 base 306 k
libstdc++-devel x86_64 4.8.5-44.el7 base 1.5 M
トランザクションの要約
======================================================================================================================================
更新 1 パッケージ (+10 個の依存関係のパッケージ)
総ダウンロード容量: 39 M
Downloading packages:
Delta RPMs disabled because /usr/bin/applydeltarpm not installed.
(1/11): cpp-4.8.5-44.el7.x86_64.rpm | 5.9 MB 00:00:01
(2/11): gcc-c++-4.8.5-44.el7.x86_64.rpm | 7.2 MB 00:00:01
(3/11): gcc-4.8.5-44.el7.x86_64.rpm | 16 MB 00:00:03
(4/11): libgcc-4.8.5-44.el7.x86_64.rpm | 103 kB 00:00:00
(5/11): libgfortran-4.8.5-44.el7.x86_64.rpm | 301 kB 00:00:00
(6/11): gcc-gfortran-4.8.5-44.el7.x86_64.rpm | 6.7 MB 00:00:00
(7/11): libquadmath-4.8.5-44.el7.x86_64.rpm | 190 kB 00:00:00
(8/11): libquadmath-devel-4.8.5-44.el7.x86_64.rpm | 54 kB 00:00:00
(9/11): libstdc++-4.8.5-44.el7.x86_64.rpm | 306 kB 00:00:00
(10/11): libgomp-4.8.5-44.el7.x86_64.rpm | 159 kB 00:00:00
(11/11): libstdc++-devel-4.8.5-44.el7.x86_64.rpm | 1.5 MB 00:00:00
--------------------------------------------------------------------------------------------------------------------------------------
合計 10 MB/s | 39 MB 00:00:03
Running transaction check
Running transaction test
Transaction test succeeded
Running transaction
更新します : libgcc-4.8.5-44.el7.x86_64 1/22
更新します : libquadmath-4.8.5-44.el7.x86_64 2/22
更新します : libstdc++-4.8.5-44.el7.x86_64 3/22
更新します : libstdc++-devel-4.8.5-44.el7.x86_64 4/22
更新します : libgfortran-4.8.5-44.el7.x86_64 5/22
更新します : libgomp-4.8.5-44.el7.x86_64 6/22
更新します : cpp-4.8.5-44.el7.x86_64 7/22
更新します : gcc-4.8.5-44.el7.x86_64 8/22
更新します : libquadmath-devel-4.8.5-44.el7.x86_64 9/22
更新します : gcc-gfortran-4.8.5-44.el7.x86_64 10/22
更新します : gcc-c++-4.8.5-44.el7.x86_64 11/22
整理中 : gcc-gfortran-4.8.5-39.el7.x86_64 12/22
整理中 : gcc-c++-4.8.5-39.el7.x86_64 13/22
整理中 : libquadmath-devel-4.8.5-39.el7.x86_64 14/22
整理中 : gcc-4.8.5-39.el7.x86_64 15/22
整理中 : libgfortran-4.8.5-39.el7.x86_64 16/22
整理中 : libstdc++-devel-4.8.5-39.el7.x86_64 17/22
整理中 : libstdc++-4.8.5-39.el7.x86_64 18/22
整理中 : libgcc-4.8.5-39.el7.x86_64 19/22
整理中 : libquadmath-4.8.5-39.el7.x86_64 20/22
整理中 : cpp-4.8.5-39.el7.x86_64 21/22
整理中 : libgomp-4.8.5-39.el7.x86_64 22/22
検証中 : gcc-c++-4.8.5-44.el7.x86_64 1/22
検証中 : gcc-gfortran-4.8.5-44.el7.x86_64 2/22
検証中 : libquadmath-devel-4.8.5-44.el7.x86_64 3/22
検証中 : libquadmath-4.8.5-44.el7.x86_64 4/22
検証中 : cpp-4.8.5-44.el7.x86_64 5/22
検証中 : libgfortran-4.8.5-44.el7.x86_64 6/22
検証中 : gcc-4.8.5-44.el7.x86_64 7/22
検証中 : libstdc++-4.8.5-44.el7.x86_64 8/22
検証中 : libstdc++-devel-4.8.5-44.el7.x86_64 9/22
検証中 : libgcc-4.8.5-44.el7.x86_64 10/22
検証中 : libgomp-4.8.5-44.el7.x86_64 11/22
検証中 : libgfortran-4.8.5-39.el7.x86_64 12/22
検証中 : gcc-4.8.5-39.el7.x86_64 13/22
検証中 : libstdc++-4.8.5-39.el7.x86_64 14/22
検証中 : libgcc-4.8.5-39.el7.x86_64 15/22
検証中 : libgomp-4.8.5-39.el7.x86_64 16/22
検証中 : libstdc++-devel-4.8.5-39.el7.x86_64 17/22
検証中 : gcc-c++-4.8.5-39.el7.x86_64 18/22
検証中 : gcc-gfortran-4.8.5-39.el7.x86_64 19/22
検証中 : libquadmath-devel-4.8.5-39.el7.x86_64 20/22
検証中 : libquadmath-4.8.5-39.el7.x86_64 21/22
検証中 : cpp-4.8.5-39.el7.x86_64 22/22
更新:
gcc.x86_64 0:4.8.5-44.el7
依存性を更新しました:
cpp.x86_64 0:4.8.5-44.el7 gcc-c++.x86_64 0:4.8.5-44.el7 gcc-gfortran.x86_64 0:4.8.5-44.el7
libgcc.x86_64 0:4.8.5-44.el7 libgfortran.x86_64 0:4.8.5-44.el7 libgomp.x86_64 0:4.8.5-44.el7
libquadmath.x86_64 0:4.8.5-44.el7 libquadmath-devel.x86_64 0:4.8.5-44.el7 libstdc++.x86_64 0:4.8.5-44.el7
libstdc++-devel.x86_64 0:4.8.5-44.el7
完了しました!
2.1.2. OASE のインストール
インストール要件
今回のインストール要件は下記のものとします。
| 項目 | 値 |
|---|---|
| ホスト名 | exastro-oase |
| FQDN | exastro-oase.local |
| 資材展開先 | /tmp |
| インストール先 | /exastro |
| SSL証明書 | 導入なし(自己証明書) |
ディレクトリ構成
# 資材展開先
/tmp/oase/
├── CHANGELOG.md
├── LICENSE
├── NOTICE
├── licenses/
├── oase-root/
├── oase_install_package/
└── tool/

# インストール先
/exastro
├── JBossEAP/
└── OASE/
OASE のバージョン設定
# OASE バージョンを変数に格納
OASE_VER=1.3.1
OASE 本体の取得と設置
# OASE 本体の取得と設置
curl -L https://github.com/exastro-suite/oase/releases/download/v${OASE_VER}/exastro-oase-${OASE_VER}.tar.gz | tar zx -C /tmp
詳細・実行例
# OASE 本体の取得と設置
curl -L https://github.com/exastro-suite/oase/releases/download/v${OASE_VER}/exastro-oase-${OASE_VER}.tar.gz | tar zx -C /
  % Total    % Received % Xferd  Average Speed   Time    Time     Time  Current
                                 Dload  Upload   Total   Spent    Left  Speed
100   633  100   633    0     0   3549      0 --:--:-- --:--:-- --:--:--  3556
100 74.7M  100 74.7M    0     0  8537k      0  0:00:08  0:00:08 --:--:-- 12.6M

# インストールされたファイルを確認
ls -l /tmp/oase
total 36
-rw-r--r-- 1 root root  3346 Mar 17 13:45 CHANGELOG.md        -rw-r--r-- 1 root root 10173 Mar 17 13:45 LICENSE
-rw-r--r-- 1 root root  2614 Mar 17 13:45 NOTICE
drwxr-xr-x 2 root root  4096 Mar 17 13:45 licenses
drwxr-xr-x 8 root root  4096 Mar 17 13:45 oase-root
drwxr-xr-x 5 root root  4096 Mar 17 13:45 oase_install_package
drwxr-xr-x 4 root root  4096 Mar 17 13:45 tool
アンサーファイルの作成
# 作業ディレクトリへ移動
cd /tmp/oase/oase_install_package/install_scripts/

# アンサーファイルのバックアップを取得
cp -pi oase_answers.txt oase_answers.txt.org

# アンサーファイルの編集
vi oase_answers.txt
編集内容(編集箇所のみ)
各設定値はここを参考にしてください。
# 25行目付近
RabbitMQ_ipaddr:127.0.0.1

# 45行目付近
db_erase:leave

# 115行目付近
ev_location:127.0.0.1

# 123行目付近
oase_os:CentOS7

# 127行目付近
oase_timezone:Asia/Tokyo
編集内容(全文)
# Select install mode.
# ("Install_Online","Install_Offline","Gather_Library","Versionup_All", "Versionup_OASE", "Uninstall")
# e.g) install_mode:Install_Online
install_mode:Install_Online


##############################
# RabbitMQ
##############################
# Decide the RabbitMQ_username.
# e.g) RabbitMQ_username:sample_rabbitmq_username
RabbitMQ_username:admin

# Decide the RabbitMQ_password.
# e.g) RabbitMQ_password:sample_rabbitmq_password
RabbitMQ_password:password


# Decide the RabbitMQ_queuename.
# e.g) RabbitMQ_queuename:oase
RabbitMQ_queuename:oase

# Enter IP address for RabbitMQ.
# e.g) RabbitMQ_ipaddr:127.0.0.1
RabbitMQ_ipaddr:127.0.0.1

##############################
# MariaDB
##############################
# Enter the MariaDB root user's password
# e.g) db_root_password:sample_root_password
db_root_password:password

# Decide the database name, username, and password for OASE.
# e.g) db_name:sample_db_name
db_name:OASE_DB
# e.g) db_username:sample_db_username
db_username:OASE_USER
# e.g) db_password:sample_db_password
db_password:OASE_PASSWD

# In uninstall mode,
# Select "erase" or "leave" oase database
# e.g) db_erase:erase
db_erase:leave


##############################
# JBoss EAP
##############################
# Enter JBoss install directory.
# e.g) jboss_root_directory:/exastro/JBossEAP
jboss_root_directory:/exastro/JBossEAP


##############################
# RHDM
##############################
# Decide the Administrator name, password.
# e.g) rhdm_adminname:admin0000
rhdm_adminname:admin0000
# e.g) rhdm_password:password@1
rhdm_password:password@1

# Enter IP address & port for Decision Manager.
# e.g) dm_ipaddrport:localhost:8080
dm_ipaddrport:localhost:8080


##############################
# RULEFILE
##############################
# Enter root path for RULEFILE.
# e.g) rulefile_rootpath:/exastro/rule
rulefile_rootpath:/exastro/rule


##############################
# APPLY
##############################
# Enter IP address & port for APPLY SERVICE.
# e.g) apply_ipaddrport:127.0.0.1:50001
apply_ipaddrport:127.0.0.1:50001


##############################
# Maven
##############################
# Enter repository path for Maven.
# e.g) mavenrep_path:/root/.m2/repository/com/oase/
mavenrep_path:/root/.m2/repository/com/oase/


##############################
# OASEメールSMTP設定
##############################
# Enter smtp settings.
# e.g) oasemail_smtp:"{'IPADDR':'127.0.0.1','PORT':25,'AUTH':False}"
oasemail_smtp:"{'IPADDR':'127.0.0.1','PORT':25,'AUTH':False}"


##############################
# OASEインストールディレクトリ
##############################
# Enter OASE install directory.
# e.g) oase_directory:/exastro
oase_directory:/exastro


##############################
# settings.py
##############################
# Decide the EVTIMER SERVER location
# e.g) ev_location:127.0.0.1
ev_location:127.0.0.1

# Select language. ("en_US" or "ja_JP")
# e.g) oase_language:en_US
oase_language:ja_JP

# Select Operation System. ("CentOS7" or "RHEL7" or "RHEL8")
# e.g) oase_os:RHEL7
oase_os:CentOS7

# Enter time_zone.
# e.g) time_zone:Asia/Tokyo
oase_timezone:Asia/Tokyo

##############################
# SSLサーバ証明書
##############################
# Enter the oase domain name.
# e.g) oase_domain:exastro-oase.local
oase_domain:exastro-oase.local

# Enter when using user-specified certificates and private keys.
# If no file path is entered for both "certificate_path" and "private_key_path",
# the OASE installer creates and installs a self-certificate and private key
# using the values entered in "oase_domain".

# Enter the file path where the certificate to be install.
# e.g) certificate_path:/temp/etc_pki_tls_certs/exastro-oase.crt
certificate_path:

# Enter the file path where the private key to be install.
# e.g) private_key_path:/temp/etc_pki_tls_certs/exastro-oase.key
private_key_path:
インストール実施
5~10分くらい掛かるので、この時間にオフロに入って来ましょう。
# 作業ディレクトリへ移動
cd /tmp/oase/oase_install_package/install_scripts

# インストーラーの実行
sh oase_installer.sh
詳細・実行例
# 作業ディレクトリへ移動
cd /tmp/oase/oase_install_package/install_scripts

# インストーラーの実行
sh oase_installer.sh
INFO : Start to create the install log's directory
INFO : Finished to create the install log's directory
INFO : Start to create the installation log file
INFO : Finished to create the installation log file
INFO : Start to read /tmp/oase/oase_install_package/install_scripts/bin/oase_common_libs.sh
[2021-05-17 18:09:03] INFO : Finished to read /tmp/oase/oase_install_package/install_scripts/bin/oase_common_libs.sh (oase_installer.sh:158:main)
[2021-05-17 18:09:03] ##################################### (oase_installer.sh:159:main)
[2021-05-17 18:09:03] INFO : oase_installer.sh start (oase_installer.sh:160:main)
[2021-05-17 18:09:03] ##################################### (oase_installer.sh:161:main)
[2021-05-17 18:09:03] INFO : Start to read the answerfile (oase_common_libs.sh:243:read_answerfile)
[2021-05-17 18:09:03] INFO : Start to read a settingfile (oase_common_libs.sh:56:read_setting_file)
[2021-05-17 18:09:03] INFO : Finished to read a settingfile (oase_common_libs.sh:71:read_setting_file)
[2021-05-17 18:09:03] INFO : Start to check answer vars (oase_common_libs.sh:78:check_answer_vars)
[2021-05-17 18:09:03] INFO : Finished to check answer vars (oase_common_libs.sh:238:check_answer_vars)
[2021-05-17 18:09:03] INFO : Finished to read the answerfile (oase_common_libs.sh:262:read_answerfile)
[2021-05-17 18:09:03] INFO : Mode=Online Install Selected (oase_installer.sh:178:main)
[2021-05-17 18:09:04] INFO : Start to install (oase_installer.sh:44:oase_install)
[2021-05-17 18:09:04] ==========[START OASE BUILDER ONLINE]==========
[2021-05-17 18:09:04] INFO : Set up repository
[2021-05-17 18:09:04] INFO : python3.6 install
[2021-05-17 18:11:28] INFO : RabbitMQ Server
[2021-05-17 18:13:37] INFO : MariaDB install and setting
[2021-05-17 18:15:47] INFO : apache install
[2021-05-17 18:16:07] INFO : JAVA install
[2021-05-17 18:16:23] INFO : RHDM install
[2021-05-17 18:22:24] INFO : Maven install
[2021-05-17 18:23:50] INFO : Django install
[2021-05-17 18:37:21] ==========[END OASE BUILDER ONLINE]==========
[2021-05-17 18:37:21] INFO : Start material deployment.
[2021-05-17 18:37:21] INFO : Create directory to place OASE.
[2021-05-17 18:37:21] INFO : /exastro already exists.
[2021-05-17 18:37:22] INFO : Material deployment is completed.
[2021-05-17 18:37:22] INFO : Start OASE app setup.
[2021-05-17 18:37:22] INFO : Create settings.py
[2021-05-17 18:37:22] INFO : Start Create Setting.py.
[2021-05-17 18:37:22] INFO : Create Setting.py is completed.
[2021-05-17 18:37:22] INFO : Bash DB SETUP Shell
[2021-05-17 18:37:22] INFO : Start DB existence check.
[2021-05-17 18:37:22] INFO : Start CREATE DATABASE.
[2021-05-17 18:37:22] INFO : CREATE DATABASE is completed.
[2021-05-17 18:37:22] INFO : Start CREATE USER.
[2021-05-17 18:37:22] INFO : CREATE USER is completed.
[2021-05-17 18:37:22] INFO : DB existence check is completed.
[2021-05-17 18:37:22] INFO : Start create init_custom.yaml.
[2021-05-17 18:37:23] INFO : Initialize init_custom.yaml.
[2021-05-17 18:37:23] INFO : append to init_custom.yaml.
[2021-05-17 18:37:23] INFO : Create init_custom.yaml is completed.
[2021-05-17 18:37:23] INFO : Start create init.yaml.
[2021-05-17 18:37:23] INFO : Create init.yaml is completed.
[2021-05-17 18:37:23] INFO : Start DB migrations.
[2021-05-17 18:37:23] INFO : create migrations directory.
[2021-05-17 18:37:23] INFO : create __init__.py.
[2021-05-17 18:37:24] INFO : Migrations for 'web_app':
  web_app/migrations/0001_initial.py
    - Create model User
    - Create model ActionLog
    - Create model ActionType
    - Create model AdapterType
    - Create model BlackListIPAddress
    - Create model Count
    - Create model DataObject
    - Create model DriverType
    - Create model EventsRequest
    - Create model Group
    - Create model LoginLogIPAddress
    - Create model MailAddressModify
    - Create model MailTemplate
    - Create model Menu
    - Create model MenuGroup
    - Create model MonitoringType
    - Create model PasswordHistory
    - Create model PermissionType
    - Create model PreActionHistory
    - Create model RhdmResponse
    - Create model RuleFile
    - Create model RuleManage
    - Create model RuleType
    - Create model Server
    - Create model ServiceMngRestapiInfo
    - Create model Session
    - Create model SsoInfo
    - Create model System
    - Create model TokenInfo
    - Create model TokenPermission
    - Create model WhiteListIPAddress
    - Create model UserGroup
    - Create model RhdmResponseCorrelation
    - Create model RhdmResponseAction
    - Create model ConditionalExpression
    - Create model ActionHistory
    - Create model AccessPermission
[2021-05-17 18:37:25] INFO : Operations to perform:
  Apply all migrations: admin, auth, contenttypes, sessions, web_app
Running migrations:
  Applying web_app.0001_initial... OK
  Applying contenttypes.0001_initial... OK
  Applying admin.0001_initial... OK
  Applying admin.0002_logentry_remove_auto_add... OK
  Applying admin.0003_logentry_add_action_flag_choices... OK
  Applying contenttypes.0002_remove_content_type_name... OK
  Applying auth.0001_initial... OK
  Applying auth.0002_alter_permission_name_max_length... OK
  Applying auth.0003_alter_user_email_max_length... OK
  Applying auth.0004_alter_user_username_opts... OK
  Applying auth.0005_alter_user_last_login_null... OK
  Applying auth.0006_require_contenttypes_0002... OK
  Applying auth.0007_alter_validators_add_error_messages... OK
  Applying auth.0008_alter_user_username_max_length... OK
  Applying auth.0009_alter_user_last_name_max_length... OK
  Applying auth.0010_alter_group_name_max_length... OK
  Applying auth.0011_update_proxy_permissions... OK
  Applying sessions.0001_initial... OK.
[2021-05-17 18:37:25] INFO : .
[2021-05-17 18:37:26] INFO : Installed 153 object(s) from 2 fixture(s).
[2021-05-17 18:37:26] INFO : DB migrations is completed.
[2021-05-17 18:37:26] INFO : Bash DB SETUP Shell is completed.
[2021-05-17 18:37:26] INFO : OASE app setup is completed.
[2021-05-17 18:37:26] INFO : Start middleware setup.
[2021-05-17 18:37:26] INFO : Start changing the settings.
[2021-05-17 18:37:26] INFO : First backup /etc/sysctl.conf
[2021-05-17 18:37:26] INFO : First backup /opt/apache-maven/conf/settings.xml
[2021-05-17 18:37:26] INFO : First backup /exastro/JBossEAP/wildfly-14.0.1.Final/standalone/configuration/standalone-full.xml
[2021-05-17 18:37:26] INFO : First backup /exastro/OASE/oase-root/confs/backyardconfs/services/oase_env
[2021-05-17 18:37:26] INFO : Red Hat Decision Manager service startup completed.
[2021-05-17 18:37:26] INFO : Configuration change is complete.
[2021-05-17 18:37:27] INFO : Middleware setup is completed.
[2021-05-17 18:37:27] INFO : Start service setup.
[2021-05-17 18:37:27] INFO : Start registration.
[2021-05-17 18:37:27] INFO : set symboliclink /etc/sysconfig/oase_env.
[2021-05-17 18:37:27] INFO : set symboliclink /etc/sysconfig/oase_action_env.
[2021-05-17 18:37:27] INFO : set service file /usr/lib/systemd/system/oase-action.service.
[2021-05-17 18:37:27] INFO : set symboliclink /etc/sysconfig/oase_agent_env.
[2021-05-17 18:37:27] INFO : set service file /usr/lib/systemd/system/oase-agent.service.
[2021-05-17 18:37:27] INFO : set symboliclink /etc/sysconfig/oase_apply_env.
[2021-05-17 18:37:27] INFO : set service file /usr/lib/systemd/system/oase-apply.service.
[2021-05-17 18:37:27] INFO : set symboliclink /etc/sysconfig/oase_accept_env.
[2021-05-17 18:37:27] INFO : set service file /usr/lib/systemd/system/oase-accept.service.
[2021-05-17 18:37:27] INFO : Start OASE service
[2021-05-17 18:37:27] INFO : start httpd.service.
[2021-05-17 18:37:27] INFO : start oase-action.service.
[2021-05-17 18:37:27] INFO : start oase-agent.service.
[2021-05-17 18:37:27] INFO : start oase-apply.service.
[2021-05-17 18:37:27] INFO : start oase-accept.service.
[2021-05-17 18:37:28] INFO : Start Drools service
[2021-05-17 18:37:28] INFO : start drools.service.
[2021-05-17 18:37:28] INFO : Registration is complete.
[2021-05-17 18:37:28] INFO : service setup is completed.
[2021-05-17 18:37:28] INFO : Finished to install
[2021-05-17 18:37:28] #####################################
[2021-05-17 18:37:28] SKIP LIST(Please check the Settings)
[2021-05-17 18:37:28] ・rabbitmq-server
[2021-05-17 18:37:28] ・mariadb-server
[2021-05-17 18:37:28] #####################################
[2021-05-17 18:37:28] INFO : Online Install Finished
[2021-05-17 18:37:28] #####################################
ログイン確認
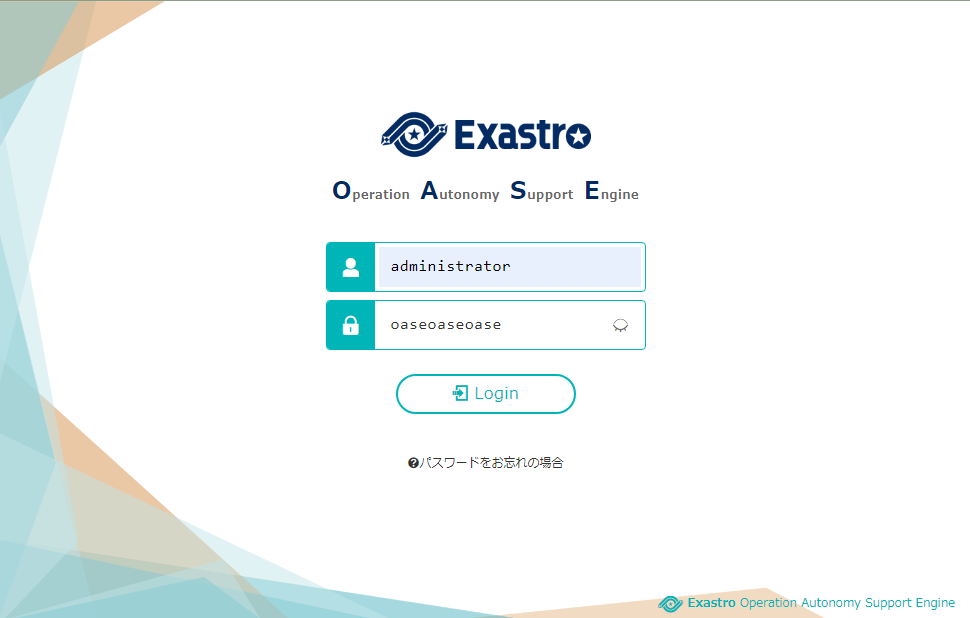
作業端末のブラウザから下記の情報で OASE にログインをする。
| 項目 | 値 |
|---|---|
| URL | http://{OASEサーバのIPアドレス or ホスト名} |
| ログインID | administrator |
| 初期パスワード | oaseoaseoase |
初回ログイン時にパスワードの変更を求められるので、条件に合ったパスワードに変更します。
2.2. 監視アダプタのインストール
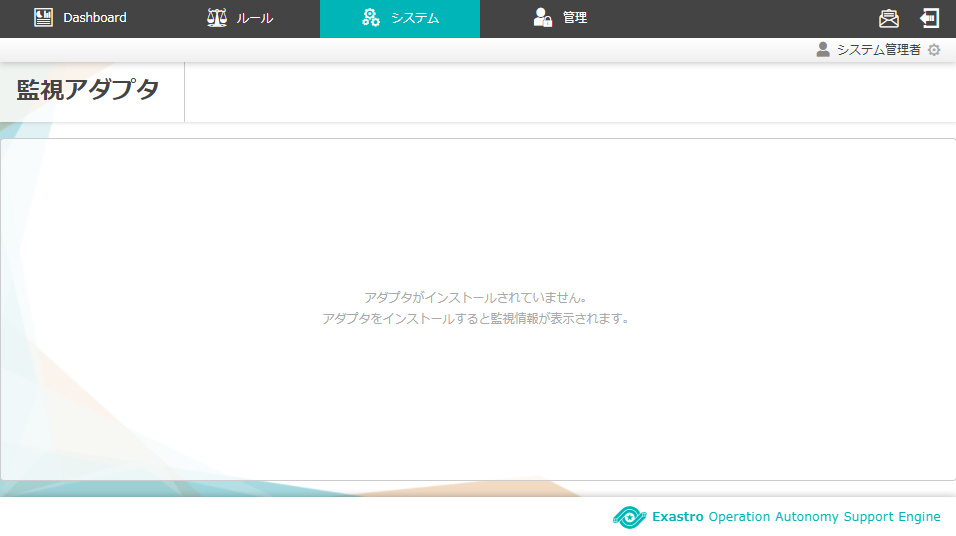
2.2.1. 監視アダプタの状況確認(事前)
2.2.2. 監視アダプタのインストール
| アダプタID | アダプタ |
|---|---|
| 1 | Zabbix アダプタ |
インストール実施
# 作業ディレクトリへ移動
cd /tmp/oase/oase_install_package/OASE/oase-contents

# Zabbix 監視アダプタ資材の解凍
tar zxf ZABBIX_Adapter.tar.gz

# oase-root に移動
cd /exastro/OASE/oase-root

# Zabbix 監視アダプタのインストール
python3 manage.py adapter_installer -p /tmp/oase/oase_install_package/OASE/oase-contents/plugins -i 1
詳細・実行例
# 作業ディレクトリへ移動
cd /tmp/oase/oase_install_package/OASE/oase-contents

# 監視アダプタ資材の解凍
tar zxf [監視アダプタ名]_Adapter.tar.gz

# Zabbix 監視アダプタ資材の解凍
tar zxf ZABBIX_Adapter.tar.gz

# oase-root に移動
cd /exastro/OASE/oase-root

# 監視アダプタインストール
python3 manage.py adapter_installer -p [pluginsパス] -i [インストール対象ID]

# Zabbix 監視アダプタのインストール
python3 manage.py adapter_installer -p /tmp/oase/oase_install_package/OASE/oase-contents/plugins -i 1
Created symlink from /etc/systemd/system/multi-user.target.wants/oase-ZABBIX-monitoring.service to /usr/lib/systemd/system/oase-ZABBIX-monitoring.service.
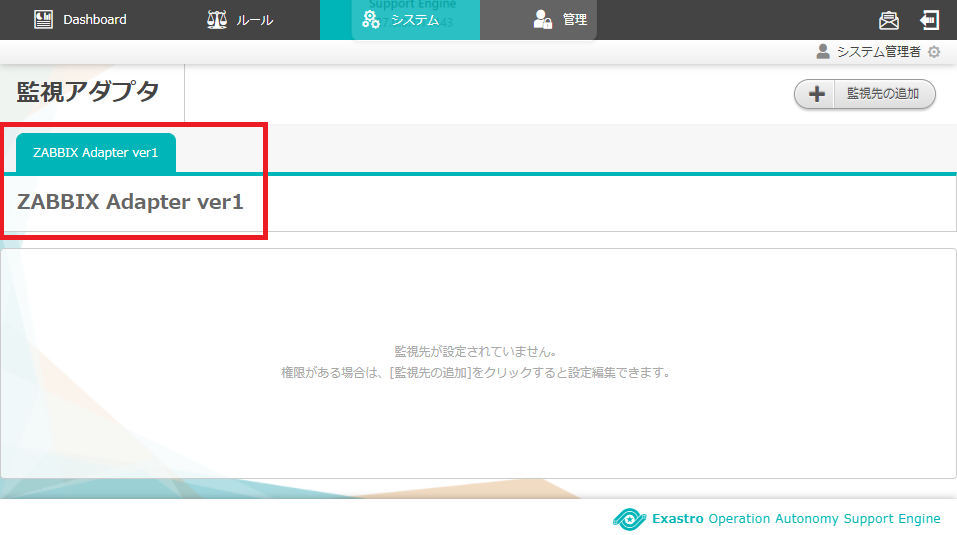
2.2.3. 監視アダプタの状況確認(事後)
2.3. ドライバのインストール
2.3.1. ドライバの状況確認(事前)
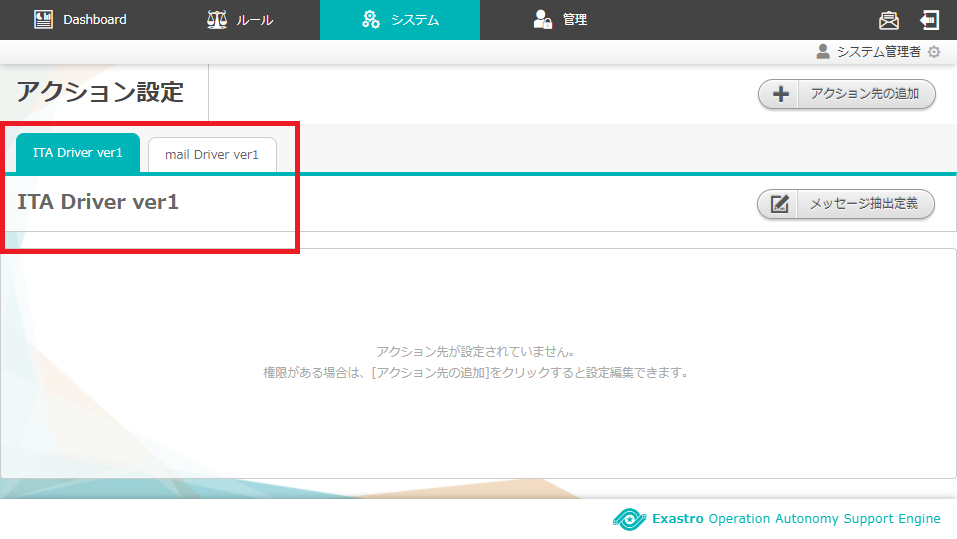
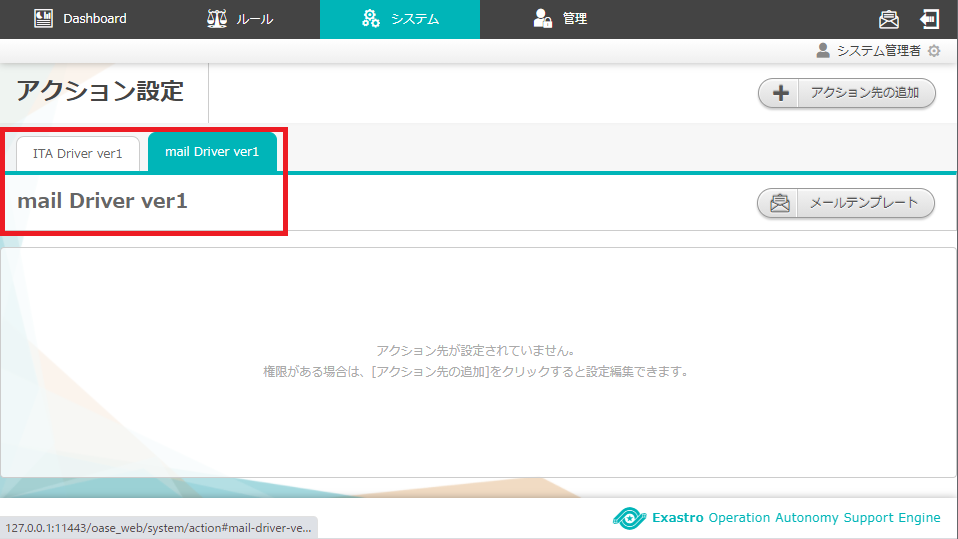
2.3.2. メールドライバのインストール
| ドライバID | ドライバ |
|---|---|
| 1 | ITAドライバ |
| 2 | メールドライバ |
インストール実施
# 作業ディレクトリへ移動
cd /tmp/oase/oase_install_package/OASE/oase-contents

# ITAドライバ資材の解凍
tar zxf ITA_Driver.tar.gz

# メールドライバ資材の解凍
tar zxf mail_Driver.tar.gz

# oase-root に移動
cd /exastro/OASE/oase-root

# ITAドライバのインストール
python3 manage.py driver_installer -p /tmp/oase/oase_install_package/OASE/oase-contents/plugins -i 1

# メールドライバのインストール
python3 manage.py driver_installer -p /tmp/oase/oase_install_package/OASE/oase-contents/plugins -i 2
詳細・実行例
# 作業ディレクトリへ移動
cd /tmp/oase/oase_install_package/OASE/oase-contents

# ドライバ資材の解凍
tar zxf [ドライバ名]_Driver.tar.gz

# ITAドライバ資材の解凍
tar zxf ITA_Driver.tar.gz

# メールドライバ資材の解凍
tar zxf mail_Driver.tar.gz

# ドライバインストール
python3 manage.py driver_installer -p [pluginsパス] -i [インストール対象ID]

# ITAドライバのインストール
python3 manage.py driver_installer -p /tmp/oase/oase_install_package/OASE/oase-contents/plugins -i 1
Created symlink from /etc/systemd/system/multi-user.target.wants/oase-ITA-collaboration.service to /usr/lib/systemd/system/oase-ITA-collaboration.service.

# メールドライバのインストール
python3 manage.py driver_installer -p /tmp/oase/oase_install_package/OASE/oase-contents/plugins -i 2
2.2.3. ドライバの状況確認(事後)
画面表示
まとめ
いかがだったでしょうか。
本稿では、Exastro OASE の概要を簡単にご紹介しました。
また、OASE とアダプタ・ドライバのインストールを行いました。
基本的には、インストーラーを実行するだけで良かったので、特に詰まるようなところはなかったです。
今回はインストール方法のみのご紹介でしたが、次回からは実際の運用シーンを想定した OASE の利用方法について触れてみたいと思います。
あっ、最速という割に時間測ってなかったけどまいっか。。。実際に手を動かしたのは15分くらい
じゃぁの!ヽ(*・ω・)ノ
[](
次回、Exastro OASE でマッチポンプした話(Web+Zabbix構築編)に続く!
)
