この記事はLaravelの環境をDockerで構築するチュートリアルを参考に書きました。
構成は以下のようにする。
Nginx -webサーバー
MySQL -DBサーバー
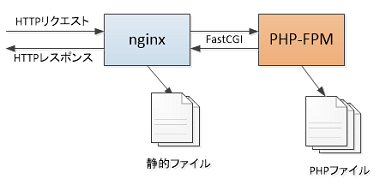
PHP-FPM -アプリケーションサーバー
PHP-FPMとは
FPMとは、PHP標準のアプリケーションサーバです。名前にあるFastCGIというプロトコルで通信するよう実装されています。 FastCGIは、Webサーバとアプリケーションサーバの間で使われるプロトコルの一つで、ここでの例ではnginxとPHP-FPMの間で交わされるプロトコルとなります。
1.1Nginxで静的なファイルを返すwebサーバーを立ち上げる。
構成が以下のようになるように、ファイルやディレクトリを作成。
.
├── docker/
│   └── web/
│       └── default.conf # Nginxの設定ファイル
│
├── docker-compose.yml
└── index.html # 配信する静的コンテンツ
version: '3'
services:
    # サービス名
  web:
      #インストールするイメージ名
    image: nginx:1.15.6
    ports:
        # ポートフォワーディング。
        #ホスト側(自分が使っているパソコン)のポート:コンテナ側のポート
        #ホスト側の8000にアクセスしたらコンテナの80番ポートに転送してくれるので、「localhost:8000」でアクセス可能
      - "8000:80"
      # ホスト側(自分が使っているパソコン)にあるディレクトリやファイルをコンテナでも使えるようにする。
      #こうすることで、ホスト側での変更がコンテナへも反映される。(dockerコンテナに入って直接編集する訳ではない)
    volumes:
      - ./docker/web/default.conf:/etc/nginx/conf.d/default.conf
      - .:/var/www/html
<h1>This is Index.html</h1>
server {
    listen 80;

    root  /var/www/html;
    index index.html;

    access_log /var/log/nginx/access.log;
    error_log  /var/log/nginx/error.log;
}
このように編集し、コンテナの作成と起動を行う
docker-compose upコマンドは作成と起動を一気に行ってくれる。
$ docker-compose up -d
*-dオプションはバックグラウンドで起動
$ docker-compose up -d
Starting laravel-docker-workspace_web_1 ... done
のようになれば起動完了。
http://localhost:8000 でアクセスすると、
のようになっていたら、Nginxの起動はOK.
1.2ホスト側での変更が本当にコンテナへ反映されているのか確認。
$docker exec -it コンテナ名 bash
でコンテナの中に入ることができる。
$ docker exec -it laravel-docker-workspace_web_1 bash
root@1234xyz:~#
このような入力待ち状態になれば成功。
ちなみに、コンテナ名は、
$ docker ps
docker psコマンドの出力のうち、"NAMES"の列に表示されている。
index.htmlへ移動し、ファイルの中をみてみると、確かにホスト側で作成したindex.htmlが作成されている。
root@1234xyz:~# pwd
root
root@1234xyz:~# cd ..
root@1234xyz:/# pwd
/
root@1234xyz:/# cd var/www/html
root@1234xyz:/var/www/html# pwd
/var/www/html
root@1234xyz:/var/www/html# ls
docker	docker-compose.yml  index.html
root@1234xyz:/var/www/html# cat index.html
<h1>This is Index.html</h1>
ホスト側でindex.htmlを編集してみる。
その後に、
root@1234xyz:/var/www/html# cat index.html
<h1>This is Index.html</h1>

編集後・・・・


root@1234xyz:/var/www/html# cat index.html
<h1>This is Index.html</h1>
<p>editting this page.........</p>
<p>editting this page.........</p>
<p>editting this page.........</p>
<p>editting this page.........</p>
<p>editting this page.........</p>
<p>editting this page.........</p>
<p>editting this page.........</p>
<p>editting this page.........</p>
root@ea6968f4e281:/var/www/html#
このように確かにホストのファイルがコンテナ側にマウントされているのがわかる。


