これはFusic Advent Calendar 2018の8日目の記事です。
昨日の記事は...なんか上がってないので、もう少しお待ちくださいませ。
ちなみに一昨日6日目の記事はAWS re:Invent2018に参加してきたメンバーが発表されたサービスの中で一番ときめいたという「Transit Gateway」について説明しています。どうぞ併せてご覧ください。
社内ツール『バボちゃん3』は今日も元気です
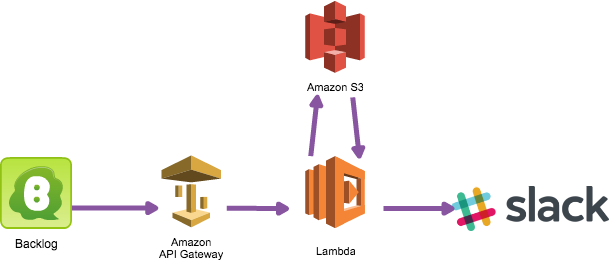
Backlog WebhookをAmazon API Gateway+AWS LambdaでSlackに通知する
昔こんな記事を書きましたが、弊社ではプロジェクトでBacklogとSlackをよく使用します。
Backlogでのチケット起票やコメントは知りたいけど、逐一メールチェックはしたくない、そんな気持ちから最初はHeroku上で稼働するアプリとして生まれました。
その後、Herokuの無料枠が変わって、24時間稼働が難しくなったタイミングでAWS Lambda for Node.jsで作り直したのが『バボちゃん2』でした。
※ちなみにバボちゃんは、バックログ・ボットの略称です^^
その後、AWS LambdaがPython3に対応したので、嬉しくなってつい作り直しちゃったのが『バボちゃん3』で、いまも元気にたくさんのプロジェクトのBacklogチケットをせっせとSlackにお届けしております。
AWS re:Invent2018で一番ときめいたのはLambda for Ruby
Announcing Ruby Support for AWS Lambda
ラスベガスに行っていた弊社メンバーから「なんかLambdaでなんかあるかも!」という情報が来たのが日本時間11/29 お昼すぎ。そわそわしながらも熟睡して翌朝(11/30)起きると社内Slackチャンネルでリリースを知りました。喜びですね。
やるしかない!『バボちゃん4』
ということで、本ポストではバボちゃんで必要な要素を一通り試してみようと思います。
さらにやろうやろうと思いつつ、やれていなかったAWS SAMも使ってみました。
環境構築
開発・デプロイ環境はMacです。
AWS SAM
以前はaws-sam-localというやつでしたが、先日バージョンアップしてaws-sam-cliになったようです。
https://aws.amazon.com/about-aws/whats-new/2018/04/aws-sam-cli-releases-new-init-command/
そのため以前使っていた場合はアンインストールする必要があります。
自分はここでちょっとハマりました。後述するbrewでのインストールは問題なくできてしまいますが、バージョンが0.2.11のままでRuntimeにRubyが使えません。
$ sam
A newer version of the AWS SAM CLI is available!
Your version:   0.2.11
Latest version: 0.8.1
See https://github.com/awslabs/aws-sam-local for upgrade instructions
(snip)

$ $ npm -g ls | grep sam
├─┬ aws-sam-local@0.2.11
自分の場合はnpmでglobalにインストールしていたようです。
入れるだけ入れて何もやってなかったので、記憶になく、ここに至るまでちょっと手間取りました(汗
aws-sam-localのアンインストール
$ npm uninstall -g aws-sam-local
aws-sam-cliインストール
$ brew update
$ brew tap aws/tap
$ brew install aws-sam-cli
$ sam --version
SAM CLI, version 0.8.1
(参考)
- https://docs.aws.amazon.com/ja_jp/serverless-application-model/latest/developerguide/serverless-sam-cli-install.html
- https://docs.aws.amazon.com/ja_jp/serverless-application-model/latest/developerguide/serverless-sam-cli-install-mac.html
Docker for macOS
こちらは公式やその他記事を参照ください。
(参考)
Ruby2.5+
AWS Lambda上では ruby2.5 と書いてますが、手元にあった 2.5.1 でも特に問題はなく
こちらもインストールについては公式やその他記事を参照ください。
bundlerのインストールもお忘れなく。
(参考)
aws-cli
これは不要なのかもしれないですが、あったほうが検証とかもろもろしやすいですよね。あとsamでパッケージしたり、デプロイしたりするときのクレデンシャル情報としてaws-cliのprofileを使用しました。
$ brew install awscli
Hello world
まずはsamでテンプレートとかをgenerateします。
$ sam init --runtime ruby2.5 --name hello_ruby
[+] Initializing project structure...
[SUCCESS] - Read hello_ruby/README.md for further instructions on how to proceed
[*] Project initialization is now complete
$ tree .
.
└── hello_ruby
    ├── Gemfile
    ├── README.md
    ├── hello_world
    │   └── app.rb
    ├── template.yaml
    └── tests
        └── unit
            └── test_handler.rb

4 directories, 5 files
おぉ、RuntimeでRubyを選択できた!
更にtemplate.yamlを見ると、デフォルトでAPI Gateway + Lambda連携になってました。便利。
丁寧にREAMD.mdが書かれているので、その通りにすれば大体うまくいきます。
せっかくなので、このサンプルでローカル実行とデプロイして動作確認してみましょう。
ローカル実行
生成されたRubyアプリを見ると、
require 'httparty'
require 'json'

def lambda_handler(event:, context:)
begin
    response = HTTParty.get('http://checkip.amazonaws.com/')
  rescue HTTParty::Error => error
    puts error.inspect
    raise error
  end

  return {
    :statusCode => response.code,
    :body => {
      :message => "Hello World!",
      :location => response.body
    }.to_json
  }
end
httpartyが使われているので、Gemインストールが必要ですね。
$ bundle install --path hello_world/vendor/bundle
ではLambda単体で動かしてみましょう。
$ sam local invoke HelloWorldFunction --no-event
2018-12-07 08:32:15 Invoking app.lambda_handler (ruby2.5)

Fetching lambci/lambda:ruby2.5 Docker container image......
2018-12-07 08:32:19 Mounting /.../hello_ruby/hello_world as /var/task:ro inside runtime container
START RequestId: 52fdfc07-2182-154f-163f-5f0f9a621d72 Version: $LATEST
END RequestId: 52fdfc07-2182-154f-163f-5f0f9a621d72
REPORT RequestId: 52fdfc07-2182-154f-163f-5f0f9a621d72  Duration: 527.55 ms     Billed Duration: 600 ms Memory Size: 128 MB     Max Memory Used: 30 MB
{"statusCode":200,"body":"{\"message\":\"Hello World!\",\"location\":\"himitsu-no-akko-chan\\n\"}"}
アプリは自身のIPアドレスを取得して返却するもののようですね。
次にAPI Gateway経由で実行してみましょう。
aws-sam-cliにはローカルで発火できる疑似Eventを簡単に生成することができます。便利!
$ sam local generate-event apigateway aws-proxy > event_file_apigateway.json
{
  "body": "eyJ0ZXN0IjoiYm9keSJ9",
  "resource": "/{proxy+}",
  "path": "/path/to/resource",
  "httpMethod": "POST",
  "isBase64Encoded": true,
  "queryStringParameters": {
    "foo": "bar"
  },
  "pathParameters": {
    "proxy": "/path/to/resource"
  },
  "stageVariables": {
    "baz": "qux"
  },
  "headers": {
    "Accept": "text/html,application/xhtml+xml,application/xml;q=0.9,image/webp,*/*;q=0.8",
    "Accept-Encoding": "gzip, deflate, sdch",
    "Accept-Language": "en-US,en;q=0.8",
    "Cache-Control": "max-age=0",
    "CloudFront-Forwarded-Proto": "https",
    "CloudFront-Is-Desktop-Viewer": "true",
    "CloudFront-Is-Mobile-Viewer": "false",
    "CloudFront-Is-SmartTV-Viewer": "false",
    "CloudFront-Is-Tablet-Viewer": "false",
    "CloudFront-Viewer-Country": "US",
    "Host": "1234567890.execute-api.us-east-1.amazonaws.com",
    "Upgrade-Insecure-Requests": "1",
    "User-Agent": "Custom User Agent String",
    "Via": "1.1 08f323deadbeefa7af34d5feb414ce27.cloudfront.net (CloudFront)",
    "X-Amz-Cf-Id": "cDehVQoZnx43VYQb9j2-nvCh-9z396Uhbp027Y2JvkCPNLmGJHqlaA==",
    "X-Forwarded-For": "127.0.0.1, 127.0.0.2",
    "X-Forwarded-Port": "443",
    "X-Forwarded-Proto": "https"
  },
  "requestContext": {
    "accountId": "123456789012",
    "resourceId": "123456",
    "stage": "prod",
    "requestId": "c6af9ac6-7b61-11e6-9a41-93e8deadbeef",
    "requestTime": "09/Apr/2015:12:34:56 +0000",
    "requestTimeEpoch": 1428582896000,
    "identity": {
      "cognitoIdentityPoolId": null,
      "accountId": null,
      "cognitoIdentityId": null,
      "caller": null,
      "accessKey": null,
      "sourceIp": "127.0.0.1",
      "cognitoAuthenticationType": null,
      "cognitoAuthenticationProvider": null,
      "userArn": null,
      "userAgent": "Custom User Agent String",
      "user": null
    },
    "path": "/prod/path/to/resource",
    "resourcePath": "/{proxy+}",
    "httpMethod": "POST",
    "apiId": "1234567890",
    "protocol": "HTTP/1.1"
  }
}
ではAPI GatewayにEventを送ってローカル実行してみましょう。
$ sam local invoke HelloWorldFunction -e event_file_apigateway.json
2018-12-07 08:38:13 Invoking app.lambda_handler (ruby2.5)

Fetching lambci/lambda:ruby2.5 Docker container image......
2018-12-07 08:38:17 Mounting /.../hello_ruby/hello_world as /var/task:ro inside runtime container
START RequestId: 52fdfc07-2182-154f-163f-5f0f9a621d72 Version: $LATEST
END RequestId: 52fdfc07-2182-154f-163f-5f0f9a621d72
REPORT RequestId: 52fdfc07-2182-154f-163f-5f0f9a621d72  Duration: 490.94 ms     Billed Duration: 500 ms Memory Size: 128 MB     Max Memory Used: 30 MB
{"statusCode":200,"body":"{\"message\":\"Hello World!\",\"location\":\"higashino-keigo\\n\"}"}
まあ、直接lambda動かしたのと差はないですね。
パッケージ&デプロイ
これもsamでちょちょいと。
その前に、パッケージするためのS3バケットが必要なので、ご準備ください。
パッケージ用にbundle install
$ bundle install --deployment --path hello_world/vendor/bundle
gemもパッケージするために --deployment を付けてinstallします。
パッケージ
$ sam package --template-file template.yaml --output-template-file packaged.yaml --s3-bucket <YOUR_BUCKET_NAME> --profile <YOUR_PROFILE_NAME>
Uploading to xxxxxxxxxxxxxxxxxxx  643003 / 643003.0  (100.00%)
Successfully packaged artifacts and wrote output template to file packaged.yaml.
Execute the following command to deploy the packaged template
aws cloudformation deploy --template-file /.../hello_ruby/packaged.yaml --stack-name <YOUR STACK NAME>
デプロイ
$ sam deploy --template-file packaged.yaml --stack-name <YOUR_STACK_NAME> --capabilities CAPABILITY_IAM --profile <YOUR_PROFILE_NAME>

Waiting for changeset to be created..
Waiting for stack create/update to complete
Successfully created/updated stack - ServerlessFunctionHelloRuby
CloudFormationのスタック名は任意でOKです。
Amazon Management Consoleで確認したらちゃんとできていました

できたAPIをブラウザでアクセスしてみたらちゃんと動きましたー!

(バボちゃん4を意識して)S3 + Slack通知を追加
tempalte.yaml
使用するS3バケットとLambdaからの権限付与するのと、Bucket名とSlack Incoming WebhookのURLをアプリで扱えるように環境変数で渡します。
またBacklogからのWebhookはPOSTになるので、API GatewayのMethodも変更します。
AWSTemplateFormatVersion: '2010-09-09'
Transform: AWS::Serverless-2016-10-31
Description: >
  babo_ruby
  Sample SAM Template for babo_ruby

# More info about Globals: https://github.com/awslabs/serverless-application-model/blob/master/docs/globals.rst
Globals:
  Function:
    Timeout: 3
Resources:
  Bucket:
    Type: AWS::S3::Bucket
  BaboFunction:
    Type: AWS::Serverless::Function # More info about Function Resource: https://github.com/awslabs/serverless-application-model/blob/master/versions/2016-10-31.md#awsserverlessfunction
    Properties:
      CodeUri: babo/
      Handler: app.lambda_handler
      Runtime: ruby2.5
      Policies:
        - S3CrudPolicy:
            BucketName: !Ref Bucket
      Environment: # More info about Env Vars: https://github.com/awslabs/serverless-application-model/blob/master/versions/2016-10-31.md#environment-object
        Variables:
          BUCKET_NAME: !Ref Bucket
          SLACK_URL: https://hooks.slack.com/services/xxxxxxxxxxxxx
      Events:
        HelloWorld:
          Type: Api # More info about API Event Source: https://github.com/awslabs/serverless-application-model/blob/master/versions/2016-10-31.md#api
          Properties:
            Path: /webhook
            Method: post
Outputs:
  HelloWorldApi:
    Description: "API Gateway endpoint URL for Prod stage for Hello World function"
    Value: !Sub "https://${ServerlessRestApi}.execute-api.${AWS::Region}.amazonaws.com/Prod/webhook/"
  HelloWorldFunction:
    Description: "Hello World Lambda Function ARN"
    Value: !GetAtt BaboFunction.Arn
  HelloWorldFunctionIamRole:
    Description: "Implicit IAM Role created for Hello World function"
    Value: !GetAtt BaboFunction.Arn
Gemfile
source "https://rubygems.org"

gem "aws-sdk-s3"
gem 'slack-notifier'
app.rb
require 'aws-sdk-s3'
require 'slack-notifier'
require 'json'

def lambda_handler(event:, context:)
  begin
    bucket_name = ENV['BUCKET_NAME']
    slack_url   = ENV['SLACK_URL']

    bl_body = JSON.parse(event['body'])
    bl_project_id = bl_body['project']['id']

    s3 = Aws::S3::Resource.new
    s3_obj = s3.bucket(bucket_name).object("#{bl_project_id}.conf")
    s3_body = JSON.parse(s3_obj.get.body.read)

  rescue => error
    puts error
    raise error
  end

  notifier = Slack::Notifier.new(slack_url, username: 'babo_tester', channel: s3_body['channel_name'])
  res = notifier.ping("『#{bl_body['project']['name']}』で変化がありました")
  return res
end
Backlogの設定
Webhookエンドポイントの
前述したパッケージ&デプロイします。
実行されたCloudFormation StackのOutputで表示れているAPI Gatewayのエンドポイントをコピペして、Backlogの『プロジェクト設定>インテグレーション>Webhook』のWebHook URLに登録して全てのイベントを通知するようにします。
BacklogプロジェクトのIDを確認して、{ProjectID番号}.confにして、作成されたS3バケットにアップロードします。(連携の仕組みは昔のポストを参照ください)
動作確認
Backlogでチケットを登録すると、Slackに通知が来ました!やったね!

まとめ
すでにちゃんと動いているものを別言語とか別サービスで作り直すのは無駄かなと思いつつ、新しい技術を覚えるのにはコストが低く、ただHello worldだけに終わらず、もう少し使える知見になりやすいなと考えています。
アドベントカレンダー担当日までに、バボちゃんのロジック部分を移行するまではできなかったので、今回はここまでです。
Fusicでは普段、Tech Blogで分野・大小様々な技術発信をしているので、バボちゃんのロジックを移行して、更に汎用性を持たせるところまでできたらそこでソース公開するポストでもを書こうと目論んでします。
もし使ってみたいなーと思っている方がいたらぜひウォッチしていただければ幸いです。
さて正月休みに気分転換でやるかな。
最後までお読みいただき、ありがとうございました。
それでは良いRuby Lifeを!