Azure Advent Calendar 2020
10日目頑張ります🙋♂️
はじめに
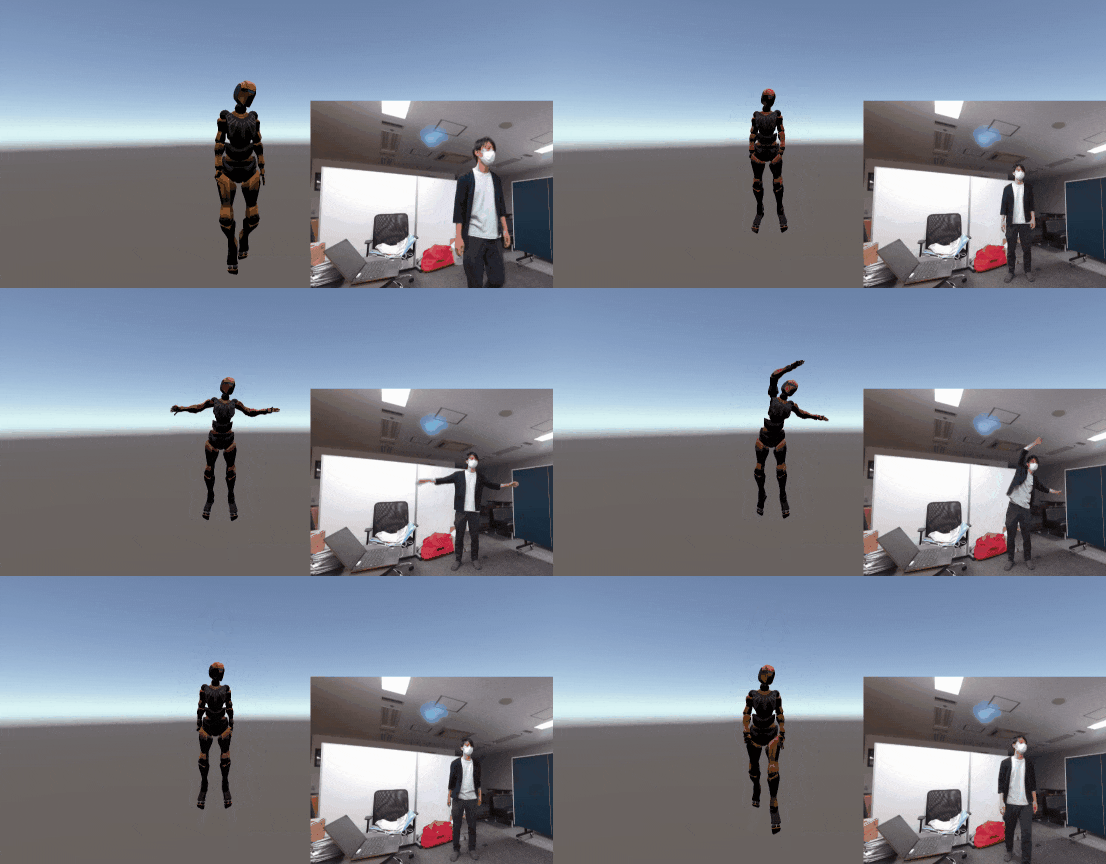
Azure Kinect DKのボディトラッキングを利用して3Dアバターを実装してみます!
過去の記事はこちら
Azure Kinect DKで火属性マジシャンに転職する
環境
- Windows10 Home
- Unity2019.4
- Azure Kinect SDK v1.4.1
- Azure Kinect Body Tracking SDK v1.0.1
Azure Kinect DKのセットアップ
Azure Kinect Sensor SDK
https://docs.microsoft.com/ja-jp/azure/kinect-dk/sensor-sdk-download
こちらを参考にインストール
Azure Kinect Body Tracking SDK
https://docs.microsoft.com/ja-jp/azure/kinect-dk/body-sdk-download
こちらを参考にインストール
これでAzure Kinect DKの動作確認ができるようになりました!
Unity開発プロジェクトの準備
プロジェクト作成
とにもかくにもプロジェクト作成。UnityHubからUnity3Dプロジェクトを作成します。
必要なdllはNuGetで後ほどダウンロード&配置するのでMicrosoft公式のGitHubから必要なファイルをダウンロードします。
https://github.com/microsoft/Azure-Kinect-Samples/tree/master/body-tracking-samples/sample_unity_bodytracking
必要なファイルは以下の3つ。
- MoveLibraryFiles.bat
- app.config
- packages.config
リポジトリと同じようにAssetsディレクトリと同階層に配置します。
スクリプト作成
今回は1ファイル1クラスで全て賄います。
Unityから適当なクラス名でC#ファイルを作成します。
実装例ではAvatarTracker.csとしました。
必要DLLの用意
UnityからAvatarTracker.csを開いてVisualStudioを起動します。
VisualStudioのソリューションを右クリックして「NuGet パッケージの復元」を選択すると、必要なdllファイルが全てダウンロードされます。
ダウンロードしたままではUnityで読み込めないので、MoveLibraryFiles.batを実行して正しい位置に配置してやります。
3Dモデル(Humanoid)の準備
HumanoidAvatarに対応した3Dモデルを用意します。
とは言えモデルを作れない筆者はAssetStoreから拝借します。
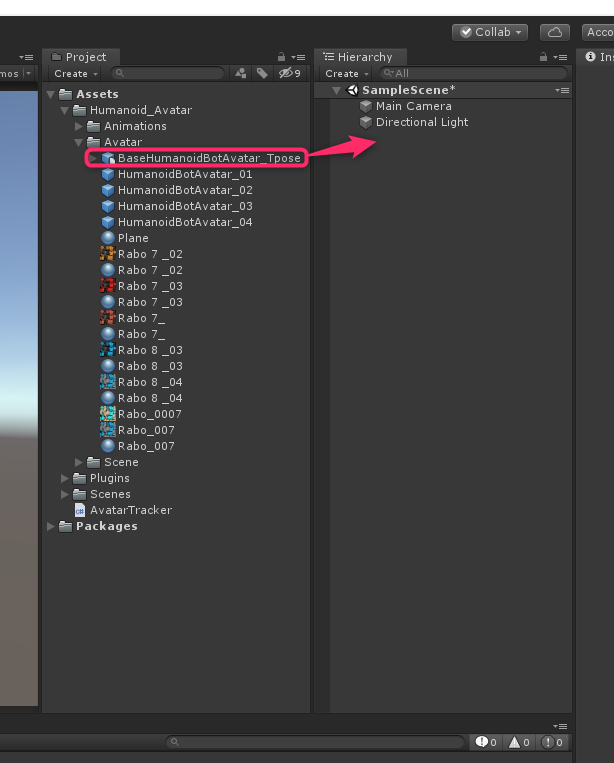
今回は以下のAssetを利用しました。
Humanoid Avatar Rig free
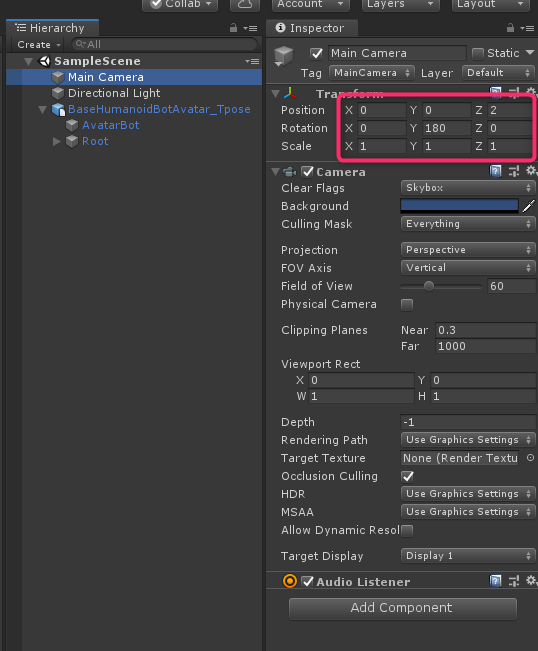
ついでにカメラの位置も調整しておきましょう。
筆者の環境ではこの位置がベストでした。
コーディング
さてさてコーディングです。
といってもコードはそれほど難しくありません。
Kinectから取得した間接の回転情報をHumanoidの各Boneに当て込んでやるだけです。
using Microsoft.Azure.Kinect.BodyTracking;
using Microsoft.Azure.Kinect.Sensor;
using System.Collections.Generic;
using System.Threading.Tasks;
using UnityEngine;

public class AvatarTracker : MonoBehaviour
{
    [SerializeField]
    private GameObject avatarRoot; // 位置移動するために3Dモデルの親を登録

    private Device kinect;
    private Tracker tracker;
    private Animator animator;

    void Awake()
    {
        this.kinect = Device.Open(0); // Kinectを起動。
        this.kinect.StartCameras(new DeviceConfiguration
        {
            ColorFormat = ImageFormat.ColorBGRA32,
            ColorResolution = ColorResolution.R720p,
            DepthMode = DepthMode.NFOV_2x2Binned,
            SynchronizedImagesOnly = true,
            CameraFPS = FPS.FPS30
        });

        this.tracker = Tracker.Create(this.kinect.GetCalibration(), TrackerConfiguration.Default);
        this.animator = this.GetComponent<Animator>();
    }

    void Start()
    {
        Task t = CaptureLooper(); // KinectからのキャプチャーデータはTaskで回して繰り返し取得します。
    }

    private async Task CaptureLooper()
    {
        while (true)
        {
            using (var capture = await Task.Run(() => this.kinect.GetCapture()).ConfigureAwait(true))
            {
                this.tracker.EnqueueCapture(capture);
                var frame = tracker.PopResult();
                if (frame.NumberOfBodies > 0) // キャプチャーしている人体の数をチェック。人体無しの状態でトラッキングすると死にます。
                {
                    var skeleton = frame.GetBodySkeleton(0);
                    foreach (KeyValuePair<HumanBodyBones, JointId> pair in this.boneJointMap)
                    {
                        var jointId = pair.Value;
                        var jointRotation = skeleton.GetJoint(jointId).Quaternion;
                        var quaternion = new Quaternion(jointRotation.X, jointRotation.Y, jointRotation.Z, jointRotation.W);
                        var adjustedQuaternion = quaternion * this.GetQuaternionOffset(jointId); // 関節によって上方向が異なるので調整します。
                        this.animator.GetBoneTransform(pair.Key).rotation = adjustedQuaternion; // HumanoidAvatarの各関節に回転を当て込んでいきます。
                    }

                    var jointPos = frame.GetBodySkeleton(0).GetJoint(JointId.Pelvis).Position; // トラッキングした腰の位置をアバターの位置情報に当て込みます。
                    this.avatarRoot.transform.localPosition = new Vector3(-jointPos.X / 500, -jointPos.Y / 500, -jointPos.Z / 1000); // そのままだと動きすぎるので調整。
                }
            }
        }
    }

    private void OnDestroy()
    {
        this.kinect.StopCameras(); // アプリケーション終了時にKinectを終了させます。終了しないと次の起動でhungします。
    }

    private Quaternion GetQuaternionOffset(JointId jointId) // 関節毎の方向調整です。後述。
    {
        switch (jointId)
        {
            case JointId.Pelvis:
            case JointId.SpineChest:
            case JointId.SpineNavel:
            case JointId.Neck:
            case JointId.Head:
                return Quaternion.Euler(90, 0, 90);
            case JointId.HipLeft:
            case JointId.KneeLeft:
            case JointId.AnkleLeft:
                return Quaternion.Euler(90, 0, 270);
            case JointId.HipRight:
            case JointId.KneeRight:
            case JointId.AnkleRight:
                return Quaternion.Euler(270, 0, 90);
            case JointId.ClavicleLeft:
            case JointId.ShoulderLeft:
            case JointId.ElbowLeft:
            case JointId.ThumbLeft:
                return Quaternion.Euler(180, 0, 90);
            case JointId.ClavicleRight:
            case JointId.ShoulderRight:
            case JointId.ElbowRight:
            case JointId.ThumbRight:
                return Quaternion.Euler(0, 0, 270);
            case JointId.FootLeft:
                return Quaternion.Euler(180, 90, 0);
            case JointId.FootRight:
                return Quaternion.Euler(180, 270, 180);
            case JointId.WristLeft:
            case JointId.HandLeft:
            case JointId.HandTipLeft:
                return Quaternion.Euler(0, 0, 90);
            case JointId.WristRight:
            case JointId.HandRight:
            case JointId.HandTipRight:
                return Quaternion.Euler(270, 0, 270);
        }

        return Quaternion.Euler(0, 0, 0);
    }

    private readonly Dictionary<HumanBodyBones, JointId> boneJointMap = new Dictionary<HumanBodyBones, JointId>() // Kinect側の各関節とHumanoidAvatarの各関節の紐づけ。
        {
            // 上半身
            {HumanBodyBones.Hips, JointId.Pelvis},
            {HumanBodyBones.Head, JointId.Head},
            {HumanBodyBones.Neck, JointId.Neck},
            {HumanBodyBones.Chest, JointId.SpineChest},
            {HumanBodyBones.Spine, JointId.SpineNavel},

            // 左腕
            {HumanBodyBones.LeftShoulder, JointId.ClavicleLeft},
            {HumanBodyBones.LeftUpperArm, JointId.ShoulderLeft},
            {HumanBodyBones.LeftLowerArm, JointId.ElbowLeft},
            {HumanBodyBones.LeftHand, JointId.WristLeft},

            // 右腕
            {HumanBodyBones.RightShoulder, JointId.ClavicleRight},
            {HumanBodyBones.RightUpperArm, JointId.ShoulderRight},
            {HumanBodyBones.RightLowerArm, JointId.ElbowRight},
            {HumanBodyBones.RightHand, JointId.WristRight},

            // 左脚
            {HumanBodyBones.LeftUpperLeg, JointId.HipLeft},
            {HumanBodyBones.LeftLowerLeg, JointId.KneeLeft},
            {HumanBodyBones.LeftFoot, JointId.AnkleLeft},

            // 右脚
            {HumanBodyBones.RightUpperLeg, JointId.HipRight},
            {HumanBodyBones.RightLowerLeg, JointId.KneeRight},
            {HumanBodyBones.RightFoot, JointId.AnkleRight},

            // 両足
            {HumanBodyBones.LeftToes, JointId.FootLeft},
            {HumanBodyBones.RightToes, JointId.FootRight},

            // 左手
            {HumanBodyBones.LeftIndexProximal, JointId.HandTipLeft},
            {HumanBodyBones.LeftIndexIntermediate, JointId.HandTipLeft},
            {HumanBodyBones.LeftIndexDistal, JointId.HandTipLeft},
            {HumanBodyBones.LeftMiddleProximal, JointId.HandTipLeft},
            {HumanBodyBones.LeftMiddleIntermediate, JointId.HandTipLeft},
            {HumanBodyBones.LeftMiddleDistal, JointId.HandTipLeft},
            {HumanBodyBones.LeftRingProximal, JointId.HandTipLeft},
            {HumanBodyBones.LeftRingIntermediate, JointId.HandTipLeft},
            {HumanBodyBones.LeftRingDistal, JointId.HandTipLeft},
            {HumanBodyBones.LeftLittleProximal, JointId.HandTipLeft},
            {HumanBodyBones.LeftLittleIntermediate, JointId.HandTipLeft},
            {HumanBodyBones.LeftLittleDistal, JointId.HandTipLeft},

            // 右手
            {HumanBodyBones.RightIndexProximal, JointId.HandTipRight},
            {HumanBodyBones.RightIndexIntermediate, JointId.HandTipRight},
            {HumanBodyBones.RightIndexDistal, JointId.HandTipRight},
            {HumanBodyBones.RightMiddleProximal, JointId.HandTipRight},
            {HumanBodyBones.RightMiddleIntermediate, JointId.HandTipRight},
            {HumanBodyBones.RightMiddleDistal, JointId.HandTipRight},
            {HumanBodyBones.RightRingProximal, JointId.HandTipRight},
            {HumanBodyBones.RightRingIntermediate, JointId.HandTipRight},
            {HumanBodyBones.RightRingDistal, JointId.HandTipRight},
            {HumanBodyBones.RightLittleProximal, JointId.HandTipRight},
            {HumanBodyBones.RightLittleIntermediate, JointId.HandTipRight},
            {HumanBodyBones.RightLittleDistal, JointId.HandTipRight},

            // 左指
            {HumanBodyBones.LeftThumbProximal, JointId.HandLeft},
            {HumanBodyBones.LeftThumbIntermediate, JointId.ThumbLeft},
            {HumanBodyBones.LeftThumbDistal, JointId.ThumbLeft},

            // 右指
            {HumanBodyBones.RightThumbProximal, JointId.HandRight},
            {HumanBodyBones.RightThumbIntermediate, JointId.ThumbRight},
            {HumanBodyBones.RightThumbDistal, JointId.ThumbRight},
        };
}
補足。
AzureKinectで取得できる各関節のxyz回転座標は関節によって上方向が異なります。
Azure Kinect ボディトラッキングの関節
ので、下記メソッドで各関節の回転方向を90°単位で追加回転しています。
    private Quaternion GetQuaternionOffset(JointId jointId)
    {
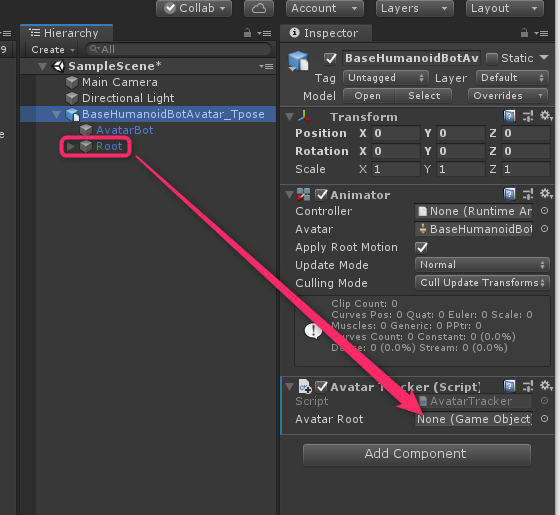
ではでは、作成したスクリプトをHumanoidAvatarのGameObjectにAdd Componentして・・・
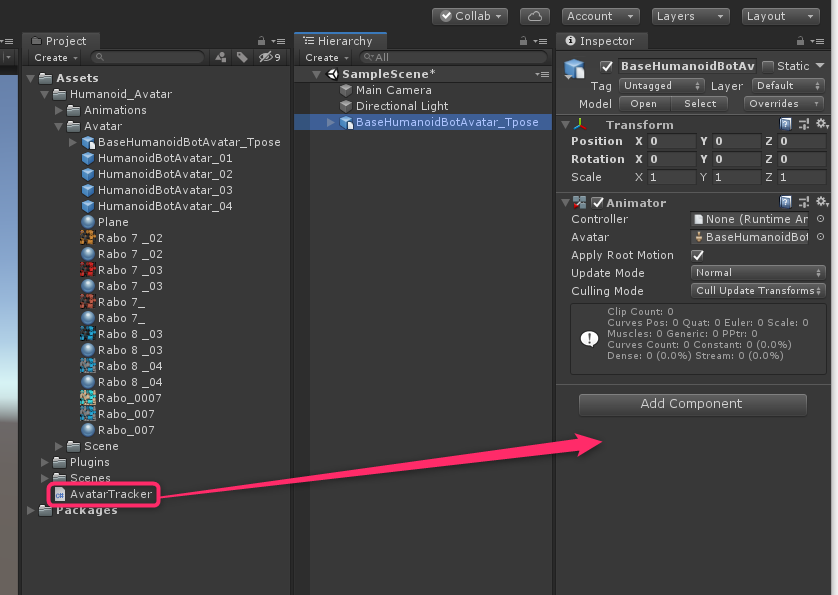
AvatarRootにベースとなるGameObjectをアタッチしてやれば完成です!
Play
実行してKinectの前に立つとアバターが動き出します。
身体にセンサーを付けずここまでトラッキングしてくれると応用の幅が広がりますね!
