概要
M5Stackを使ってProxmox上の仮想サーバをコントロールします。
ひとまず起動、シャットダウンをさせることができました。
構成
M5stack BASIC v2.7
proxmox Virtual Environment 8.2.2
動作
・ABボタン同時押しで起動、シャットダウンのモードを切り替えられます
・AまたはBボタンでVMを選択し、Cボタンで決定します
・起動中のVMは緑、停止中のVMは赤色で表示されます
・VM名、ノード、ID、状態を表示しています


開発環境
OS:windows 10
エディタ:vscode
IDE:PlatformIO
準備
proxmoxにてtoken、APIキーを取得する
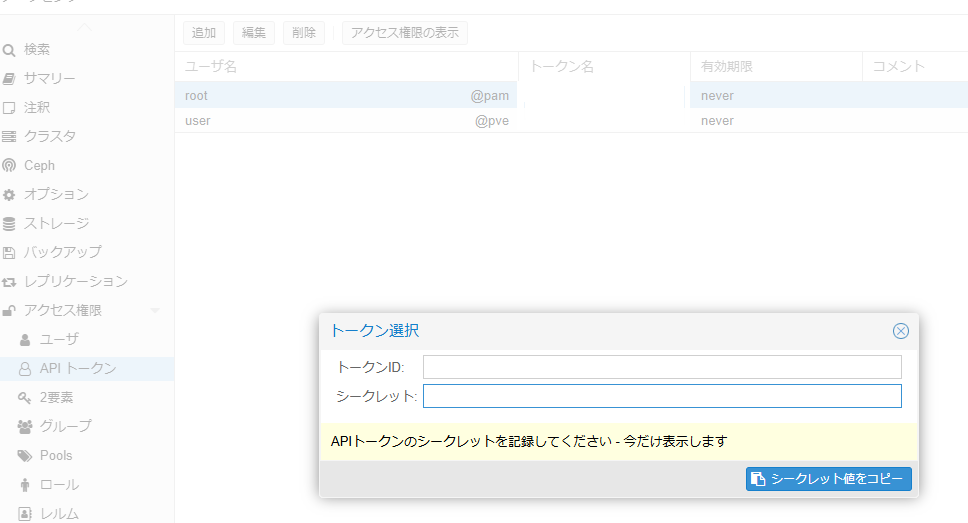
※画像は加工してます
参考例としてAPI_Tokenは以下のようになります。
[ユーザ名]![トークン名]=[シークレット]
root@pam!monitoring=aaaaaaaaa-bbb-cccc-dddd-ef0123456789
後ほど使用します。
プログラム
platformio.ini
; PlatformIO Project Configuration File
;
;   Build options: build flags, source filter
;   Upload options: custom upload port, speed and extra flags
;   Library options: dependencies, extra library storages
;   Advanced options: extra scripting
;
; Please visit documentation for the other options and examples
; https://docs.platformio.org/page/projectconf.html

[env:m5stack-core-esp32]
platform = espressif32
board = m5stack-core-esp32
framework = arduino
lib_deps =
     m5stack/M5Stack@^0.3.0
     bblanchon/ArduinoJson@^6.18.3
monitor_speed = 115200
main.cpp
#include <M5Stack.h>
#include <WiFi.h>
#include <HTTPClient.h>
#include <ArduinoJson.h>
#include <time.h>
#include <string>

const char* ssid = "xxxxxxxxxxxxxx";
const char* password = "xxxxxxxxxxxx";
const char* api_url ="https://xxxxxxxx:xxxx/api2/json";
const char* api_token = "xxxxxxxxxxxxxxxxxxxxxxxx";
int vmMode = 0; // 0: 起動モード, 1: シャットダウンモード


unsigned long previousMillis = 0; // 前回の更新時刻を保持する変数
const long interval = 10000;

struct Serverstr {
  std::string name; // サーバの名前
  int vmid;         // サーバのVMID
  std::string status; // サーバの状態
  std::string node;   // サーバが存在するノードの名前

  Serverstr(std::string name, int vmid, std::string status, std::string node)
    : name(name), vmid(vmid), status(status), node(node) {}
};
// 仮想マシンのリストと選択されたVMのインデックスを保持する変数
std::vector<Serverstr> vmList; // Server構造体は以前定義されているものとします
int selectedIndex = 0;


void fetchAndDisplayVMList(int x, int y,int csize);
void displayVMList(int x, int y,int csize);
void startSelectedVM(int x, int y,int csize);
void shutdownSelectedVM(int x, int y,int csize);


void setup() {
  M5.begin();
  WiFi.begin(ssid, password);

  while (WiFi.status() != WL_CONNECTED) {
    delay(500);
    M5.Lcd.print(".");
  }

  // WiFi接続成功
  M5.Lcd.clear();
  M5.Lcd.println("WiFi Connected");
  //M5.Lcd.println("Waiting...");

  // NTPサーバから時刻を取得する設定
  configTime(9 * 3600, 0, "XXX.XXX.XXX.XXX");

}

void fetchAndDisplayVMList(int x, int y,int csize) {
  HTTPClient http;


  String fullUrl = String(api_url) + "/cluster/resources?type=vm";
  http.begin(fullUrl);
  // トークンをAuthorizationヘッダーに追加
  String authHeader = "PVEAPIToken=" + String(api_token);
  http.addHeader("Authorization", authHeader);

  int httpCode = http.GET();
  if (httpCode > 0) {
    String payload = http.getString();
    // ここでpayloadを解析し、表示します。
    // JSONオブジェクトの容量を計算(ArduinoJson v6の文法)
    const size_t capacity = JSON_ARRAY_SIZE(25) + 25*JSON_OBJECT_SIZE(20) + JSON_OBJECT_SIZE(1) + 2048; // 余裕を持たせるために追加
    DynamicJsonDocument doc(capacity);

    // JSONデータの解析
    deserializeJson(doc, payload);

     // "data" キーの配列を取得
    JsonArray data = doc["data"];

    vmList.clear(); // 既存のリストをクリア

    for (JsonObject obj : data) {
      const char* name = obj["name"]; // サーバの名前
      int vmid = obj["vmid"]; // vmid
      const char* status = obj["status"]; // サーバのステータス
      const char* node = obj["node"]; // ノード名

      // Serverstr構造体のインスタンスを作成し、vmListに追加
      Serverstr server(std::string(name), vmid, std::string(status), std::string(node));
      vmList.push_back(server);
    }
    // 時刻を表示
    struct tm timeinfo;
    if (!getLocalTime(&timeinfo)) {
      Serial.println("Failed to obtain time");
      return;
    }

    char timeString[64];
    strftime(timeString, sizeof(timeString), "%Y-%m-%d %H:%M:%S", &timeinfo);
    M5.Lcd.setCursor(x, y);
    M5.Lcd.setTextSize(csize);
    M5.Lcd.setTextColor(TFT_WHITE, TFT_BLACK);
    M5.Lcd.println(String("Status Get: ") + timeString);

    // ここでvmListを表示する関数を呼び出すか、または別の適切な場所で表示処理を行う
    displayVMList(0,30,1);

  } else {
    M5.Lcd.setTextSize(csize); // エラーメッセージも同じテキストサイズで表示
    M5.Lcd.println("Error on HTTP request");
  }
  http.end();
}

void displayVMList(int x, int y,int csize) {
  //M5.Lcd.fillScreen(BLACK); // 画面をクリア
  //M5.Lcd.setCursor(0, 0); // カーソルを画面の上部に設定
  M5.Lcd.setCursor(x, y); // VMリストの表示開始位置を下にずらす
  M5.Lcd.setTextSize(csize); // テキストサイズを設定

  for (int i = 0; i < vmList.size(); i++) {
    // サーバの状態に応じて文字色を設定
    if (vmList[i].status == "running") {
      M5.Lcd.setTextColor(TFT_GREEN, TFT_BLACK); // 状態がrunningの場合は緑色
    } else if (vmList[i].status == "stopped") {
      M5.Lcd.setTextColor(TFT_RED, TFT_BLACK); // 状態がstoppedの場合は赤色
    } else {
      M5.Lcd.setTextColor(TFT_WHITE, TFT_BLACK); // その他の状態の場合は白色
    }

    // 選択中のVMにはマークを付ける
    if (i == selectedIndex) {
      M5.Lcd.printf("> %s: %s: %d: %s    \n", vmList[i].name.c_str(), vmList[i].node.c_str(), vmList[i].vmid, vmList[i].status.c_str());
    } else {
      // 選択されていないVMは通常通り表示
      M5.Lcd.printf("  %s: %s: %d: %s    \n", vmList[i].name.c_str(), vmList[i].node.c_str(), vmList[i].vmid, vmList[i].status.c_str());
    }
  }
}

void startSelectedVM(int x, int y,int csize) {
  if (selectedIndex < 0 || selectedIndex >= vmList.size()) return; // 範囲外チェック

  Serverstr selectedVM = vmList[selectedIndex];

  String node = String(selectedVM.node.c_str()); // 選択されたVMのノード名
  int vmid = selectedVM.vmid; // 選択されたVMのID
  String name = String(selectedVM.name.c_str());
  String fullUrl = String(api_url) + "/nodes/" + node + "/qemu/" + String(vmid) + "/status/start"; // 完全なURL

  HTTPClient http;
  http.begin(fullUrl);
  http.addHeader("Authorization", "PVEAPIToken=" + String(api_token));

  // リクエストの詳細をシリアル出力
  Serial.println("Sending HTTP POST Request to URL: " + fullUrl);
  Serial.println("Headers:");
  Serial.println("Authorization: PVEAPIToken=" + String(api_token));
  // POSTリクエストの場合、ボディがあればここで出力
  // この例ではボディは空ですが、必要に応じて出力してください
  Serial.println("Body: (empty)");

  int httpCode = http.POST(""); // POSTリクエストを送信


  if (httpCode > 0) {
    // リクエスト成功
    String payload = http.getString(); // レスポンスペイロードを取得
    Serial.println("Response: " + payload); // レスポンス内容をシリアル出力

    // JSONオブジェクトの容量を計算(ArduinoJson v6の文法)
    const size_t capacity = JSON_OBJECT_SIZE(1) + JSON_OBJECT_SIZE(2) + 70;
    DynamicJsonDocument doc(capacity);

    // JSONデータの解析
    DeserializationError error = deserializeJson(doc, payload);
    if (error) {
      Serial.print(F("deserializeJson() failed: "));
      Serial.println(error.f_str());
      return;
    }
    // 時刻を表示
    struct tm timeinfo;
    if (!getLocalTime(&timeinfo)) {
      Serial.println("Failed to obtain time");
      return;
    }

    char timeString[64];
    strftime(timeString, sizeof(timeString), "%Y-%m-%d %H:%M:%S", &timeinfo);
    M5.Lcd.setCursor(x, y);
    M5.Lcd.setTextColor(TFT_WHITE, TFT_BLACK);
    M5.Lcd.setTextSize(csize);
    M5.Lcd.println(String("Start Server: ") + name);
    M5.Lcd.println(String("Start signal: ") + timeString);

    // "data" キーから値を取得
    const char* upid = doc["data"];
    Serial.print("UPID: ");
    Serial.println(upid);
  } else {
    // リクエスト失敗
    Serial.println("Failed to Send VM Start Request");
  }

  http.end();
}

void shutdownSelectedVM(int x, int y,int csize) {
  if (selectedIndex < 0 || selectedIndex >= vmList.size()) return; // 範囲外チェック

  Serverstr selectedVM = vmList[selectedIndex];

  String node = String(selectedVM.node.c_str()); // 選択されたVMのノード名
  int vmid = selectedVM.vmid; // 選択されたVMのID
  String name = String(selectedVM.name.c_str());
  String fullUrl = String(api_url) + "/nodes/" + node + "/qemu/" + String(vmid) + "/status/shutdown"; // 完全なURL

  HTTPClient http;
  http.begin(fullUrl);
  http.addHeader("Authorization", "PVEAPIToken=" + String(api_token));

  // リクエストの詳細をシリアル出力
  Serial.println("Sending HTTP POST Request to URL: " + fullUrl);
  Serial.println("Headers:");
  Serial.println("Authorization: PVEAPIToken=" + String(api_token));
  // POSTリクエストの場合、ボディがあればここで出力
  // この例ではボディは空ですが、必要に応じて出力してください
  Serial.println("Body: (empty)");

  int httpCode = http.POST(""); // POSTリクエストを送信


  if (httpCode > 0) {
    // リクエスト成功
    String payload = http.getString(); // レスポンスペイロードを取得
    Serial.println("Response: " + payload); // レスポンス内容をシリアル出力

    // JSONオブジェクトの容量を計算(ArduinoJson v6の文法)
    const size_t capacity = JSON_OBJECT_SIZE(1) + JSON_OBJECT_SIZE(2) + 70;
    DynamicJsonDocument doc(capacity);

    // JSONデータの解析
    DeserializationError error = deserializeJson(doc, payload);
    if (error) {
      Serial.print(F("deserializeJson() failed: "));
      Serial.println(error.f_str());
      return;
    }
    // 時刻を表示
    struct tm timeinfo;
    if (!getLocalTime(&timeinfo)) {
      Serial.println("Failed to obtain time");
      return;
    }
    M5.Lcd.setTextColor(TFT_WHITE, TFT_BLACK);
    char timeString[64];
    strftime(timeString, sizeof(timeString), "%Y-%m-%d %H:%M:%S", &timeinfo);
    M5.Lcd.setCursor(x, y);
    M5.Lcd.setTextSize(csize);
    M5.Lcd.println(String("Shutdown Server: ") + name);
    M5.Lcd.println(String("Shutdown signal: ") + timeString);

    // "data" キーから値を取得
    const char* upid = doc["data"];
    Serial.print("UPID: ");
    Serial.println(upid);
  } else {
    // リクエスト失敗
    Serial.println("Failed to Send VM Start Request");
  }

  http.end();
}


void loop() {
  unsigned long currentMillis = millis(); // 現在の時刻を取得
  static unsigned long lastButtonAPressTime = 0;
  static unsigned long lastButtonBPressTime = 0;
  static bool buttonAPressed = false;
  static bool buttonBPressed = false;
  const unsigned long debounceTime = 50; // デバウンス時間(ミリ秒)
  const unsigned long simultaneousPressInterval = 100; // 同時押し判定間隔(ミリ秒)


  M5.update(); // ボタンの状態を更新
  // ボタン操作などをここで処理
  if (vmMode == 0) {
      M5.Lcd.setCursor(0, 10);
      M5.Lcd.setTextColor(TFT_WHITE, TFT_BLACK);
      M5.Lcd.setTextSize(2);
      M5.Lcd.println("Mode:VM Start   ");
  } else {
      M5.Lcd.setCursor(0, 10);
      M5.Lcd.setTextColor(TFT_WHITE, TFT_BLACK);
      M5.Lcd.setTextSize(2);
      M5.Lcd.println("Mode:VM Shutdown");
  }
     // ボタンAが押されたかチェック
  if (M5.BtnA.wasPressed()) {
    unsigned long currentTime = millis();
    if (currentTime - lastButtonAPressTime > debounceTime) {
      lastButtonAPressTime = currentTime;
      buttonAPressed = true;
    }
  }

  // ボタンBが押されたかチェック
  if (M5.BtnB.wasPressed()) {
    unsigned long currentTime = millis();
    if (currentTime - lastButtonBPressTime > debounceTime) {
      lastButtonBPressTime = currentTime;
      buttonBPressed = true;
    }
  }

  // ボタンAとBが同時に押されたかどうかをチェック
  if (buttonAPressed && buttonBPressed) {
    if (abs((int)(lastButtonAPressTime - lastButtonBPressTime)) <= simultaneousPressInterval) {
      // 同時押しとみなす処理
      vmMode = !vmMode; // モードを切り替える
      if (vmMode == 0) {
        Serial.println("Mode: VM Start");
      } else {
        Serial.println("Mode: VM Shutdown");
      }
      // フラグをリセット
      buttonAPressed = false;
      buttonBPressed = false;
    }
  }
   // ボタンAが押された場合、選択されたVMのインデックスを減らす
  if (M5.BtnA.wasPressed()) {
    selectedIndex--;
    if (selectedIndex < 0) {
      selectedIndex = vmList.size() - 1; // リストの最後に戻る
    }
    Serial.println("Btn Press A");
    displayVMList(0,30,1); // VMリストを再表示
  }

  // ボタンBが押された場合、選択されたVMのインデックスを増やす
  if (M5.BtnB.wasPressed()) {
    selectedIndex++;
    if (selectedIndex >= vmList.size()) {
      selectedIndex = 0; // リストの最初に戻る
    }
    Serial.println("Btn Press B");
    displayVMList(0,30,1); // VMリストを再表示
  }

  // ボタンCが押された場合の動作を切り替える
  if (M5.BtnC.wasPressed()) {
    if (vmMode == 0) {
      Serial.println("Btn Press C: VM Start");
      startSelectedVM(0,200,1);
    } else if (vmMode == 1) {
      Serial.println("Btn Press C: VM Shutdown");
      shutdownSelectedVM(0,200,1);
    }
  }


  // 前回の更新から10秒以上経過しているか確認
  if (currentMillis - previousMillis >= interval) {
    previousMillis = currentMillis; // 前回の更新時刻を更新

    // 10秒ごとに実行したい処理をここに記述
    fetchAndDisplayVMList(0,0,1);
    Serial.print("Free heap: ");
    Serial.println(ESP.getFreeHeap()); // 使用可能なヒープメモリのサイズを出力
    Serial.print("currentMillis: ");
    Serial.println(currentMillis); //
  }
}
## 参考
https://pve.proxmox.com/wiki/Proxmox_VE_API#Example:_Use_API_Token
その他
PCIパススルーをWin10とWin11の端末で設定していて、その時々で立ち上げたいVMが違うので自動起動は使わず。
かといって、毎回別の端末やスマホからWeb経由でVMを起動させるのも面倒だったので、重宝してます。
クラスタを組んでいたり、VMが多い環境に対応させるにはプログラムの改良が必要かと思います。