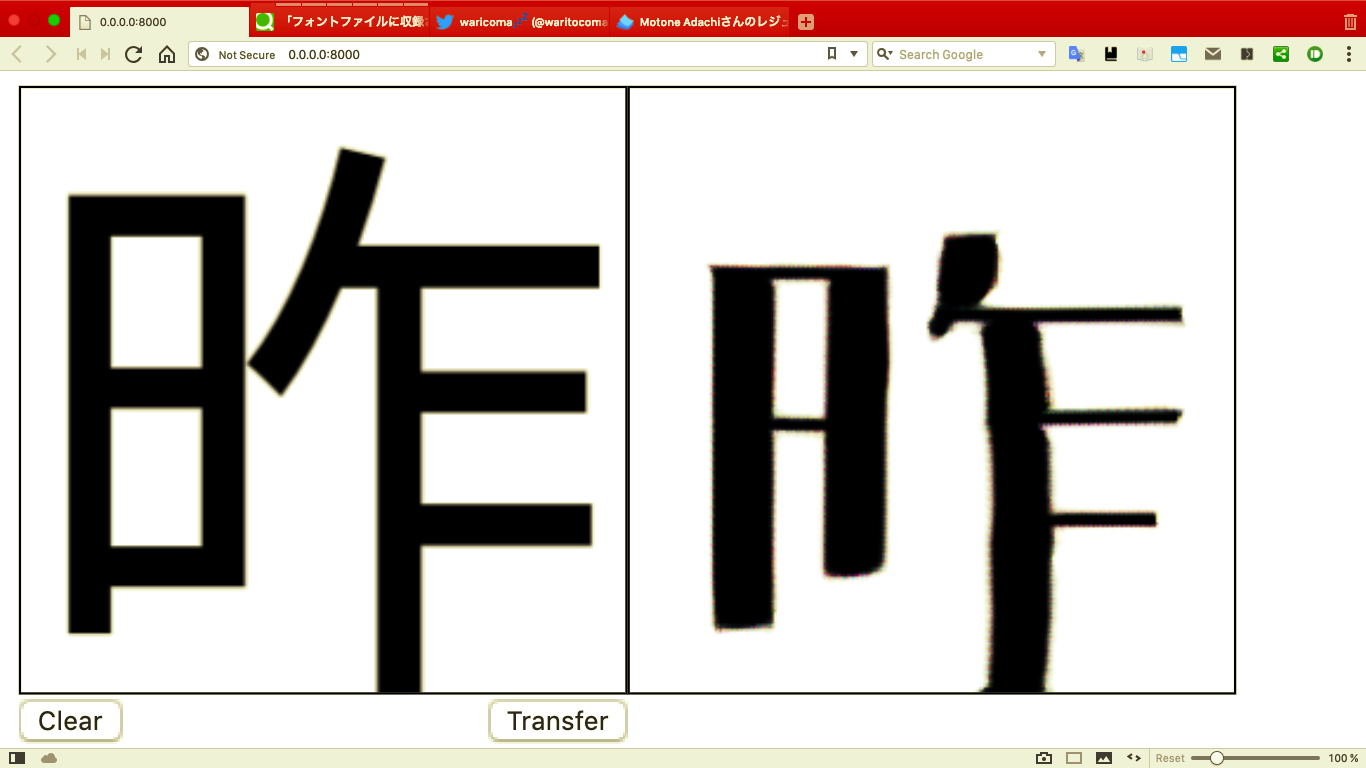
結果
-
この画像は結果です、この document の。
-
この方法は、 convert することです、 source-han-sans Japanese を GLT-ごぬんね(アニメ「少女終末旅行」副題風フォント) へ。
-
'昨' isn't included in GLT-ごぬんね(アニメ「少女終末旅行」副題風フォント)
-
--max_epochs 45
主に使ったもの
Google Colab
- https://colab.research.google.com
- Google user は可能です、 使うことが ( GPU や TPU を) 、 Google Colab 上で。
- Google user は可能です、しない ( pay することを ) 、 Google Colab へ。
- ( 警告 ) Google Colabは有します、様々な制約を。
- 持つことは ( Google account を ) must です。
Google Drive
- https://www.google.co.jp/drive
- Google user は使うことが出来ます、 15GB storage ( free 💰 ) を。
- 持つことは ( Google account を ) must です。
MacBook Air (11-inch, Early 2015)
- macOS Mojave
- 1.6 GHz Intel Core i5
- 8 GB 1600 MHz DDR3
GLT-ごぬんね(アニメ「少女終末旅行」副題風フォント)
- https://booth.pm/ja/items/687528
- https://noraglyphs.booth.pm
- https://www.pixiv.net/member.php?id=169396
- DL & 可能 ( 利用を ) にして下さい、 Font Book App などで。
- Font file
- 筆者は気に入っています、この font を。
adobe-fonts/source-han-sans Japanese (日本語) | HW Regular + HW Bold)
- https://github.com/adobe-fonts/source-han-sans/tree/release
- DL & 可能 ( 利用を ) にして下さい、 Font Book App などで。
- Font file
- この document の program は convert します、この font を。
- 筆者はこの font を select しました、なぜなら、多分この font は include しています、多くの字を。
iTerm2
- https://www.iterm2.com
- これは must です、 run command のために。
- iTerm2 open PATH ( or URL ) on Finder or Web browser or some applications when user click to PATH ( or URL ) when key down ⌘.
- Or use open command in Terminal.app
Homebrew
- https://brew.sh
- 可能 ( 利用を ) にして下さい、 one line code で、この Web page 上の。
- package manager for macOS (or Linux)
- CLI Tool
- これを使います、 ImageMagick の install のために。
ImageMagick
- https://www.imagemagick.org
- これは有しています、様々な機能を、加工の、 image file のための。
- CLI Tool
-
brew install imagemagick可能(利用を)にして下さい、Homebrew などで。
Node.js v8.11.2
- https://nodejs.org
- これは must です、 operation するために、ImageMagickを。
- 筆者は recommend します、 使う ( nodebrew やその他を ) 、 install のために。
- この programming lang を select しました、なぜなら、筆者が好きだからです、これを。
- この version は install されていました、筆者の MacBook Air に。
- 筆者は思います、使う ( 他の programming lang を ) ことは problem ではないと。
affinelayer/pix2pix-tensorflow
- clone して下さい、これを。
git clone git@github.com:affinelayer/pix2pix-tensorflow.git
- https://github.com/affinelayer/pix2pix-tensorflow
- 学習 model
Python 3.6.4
- https://www.python.org
- これは must です、 affinelayer/pix2pix-tensorflow のために。
- Python 3.6.7 は install されています、 Google Colab 上に。
- しかし、 install は ( Python の ) must です、 local への。
- なぜなら、使います、 local 上で、この document 内で。
- 筆者は recommend します、 使う ( pyenv やその他を ) 、 install のために。
- この version は install されていました、筆者の MacBook Air に。
Ml5.js
- https://ml5js.org
- machine learning JavaScript library
- これは must です、 見るために、 training の結果を。
<script src="https://unpkg.com/ml5@0.1.3/dist/ml5.min.js" type="text/javascript"></script>
p5.js
- https://p5js.org
- Processing like JavaScript library.
- CDN
- p5.js used with Ml5.js in this document.
<script src="https://cdnjs.cloudflare.com/ajax/libs/p5.js/0.7.3/p5.min.js" type="text/javascript"></script>
<script src="https://cdnjs.cloudflare.com/ajax/libs/p5.js/0.7.3/addons/p5.dom.min.js" type="text/javascript"></script>
手順
用意して下さい、環境やその他を。 ( 主に使ったもの base )
移動して下さい。 ( pix2pix-tensorflow ( clone した ) へ )
pushd ./pix2pix-tensorflow
用意して下さい。 ( 学習 data を )
-
用意して下さい。 ( 字を )
- 定義して下さい、 JavaScript 配列を、その字の。
- 幾つかの字が用意されました、筆者により。
- 確認して下さい。 ( strArrToImgs.js )
- Google Search
- 小学生 1年生 習う漢字 ~ 小学生 6年生 習う漢字
- 中学生 1年生 習う漢字 ~ 中学生 3年生 習う漢字
-
Generate して下さい。 ( 字の image を。 )
- Save して下さい。 ( strArrToImgs.js を。 )
- Copy strArrToImgs.js ( この document の。 )
- Run.
vim strArrToImgs.js
- Put
ikey. - Paste it.
- Put Escape key.
- Type
:wq - Put Return key. ( or Enter )
- Run.
node strArrToImgs.js
- Save して下さい。 ( strArrToImgs.js を。 )
-
Delete して下さい。 ( white image を。 )
- Save して下さい。 ( imgsCleaner.js を。 )
- Copy imgsCleaner.js ( この document の。 )
- Run.
vim imgsCleaner.js
- Put
ikey. - Paste it.
- Put Escape key.
- Type
:wq - Put Return key. ( or Enter )
- Run.
node imgsCleaner.js
- white image は generate されます、 convert したときに、字を ( 含まれない、その font file に ) 、 image file へ。
- それを delete することは must です。
- imagemagic の identify command は output します、 65535 を、 import ( white image を ) したとき。
- imagemagic の identify command は output します、 0 を、 import ( black image を ) したとき。
- Save して下さい。 ( imgsCleaner.js を。 )
-
関連付けて下さい、 'a' directory's files と 'b' directory's files を。
- Save して下さい。 ( matchingImgs.js を。 )
- Copy matchingImgs.js ( この document の。 )
- Run.
vim matchingImgs.js
- Put
ikey. - Paste it.
- Put Escape key.
- Type
:wq - Put Return key. ( or Enter )
- Run.
node matchingImgs.js
- なぜなら、 幾つかの file が delete されたからです、 3. にて。
- Save して下さい。 ( matchingImgs.js を。 )
-
Resize して下さい、 'a' directory's files と 'b' directory's files を。
- Run.
python tools/process.py --input_dir a --operation resize --output_dir resizedA
- Run.
python tools/process.py --input_dir b --operation resize --output_dir resizedB
- Run.
-
Combine して下さい、 'resizedA' directory's files と 'resizedB' directory's files を、 ab directory へ。
- Run.
python tools/process.py --input_dir resizedA --b_dir resizedB --operation combine --output_dir ab
- Run.
-
Rename して下さい、 'ab' directory's files を。
- Run.
pushd abls *.png|awk '{printf "mv %s %s.png\n",$1,NR}'|shpopd
- Run.
strArrToImgs.js
'use strict';
// strArrToImgs.js

const strArr = ['!', '#', '%', '&', '(', ')', '*', '猫', '犬', '紹', '一', '右', '雨', '円', '王', '下', '火', '花', '貝', '学', '気', '九', '休', '玉', '金', '空', '月', '犬', '見', '五', '口', '校', '左', '三', '山', '子', '大', '字', '耳', '七', '車', '手', '十', '出', '女', '小', '上', '森', '人', '水', '正', '生', '青', '夕', '石', '赤', '千', '川', '先', '早', '草', '足', '村', '大', '男', '竹', '中', '虫', '町', '天', '田', '土', '二', '日', '入', '年', '白', '八', '百', '文', '木', '本', '名', '目', '立', '力', '林', '六', '引', '羽', '雲', '園', '遠', '何', '科', '夏', '家', '歌', '画', '回', '会', '海', '絵', '外', '角', '楽', '活', '間', '丸', '岩', '顔', '汽', '記', '帰', '弓', '牛', '魚', '京', '強', '教', '近', '兄', '形', '計', '元', '言', '原', '戸', '古', '午', '後', '語', '工', '公', '広', '交', '光', '考', '行', '高', '黄', '合', '谷', '国', '黒', '今', '才', '細', '作', '算', '止', '市', '矢', '姉', '思', '紙', '寺', '自', '時', '室', '社', '弱', '首', '秋', '週', '春', '書', '少', '場', '色', '食', '心', '新', '親', '図', '数', '西', '声', '星', '晴', '切', '雪', '船', '線', '前', '組', '走', '多', '太', '体', '台', '地', '池', '知', '茶', '昼', '長', '鳥', '朝', '直', '通', '弟', '店', '点', '電', '刀', '冬', '当', '東', '答', '頭', '同', '道', '読', '内', '南', '肉', '馬', '売', '買', '麦', '半', '番', '父', '風', '分', '聞', '米', '歩', '母', '方', '北', '毎', '妹', '万', '明', '鳴', '毛', '門', '夜', '野', '友', '用', '曜', '来', '里', '理', '話', ',', '-', '.', '/', '0', '1', '2', '3', '4', '5', '6', '7', '8', '9', ':', ';', '<', '=', '>', '?', '@', 'A', 'B', 'C', 'D', 'E', 'F', 'G', 'H', 'I', 'J', 'K', 'L', 'M', 'N', 'O', 'P', 'Q', 'R', 'S', 'T', 'U', 'V', 'W', 'X', 'Y', 'Z', '[', ']', '^', '_', 'a', 'b', 'c', 'd', 'e', 'f', 'g', 'h', 'i', 'j', 'k', 'l', 'm', 'n', 'o', 'p', 'q', 'r', 's', 't', 'u', 'v', 'w', 'x' , 'y', 'z', '{', '|', '}', '~', '¡', '¥', '¦', '§', '©', '«', '¬', '®', '°', '±', '¶', '·', '»', '¿', '×', '÷', '☯', '♩', '♪', '♫', '♬', '♭', '♮', '♯', '⸘', '、', '。', '々', '〇', '〈', '〉', '《', '》', '「', '」', '『', '』', '【', '】', '〔', '〕', '〖', '〗', '〜', '〰', 'ぁ', 'あ', 'ぃ', 'い', 'ぅ', 'う', 'ぇ', 'え', 'ぉ', 'お', 'か', 'が', 'き', 'ぎ', 'く', 'ぐ', 'け', 'げ', 'こ', 'ご', 'さ', 'ざ', 'し', 'じ', 'す', 'ず', 'せ', 'ぜ', 'そ', 'ぞ', 'た', 'だ', 'ち', 'ぢ', 'っ', 'つ', 'づ', 'て', 'で', 'と', 'ど', 'な', 'に', 'ぬ', 'ね', 'の', 'は', 'ば', 'ぱ', 'ひ', 'び', 'ぴ', 'ふ', 'ぶ', 'ぷ', 'へ', 'べ', 'ぺ', 'ほ', 'ぼ', 'ぽ', 'ま', 'み', 'む', 'め', 'も', 'ゃ', 'や', 'ゅ', 'ゆ', 'ょ', 'よ', 'ら', 'り', 'る', 'れ', 'ろ', 'ゎ', 'わ', 'ゐ', 'ゑ', 'を', 'ん', 'ゔ', 'ァ', 'ア', 'ィ', 'イ', 'ゥ', 'ウ', 'ェ', 'エ', 'ォ', 'オ', 'カ', 'ガ', 'キ', 'ギ', 'ク', 'グ', 'ケ', 'ゲ', 'コ', 'ゴ', 'サ', 'ザ', 'シ', 'ジ', 'ス', 'ズ', 'セ', 'ゼ', 'ソ', 'ゾ', 'タ', 'ダ', 'チ', 'ヂ', 'ッ', 'ツ', 'ヅ', 'テ', 'デ', 'ト', 'ド', 'ナ', 'ニ', 'ヌ', 'ネ', 'ノ', 'ハ', 'バ', 'パ', 'ヒ', 'ビ', 'ピ', 'フ', 'ブ', 'プ', 'ヘ', 'ベ', 'ペ', 'ホ', 'ボ', 'ポ', 'マ', 'ミ', 'ム', 'メ', 'モ', 'ャ', 'ヤ', 'ュ', 'ユ', 'ョ', 'ヨ', 'ラ', 'リ', 'ル', 'レ', 'ロ', 'ヮ', 'ワ', 'ヰ', 'ヱ', 'ヲ', 'ン', 'ヴ', 'ヵ', 'ヶ', 'ヷ', 'ヸ', 'ヹ', 'ヺ', '・', 'ー', '一', '丁', '七', '万', '丈', '三', '上', '下', '不', '与', '丐', '丑', '且', '丕', '世', '丗', '丘', '丙', '丞', '両', '並', '丨', '个', '中', '丱', '串', '丶', '丸', '丹', '主', '丼', '丿', '乂', '乃', '久', '之', '乍', '乎', '乏', '乕', '乖', '乗', '乘', '乙', '九', '乞', '也', '乢', '乱', '乳', '乾', '亀', '亂', '亅', '了', '予', '争', '亊', '事', '二', '于', '云', '互', '五', '井', '亘', '亙', '些', '亜', '亞', '亟', '亠', '亡', '亢', '交', '亥', '亦', '亨', '享', '京', '亭', '亮', '亰', '亳', '彿', '往', '征', '徂', '徃', '径', '待', '徇', '很', '徊', '律', '後', '徐', '徑', '徒', '従', '得', '徘', '徙', '從', '徠', '后', '吏', '吐', '向', '君', '吝', '吟', '吠', '否', '吩', '含', '听', '吭', '吮', '吶', '吸', '吹', '吻', '吼', '吽', '吾', '呀', '呂', '呆', '呈', '樹', '樺', '樽', '橄', '橆', '橇', '橈', '橋', '橘', '橙', '機', '橡', '橢', '橦', '橫', '橲', '橳', '橸', '橾', '橿', '檀', '檄', '檍', '檎', '檐', '檗', '檜', '檠', '檢', '檣', '檪', '檬', '檮', '檳', '檸', '檻', '櫁', '櫂', '櫃', '櫑', '櫓', '櫚', '櫛', '櫞', '櫟', '櫢', '櫤', '櫨', '櫪', '櫺', '櫻', '欄', '欅', '權', '欒', '欖', '欝', '欟', '欠', '次', '欣', '欧', '欲', '欷', '欸', '欹', '欺', '欽', '款', '歃', '歇', '歉', '歌', '歎', '歐', '歓', '歔', '歙', '歛', '歟', '歡', '止'];

const { execSync } = require('child_process');

execSync('mkdir -p ./a');
execSync('mkdir -p ./b');

for (let i = 0; i < strArr.length; i++) {
  execSync(`convert -font ~/Library/Fonts/GLT-GonunneObsolete.otf -pointsize 256 label:'${strArr[i]}' ./a/${i}.png`);
  execSync(`convert -font ~/Library/Fonts/SourceHanSans-Regular.otf -pointsize 256 label:'${strArr[i]}' ./b/${i}.png`);
  process.stdout.write(`\r${i+1}/${strArr.length}`);
}
実際に、使った code は https://github.com/waricoma/make-font-pix2pix-tensorflow
↑ これは async な仕様です。筆者は目指しました、 automation を。
cleaningImgs.js
'use strict';
//cleaningImgs.js

const fs = require('fs');
const { execSync } = require('child_process');

for (let ab of ['a', 'b']) fs.readdir(`./${ab}`, (e, files) => {
  for (let i = 0; i < files.length; i++) {
    const filePath = `./${ab}/${files[i]}`;
    if (execSync(`identify -format "%[mean]" ${filePath}`).toString() === '65535') fs.unlink(filePath, () => console.log(`deleted: ${filePath}`));
    process.stdout.write(`\r${ab} ${i+1}/${files.length}`);
  }
});
実際に、使った code は https://github.com/waricoma/make-font-pix2pix-tensorflow
↑ これは async な仕様です。筆者は目指しました、 automation を。
matchingImgs.js
'use strict';
// matchingImgs.js

const fs = require('fs');

/**
 * This function delete input file of can't use.
 * @param {array[string]} usingFilesArr
 * @param {string} ab
 * @param {string} file
 */
const cleaner = (usingFilesArr, ab, file) => {
  const filePath = `./${ab}/${file}`;
  if (usingFilesArr.indexOf(file) === -1) fs.unlink(filePath, () => console.log(`deleted: ${filePath}`));
};

fs.readdir('./a', (e, aFiles) => { fs.readdir('./b', (e, bFiles) => {
  const usingFilesArr = aFiles.concat(bFiles).filter((fileName, i, thisFilesArr) => {
    return thisFilesArr.indexOf(fileName) === i && i !== thisFilesArr.lastIndexOf(fileName);
  });
  for (let file of aFiles) cleaner(usingFilesArr, 'a', file);
  for (let file of bFiles) cleaner(usingFilesArr, 'b', file);
}); });
実際に、使った code は https://github.com/waricoma/make-font-pix2pix-tensorflow
↑ これは async な仕様です。筆者は目指しました、 automation を。
Compress pix2pix-tensorflow
zip -r ../pix2pix-tensorflow.zip ./ && open ../
Upload pix2pix-tensorflow.zip to 'My Drive' on Google Drive.
Google Colab setting.
-
Open Google Colab on your web browser.
-
Click 'NEW PYTHON 3 NOTE BOOK'
-
Select 'GPU' ( Edit > Notebook settings > Hardware accelerator )
-
Click 'SAVE'
-
Click '+CODE'
Mount to Google Colab from Google Drive.
from google.colab import drive
drive.mount('/content/drive')
-
Copy ↑
-
Paste it.
-
Run.
- Click '▶'
-
Open generated URL.
- Go to this URL in a browser: https://accounts.google.com/o/oauth2/auth?...
-
Login ( Google account. )
-
Give permission.
-
Copy the code.
-
Back to Google Colab.
-
Paste it.
-
Put Return key. ( or Enter )
Unzip pix2pix-tensorflow.zip
!unzip -d '/content/drive/My Drive/pix2pix-tensorflow' '/content/drive/My Drive/pix2pix-tensorflow.zip' && rm '/content/drive/My Drive/pix2pix-tensorflow.zip'
-
Copy ↑
-
Paste it.
-
Run.
- Click '▶'
Move to pix2pix-tensorflow
import os
os.chdir('/content/drive/My Drive/pix2pix-tensorflow')
-
Copy ↑
-
Paste it.
-
Run.
- Click '▶'
Training.
!python pix2pix.py --mode train --output_dir lastTour --max_epochs 100 --input_dir ab --which_direction BtoA
-
Copy ↑
-
Paste it.
-
Run.
- Click '▶'
-
Wait for long time...
- Check 'progress epoch 1 step 49 image/sec 3.6 remaining ***'
-
--max_epochs 100
- It's long time if set large number.
- It's short time if set small number.
Export model.
!python pix2pix.py --mode export --output_dir lastTourExport --checkpoint lastTour --which_direction BtoA && python server/tools/export-checkpoint.py --checkpoint lastTourExport --output_file lastTour.pict
DL: lastTour.pict ( Google Drive > pix2pix-tensorflow ) to pix2pix-tensorflow directory. ( local )
- Please use Google Colab Files Tab.
Make test image. ( yesterday.png )
convert -font ~/Library/Fonts/SourceHanSans-Regular.otf -pointsize 256 label:'昨' yesterday.png && mkdir -p test && mv yesterday.png test && python tools/process.py --input_dir test --operation resize --output_dir resizedTest
Check
↓ by: https://ml5js.org/docs/pix2pix-example
<!-- index.html -->

<head>
  <script src="https://cdnjs.cloudflare.com/ajax/libs/p5.js/0.7.3/p5.min.js" type="text/javascript"></script>
  <script src="https://cdnjs.cloudflare.com/ajax/libs/p5.js/0.7.3/addons/p5.dom.min.js" type="text/javascript"></script>
  <script src="https://unpkg.com/ml5@0.1.3/dist/ml5.min.js" type="text/javascript"></script>
</head>

<body>
  <div id="example">
    <style>
    .border-box {
      border: black 1px solid;
    }

    .flex {
      display: flex;
    }

    .flex-space-between {
      justify-content: space-between;
    }
    </style>

    <div class="flex">
      <div>
        <div id="canvasContainer" style="height: 260px;">
        </div>
        <div id="btnContainer" class="flex flex-space-between">
          <button id="clearBtn">Clear</button><br>
          <button id="transferBtn" class="btn">Transfer</button>
        </div>
      </div>
      <div id="output">
        <img src="" class="border-box">
      </div>
    </div>

    <p id="status">Loading...</p>

    <script>
    // So the input images can only be 256x256 or 512x512, or multiple of 256
    const SIZE = 256;
    let inputImg, inputCanvas, outputContainer, statusMsg, pix2pix, clearBtn, transferBtn, modelReady = false, isTransfering = false;

    function setup() {
      // Create a canvas
      inputCanvas = createCanvas(SIZE, SIZE);
      inputCanvas.class('border-box').parent('canvasContainer');

      // Display initial input image
      inputImg = loadImage('resizedTest/yesterday.png', drawImage);

      // Selcect output div container
      outputContainer = select('#output');
      statusMsg = select('#status');

      // Select 'transfer' button html element
      transferBtn = select('#transferBtn');

      // Select 'clear' button html element
      clearBtn = select('#clearBtn');

      // line size
      strokeWeight(18);

      // Attach a mousePressed event to the 'clear' button
      clearBtn.mousePressed(function() {
        clearCanvas();
      });

      // Set stroke to black
      stroke(0);
      pixelDensity(1);

      // Create a pix2pix method with a pre-trained model
      pix2pix = ml5.pix2pix('lastTour.pict', modelLoaded);
    }

    // Draw on the canvas when mouse is pressed
    function draw() {
      if (mouseIsPressed) {
        line(mouseX, mouseY, pmouseX, pmouseY);
      }
    }

    // When mouse is released, transfer the current image if the model is loaded and it's not in the process of another transformation
    function mouseReleased() {
      if (modelReady && !isTransfering) {
        transfer()
      }
    }

    // A function to be called when the models have loaded
    function modelLoaded() {
      // Show 'Model Loaded!' message
      statusMsg.html('Model Loaded!');

      // Set modelReady to true
      modelReady = true;

      // Call transfer function after the model is loaded
      transfer();

      // Attach a mousePressed event to the transfer button
      transferBtn.mousePressed(function() {
        transfer();
      });
    }

    // Draw the input image to the canvas
    function drawImage() {
      image(inputImg, 0, 0);
    }

    // Clear the canvas
    function clearCanvas() {
      background(255);
    }

    function transfer() {
      // Set isTransfering to true
      isTransfering = true;

      // Update status message
      statusMsg.html('Applying Style Transfer...!');

      // Select canvas DOM element
      const canvasElement = select('canvas').elt;

      // Apply pix2pix transformation
      pix2pix.transfer(canvasElement, function(err, result) {
        if (err) {
          console.log(err);
        }
        if (result && result.src) {
          // Set isTransfering back to false
          isTransfering = false;
          // Clear output container
          outputContainer.html('');
          // Create an image based result
          createImg(result.src).class('border-box').parent('output');
          // Show 'Done!' message
          statusMsg.html('Done!');
        }
      });
    }

    </script>
  </div>
</body>
-
Copy ↑
-
Run.
vim index.html
-
Put
ikey. -
Paste it.
-
Put Escape key.
-
Type
:wq -
Put Return key. ( or Enter )
-
Run.
python -m http.server
-
Open URL ( by http.server ) to Web browser.
Finished 🎉
年賀状駆動開発
- 学校法人角川ドワンゴ学園N高等学校
- https://nnn.ed.jp
- 全国に展開する通信制高校です。
- 通学コースもあります。
- 毎年、北海道から沖縄までの生徒たちは年賀状を送り合います。
- 7875人以上の生徒がいます。 ( 2019年度現在 )
- プログラミングをしている生徒が多いです。
- 例えば 年賀状をスマホアプリのカメラにかざすと、メッセージが浮かび上がる ものなど様々な年賀状駆動開発が行われたりしたようです。
- 私もこれを行いたく思い、フォントファイルに収録されてない字を機械学習で生成し、年賀状に使ってみました。

今後
- アルファベット、漢字、平仮名、片仮名、数字、記号…などで分類しそれぞれ違う色にして学習させるなどし、様子を見てみたいと思っています。
- 生成された字をフォントファイルとして使えるようにできればなとも思います。
LTしました。
N高等学校 2/22 16:30 - 17:30 通学コースLT大会
3人目/8人の登壇者 https://font2font.netlify.com/#/0/1 (⚠: 非常に長い読込時間)