はじめに
2015年11月30日、TOPPERS プロジェクト から Arduino M0 Pro の依存部を組み込んだ簡易パッケージがリリースされました。
数カ月前から TOPPERS/ASP を実機で試してみたいなぁ、と思っていたところに、ちょうど良いニュースでした。
ここでは、Ubuntu で前記 TOPPERS/ASP 簡易パッケージをビルドし、 Arduino M0 Pro に書き込み、動作確認したいと思います。
Windows じゃない理由は、個人的都合です(笑)
- 環境
- Ubuntu Mate 15.10 x86_64 (Desktop, 64-bit)
-
Arduino.org 製 Arduino IDE 1.7.8
- arduino-1.7.8.org-linux64.tar.xz
-
TOPPERS/ASP Arduino M0 (GCC) 簡易パッケージ
- asp_arduino_m0_gcc-20151128.zip
手順
一気に最終目標をやろうとすると、いろんな問題が一気に出てきてへこたれちゃうので、次の手順で進めました。
1. Arduino M0 Proの開発環境を準備する
/home/hogehoge/Programs/arduino-1.7.8-linux64/ に展開しているとします。
※ hogehoge は、ユーザー名です。
2. Linux 64-bit 用 TOPPERS/ASP コンフィギュレータを作成する
/home/hogehoge/Works/cfg/cfg/ に実行バイナリ cfg ができているとします。
3. TOPPERS プロジェクトの Arduino M0 (GCC) 簡易パッケージをダウンロードする
- asp_arduino_m0_gcc-20151128.zip
4. ファイルを展開する
$ unzip asp_arduino_m0_gcc-20151128.zip
5. ステップ 2 で作成したコンフィギュレータ cfg を配置する
$ cp /home/hogehoge/Works/cfg/cfg/cfg asp_1.9.2/cfg/cfg/
※ cp 後、実行権限付与が必要かも?
6. ビルドのための修正
target_user.txt にビルドのための手順が記載されています。必読です。
- asp_1.9.2/target/arduino_m0_gcc/target_user.txt
$ cd asp_1.9.2
1. Arduino IDE の gcc-arm-none-eabi に PATH を通す
$ export PATH="$PATH:/home/hogehoge/Programs/arduino-1.7.8-linux64/hardware/tools/gcc-arm-none-eabi-4.8.3-2014q1/bin"
※ これは一時的な export ですので、必要であれば恒久的な対策を行うと良いです。
2. Arduino IDE のインストールパスを Makefile.target に指定する
$ vi target/arduino_m0_gcc/Makefile.target
#
# Arduinoの開発環境のパス(Windows表記)
#
ARDUINO_BASE_DIR_WIN = /home/hogehoge/Programs/arduino-1.7.8-linux64
3. Makefile.target の Windows 的な記述を訂正する
※ "" を "/" に修正, openocd.exe ではなく openocd に修正, などです。
$ vi target/arduino_m0_gcc/Makefile.target
#
#  フラッシュへの書き込み
#
# OPENOCD_PATH = $(ARDUINO_BASE_DIR_WIN)\hardware\tools\OpenOCD-0.9.0-arduino\bin\openocd.exe
# OPENOCD_SCRIPT_PATH = $(ARDUINO_BASE_DIR_WIN)\hardware\tools\OpenOCD-0.9.0-arduino\share\openocd\scripts
# OPENOCD_SCRIPT  = $(ARDUINO_BASE_DIR_WIN)\hardware\arduino\samd\variants\arduino_zero\openocd_scripts\arduino_zero.cfg
OPENOCD_PATH = $(ARDUINO_BASE_DIR_WIN)/hardware/tools/OpenOCD-0.9.0-arduino/bin/openocd
OPENOCD_SCRIPT_PATH = $(ARDUINO_BASE_DIR_WIN)/hardware/tools/OpenOCD-0.9.0-arduino/share/openocd/scripts
OPENOCD_SCRIPT  = $(ARDUINO_BASE_DIR_WIN)/hardware/arduino/samd/variants/arduino_zero/openocd_scripts/arduino_zero.cfg

ifeq ($(UNAME_TARGET), Cygwin)
	GDB = arm-gdb_m0.exe
else
#	GDB = $(ARDUINO_BASE_DIR_WIN)\hardware\tools\gcc-arm-none-eabi-4.8.3-2014q1\bin\arm-none-eabi-gdb
	GDB = $(ARDUINO_BASE_DIR_WIN)/hardware/tools/gcc-arm-none-eabi-4.8.3-2014q1/bin/arm-none-eabi-gdb
endif
4. ビルドする
$ cd target/arduino_m0_gcc/atmelstudio
$ make
7. Arduino M0 Pro を USB ケーブルで PC に接続する
Arduino M0 Pro 側は Native USB Port ではなく、Programming Port に接続します。
8. 書き込みを実行する
$ make run
complete ...
一旦、 PC から Arduino M0 Pro を抜き差しします。
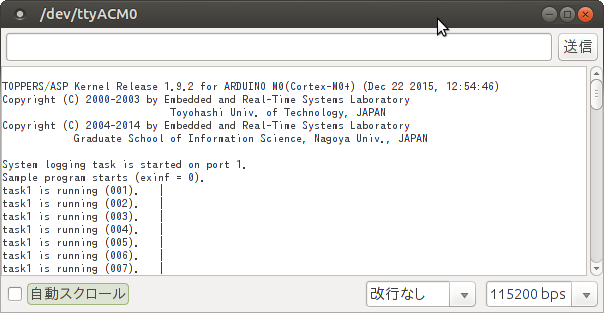
9. シリアルモニタを準備する
Arduino IDE を起動し、シリアルモニタを起動しておきます。
転送速度は、115200 bps です。
シリアルコマンド入力欄に sample1.c 記載のキーを入力すると sample1 の動作を確認できます。
おわりに
個人的な感想なのですが、今まで「 TOPPERS/ASP の簡易パッケージの対象ハードウェアが古いなぁ」と感じておりました。
そこに、最新のハードウェアに対応した簡易パッケージがリリースされ、個人的に盛り上がった次第です。
Arduino M0 Pro は、他の Arduino に比べると少々お高いですが、入手性がかなり良いと思いますので、ぜひ試していただければ幸いです。
