こんにちは。
Android 8.0(Oreo)の新機能の目玉のひとつに、通知をランチャアイコン(アプリアイコン)上にドットで表示する「Notification Dots」が導入されました。「通知バッジ」とも呼ぶそうです。
動機は、例えば「LINE」というアプリは、未読メッセージが届いていることをユーザに通知するべく、ランチャアイコンの右上に小さな数字(件数)を表示してくれます。この表示のことをバッジと呼ぶわけですが、この仕組みはどう実現しているのかというと:そもそもまず、ランチャアイコンの上にバッジを表示することができるランチャアプリ(ホーム画面アプリ)でホーム画面を適用していないと表示しません。一例として「TeslaUnread for Nova Launcher」というランチャアプリです。
- LINEがバッジに出してネの旨をブロードキャストする&ランチャアプリが受信して、バッジを表示
- LINEがContentProviderを用意していて&ランチャアプリが貰いに行って、バッジを表示
という仕組みで実現しているようです。すみません、当ランチャアプリに関しては憶測ですが、LINEがその旨のインテントをブロードキャストしているのは確実です1。
Androidでは様々なランチャアプリがあり、GooglePlayからお好みのランチャアプリを入手するユーザもいますが、多くのユーザはプリインストールされたランチャアプリをそのまま使っていることと思われます。なので、「私の端末では、LINEの右上に赤く未読件数が出るよ/出ないよ」と話題になっているようです。
ともあれ、LINE自身がバッジを表示しているのではなく、ランチャアプリがバッジを表示していました。
でも、Android 8.0からは、アプリ自身が通知ドットを表示できるようになった(そのためのAPIが導入された)、とのことなので、試してみた次第です。
結果
こういうのを作りました。
画面は1つだけのアプリで、入力欄が2つ
コメントとお名前を書いて頂戴な。「Oreo」と「俺を」は駄洒落です。
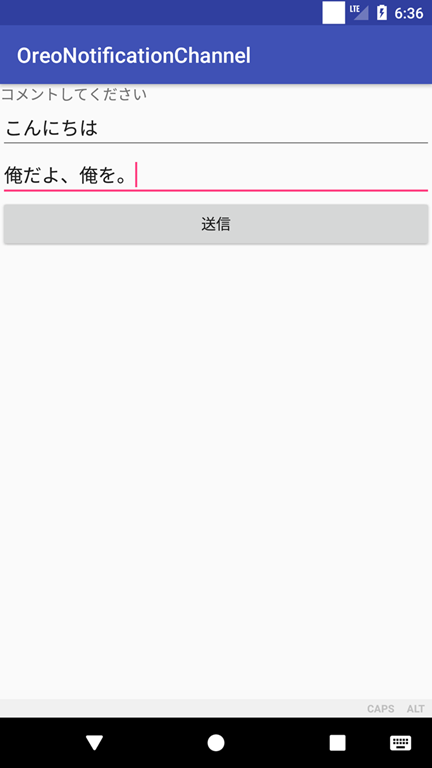
「送信」ボタンをクリックしたら、この画面(というかこのアプリ)は終了させたいと思います。
通知ドットがランチャアイコンの右肩に憑いてる!
事前にこのアプリをインストールしてから、ホーム画面にランチャアイコンを置いておきます。それを踏まえたうえで、コメントと名前を書いて送信ボタンを押しました。
おお、ランチャアイコンの右肩に人魂が憑いてますね。と、薄気味悪いこと言いましたが、このドットの色は自動的に、どうやらランチャアイコンの色を薄めたものになるようです。

ランチャアイコンを長押ししてみると、通知が出ます。

従来の通知も出しております。
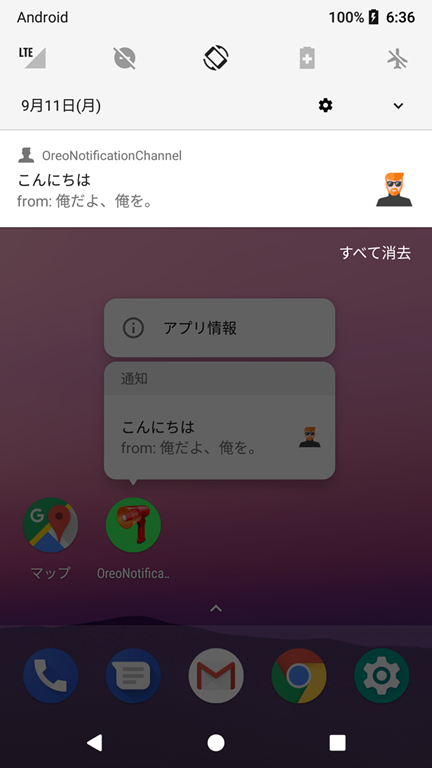
ちなみに通知アイコンの画像はこのサングラスマンです。

サンプルコード
画面ひとつだけのアプリです。
画面レイアウト
<?xml version="1.0" encoding="utf-8"?>
<LinearLayout xmlns:android="http://schemas.android.com/apk/res/android"
    android:id="@+id/activity_main"
    android:layout_width="match_parent"
    android:layout_height="match_parent">

    <LinearLayout
        android:layout_width="match_parent"
        android:layout_height="wrap_content"
        android:orientation="vertical">

        <TextView
            android:layout_width="wrap_content"
            android:layout_height="wrap_content"
            android:text="コメントしてください" />

        <EditText
            android:id="@+id/edittext_comment"
            android:layout_width="match_parent"
            android:layout_height="wrap_content"
            android:hint="コメント" />

        <EditText
            android:id="@+id/edittext_name"
            android:layout_width="match_parent"
            android:layout_height="wrap_content"
            android:hint="お名前" />

        <Button
            android:layout_width="match_parent"
            android:layout_height="wrap_content"
            android:onClick="onClickSendComment"
            android:text="送信" />
    </LinearLayout>

</LinearLayout>
Activityクラス
package jp.co.casareal.oreonotificationchannel;

import android.app.Notification;
import android.app.NotificationChannel;
import android.app.NotificationManager;
import android.content.Context;
import android.graphics.Color;
import android.graphics.drawable.Icon;
import android.os.Bundle;
import android.support.v7.app.AppCompatActivity;
import android.text.TextUtils;
import android.view.View;
import android.widget.EditText;

public class MainActivity extends AppCompatActivity {

    /**
     * アプリでユニークなID
     */
    private static final String MY_CHANNEL_ID = "jp.co.casareal.oreonotificationchannel.MY_CHANNEL_ID";
    /**
     * ユーザが[設定]で確認できるチャンネル名
     */
    private static final String MY_CHANNEL_NAME = "MY CHANNEL NAME";
    /**
     * 重要度(無しは0、強弱は1~5、「指定なし」というのもある)
     */
    private static final int IMPORTANCE = NotificationManager.IMPORTANCE_DEFAULT;

    private EditText editTextComment;
    private EditText editTextName;

    @Override
    protected void onCreate(Bundle savedInstanceState) {
        super.onCreate(savedInstanceState);
        setContentView(R.layout.activity_main);

        editTextComment = (EditText) findViewById(R.id.edittext_comment);
        editTextName = (EditText) findViewById(R.id.edittext_name);
    }

    public void onClickSendComment(View view) {
        String comment = editTextComment.getText().toString();
        String name = editTextName.getText().toString();

        if (!TextUtils.isEmpty(comment) && !TextUtils.isEmpty(name)) {

            Notification.Builder builder = new Notification.Builder(getApplicationContext(), MY_CHANNEL_ID)
                    .setContentTitle(comment)
                    .setContentText("from: " + name)
                    // smallIcon はステータスバー表示とサマリとして表示されるところに使われるアイコン
                    .setSmallIcon(R.drawable.notify_icon)
                    // largeIcon は Notification を開いたときに大きく表示されるところに使われるアイコン ※Android 3.0 (APIレベル11) 以前では使えない
                    .setLargeIcon(Icon.createWithResource(this, R.drawable.notify_icon))
                    // チャンネルIDをセットする
                    .setChannelId(MY_CHANNEL_ID)
                    .setAutoCancel(true);

            NotificationManager notificationManager = (NotificationManager) getSystemService(Context.NOTIFICATION_SERVICE);

            NotificationChannel channel = new NotificationChannel(MY_CHANNEL_ID, MY_CHANNEL_NAME, IMPORTANCE);
            // 通知時の記述
            channel.setDescription(comment);
            // 通知時のライトを光らせ、その色
            channel.enableLights(true);
            channel.setLightColor(Color.RED);
            // ロック画面で通知を表示するかどうか
            channel.setLockscreenVisibility(Notification.VISIBILITY_PRIVATE);
            // バイブレーション(エミュレータじゃ震えてくれないよね(^o^;ゞ)
            channel.enableVibration(true);
            channel.setVibrationPattern(new long[]{100, 200, 300, 400, 300, 200});
            // 端末にチャンネルを登録([設定]で確認可能になる)
            notificationManager.createNotificationChannel(channel);

            notificationManager.notify(null, 123, builder.build());
        }

        // このActivityを終了しちゃいます
        finish();
    }
}
コードのポイント
API level 26すなわちAndroid 8.0から導入されたNotificationChannelを使います。この「Notification Channel」とは、複数の通知をチャンネルに振り分けて管理するという仕組みです。チャンネルには様々な設定を課すことができます。まず、そのチャンネルの必須設定としては、newする際の[コンストラクタ](https://developer.android.com/reference/android/app/NotificationChannel.html#NotificationChannel(java.lang.String, java.lang.CharSequence, int))の3つの引数です。
- チャンネルID
- チャンネル名
- 重要度
その他の設定としては、ライトだとかバイブレーションとかです。
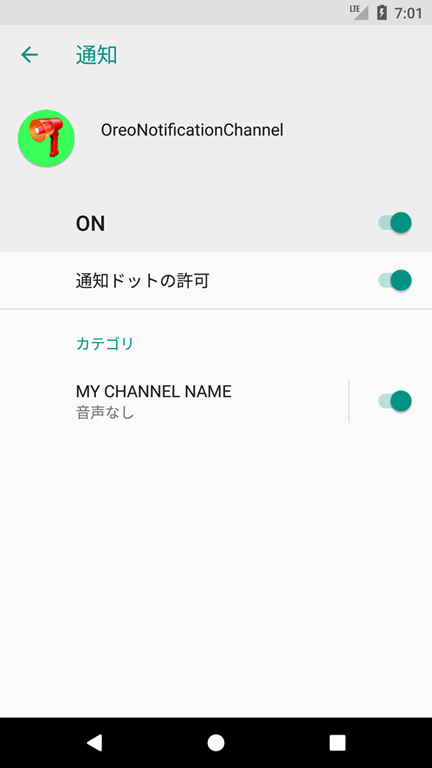
チャンネル名は、[設定]で確認できます(というか、確認できるようにNotificationManagerにチャンネルを登録したので)。
一連の手順としては、
- Notificationを作成する(Notification.Builderで組み立てて、仕上げに
build()しましょう) - チャンネルを作っておく
- NotificationManagerにチャンネルを登録、そして作ったNotificationを
notify()でユーザに見せつける
私の失敗例
チャンネルの登録をちゃんとしてないのにアプリを実行したら、こんなトーストが出ました。LogCatに出力するわけでもなく、トーストでメッセージ出るの?!そっちの方が驚きですわ。

以上です。
-
ブロードキャストインテントのActionは「android.intent.action.BADGE_COUNT_UPDATE」で、"badge_count_package_name"(文字列)、"badge_count_class_name"(文字列)、"badge_count"(整数)の情報が含まれています。 ↩