まえがき
GPTに実装をお願いできたらというのは多くのエンジニアの願いです。色んなお願いの仕方があるかと思いますが、今回はJSDocを投げてみることにします。
GPTはトークンの上限の問題でお願いできる実装の規模は限られています。ちょうど良くまとまった実装単位として、今回はReactコンポーネントの実装をお願いしてみます。適当にロジックが必要なものである方が良いので、ページネーションコンポーネントを実装してみます。
GPTのバージョンは3.5です。
最初の実装
まずは普段書くようなJSDocで、少ない記述でやってみます。
/**
 * Pagination component
 * ページネーションを表示するコンポーネント
 * @param {number} current - 現在のページ位置
 * @param {function} clickButton - ボタンをクリックしたときの処理
 * @param {number} max - 最大のページ位置
 * @returns {JSX.Element}
 */
実際のプロンプト
次のJSDocをふまえたReactコンポーネントをTypeScriptで実装してください。

/**
 * Pagination component
 * ページネーションを表示するコンポーネント
 * @param {number} current - 現在のページ位置
 * @param {function} clickButton - ボタンをクリックしたときの処理
 * @param {number} max - 最大のページ位置
 * @returns {JSX.Element}
 */
次のような出力が得られました。
import React, { FC } from 'react';

type Props = {
  current: number;
  clickButton: (page: number) => void;
  max: number;
};

const Pagination: FC<Props> = ({ current, clickButton, max }) => {
  const pages = [];
  for (let i = 1; i <= max; i++) {
    pages.push(
      <button key={i} onClick={() => clickButton(i)}>
        {i}
      </button>
    );
  }

  return <div>{pages}</div>;
};

export default Pagination;
出してくれたコードの挙動を確認したいので、続けてStorybookのコードもお願いしてみます。
import React from 'react';
import { Story, Meta } from '@storybook/react';

import Pagination, { Props } from './Pagination';

export default {
  title: 'Components/Pagination',
  component: Pagination,
  argTypes: {
    current: {
      control: { type: 'number' },
      defaultValue: 1,
    },
    max: {
      control: { type: 'number' },
      defaultValue: 10,
    },
    clickButton: { action: 'clickButton' },
  },
} as Meta;

const Template: Story<Props> = (args) => <Pagination {...args} />;

export const Default = Template.bind({});
Default.args = {};

export const Custom = Template.bind({});
Custom.args = {
  current: 5,
  max: 20,
};

export const OnePage = Template.bind({});
OnePage.args = {
  max: 1,
};
Propsをexportするように少しだけ実装に手を入れると、↓のようなStorybookを確認する事が出来ました。
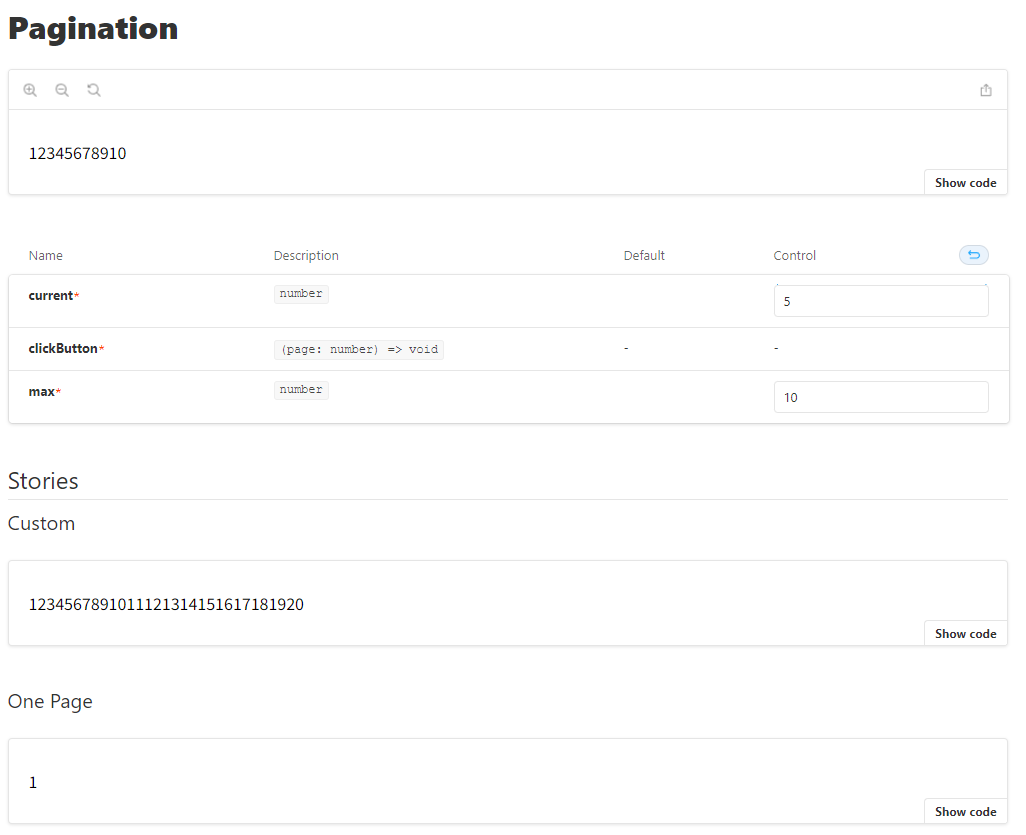
評価
maxを変化させるとそれに従って表示される数字が変わります。一方currentは特に実装には用いられていないようです(悲しい)。最低限のページネーションと呼べなくもないですが、ちょっと寂しいです。
パラメータの数が少なすぎてぼんやりした要求になってしまったかもしれません。
@paramを追加してみる(デフォルト値も追加してみる)
パラメータを色々追加しました。一部にはデフォルト値も指定しています。
/**
 * Pagination component
 * ページネーションを表示するコンポーネント
 * @param {number} current - 現在のページ位置
 * @param {function} clickButton - ボタンをクリックしたときの処理
 * @param {number} max - 最大のページ位置
 * @param {number} displayNumberNearCurrent - 現在のページ位置の前後に表示させるページ数
 * @param {string} [currentBtnClass=current] - 現在のページ位置のボタンに適用するクラス名
 * @param {boolean} [displayMinMaxNumber=true] - 始点と終点のページ番号を表示するフラグ
 * @param {string} [previousLabel=<] - 一つ前に戻るボタンとして表示するラベル
 * @param {string} [nextLabel=>] - 一つ先に進むボタンとして表示するラベル
 * @returns {JSX.Element}
 */
出力されたコード
import React from 'react';

interface Props {
  current: number;
  clickButton: (page: number) => void;
  max: number;
  displayNumberNearCurrent: number;
  currentBtnClass?: string;
  displayMinMaxNumber?: boolean;
  previousLabel?: string;
  nextLabel?: string;
}

const Pagination: React.FC<Props> = ({
  current,
  clickButton,
  max,
  displayNumberNearCurrent,
  currentBtnClass = 'current',
  displayMinMaxNumber = true,
  previousLabel = '<',
  nextLabel = '>',
}) => {
  const buttons = [];

  // 始点から終点までのページ番号を配列にする
  for (let i = 1; i <= max; i++) {
    buttons.push(i);
  }

  // ページ番号の配列を現在のページ位置の前後に切り詰める
  const displayedButtons = buttons.slice(
    Math.max(0, current - displayNumberNearCurrent - 1),
    Math.min(max, current + displayNumberNearCurrent),
  );

  return (
    <div>
      {displayMinMaxNumber && (
        <>
          <button onClick={() => clickButton(1)}>1</button>
          {displayedButtons[0] !== 2 && <span>...</span>}
        </>
      )}

      {displayedButtons.map((button) => (
        <button
          key={button}
          onClick={() => clickButton(button)}
          className={button === current ? currentBtnClass : undefined}
        >
          {button}
        </button>
      ))}

      {displayMinMaxNumber && (
        <>
          {displayedButtons[displayedButtons.length - 1] !== max - 1 && (
            <span>...</span>
          )}
          <button onClick={() => clickButton(max)}>{max}</button>
        </>
      )}

      {current > 1 && <button onClick={() => clickButton(current - 1)}>{previousLabel}</button>}
      {current < max && <button onClick={() => clickButton(current + 1)}>{nextLabel}</button>}
    </div>
  );
};

export default Pagination;
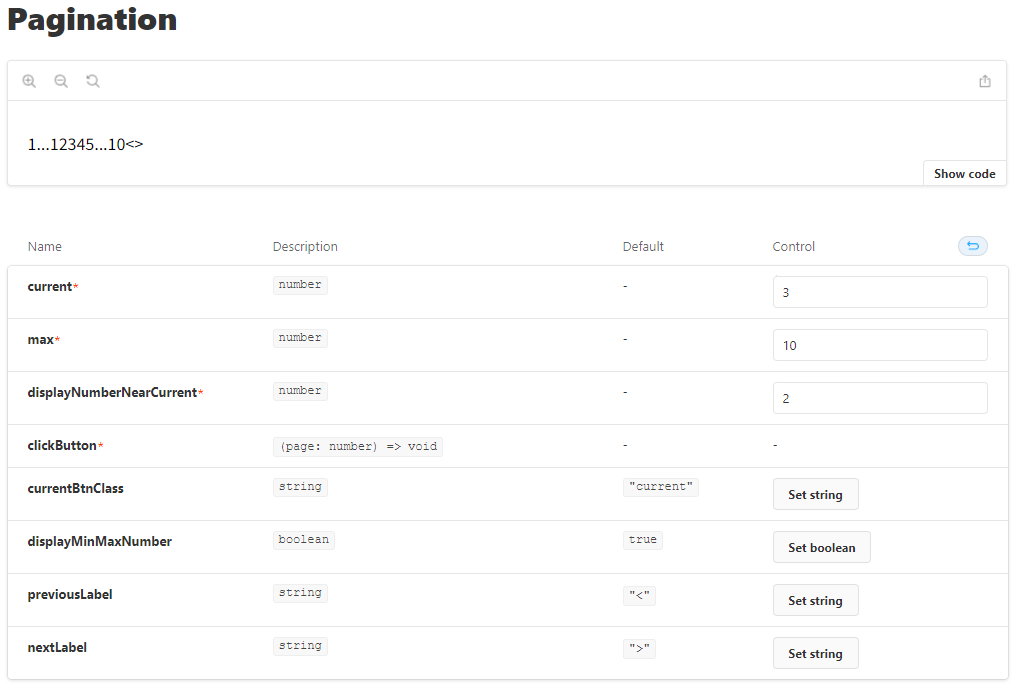
評価
デフォルト値は問題無く反映してくれました。
breakLabelを表示してくれているんですが、その表示ロジックがしっくりきません。また始点と終点に当たるページ番号の表示ロジックも不満があります。こういったある程度慣例化しているページネーションの表示を踏襲してくれないのは、やや辛いです。
何度か出力をお願いしましたが、そもそもパラメータを使ってくれない場合もあり、お願いするのが厳しくなりました。
考察
自由度があるところは徹底的にパラメータ化してがちがちに指定できるようにしていけば、こちらの思い通りの実装に近づくのではと考えました。しかしパラメータを増やしていくと実装の複雑度が上がり、あるところから出力が安定しなくなりました。試しにGPTを4にすると問題無くパラメータを反映した出力をしてくれました。パラメータを増やしていく方法(複雑度を上げていく方法)は、早々にGPTの限界にぶち当たるようです。
別のアプローチを考えてみます。
@exampleを追加してみる
JSDocに@exampleを追加して出力フォーマットの安定化を狙ってみます。
/**
 * Pagination component
 * ページネーションを表示するコンポーネント
 * @param {number} current - 現在のページ位置
 * @param {function} clickButton - ボタンをクリックしたときの処理
 * @param {number} max - 最大のページ位置
 * @param {number} displayNumberNearCurrent - 現在のページ位置の前後に表示させるページ数
 * @param {string} [currentBtnClass=current] - 現在のページ位置のボタンに適用するクラス名
 * @param {string} [previousLabel=<] - 一つ前に戻るボタンとして表示するラベル
 * @param {string} [nextLabel=>] - 一つ先に進むボタンとして表示するラベル
 * @param {string} [breakLabel=...] - 非表示にしているページ番号を埋めるラベル
 * @returns {JSX.Element}
 * @example
 *  // return < 1 ... 3 4 5 6 7 ... 10 >
 *  <Pagination current={5} max={10} displayNumberNearCurrent={2} />
 * @example
 * // return 1 2 3 ... 10 >
 * <Pagination current={1} max={10} displayNumberNearCurrent={2} />
 */
出力されたコード
import React from "react";

type Props = {
  current: number;
  clickButton: (page: number) => void;
  max: number;
  displayNumberNearCurrent: number;
  currentBtnClass?: string;
  previousLabel?: string;
  nextLabel?: string;
  breakLabel?: string;
};

const Pagination: React.FC<Props> = ({
  current,
  clickButton,
  max,
  displayNumberNearCurrent,
  currentBtnClass = "current",
  previousLabel = "<",
  nextLabel = ">",
  breakLabel = "...",
}) => {
  const pageNumbers = [];
  for (let i = 1; i <= max; i++) {
    if (
      i === 1 ||
      i === max ||
      (i >= current - displayNumberNearCurrent && i <= current + displayNumberNearCurrent)
    ) {
      pageNumbers.push(i);
    } else if (
      (i === current - displayNumberNearCurrent - 1 && current - displayNumberNearCurrent > 2) ||
      (i === current + displayNumberNearCurrent + 1 && current + displayNumberNearCurrent < max - 1)
    ) {
      pageNumbers.push(breakLabel);
    }
  }

  return (
    <div className="pagination">
      {current !== 1 && (
        <button onClick={() => clickButton(current - 1)}>{previousLabel}</button>
      )}
      {pageNumbers.map((pageNumber, index) =>
        pageNumber === breakLabel ? (
          <span key={index} className="break">
            {breakLabel}
          </span>
        ) : (
          <button
            key={index}
            onClick={() => clickButton(pageNumber)}
            className={pageNumber === current ? currentBtnClass : ""}
          >
            {pageNumber}
          </button>
        )
      )}
      {current !== max && <button onClick={() => clickButton(current + 1)}>{nextLabel}</button>}
    </div>
  );
};

export default Pagination;
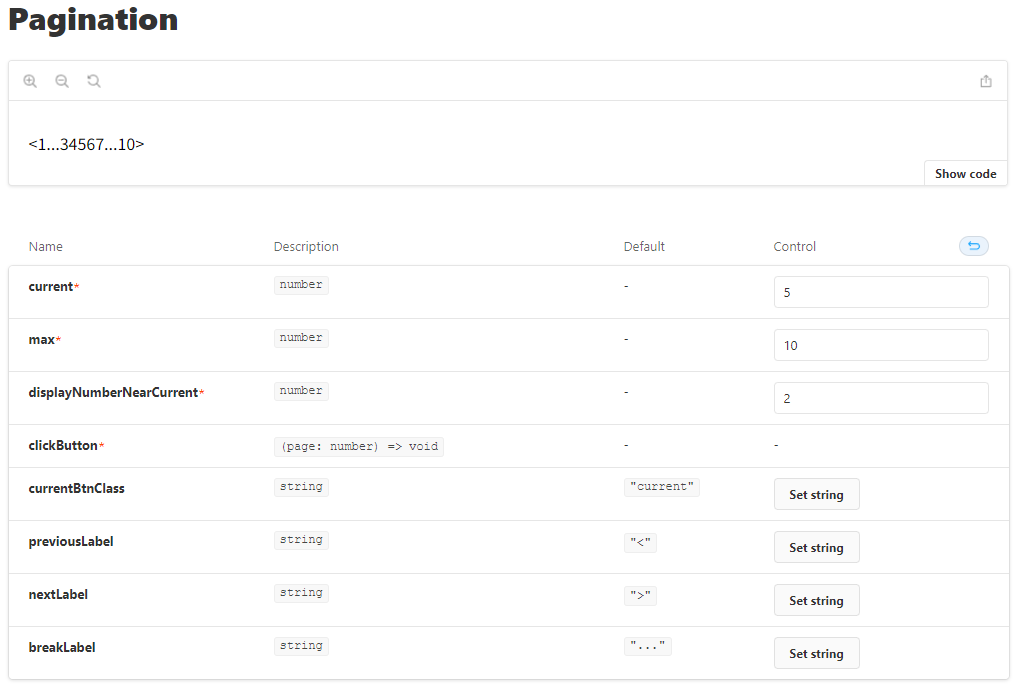
評価
@exampleの追加によって出力が安定してくれました。これによってパラメータ化しなくても良いものも出てきて、かなり強力そうです。
考察
@exampleに書いた出力形式を踏まえて実装してくれたようです。これも一応、Few-shotをしていることになるんでしょうか。GPT的にはこちらの情報が有益なのかもしれないです。
https://jsdoc.app/tags-kind.html を眺めて、他にGPTにとって意味を持ちそうなタグを挙げてみます。
-
@name名称をしっかり指定して記述したいときに必要そう -
@descriptionしっかり説明を記述したいときに必要そう -
@throws例外を投げたいときに必要そう -
@async内部で走る非同期処理を待つ必要があるなら必要そう -
@kind関数コンポーネントか、クラスコンポーネントかとか指定するときに必要そう
色々タグを追加してみる
/**
 * @name Pagination
 * @description ページネーションを表示するコンポーネント
 * @kind constant
 * @throws 現在のページ位置が不正
 * @param {number} current - 現在のページ位置
 * @param {function} clickButton - ボタンをクリックしたときの処理
 * @param {number} max - 最大のページ位置
 * @param {number} displayNumberNearCurrent - 現在のページ位置の前後に表示させるページ数
 * @param {string} [currentBtnClass=current] - 現在のページ位置のボタンに適用するクラス名
 * @param {string} [previousLabel=<] - 一つ前に戻るボタンとして表示するラベル
 * @param {string} [nextLabel=>] - 一つ先に進むボタンとして表示するラベル
 * @param {string} [breakLabel=...] - 非表示にしているページ番号を埋めるラベル
 * @returns {JSX.Element}
 * @example
 *  // return < 1 ... 3 4 5 6 7 ... 10 >
 *  <Pagination current={5} max={10} displayNumberNearCurrent={2} />
 * @example
 * // return 1 2 3 ... 10 >
 * <Pagination current={1} max={10} displayNumberNearCurrent={2} />
 */
出力されたコード
import React from "react";

type PaginationProps = {
  current: number;
  clickButton: (pageNumber: number) => void;
  max: number;
  displayNumberNearCurrent: number;
  currentBtnClass?: string;
  previousLabel?: string;
  nextLabel?: string;
  breakLabel?: string;
};

const Pagination: React.FC<PaginationProps> = ({
  current,
  clickButton,
  max,
  displayNumberNearCurrent,
  currentBtnClass = "current",
  previousLabel = "<",
  nextLabel = ">",
  breakLabel = "...",
}) => {
  if (current < 1 || current > max) {
    throw new Error("現在のページ位置が不正");
  }

  const pages = [];

  let leftBoundary = current - displayNumberNearCurrent;
  let rightBoundary = current + displayNumberNearCurrent;

  if (leftBoundary < 1) {
    leftBoundary = 1;
    rightBoundary = leftBoundary + displayNumberNearCurrent * 2;
  }

  if (rightBoundary > max) {
    rightBoundary = max;
    leftBoundary = max - displayNumberNearCurrent * 2;
    if (leftBoundary < 1) {
      leftBoundary = 1;
    }
  }

  for (let i = 1; i <= max; i++) {
    if (i === 1 || i === max || (i >= leftBoundary && i <= rightBoundary)) {
      pages.push(i);
    }
  }

  return (
    <div>
      {current > 1 && (
        <button onClick={() => clickButton(current - 1)}>{previousLabel}</button>
      )}
      {pages.map((pageNumber, index) => {
        const isCurrentPage = pageNumber === current;
        return (
          <React.Fragment key={index}>
            {index !== 0 && pageNumber - pages[index - 1] > 1 && (
              <span>{breakLabel}</span>
            )}
            <button
              onClick={() => clickButton(pageNumber)}
              className={isCurrentPage ? currentBtnClass : undefined}
            >
              {pageNumber}
            </button>
          </React.Fragment>
        );
      })}
      {current < max && (
        <button onClick={() => clickButton(current + 1)}>{nextLabel}</button>
      )}
    </div>
  );
};

export default Pagination;
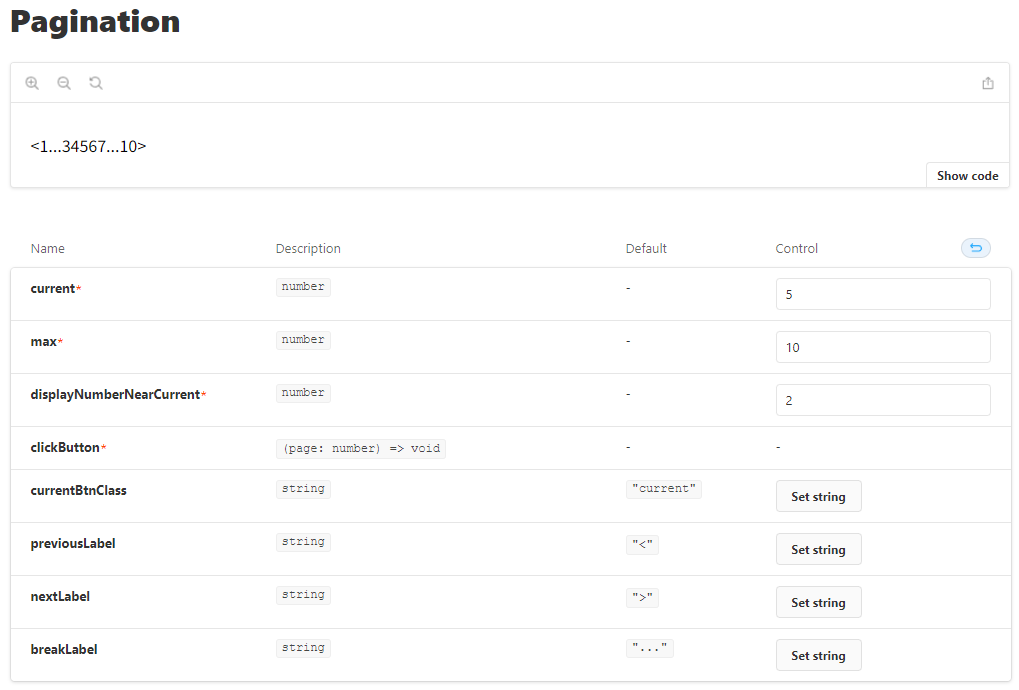
考察
いけそうです。@throwsで雑に書いたエラー判定も良い感じにしてくれました。
別パターン
@nameと@kindを変えてみます。
/**
 * @name Paging
 * @description ページネーションを表示するコンポーネント
 * @kind class
 * @throws 現在のページ位置が不正
 * @param {number} current - 現在のページ位置
 * @param {function} clickButton - ボタンをクリックしたときの処理
 * @param {number} max - 最大のページ位置
 * @param {number} displayNumberNearCurrent - 現在のページ位置の前後に表示させるページ数
 * @param {string} [currentBtnClass=current] - 現在のページ位置のボタンに適用するクラス名
 * @param {string} [previousLabel=<] - 一つ前に戻るボタンとして表示するラベル
 * @param {string} [nextLabel=>] - 一つ先に進むボタンとして表示するラベル
 * @param {string} [breakLabel=...] - 非表示にしているページ番号を埋めるラベル
 * @returns {JSX.Element}
 * @example
 *  // return < 1 ... 3 4 5 6 7 ... 10 >
 *  <Pagination current={5} max={10} displayNumberNearCurrent={2} />
 * @example
 * // return 1 2 3 ... 10 >
 * <Pagination current={1} max={10} displayNumberNearCurrent={2} />
 */
出力されたコード
type PagingProps = {
  current: number;
  clickButton: (page: number) => void;
  max: number;
  displayNumberNearCurrent: number;
  currentBtnClass?: string;
  previousLabel?: string;
  nextLabel?: string;
  breakLabel?: string;
};

class Paging extends React.Component<PagingProps> {
  /**
   * @throws 現在のページ位置が不正
   */
  constructor(props: PagingProps) {
    super(props);

    if (props.current < 1 || props.current > props.max) {
      throw new Error("現在のページ位置が不正");
    }
  }

  /**
   * ページ番号の配列を生成する
   * @returns {number[]} ページ番号の配列
   */
  createPageArray(): number[] {
    const { current, max, displayNumberNearCurrent } = this.props;
    const pageArray = [];

    // 左端のページ番号を計算する
    let left = Math.max(current - displayNumberNearCurrent, 1);

    // 右端のページ番号を計算する
    let right = Math.min(current + displayNumberNearCurrent, max);

    // 左端のページ番号が1より大きい場合は省略記号を表示する
    if (left > 1) {
      pageArray.push(1, this.props.breakLabel || "...");
    }

    // ページ番号を配列に追加する
    for (let i = left; i <= right; i++) {
      pageArray.push(i);
    }

    // 右端のページ番号が最大値より小さい場合は省略記号を表示する
    if (right < max) {
      pageArray.push(this.props.breakLabel || "...", max);
    }

    return pageArray;
  }

  /**
   * ページボタンを生成する
   * @param {number} page ページ番号
   * @param {string} label ラベル
   * @param {string} [className=""] クラス名
   * @returns {JSX.Element} ページボタン
   */
  createPageButton(page: number, label: string, className = ""): JSX.Element {
    const { current, clickButton, currentBtnClass } = this.props;
    const isCurrent = page === current;
    const btnClassName = isCurrent
      ? `${className} ${currentBtnClass || "current"}`
      : className;

    return (
      <button
        key={label}
        className={btnClassName}
        onClick={() => clickButton(page)}
      >
        {label}
      </button>
    );
  }

  render() {
    const { previousLabel, nextLabel } = this.props;
    const pageArray = this.createPageArray();

    return (
      <div className="pagination">
        {previousLabel &&
          this.createPageButton(
            this.props.current - 1,
            previousLabel,
            "prev"
          )}

        {pageArray.map((page, index) => {
          if (typeof page === "number") {
            return this.createPageButton(page, page.toString());
          } else {
            return <span key={index}>{page}</span>;
          }
        })}

        {nextLabel &&
          this.createPageButton(
            this.props.current + 1,
            nextLabel,
            "next"
        )}
      </div>
    );
  }
}
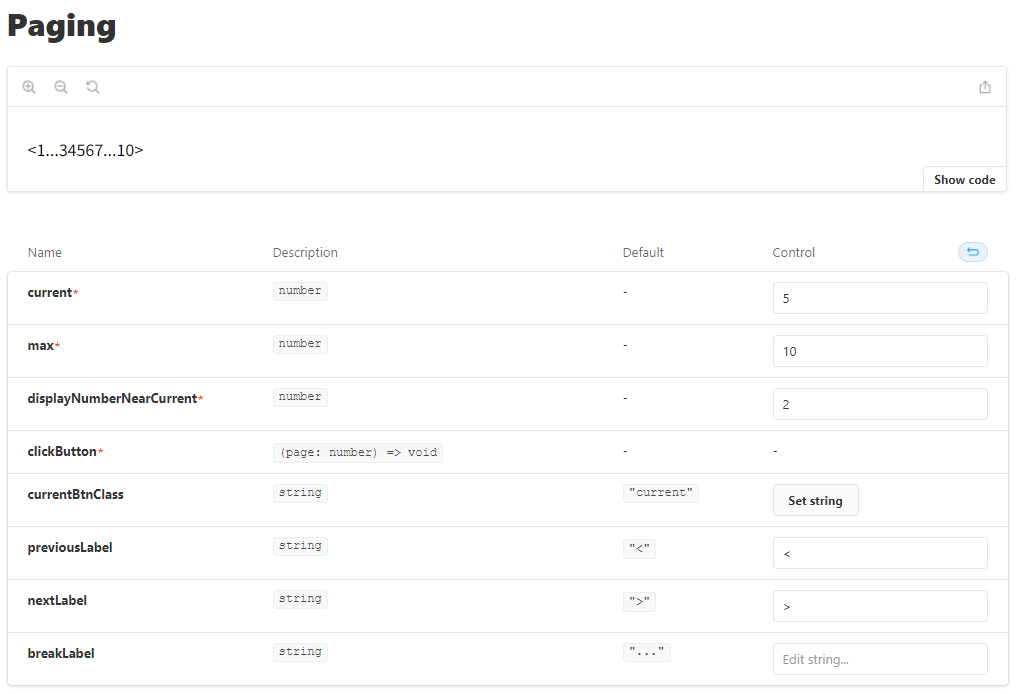
評価
無事
class Paging
から始まるコンポーネントを実装してくれました。ただし出力の安定感はやや下がりました(何度かリトライしました)。クラスコンポーネントはあまり得意じゃないかもしれません。
まとめ
始めは少ない@paramでお願いしてみましたが、必要最低限の実装しかしてくれませんでした。そこで自由度のある箇所を徹底的に@paramsで指定できるようにしようと増やしていきましたが、あるところからロジックが破綻した出力ばかりになってしまいました。出力の安定化を狙って@exampleを追加したところ、Few-shotの働きがあったのか効果が見られました。他にもJSDocのタグの種類を増やすことでいろいろな要件を満たす実装が出来そうでした。
結論として、フロントエンドである程度の複雑さを持つページネーションコンポーネントがGPT-3.5で実装出来ました。
何故今回JSDocでお願いしたかというと、JSDocがあればコードの仕様がつかめて人間にとっても嬉しいからです。GPTに書いてもらったコードをStorybook上で確認し(何だったらテストも書いてもらって)、問題なさそうでしたらJSDocをコンポーネント上部にペタッとはれば、保守性もそこそこに良いものが出来上がると思われます。