はじめに
Web アプリ開発で複数のプロジェクトが並行して動いていると、本番環境と検証環境を行き来する機会が多くなり、「あれ?今どこ開いてるんだっけ?」となりませんか。
私自身、一度 検証と本番を取り違えてしまい、テストデータを誤って本番環境に投入してしまった苦い経験があります。
そのときの環境の見分け方は「IP アドレス」と「ポート番号」だけでした。
当然ながら、ぱっと見ではどちらか判断しにくく、ヒューマンエラーを防げませんでした(プロジェクト専属期間は何とか区別できていましたが、落ち着くと別のプロジェクトと掛け持ちになり、、、)。
そこで「URL に応じて画面上部にバーを表示し、環境をひと目で分かるようにしたい」と思い、Chrome 拡張機能を自作することにしました。
既存拡張機能を使わなかった理由
似たようなことができる拡張機能を探していると、Stylish というものがありました。
ただし、過去にセキュリティ上の懸念が上がったことがあり、同様の機能を持った拡張機能(Stylus等)もあるものの「安心して長く使えるかどうか不安」という気持ちがありました。
また、業務環境に依存する以上、外部に依存せずに 自分で理解してメンテできること が重要だと判断し、自作することにしました。
アプリ側で見た目を変える案との比較
「アプリ側にスタイルを組み込んでしまえばいいのでは?」という考えもあります。
しかし、実際にはすでに稼働中のアプリが多数あり、開発チームもそれぞれ異なります。
大規模な案件で開発チームメンバーが多い場合には、組み込んでしまう方が楽に思えますが、小規模な案件を多数抱える場合には、
全てのアプリに手を入れて改修するのは非現実的 でした。
そこで「アプリに触れず、ブラウザ拡張側で対応できる方法」が最適解だと考えています。
拡張機能の仕様
- URL のルールに基づいて環境を判定
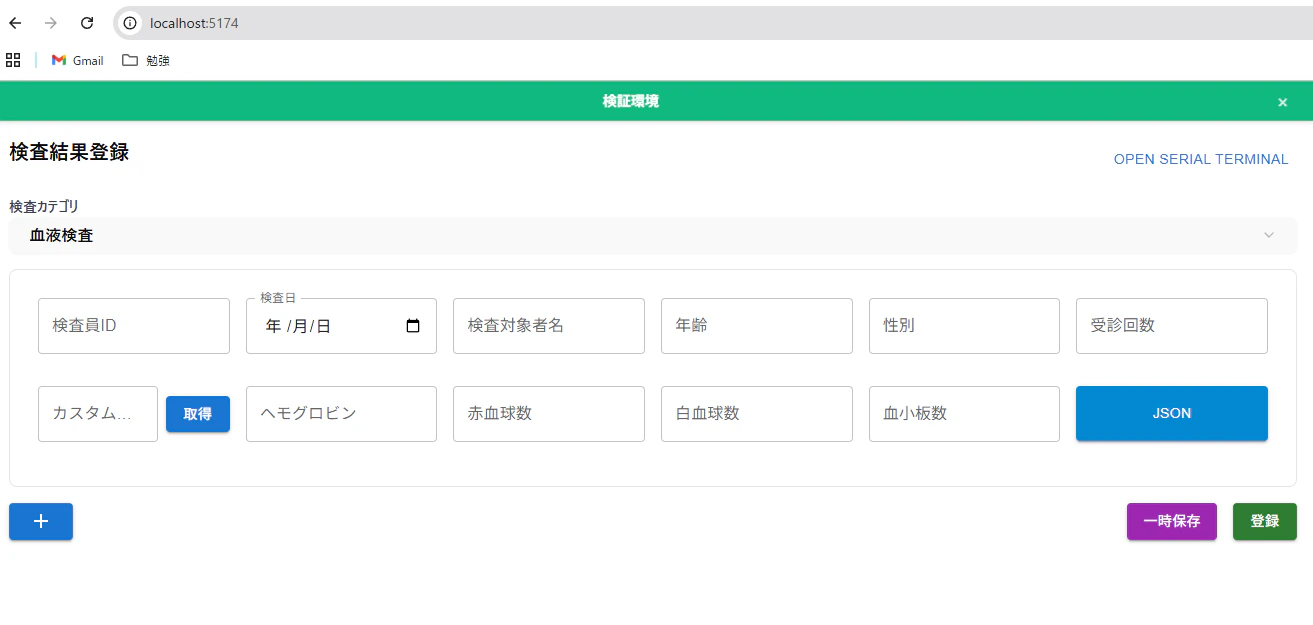
- 検証環境では 緑色のバー
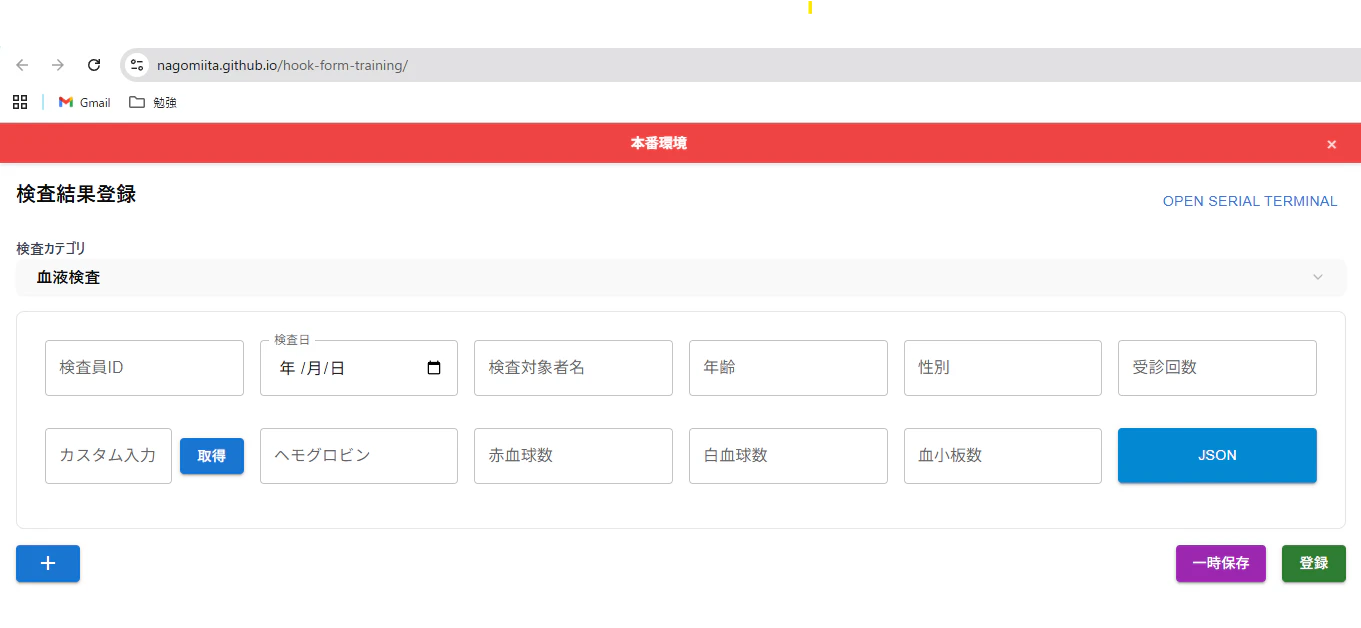
- 本番環境では 赤色のバー
- ページ上部に常に表示されるので、見間違いを防止できる
実装方法
フォルダ構成は以下のようにしました。
env-bar-extension/
├─ manifest.json
├─ content.js
└─ options.js
manifest.json
{
  "manifest_version": 3,
  "name": "環境判定表示",
  "version": "1.0",
  "description": "URLで検証環境と本番環境を判定し、バーで表示します",
  "permissions": ["activeTab"],
  "content_scripts": [
    {
      "matches": ["<all_urls>"],
      "js": ["content.js"],
      "css": ["styles.css"]
    }
  ]
}
content.js(抜粋)
function detectEnvironment() {
  const url = window.location.href;
  const hostname = window.location.hostname;

  // 検証環境のパターン(カスタマイズ可能)
  const stagingPatterns = [/localhost/i, /127\.0\.0\.1/, /192\.168\./];

  // 本番環境のパターン(例:example.com のみ本番と判定)
  const productionPatterns = [
    /example\.com$/,
    // 必要に応じて追加
  ];

  const isStaging = stagingPatterns.some(
    (pattern) => pattern.test(url) || pattern.test(hostname)
  );

  const isProduction = productionPatterns.some(
    (pattern) => pattern.test(url) || pattern.test(hostname)
  );

  if (isStaging) return "staging";
  if (isProduction) return "production";
  return "unknown";
}

// ページレイアウトを調整してバー用のスペースを確保
function adjustPageLayout() {
  const existingStyle = document.getElementById("env-bar-page-adjustment");
  if (existingStyle) {
    existingStyle.remove();
  }

  // ページ全体を下にずらすスタイルを追加
  const style = document.createElement("style");
  style.id = "env-bar-page-adjustment";
  style.textContent = `
    html {
      padding-top: 40px !important;
      box-sizing: border-box !important;
    }

    body {
      margin-top: 0 !important;
    }

    /* 固定ヘッダーがある場合の調整 */
    [style*="position: fixed"][style*="top: 0"],
    [style*="position:fixed"][style*="top:0"] {
      top: 40px !important;
    }

    /* よくある固定ヘッダーのクラス名 */
    .header[style*="position: fixed"],
    .navbar[style*="position: fixed"],
    .top-bar[style*="position: fixed"],
    .fixed-header[style*="position: fixed"] {
      top: 40px !important;
    }
  `;

  document.head.appendChild(style);
}

// 環境表示バーを作成
function createEnvironmentBar(environment) {
  const existingBar = document.getElementById("env-indicator-bar");
  if (existingBar) {
    existingBar.remove();
  }

  const bar = document.createElement("div");
  bar.id = "env-indicator-bar";
  bar.className = `env-bar ${environment}`;

  const environmentText = environment === "staging" ? "検証環境" : "本番環境";

  bar.innerHTML = `
    <span class="env-text">${environmentText}</span>
    <button class="env-close">×</button>
  `;

  // ページの最上部に挿入
  document.body.insertBefore(bar, document.body.firstChild);

  // 閉じるボタンのイベント
  bar.querySelector(".env-close").addEventListener("click", () => {
    bar.remove();
    // バーを削除したらページの調整も削除
    const style = document.getElementById("env-bar-page-adjustment");
    if (style) {
      style.remove();
    }
  });
}

// ページ読み込み時に実行
function initialize() {
  const environment = detectEnvironment();
  if (environment === "unknown") return; // 環境が不明な場合は何もしない
  adjustPageLayout(); // ページレイアウトを調整
  createEnvironmentBar(environment);
}

// DOM読み込み完了後に実行
if (document.readyState === "loading") {
  document.addEventListener("DOMContentLoaded", initialize);
} else {
  initialize();
}

// SPA対応:URL変更を監視
let currentUrl = window.location.href;
const observer = new MutationObserver(() => {
  if (window.location.href !== currentUrl) {
    currentUrl = window.location.href;
    setTimeout(initialize, 100);
  }
});

observer.observe(document.body, {
  childList: true,
  subtree: true,
});
styles.css(抜粋)
/* 環境表示バーのスタイル */
#env-indicator-bar {
  position: fixed !important;
  top: 0 !important;
  left: 0 !important;
  right: 0 !important;
  z-index: 2147483647 !important; /* 最大のz-index値 */
  font-family: -apple-system, BlinkMacSystemFont, "Segoe UI", Roboto, sans-serif !important;
  display: flex !important;
  align-items: center !important;
  justify-content: center !important;
  padding: 10px 16px !important;
  font-size: 14px !important;
  font-weight: 600 !important;
  color: white !important;
  box-shadow: 0 2px 4px rgba(0, 0, 0, 0.1) !important;
  height: 40px !important;
  box-sizing: border-box !important;
}

/* 検証環境(緑) */
#env-indicator-bar.staging {
  background: #10b981 !important;
}

/* 本番環境(赤) */
#env-indicator-bar.production {
  background: #ef4444 !important;
}

/* テキスト */
#env-indicator-bar .env-text {
  margin-right: auto !important;
  margin-left: auto !important;
  margin-top: 0 !important;
  margin-bottom: 0 !important;
  padding: 0 !important;
  line-height: 1 !important;
}

/* 閉じるボタン */
#env-indicator-bar .env-close {
  background: none !important;
  border: none !important;
  color: white !important;
  font-size: 18px !important;
  cursor: pointer !important;
  padding: 4px 8px !important;
  margin: 0 !important;
  margin-left: 16px !important;
  opacity: 0.8 !important;
  transition: opacity 0.2s ease !important;
  border-radius: 4px !important;
  line-height: 1 !important;
}

#env-indicator-bar .env-close:hover {
  opacity: 1 !important;
  background: rgba(255, 255, 255, 0.1) !important;
}
拡張機能の導入方法
- Chrome で
chrome://extensions/を開く - 右上の「デベロッパーモード」を ON にする
- 「パッケージ化されていない拡張機能を読み込む」から上記フォルダを選択
これで、設定した URL に応じて緑 or 赤のバーが以下のように表示されます。
↓ 検証環境
↓ 本番環境
まとめ
- 本番と検証を間違えると大事故につながる
- アプリを改修せずに、Chrome 拡張で見分けやすくする方法を採用
- 自作することで安心して長く使える
「あ、今どの環境だっけ?」をなくす工夫として、シンプルですが効果的でした。
もし同じ課題を抱えている方がいれば、ぜひ試してみてください。