コマンドから実行
powershell -ExecutionPolicy Bypass -File .\test.ps1
コマンドプロンプトなどからpsファイルを実行する際のコマンド。
既定ではセキュリティの関係でpsファイルを実行できないため、パラメータでExecutionPolicyを低いものに変更しつつ実行する。既定値の変更もできる。
バージョンの確認
PowerShellはバージョンによって出来ることが結構違うので、まず自環境のバージョンを確認しておくと良い。
コンソールで変数$PSVersionTableを参照するとバージョンが分かる。
PS C:\test> $PSVersionTable

Name                           Value
----                           -----
PSVersion                      5.1.18362.752
PSEdition                      Desktop
PSCompatibleVersions           {1.0, 2.0, 3.0, 4.0...}
BuildVersion                   10.0.18362.752
CLRVersion                     4.0.30319.42000
WSManStackVersion              3.0
PSRemotingProtocolVersion      2.3
SerializationVersion           1.1.0.1
PSVersionがPowerShellのバージョン。
MSのドキュメントを参照する
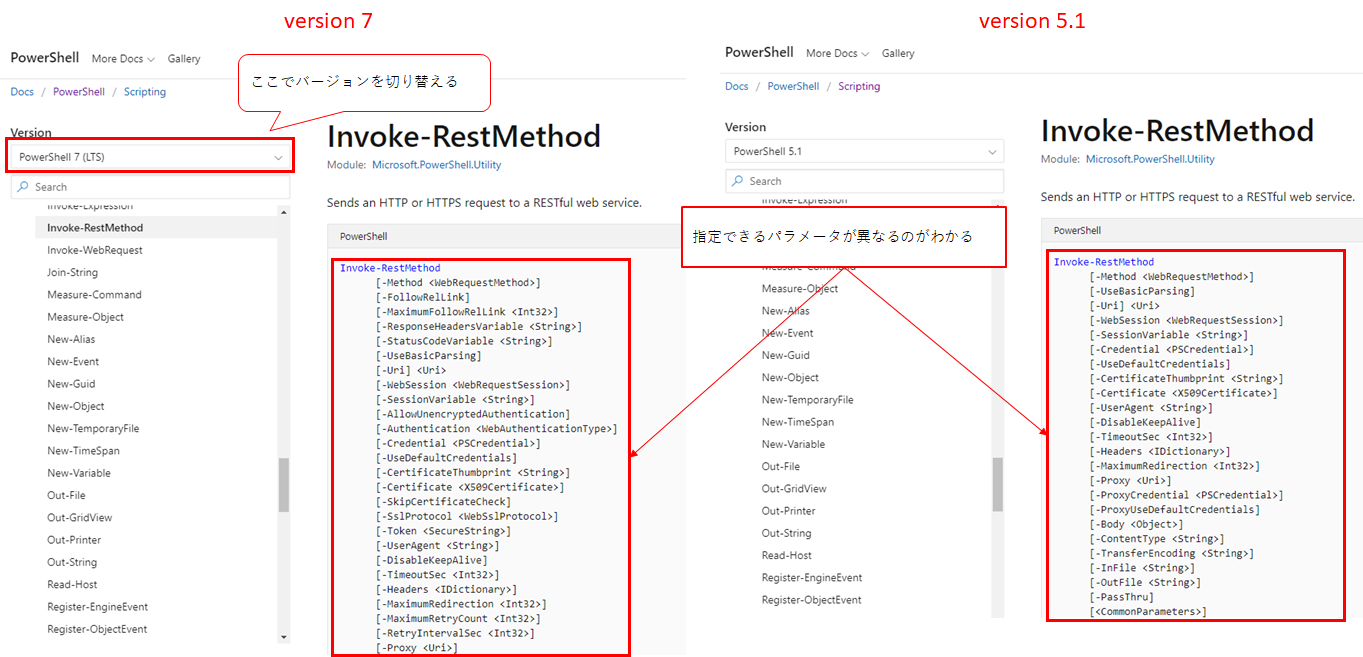
PowerShellのサンプルはネット上に色々あるが、バージョンが明記されていないことが多く、その不一致でサンプルが意図したとおりに動かないことがたまにある。それを避けるためにも、使用するメソッド類の公式ドキュメントは目を通したほうがよさそう。
上記URLへアクセスし、ページ左上でバージョンを選択すれば、それに合わせてドキュメントが変わる。
Visual Studio Code で開発する
拡張機能の追加
- VSCodeでps1ファイルを開く。
- PowerShellの拡張機能をインストールするか聞かれるので、インストールする。
文字コードの設定を変更
PowerShell ISE の既定の文字コードは UTF-8 bom付 だが、VSCodeは UTF-8。この違いが原因で日本語を出力した際などに文字化けする。
↓以下手順
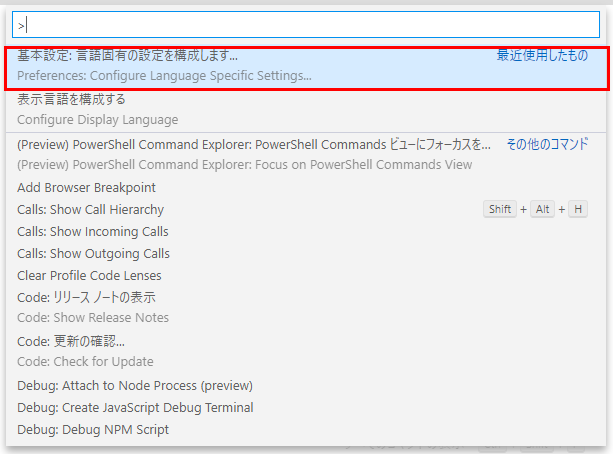
F1またはCtrl+Shift+Pを押してコマンドパレットを表示する。
Configure Language Specific Settingsと入力、出てきたものをクリック。

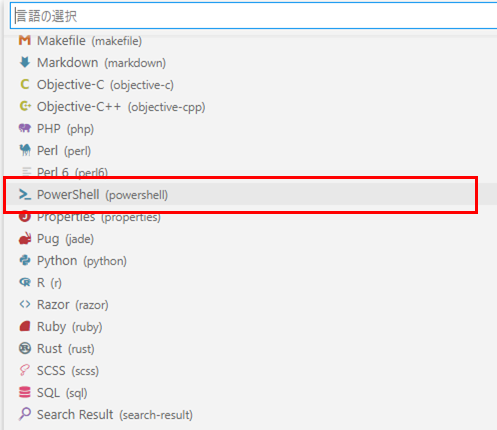
PowerShellを選ぶ。

Settings.jsonが開くので、"files.encoding": "utf8bom"を追記する。
Settings.jsonを保存して閉じる。
デバッグの設定
エディタウィンドウで開いているファイルをデバッグするように設定する手順。
「実行」のタブを開く(Ctrl + Shift + D)。
「launch.jsonファイルを作成します」のリンクを押す。
「Launch Current File」を選ぶ。

launch.jsonが作成されて表示されるので、閉じる。
これで、デバッグしたいps1ファイルを開いた状態でF5を押すと、そのファイルが実行されるようになる。
文字コードの確認
PS C:\test> $OutputEncoding.EncodingName
日本語 (シフト JIS)
参考:PowerShellの文字コードを変更する - Qiita
ファイル操作
フォルダ内のファイル一覧取得
$fileDir = "C:\test"

$files = Get-ChildItem -Path $fileDir

foreach($file in $files) {
    Write-Host $file.Name
}
ファイルアップロードを含んだPOSTを実行する
要はmultipart/form-dataの送信。
PowerShellのバージョンが6以上の場合
Invoke-WebRequestまたはInvoke-RestMethodのパラメータに-Formというものがあり、それを使えばmultipartデータが簡単に送れる。
PowerShellのバージョンが5.1以下の場合
Invoke-WebRequestなどにmultipartのための便利機能がないので、自力でマルチパートデータを作り上げるか、.netのクラスに頼る方法をとる。
# .netのアセンブリをロード
Add-Type -AssemblyName "System.Net.Http"

$content = New-Object System.Net.Http.MultipartFormDataContent

# 文字列パラメータ
$StringContent = New-Object System.Net.Http.StringContent("value1")
$StringContent.Headers.Add("Content-Disposition", "form-data; name=`"param1`"")
$content.Add($stringContent)

# ファイル
$fileStream = [System.IO.File]::OpenRead($filePath)
$fileContent = New-Object System.Net.Http.StreamContent($fileStream)
$fileName = [System.IO.Path]::GetFileName($filePath)

$fileContent.Headers.Add("Content-Disposition", "form-data; name=`"file`"; filename=`"$fileName`"");
$content.Add($fileContent)

# HTTPヘッダー
$content.Headers.Add("ApiKey", $apiKey)

# contentの中身をデバッグで確認
# Write-Host $content.ReadAsStringAsync().Result

# リクエスト実行
$client = New-Object System.Net.Http.HttpClient
$result = $client.PostAsync($url, $content).Result

# レスポンス確認
# echo $result.Content.ReadAsStringAsync().Result
参考:PowerShellでChatworkにファイルをPOSTする - Qiita
※上記ページのInvoke-RestMethodのサンプルはboundaryの指定が仕様と異なる。サーバーによってはOKかもしれない。
(multipart/form-dataのリクエストで地味にハマったメモ - Qiita)
日本語ファイル名が文字化けする
上記サンプルでは、ファイルを添付したときの日本語ファイル名が文字化けする。
それの解消方法は、サーバー側の実装も含めて試行錯誤が必要。
解決策1:ContentDispositionHeaderValue
$fileStream = [System.IO.File]::OpenRead($filePath)
$fileName = [System.IO.Path]::GetFileName($filePath)

$fileContent = New-Object System.Net.Http.StreamContent($fileStream)

$header = New-Object System.Net.Http.Headers.ContentDispositionHeaderValue("form-data")
$header.Name = $name
$header.FileName = $fileName

$fileContent.Headers.ContentDisposition = $header
このクラスを使うと、Content-Dispositionが以下のようになる。
Content-Disposition: form-data; name=test; filename="=?utf-8?B?44GC44GE44GG44GI44GKLnBkZg==?="
サーバー側でこのfilenameをパースしてくれるなら、これで解決。
解決策2:リクエストデータを自分で作る
サーバーによっては?utf-8?を解釈してくれないので、そのときはInvoke-RestMethodまたはInvoke-WebRequestを使いつつ、リクエストデータを自分で作る。
$headers = @{
    "ApiKey" = $apiKey
}

$boundary = "-------abcdefz"
$contentType = "multipart/form-data; boundary=$boundary"

$inFilePath = "${fileDir}\test.txt"

# 文字列パラメータ
$sw = New-Object System.IO.StreamWriter($inFilePath, $false)
$sw.WriteLine("--$boundary")
$sw.WriteLine("Content-Disposition: form-data; name=`"param1`"")
$sw.WriteLine("")
$sw.WriteLine("value1")

# ファイル
$sw.WriteLine("--$boundary")
$sw.WriteLine("Content-Disposition: form-data; name=`"file`"; filename=`"test.pdf`"")
$sw.WriteLine("")
$sw.Close()

$fs = New-Object System.IO.FileStream($inFilePath, [System.IO.FileMode]::Append)
$bw = New-Object System.IO.BinaryWriter($fs)
$fileBinary = [System.IO.File]::ReadAllBytes($filePath1)
$bw.Write($fileBinary)
$bw.Close()

# 最後のboundary
$sw = New-Object System.IO.StreamWriter($inFilePath, $true)
$sw.WriteLine("")
$sw.WriteLine("--$boundary--")
$sw.Close()

try {
    $response = Invoke-RestMethod -Uri $url -Headers $headers -Method Post -ContentType $contentType -InFile $inFilePath

    # レスポンスをファイルへ書込
    if ($response -is [string]) {
        $response | Out-File -FilePath $responseFilePath

    } elseif ($response -is [System.Management.Automation.PSCustomObject]) {
        $response | ConvertTo-Json | Out-File -FilePath $responseFilePath

    } else {
        $response | Out-File -FilePath $responseFilePath
    }

} catch {
    if ($_.Exception.Response -eq $null) {
        echo $_.Exception
    } else {
        echo $_.Exception.Response.StatusCode
        $result = $_.Exception.Response.GetResponseStream()
        $reader = New-Object System.IO.StreamReader($result)
        $reader.BaseStream.Position = 0
        $reader.DiscardBufferedData()
        $responseBody = $reader.ReadToEnd()
        echo $responseBody
    }
}
