Chrome Canary に ES Modules が仮実装されました(chrome://flags/#enable-experimental-web-platform-features を有効にすると利用できます)。
いよいよ HTTP/2 と ES Modules を組み合わせた形で、アセットパイプラインを考える時代に突入するようです。
このエントリでは、ES Modules を手元で試したい方のために、HTTP/2 の最低限の動作環境を Mac に構築する手順を簡単に紹介します。
nginx --with-http2
brew nginx --with-http2 で HTTP/2 を利用できる状態の nginx をインストールします。
brew install nginx --with-http2

nginx -V

> nginx version: nginx/1.12.0
> built by clang 8.1.0 (clang-802.0.42)
> built with OpenSSL 1.1.0e  16 Feb 2017
> TLS SNI support enabled
> configure arguments:
>    --prefix=/usr/local/Cellar/nginx/1.12.0
>    --with-http_ssl_module
>    --with-pcre
>    --sbin-path=/usr/local/Cellar/nginx/1.12.0/bin/nginx
>    --with-cc-opt='-I/usr/local/opt/pcre/include -I/usr/local/opt/openssl@1.1/include'
>    --with-ld-opt='-L/usr/local/opt/pcre/lib -L/usr/local/opt/openssl@1.1/lib'
>    --conf-path=/usr/local/etc/nginx/nginx.conf
>    --pid-path=/usr/local/var/run/nginx.pid
>    --lock-path=/usr/local/var/run/nginx.lock
>    --http-client-body-temp-path=/usr/local/var/run/nginx/client_body_temp
>    --http-proxy-temp-path=/usr/local/var/run/nginx/proxy_temp
>    --http-fastcgi-temp-path=/usr/local/var/run/nginx/fastcgi_temp
>    --http-uwsgi-temp-path=/usr/local/var/run/nginx/uwsgi_temp
>    --http-scgi-temp-path=/usr/local/var/run/nginx/scgi_temp
>    --http-log-path=/usr/local/var/log/nginx/access.log
>    --error-log-path=/usr/local/var/log/nginx/error.log
>    --with-http_gzip_static_module
>    --with-ipv6
>    --with-http_v2_module
nginx.conf は /usr/local/etc/nginx/nginx.conf に存在します。
以下のコマンドでローカルホスト用の自己証明書のペアを作成します。
作成するキーのペアは http2servertest.key と http2servertest.csr とします。
cd ~/.ssh

openssl genrsa -des3 -out http2servertest.key 2048
openssl req -new -key http2servertest.key -out http2servertest.csr

> Country Name (2 letter code) [AU]:JP
> State or Province Name (full name) [Some-State]:Tokyo
> Common Name (e.g. server FQDN or YOUR name) []:localhost

cp http2servertest.key http2servertest.key.org
openssl rsa -in http2servertest.key.org -out http2servertest.key
openssl x509 -req -days 365 -in http2servertest.csr -signkey http2servertest.key -out http2servertest.crt
nginx.conf と同じディレクトリにキーペアをコピーします。
cp -ip http2servertest.key http2servertest.crt /usr/local/etc/nginx/
nginx.conf に HTTP/2 用の設定を追加します。
(nginx を初めてインストールした場合は、下記以外にも色々と設定が必要です)
# nginx.conf

server {
    listen 8000;
    server_name localhost;
+   listen 443 ssl http2;
+   ssl_prefer_server_ciphers on;
+   ssl_ciphers AESGCM:HIGH:!aNULL:!MD5;
+   ssl_certificate     /usr/local/etc/nginx/http2servertest.crt;
+   ssl_certificate_key /usr/local/etc/nginx/http2servertest.key;
}
sudo nginx -t で nginx.conf をテストします。
nginx: the configuration file /usr/local/etc/nginx/nginx.conf syntax is ok
nginx: configuration file /usr/local/etc/nginx/nginx.conf test is successful
443 ポートを使うため sudo nginx で nginx を起動します。
sudo nginx
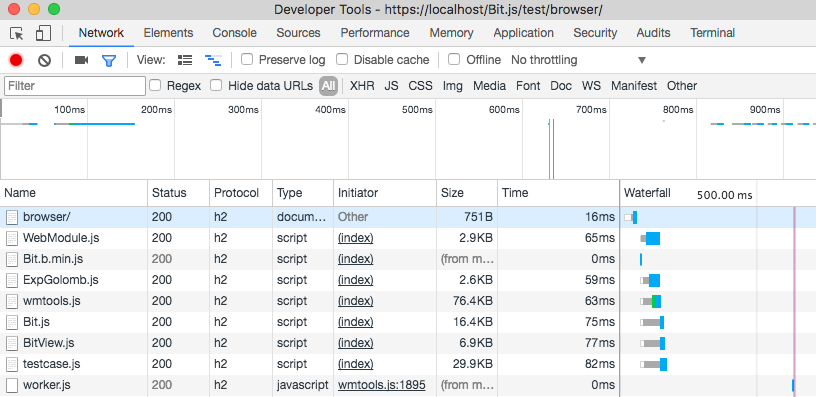
Chrome で https://localhost:443/ にアクセスし、ネットワークタブの Protocol を見ると HTTP/2 が利用されている事を確認します(h2がそれです)。
終わりに
ブラウザ毎の ES Modules の実装状況は https://jakearchibald.com/2017/es-modules-in-browsers/ で学ぶ事ができます。