Unityでディープラーニングや機械学習といえばML-Agentsのことですが、この記事ではML-Agentsの話題は一切ありません。
主に画像を入力して分類やオブジェクト検出する系のディープラーニング推論についての記事になります。
Unityでマルチプラットフォーム対応のディープラーニングを使用したアプリの作り方
Unite Tokyo 2019において個人的に興味深いセッションがありました。
セッションの内容的としては、DeepLearning推論を実行するためのUnity用のプラグインの紹介で、簡単に利用できるフレームワーク、マルチプラットフォーム実行、高速な推論処理が可能というものでした。
このセッション映像を観て、私はつぎのことを思い出しました。
OpenCVでもDnnモジュールで、ディープラーニング推論が実行可能!!!
ということで今回の記事ではUnityでマルチプラットフォーム対応のディープラーニングを使用したアプリを作ってみたいと思います。
OpenCVのWikiでDnnモジュールの対応状況を確認
結構な種類のモデル(Caffe, TensorFlow, Torch, Darknet, Models in ONNX format)とレイヤー、ネットワーク形式に対応していることがわかります。
さらにONNX形式へは、ほとんどのフレームワークから変換可能です。
(当然、最新のレイヤー、ネットワークには対応していませんが、今後も継続して追加更新されていくと思われます)
今回もUnity×OpenCV×マルチプラットフォームということで、OpenCVForUnityアセットを利用したいと思います。
先行事例
実制作に先立って、先行事例がないか検索したところ、ドンピシャの記事を発見。
いずれもOpenCVSharpを使用した方法が紹介されていました。(windowsのみ対応)
こちらは上記の「3Dの姿勢推定のOnnxのモデルでUnityちゃんを動かしてみた」をOpenCVForUnityを利用したものに書き換えてiOSで動くようにしたものです。(おそらくマルチプラットフォーム対応)
もちろんOpenCVForUnityのDnnModulesのExampleコードも大いに参考なりました。
YOLOやOpenPoseなど、代表的なモデルを使用して推論をする例があります。
これらを見て、おおまかな使い方を理解したところで自分でサンプルを作成してみたいと思います。
ベースとなるサンプルコード
OpenCVForUnityのExampleコードを参考にベースクラスをでっち上げました。
このクラスを継承して、ロードするモデルに対応じた前処理、後処理をPreProcessとPostProcessメソッドをオーバーライドして実装していきます。
入力画像、モデルファイルはStreamingAssetsフォルダ内に入っているものとします。

(コードの分量が長いので記事の最後に貼り付けておきます)
ONNX形式のVGG19
まずはONNX Model Zooで公開されているImage Classification(画像分類)のVGG19モデルを試してみます。
入力画像に写っている物体を1000カテゴリに分類します。
https://github.com/onnx/models/tree/master/vision/classification/vgg
https://github.com/onnx/models/blob/master/vision/classification/imagenet_inference.ipynb
using OpenCVForUnity.CoreModule;
using OpenCVForUnity.DnnModule;
using OpenCVForUnity.ImgprocModule;
using System.Collections.Generic;
using UnityEngine;

// model https://github.com/onnx/models/tree/master/vision/classification/vgg
// https://github.com/onnx/models/blob/master/vision/classification/imagenet_inference.ipynb
public class OpenCVDnnVGGExample : OpenCVDnnModuleExampleBase
{
    protected override Mat PreProcess(Mat img)
    {
        // Input
        // All pre - trained models expect input images normalized in the same way, i.e.mini - batches of 3 - channel RGB images of shape(N x 3 x H x W), where N is the batch size, and H and W are expected to be at least 224.The inference was done using jpeg image.

        // Preprocessing
        // The images have to be loaded in to a range of[0, 1] and then normalized using mean = [0.485, 0.456, 0.406] and std = [0.229, 0.224, 0.225].The transformation should preferrably happen at preprocessing. Check imagenet_preprocess.py for code.

        //def preprocess(img_data):
        //    mean_vec = np.array([0.485, 0.456, 0.406])
        //    stddev_vec = np.array([0.229, 0.224, 0.225])
        //    norm_img_data = np.zeros(img_data.shape).astype('float32')
        //    for i in range(img_data.shape[0]):
        //         # for each pixel in each channel, divide the value by 255 to get value between [0, 1] and then normalize
        //        norm_img_data[i,:,:] = (img_data[i,:,:] / 255 - mean_vec[i]) / stddev_vec[i]
        //    return norm_img_data


        // Dnn.blobFromImage(img, 1.0 / 255.0 / 0.229, (224, 224), (0.485, 0.456, 0.406));メソッドを使用すると、
        // norm_img_data[i,:,:] = (img_data[i,:,:] - mean_vec[i]) / 255 / stddev_vec[i]
        // のような順番で計算がされてしまうので指定されたpreprocessとは異なるblobが生成される。
        // したがってDnn.blobFromImageメソッドは使用しないで自前でblobデータを計算する。

        Size inpSize = new Size(inpWidth > 0 ? inpWidth : img.cols(),
                   inpHeight > 0 ? inpHeight : img.rows());
        Scalar mean_vec = new Scalar(0.485, 0.456, 0.406);
        Scalar stddev_vec = new Scalar(0.229, 0.224, 0.225); // scalefactorをチャンネル別に適用するために値を直接指定

        Imgproc.resize(img, img, inpSize);
        Mat norm_img_data = new Mat();
        img.convertTo(norm_img_data, CvType.CV_32F, 1.0 / 255.0);// タイプをfloat32に変換
        Core.subtract(norm_img_data, mean_vec, norm_img_data);// meanを減算
        Core.divide(norm_img_data, stddev_vec, norm_img_data);// stddevを除算

        // 2D(224, 224, channels=3) -> 4D(1, 3, 224, 224)
        Mat blob = Dnn.blobFromImage(norm_img_data);

        return blob;
    }

    protected override void PostProcess(Mat img, List<Mat> outputBlobs)
    {
        // Output
        // The model outputs image scores for each of the 1000 classes of ImageNet.

        // Postprocessing
        // The post - processing involves calculating the softmax probablility scores for each class and sorting them to report the most probable classes.Check imagenet_postprocess.py for code.


        // ImageNet 1000クラス毎の確率(32bits浮動小数点値)が格納された1x1000のMat
        Mat probabilities = outputBlobs[0];

        // 確率(信頼度)の高い順にソートして、上位5つのインデックスを取得
        Mat sorted = new Mat(probabilities.rows(), probabilities.cols(), CvType.CV_32FC1);
        Core.sortIdx(probabilities, sorted, Core.SORT_EVERY_ROW | Core.SORT_DESCENDING);

        Mat top5 = new Mat(sorted, new OpenCVForUnity.CoreModule.Rect(0, 0, 5, 1));

        for (int i = 0; i < top5.cols(); i++)
        {
            int index = (int)top5.get(0, i)[0];
            Debug.Log((i + 1) + " : class=" + classNames[index] + " ; probability=" + probabilities.get(0, index)[0]);
            console.text += (i + 1) + " : class=" + classNames[index] + " ; probability=" + probabilities.get(0, index)[0] + "\n";
        }
    }
}
結果
Inference time, ms: 447.2867
1 : class=n02123045 tabby, tabby cat ; probability=15.5845508575439
2 : class=n02123159 tiger cat ; probability=15.3765754699707
3 : class=n02124075 Egyptian cat ; probability=15.1774978637695
4 : class=n02127052 lynx, catamount ; probability=9.79576587677002
5 : class=n02129604 tiger, Panthera tigris ; probability=9.44003105163574
推論は成功しているようです。
前処理はDnn.blobFromImageメソッドは使用しないで自前でblobデータを計算しています。
同じコードでONNX Model Zooの(前処理、後処理が共通の)MobileNetやResnetやSqueezeモデルに入れ替えても動作可能なので、それぞれのモデルの特徴(ファイルサイズ、推論性能、推論速度)を比較することが可能です。
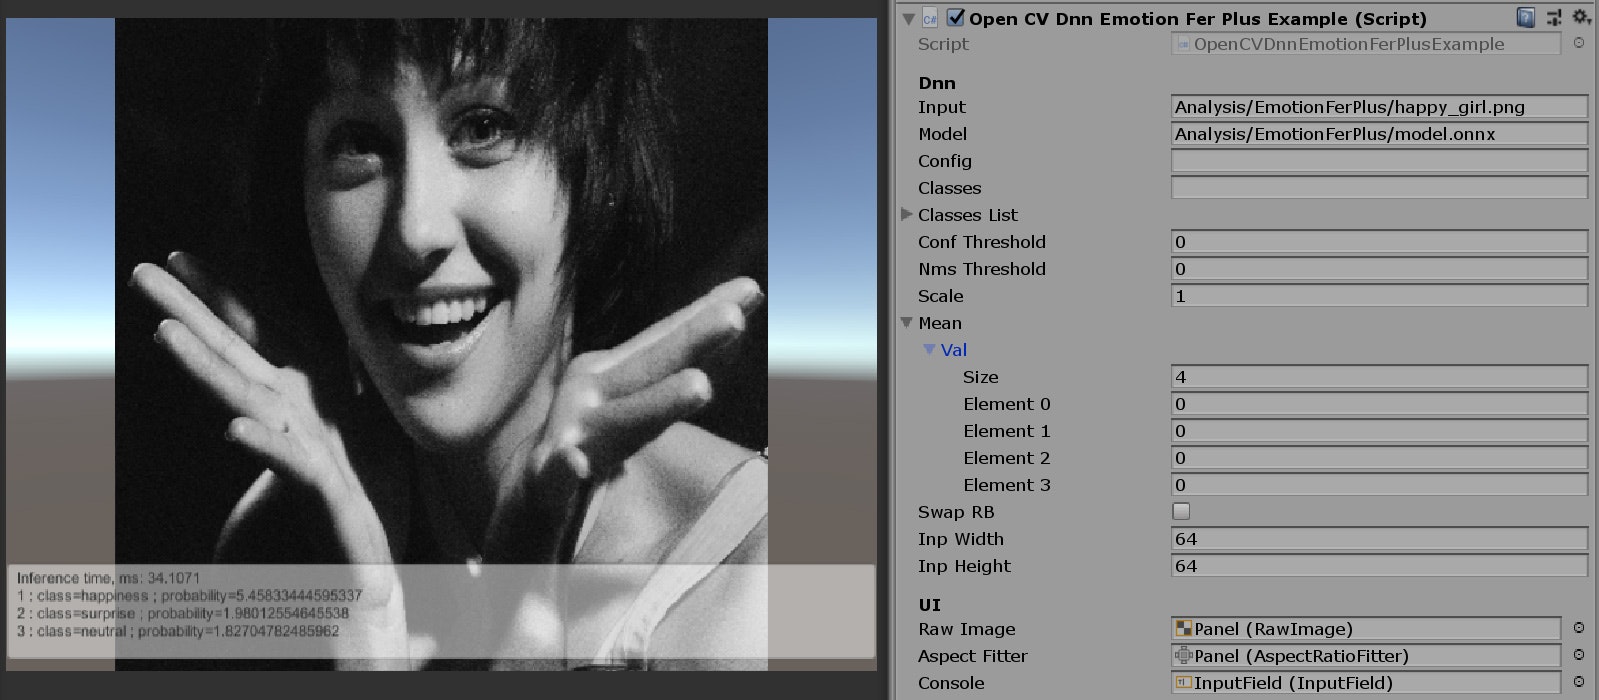
ONNX形式のEmotionFerPlus
ONNX Model Zooで公開されているBody, Face & Gesture AnalysisのEmotionFerPlusモデルを試してみます。
入力画像に写っている人物の感情を分類します。
https://github.com/onnx/models/tree/master/vision/body_analysis/emotion_ferplus
using OpenCVForUnity.CoreModule;
using OpenCVForUnity.DnnModule;
using OpenCVForUnity.ImgprocModule;
using System.Collections.Generic;
using UnityEngine;


//  model https://github.com/onnx/models/tree/master/vision/body_analysis/emotion_ferplus
public class OpenCVDnnEmotionFerPlusExample : OpenCVDnnModuleExampleBase
{

    protected override Mat PreProcess(Mat img)
    {
        // Input
        // The model expects input of the shape(Nx1x64x64), where N is the batch size.

        // Preprocessing
        // Given a path image_path to the image you would like to score:

        //import numpy as np
        //from PIL import Image

        //def preprocess(image_path):
        //  input_shape = (1, 1, 64, 64)
        //  img = Image.open(image_path)
        //  img = img.resize((64, 64), Image.ANTIALIAS)
        //  img_data = np.array(img)
        //  img_data = np.resize(img_data, input_shape)
        //  return img_data

        //return base.PreProcess(img);

        Mat grayImg = new Mat();
        Imgproc.cvtColor(img, grayImg, Imgproc.COLOR_RGB2GRAY);

        // Create a 4D blob from a frame.
        Size inpSize = new Size(inpWidth > 0 ? inpWidth : img.cols(),
                           inpHeight > 0 ? inpHeight : img.rows());
        Mat blob = Dnn.blobFromImage(grayImg, scale, inpSize, mean, swapRB, false, CvType.CV_32F);

        //Debug.Log(ToStringHighDimsMat(blob));

        grayImg.Dispose();

        return blob;
    }

    protected override void PostProcess(Mat img, List<Mat> outputBlobs)
    {
        // Output
        // The model outputs a(1x8) array of scores corresponding to the 8 emotion classes, where the labels map as follows:
        // emotion_table = { 'neutral':0, 'happiness':1, 'surprise':2, 'sadness':3, 'anger':4, 'disgust':5, 'fear':6, 'contempt':7}

        // Postprocessing
        // Route the model output through a softmax function to map the aggregated activations across the network to probabilities across the 8 classes.

        //import numpy as np

        //def softmax(scores):
        //  # your softmax function

        //def postprocess(scores):
        //  '''
        //  This function takes the scores generated by the network and returns the class IDs in decreasing
        //  order of probability.
        //  '''
        //  prob = softmax(scores)
        //  prob = np.squeeze(prob)
        //  classes = np.argsort(prob)[::- 1]
        //  return classes


        //Debug.Log(outputBlobs[0].dump());

        // emotion 8クラス毎の確率(32bits浮動小数点値)が格納された1x8のMat
        Mat probabilities = outputBlobs[0];

        // 確率(信頼度)の高い順にソートして、上位5つのインデックスを取得
        Mat sorted = new Mat(probabilities.rows(), probabilities.cols(), CvType.CV_32FC1);
        Core.sortIdx(probabilities, sorted, Core.SORT_EVERY_ROW | Core.SORT_DESCENDING);

        Mat top5 = new Mat(sorted, new OpenCVForUnity.CoreModule.Rect(0, 0, 5, 1));

        for (int i = 0; i < top5.cols(); i++)
        {
            int index = (int)top5.get(0, i)[0];
            Debug.Log((i + 1) + " : class=" + classNames[index] + " ; probability=" + probabilities.get(0, index)[0]);
            console.text += (i + 1) + " : class=" + classNames[index] + " ; probability=" + probabilities.get(0, index)[0] + "\n";
        }
    }
}
結果
Inference time, ms: 32.6074
1 : class=happiness ; probability=5.45833444595337
2 : class=surprise ; probability=1.98012554645538
3 : class=neutral ; probability=1.82704782485962
4 : class=anger ; probability=0.00366731081157923
5 : class=fear ; probability=-1.28915393352509
推論は成功しているようです。
前処理で入力画像Matをグレースケールの1チャンネルに変換しているのがポイントです。
Torch形式のFastNeuralStyleTransfer
最後にONNX Model Zooで公開されているImage ManipulationのFastNeuralStyleTransferモデルを試してみようと思ったのですが、OpenCVではモデルをロードしようとするとエラーが発生しました。
このようにonnx形式のモデルは対応していないことがあります。(推論処理部分は対応しているはずなので、onnxモデルのインポート部分に問題があるようです)
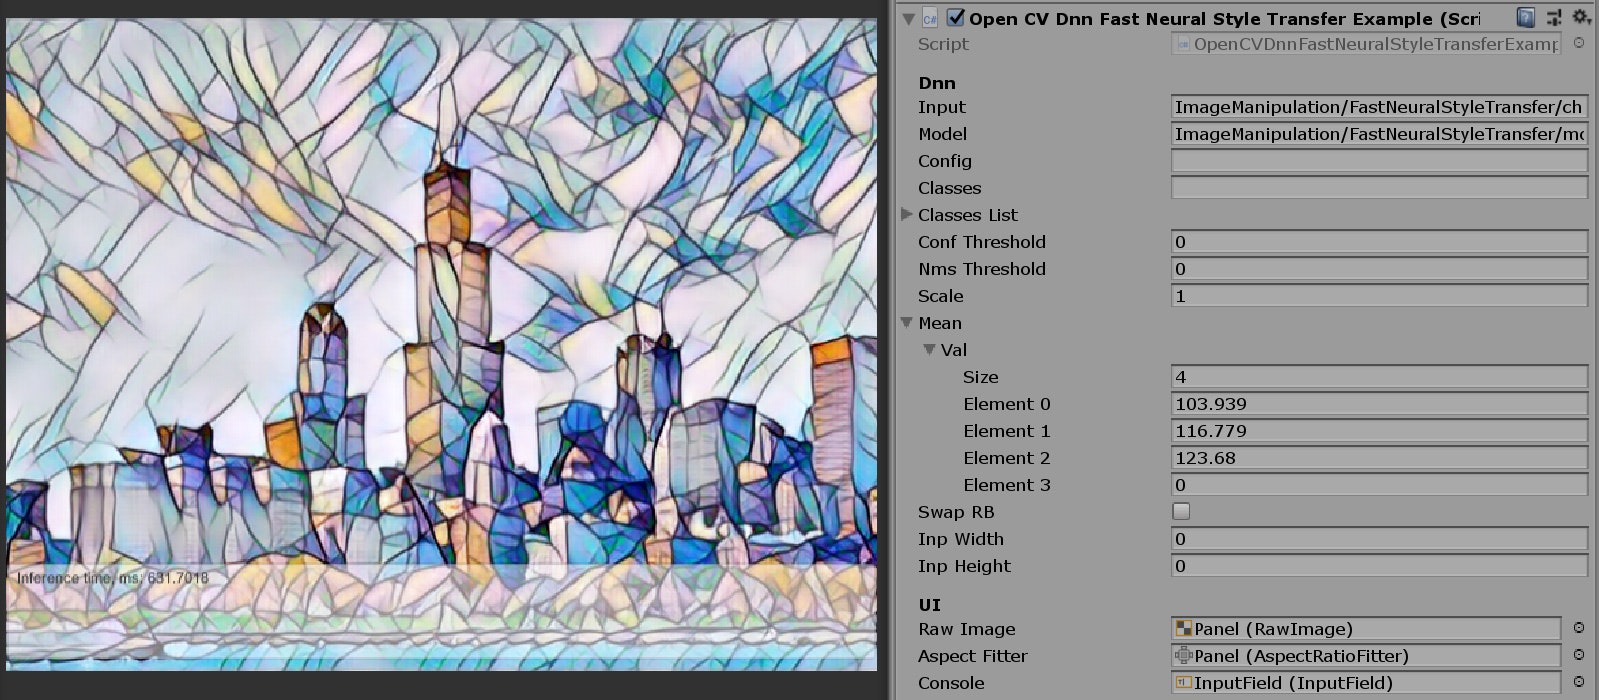
今回は代わりにTorch形式のモデルで試してみます。
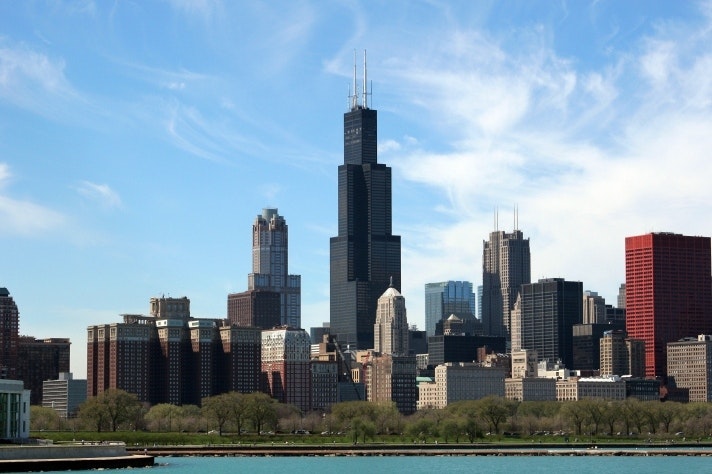
入力画像から画風を変換した新しい画像を出力する処理を行います。
https://github.com/jcjohnson/fast-neural-style
using OpenCVForUnity.CoreModule;
using OpenCVForUnity.ImgprocModule;
using System.Collections.Generic;

// model https://cs.stanford.edu/people/jcjohns/fast-neural-style/models/instance_norm/mosaic.t7
// https://github.com/opencv/opencv/blob/master/samples/dnn/fast_neural_style.py
// http://amroamroamro.github.io/mexopencv/opencv/dnn_style_transfer.html
// https://github.com/jcjohnson/fast-neural-style
public class OpenCVDnnFastNeuralStyleTransferExample : OpenCVDnnModuleExampleBase
{

    protected override Mat PreProcess(Mat img)
    {
        // Preprocessing
        //
        // inp = cv.dnn.blobFromImage(frame, 1.0, (inWidth, inHeight),
        // (103.939, 116.779, 123.68), swapRB = False, crop = False)

        return base.PreProcess(img);
    }

    protected override void PostProcess(Mat img, List<Mat> outputBlobs)
    {
        // Output
        // [1, 3, ‘height’, ‘width’]

        // Postprocessing
        //
        // out = out.reshape(3, out.shape[2], out.shape[3])
        // out[0] += 103.939
        // out[1] += 116.779
        // out[2] += 123.68
        // out /= 255
        // out = out.transpose(1, 2, 0)


        ////////////////////////////////////////
        // 推論結果を画像形式に変換する
        // Convert [N, C, H, W](1) to [H, W](3)
        ////////////////////////////////////////
        Mat output = outputBlobs[0];
        int C = output.size(1);
        int H = output.size(2);
        int W = output.size(3);

        // チャンネルごとにMatを分割する
        Mat output_r = new Mat(output, new Range[] { new Range(0, 1), new Range(0, 1), Range.all(), Range.all() });
        Mat output_g = new Mat(output, new Range[] { new Range(0, 1), new Range(1, 2), Range.all(), Range.all() });
        Mat output_b = new Mat(output, new Range[] { new Range(0, 1), new Range(2, 3), Range.all(), Range.all() });

        // 不要な次元を削除する [1, 1, H, W](1) to [H, W](1)
        output_r = output_r.reshape(1, new int[] { H, W });
        output_g = output_g.reshape(1, new int[] { H, W });
        output_b = output_b.reshape(1, new int[] { H, W });

        // 各チャンネルMatをマージする [H, W](1) * RGB to [H, W](3)
        List<Mat> channels = new List<Mat>();
        channels.Add(output_r);
        channels.Add(output_g);
        channels.Add(output_b);
        Mat merged = new Mat();
        Core.merge(channels, merged);

        // meanを加算
        Core.add(merged, mean, merged);

        if (img.width() != merged.width() || img.height() != merged.height())
            Imgproc.resize(merged, merged, img.size());

        merged.convertTo(img, CvType.CV_8U);
    }
}
結果
Inference time, ms: 629.9388
推論は成功しているようです。
後処理でNumpy.transposeメソッドで1行で出来る処理をOpenCVで再現するために10行以上必要でした。(もっとシンプルな書き方があったら知りたいです)
使用するモデルを入れ替えることで様々な画風に変換することが可能です。
おわりに
OpenCVを使用するメリット
さまざまなフレームワーク形式のモデルの推論を共通のコードで手軽に試すことが可能になります。
さらにOpenCVForUnityを利用してUnity上で実行すれば、マルチプラットフォーム環境(Win, Mac, Linux, Android, iOS, WebGL)でも!!!
推論速度について
推論速度については基本的にはCPUで計算するので遅いと思われがちですが、
以下のPDFの情報を信じるのならば、なんと、フレームワークで推論するよりOpenCVのDNNモジュールで推論したほうが何倍も速いという結果が示されています。
推測ですが、OpenCVには極限まで最適化が施されているためだと思われます。
特別なことをしないでも、マルチプラットフォームでもそこそこの速度が期待できるのは素晴らしいですね。
これからもいろいろなモデルで推論を試してみて、その結果をこの記事に追加していけたらと思います。
OpenCVDnnModuleExampleBase.cs
using OpenCVForUnity.CoreModule;
using OpenCVForUnity.DnnModule;
using OpenCVForUnity.ImgcodecsModule;
using OpenCVForUnity.ImgprocModule;
using OpenCVForUnity.UnityUtils;
using System;
using System.Collections;
using System.Collections.Generic;
using UnityEngine;
using UnityEngine.UI;

public class OpenCVDnnModuleExampleBase : MonoBehaviour
{
    [Header("Dnn")]

    [TooltipAttribute("Path to input image.")]
    public string input;

    [TooltipAttribute("Path to a binary file of model contains trained weights. It could be a file with extensions .caffemodel (Caffe), .pb (TensorFlow), .t7 or .net (Torch), .weights (Darknet).")]
    public string model;

    [TooltipAttribute("Path to a text file of model contains network configuration. It could be a file with extensions .prototxt (Caffe), .pbtxt (TensorFlow), .cfg (Darknet).")]
    public string config;

    [TooltipAttribute("Optional path to a text file with names of classes to label detected objects.")]
    public string classes;

    [TooltipAttribute("Optional list of classes to label detected objects.")]
    public List<string> classesList;

    [TooltipAttribute("Confidence threshold.")]
    public float confThreshold;

    [TooltipAttribute("Non-maximum suppression threshold.")]
    public float nmsThreshold;

    [TooltipAttribute("Preprocess input image by multiplying on a scale factor.")]
    public float scale;

    [TooltipAttribute("Preprocess input image by subtracting mean values. Mean values should be in BGR order and delimited by spaces.")]
    public Scalar mean;

    [TooltipAttribute("Indicate that model works with RGB input images instead BGR ones.")]
    public bool swapRB;

    [TooltipAttribute("Preprocess input image by resizing to a specific width.")]
    public int inpWidth;

    [TooltipAttribute("Preprocess input image by resizing to a specific height.")]
    public int inpHeight;

    protected Net net;

    protected List<string> classNames;
    protected List<string> outBlobNames;
    protected List<string> outBlobTypes;

    protected string classes_filepath;
    protected string input_filepath;
    protected string config_filepath;
    protected string model_filepath;

    protected Texture2D texture;

    [Header("UI")]
    public RawImage rawImage;
    public AspectRatioFitter aspectFitter;
    public InputField console;

    IEnumerator getFilePath_Coroutine;


    // Use this for initialization
    protected IEnumerator Start()
    {
        getFilePath_Coroutine = Utils.getMultipleFilePathsAsync(new string[] { classes, input, config, model },
            (paths) =>
            {
                classes_filepath = paths[0];
                input_filepath = paths[1];
                config_filepath = paths[2];
                model_filepath = paths[3];
            });
        yield return getFilePath_Coroutine;
        getFilePath_Coroutine = null;


        //if true, The error log of the Native side OpenCV will be displayed on the Unity Editor Console.
        Utils.setDebugMode(true);

        Mat img = LoadImage(input_filepath);

        SetupDnn();
        Process(img);

        Utils.setDebugMode(false);

        DisplayImage(img);

        img.Dispose();
    }

    void OnDisable()
    {
        if (getFilePath_Coroutine != null)
        {
            StopCoroutine(getFilePath_Coroutine);
            ((IDisposable)getFilePath_Coroutine).Dispose();
        }

        if (net != null)
            net.Dispose();

        if (texture != null)
        {
            Texture.Destroy(texture);
            texture = null;
        }
    }

    protected virtual Mat LoadImage(string imageFilepath)
    {
        Mat img = Imgcodecs.imread(imageFilepath);
        if (img.empty())
        {
            Debug.LogError(imageFilepath + " is not loaded.");
            img = new Mat(480, 640, CvType.CV_8UC3, new Scalar(0, 0, 0));
        }

        Imgproc.cvtColor(img, img, Imgproc.COLOR_BGR2RGB);

        return img;
    }

    protected virtual void DisplayImage(Mat img)
    {
        if (texture == null) texture = new Texture2D(img.cols(), img.rows(), TextureFormat.RGBA32, false);
        Utils.matToTexture2D(img, texture);
        rawImage.texture = texture;
        // Scale the panel to match aspect ratios
        aspectFitter.aspectRatio = texture.width / (float)texture.height;
    }


    protected virtual void SetupDnn()
    {
        if (!string.IsNullOrEmpty(classes))
        {
            classNames = readClassNames(classes_filepath);
            if (classNames == null)
            {
                Debug.LogError(classes_filepath + " is not loaded.");
            }
        }
        else if (classesList.Count > 0)
        {
            classNames = classesList;
        }

        if (!string.IsNullOrEmpty(config_filepath) && !string.IsNullOrEmpty(model_filepath))
        {
            net = Dnn.readNet(model_filepath, config_filepath);
        }
        else if (!string.IsNullOrEmpty(model_filepath))
        {
            net = Dnn.readNet(model_filepath);
        }
        else
        {
            Debug.LogError(config_filepath + " or " + model_filepath + " is not loaded.");
        }


        outBlobNames = getOutputsNames(net);
        //for (int i = 0; i < outBlobNames.Count; i++)
        //{
        //    Debug.Log("names [" + i + "] " + outBlobNames[i]);
        //}

        outBlobTypes = getOutputsTypes(net);
        //for (int i = 0; i < outBlobTypes.Count; i++)
        //{
        //    Debug.Log("types [" + i + "] " + outBlobTypes[i]);
        //}

    }

    protected virtual void Process(Mat img)
    {
        Mat inputBlob = PreProcess(img);


        TickMeter tm = new TickMeter();
        tm.start();


        List<Mat> outputBlobs = Predict(inputBlob);

        tm.stop();
        Debug.Log("Inference time, ms: " + tm.getTimeMilli());
        console.text += "Inference time, ms: " + tm.getTimeMilli() + "\n";


        PostProcess(img, outputBlobs);

        for (int i = 0; i < outputBlobs.Count; i++)
        {
            outputBlobs[i].Dispose();
        }
        inputBlob.Dispose();
    }

    protected virtual Mat PreProcess(Mat img)
    {
        // Create a 4D blob from a frame.
        Size inpSize = new Size(inpWidth > 0 ? inpWidth : img.cols(),
                           inpHeight > 0 ? inpHeight : img.rows());
        Mat blob = Dnn.blobFromImage(img, scale, inpSize, mean, swapRB, false);

        return blob;
    }

    protected virtual List<Mat> Predict(Mat inputBlob)
    {
        net.setInput(inputBlob);

        List<Mat> outs = new List<Mat>();
        net.forward(outs, outBlobNames);

        return outs;
    }

    protected virtual void PostProcess(Mat img, List<Mat> outputBlobs)
    {

    }

    protected virtual List<string> readClassNames(string filename)
    {
        List<string> classNames = new List<string>();

        System.IO.StreamReader cReader = null;
        try
        {
            cReader = new System.IO.StreamReader(filename, System.Text.Encoding.Default);

            while (cReader.Peek() >= 0)
            {
                string name = cReader.ReadLine();
                classNames.Add(name);
            }
        }
        catch (System.Exception ex)
        {
            Debug.LogError(ex.Message);
            return null;
        }
        finally
        {
            if (cReader != null)
                cReader.Close();
        }

        return classNames;
    }

    private List<string> getOutputsNames(Net net)
    {
        List<string> names = new List<string>();


        MatOfInt outLayers = net.getUnconnectedOutLayers();
        for (int i = 0; i < outLayers.total(); ++i)
        {
            names.Add(net.getLayer(new DictValue((int)outLayers.get(i, 0)[0])).get_name());
        }
        outLayers.Dispose();

        return names;
    }

    private List<string> getOutputsTypes(Net net)
    {
        List<string> types = new List<string>();


        MatOfInt outLayers = net.getUnconnectedOutLayers();
        for (int i = 0; i < outLayers.total(); ++i)
        {
            types.Add(net.getLayer(new DictValue((int)outLayers.get(i, 0)[0])).get_type());
        }
        outLayers.Dispose();

        return types;
    }

    protected string ToStringHighDimsMat(Mat mat)
    {
        string size = "";
        for (int i = 0; i < mat.dims(); ++i)
        {
            size += mat.size(i) + "*";
        }

        return "Mat [ " + size + CvType.typeToString(mat.type()) + ", isCont=" + mat.isContinuous() + ", isSubmat=" + mat.isSubmatrix()
             + ", nativeObj=" + mat.nativeObj + ", dataAddr=" + mat.dataAddr() + " ]";
    }
}


