はじめに
この記事はAdventar Ansible Advent Calendar 2020の17日目の記事です。
AWXでAzure・AWSと触ってきたので、次はOracle Cloud Infrastructure(OCI)をやります。
OCI公式でAnsible利用に関するドキュメントが公開されています。
が、AWXの認証情報の一覧にはOCIが存在しません。
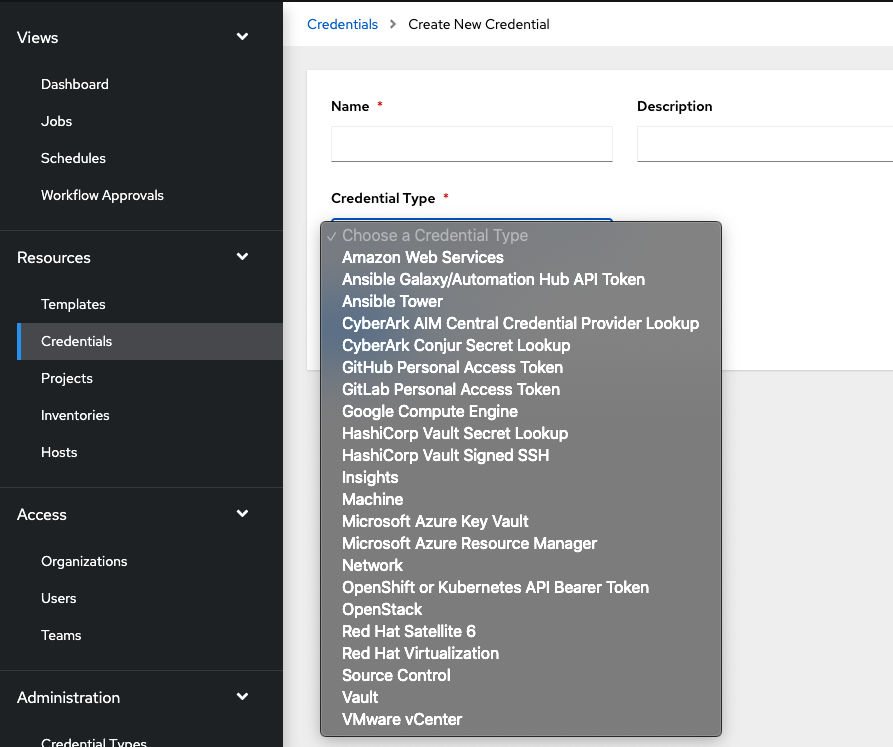
そこで「カスタム認証情報タイプ」を作成する事で、標準にはないOCIに対応させてみます。
環境
AWX 16.0.0 (ARM64自家ビルド版)
AWX venv環境の準備
OCI公式ドキュメントのスタートガイドを読むと、Python用のOracle Cloud Infrastructure SDKのインストールが必要との事でした。
pipでインストールすることができるようなので、以前紹介したvenv環境の作成を行います。
venv環境は以下のように
- Python 3.6
- Ansible 2.9.15
- OCI SDKのインストール
を指定します。
---
custom_venvs:
  - name: oci
    python: python3.6
    python_ansible_version: 2.9.15
    python_modules:
      - oci
また、ARM64版特有の問題と思いますが、そのままですとvenv作成がエラーとなってしまいますので、以下のようにテンプレートファイルの修正を行います。
(initコンテナ内でlibffi-develのインストールとpipのアップグレードを実行)
--- awx-16.0.0/installer/roles/kubernetes/templates/deployment.yml.j2.bak	2020-12-17 00:53:36.000000000 +0900
+++ awx-16.0.0/installer/roles/kubernetes/templates/deployment.yml.j2	2020-12-16 01:59:25.000000000 +0900
@@ -144,12 +144,13 @@ spec:
             - >-
               yum install -y ansible curl python-setuptools epel-release \
                 openssl openssl-devel gcc python-devel &&
-              yum install -y python-virtualenv python36 python36-devel &&
+              yum install -y python-virtualenv python36 python36-devel libffi-devel &&
               mkdir -p {{ custom_venvs_path }} &&
 {% for custom_venv in custom_venvs %}
               virtualenv -p {{ custom_venv.python | default(custom_venvs_python) }} \
                 {{ custom_venvs_path }}/{{ custom_venv.name }} &&
               source {{ custom_venvs_path }}/{{ custom_venv.name }}/bin/activate &&
+              pip install --upgrade pip &&
               {{ custom_venvs_path }}/{{ custom_venv.name }}/bin/pip install {{ trusted_hosts }} -U psutil \
                 "ansible=={{ custom_venv.python_ansible_version }}" &&
 {% if custom_venv.python_modules is defined %}
準備ができたら以下のコマンドでAWXのインストールPlaybookを流します。
$ ansible-playbook -i inventory install.yml --extra-vars "@venv_vars.yaml"
しばらく待って、AWXコンテナがRunning状態になったら準備完了です。
$ kubectl get pod -n awx
NAME                          READY   STATUS    RESTARTS   AGE
awx-postgresql-postgresql-0   1/1     Running   2          38d
awx-7bc79c69f5-rsn2x          3/3     Running   0          9m
この後、AWXのメニューから Settings -> Miscellaneous System でカスタムvenvのパスを記述する必要があるのですが、16.0.0ではうまく保存ができないようです。(保存ボタンが機能しない?)
ですので、APIで追加しました。
$ curl -X PATCH 'http://<ユーザー名>:<パスワード>@<AWXのIP>/api/v2/settings/system/' \
    -d '{"CUSTOM_VENV_PATHS": ["/opt/custom-venvs/"]}'  -H 'Content-Type:application/json'
curl実行後、設定画面で以下のようにパスが保存されていればOKです。

AWX カスタム認証情報タイプの準備
Ansible Towerのドキュメントを参照しつつ進めていきます。
カスタム認証情報タイプとは、入力した値を
- 環境変数
- Ansibleの変数
- 設定ファイル
といった形でPlaybookから参照できるようにする、という仕組みのようです。
ociモジュールのコードを見た結果、必要な値としては、
- OCI_CONFIG_FILE: 認証情報を記述した設定ファイルのパス
- OCI_USER_KEY_FILE: ユーザー認証用の秘密鍵ファイルのパス
の2つの環境変数があればよさそうです。
AWXの左メニュー、 Administration -> Credential Types を開きAddボタンをクリックし登録します。
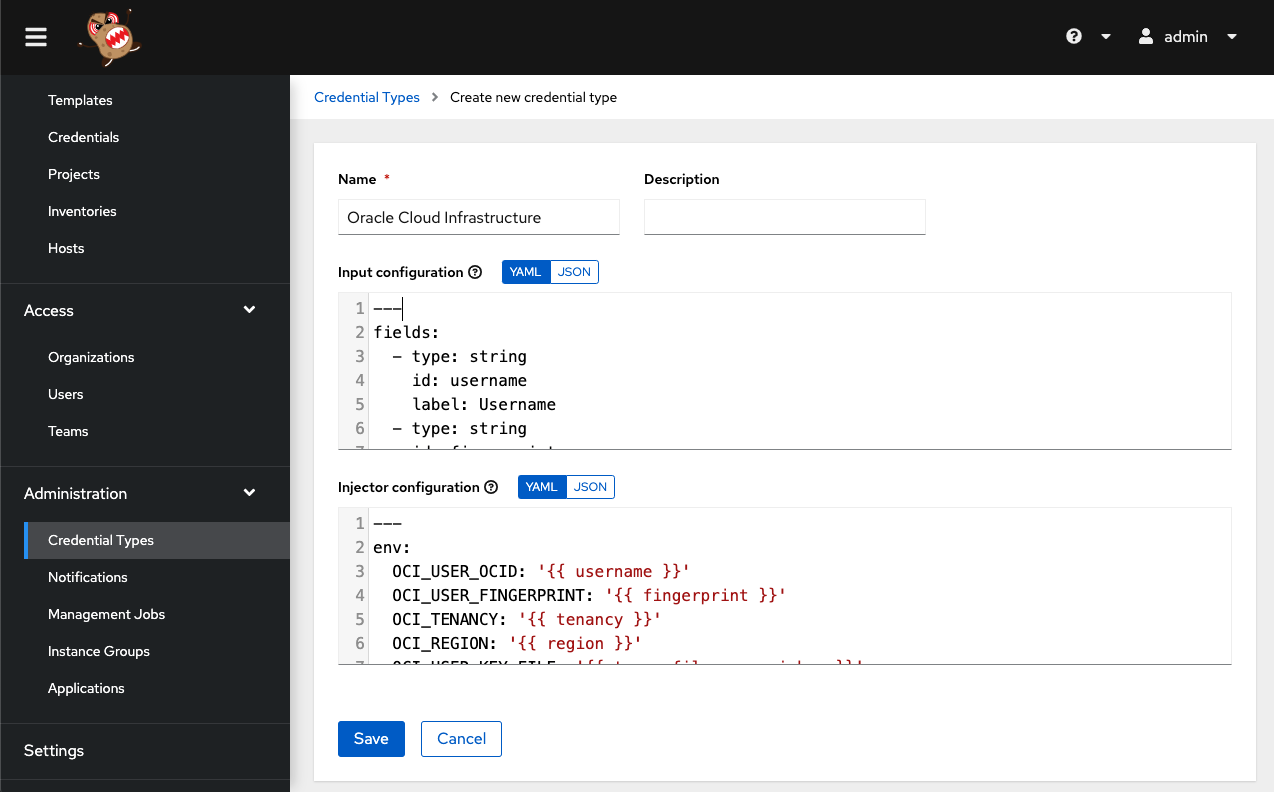
各項目に以下のように入力していきます。
- Name: Oracle Cloud Infrastracture
- Input configuration: 下記YAML
---
fields:
  - id: config_file
    type: string
    label: OCI SDK Config file
    multiline: true
  - id: api_key
    type: string
    label: API Private key
    format: ssh_private_key
    secret: true
    multiline: true
required:
  - config_file
  - api_key
- Injector configuration: 下記YAML
---
env:
  OCI_CONFIG_FILE: '{{ tower.filename.config_file }}'
  OCI_USER_KEY_FILE: '{{ tower.filename.api_key }}'
file:
  template.config_file: '{{ config_file }}'
  template.api_key: '{{ api_key }}'
以上で設定がカスタム認証情報の設定が完了しました。
OCI API実行用ユーザー作成
続いてOCI上でAWX用のユーザーを作成していきます。
コンソールにログインし、ガバナンスと管理 -> アイデンティティ -> ユーザー を選択します。
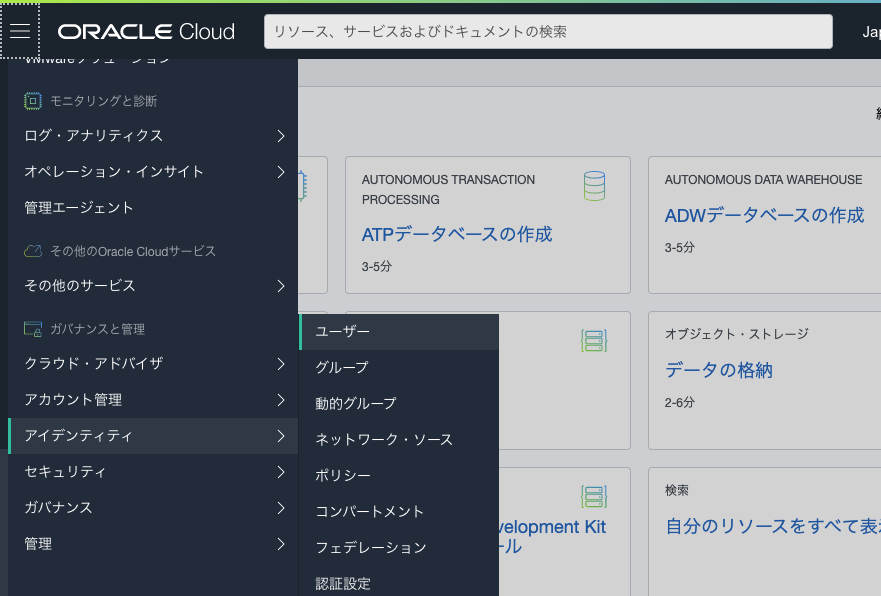
ユーザーの名前と説明を記入し「作成」ボタンをクリックします。
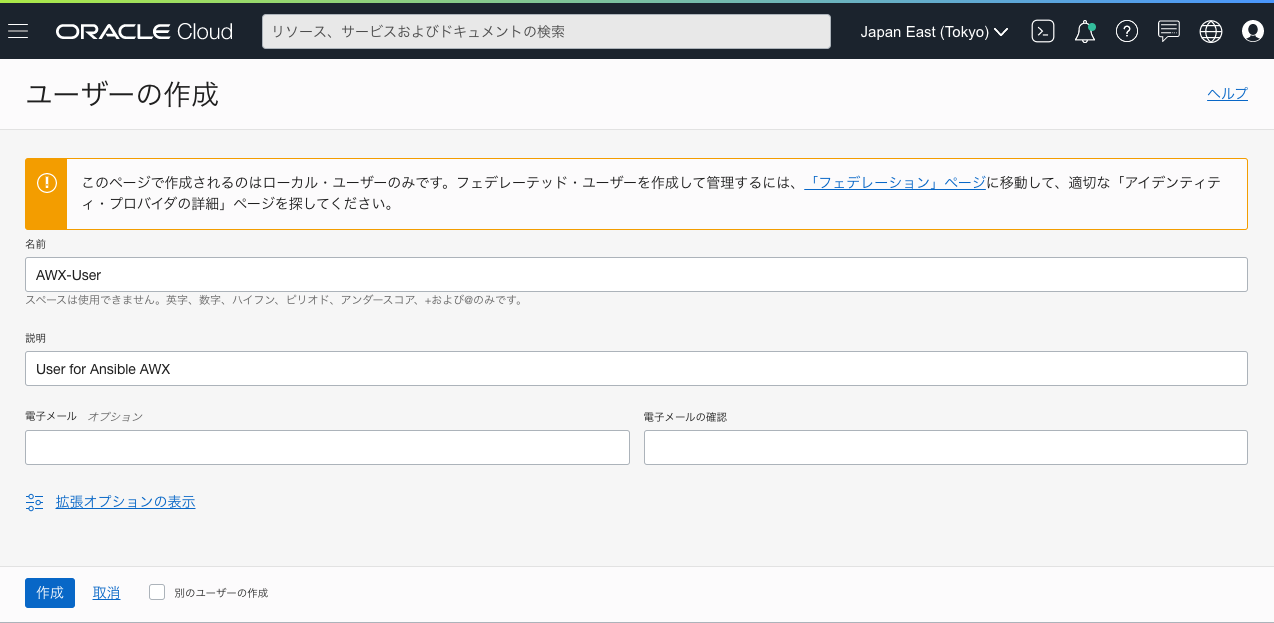
ユーザーが作成されたら、「ユーザー機能の編集」ボタンをクリックし、APIキー以外のチェックを外し保存します。

続いてユーザーのページの左下のリソース -> グループ から「ユーザーをグループの追加」をクリック、リソース作成に必要な権限を持ったグループに紐付けます。
ここでは、Administratorsを追加しました。

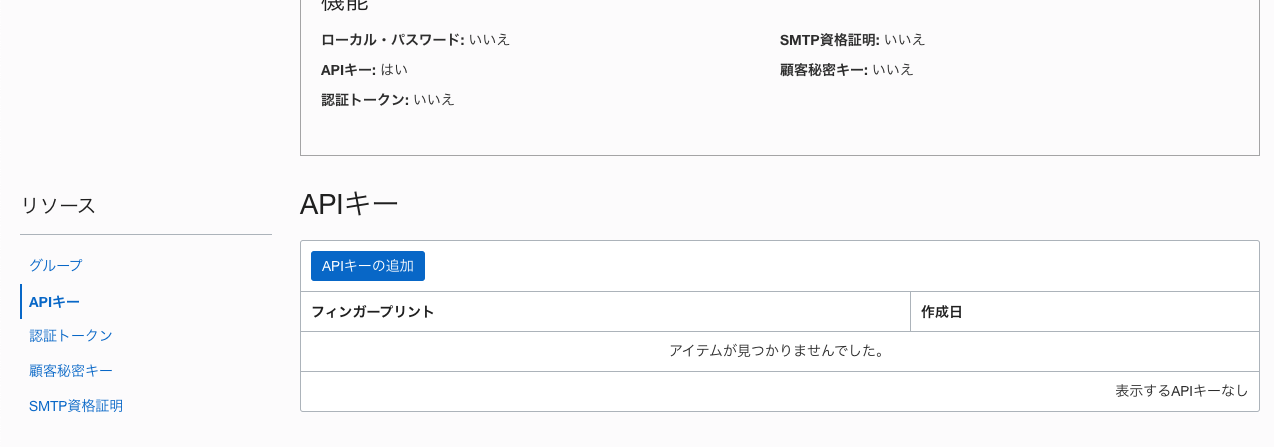
次に左下のリソース -> APIキーを選択し、「APIキーの追加」ボタンをクリックします。
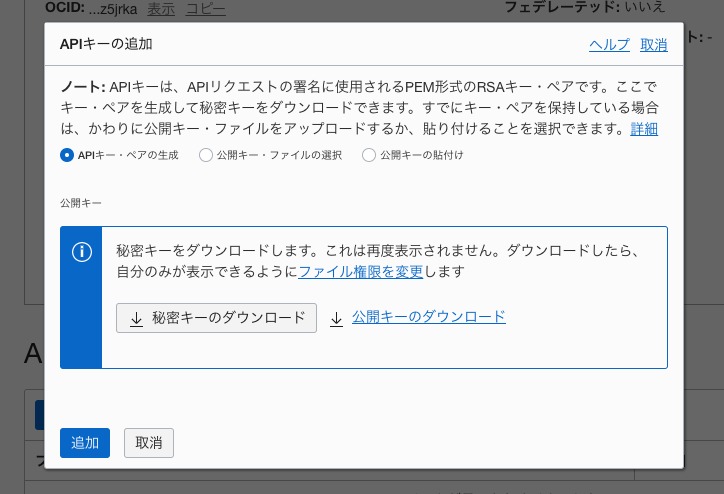
APIキー・ペアの生成 を選択し、「秘密キーのダウンロード」をクリックしキーをダウンロードします。
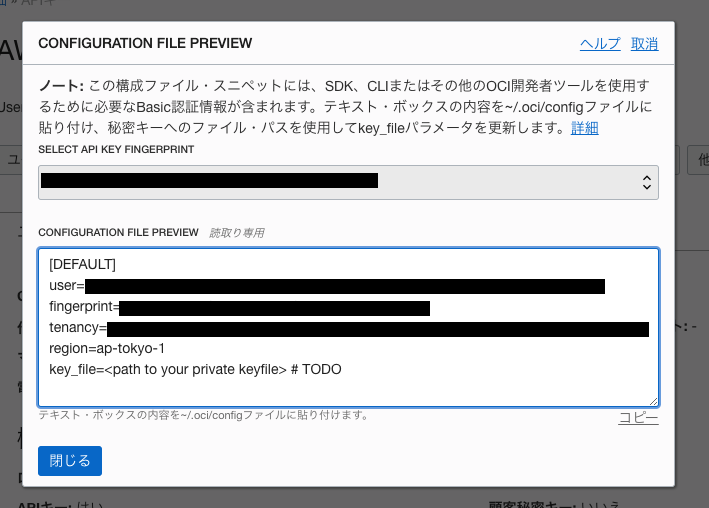
「追加」クリックすると下記の画面が表示されるので、「CONFIGURATION FILE PREVIEW」の中のテキストをコピーして保存、「閉じる」ボタンで完了させます。
認証情報登録
作成したOCI用ユーザーの情報を、AWXの認証情報として登録していきます。
先ほどカスタム認証情報タイプを作成したため、Credential Typeに「Oracle Cloud Infrastructure」という選択肢が増えています。
保存したコンフィグ情報と秘密キーをファイル選択もしくはテキスト貼り付けで入力します。
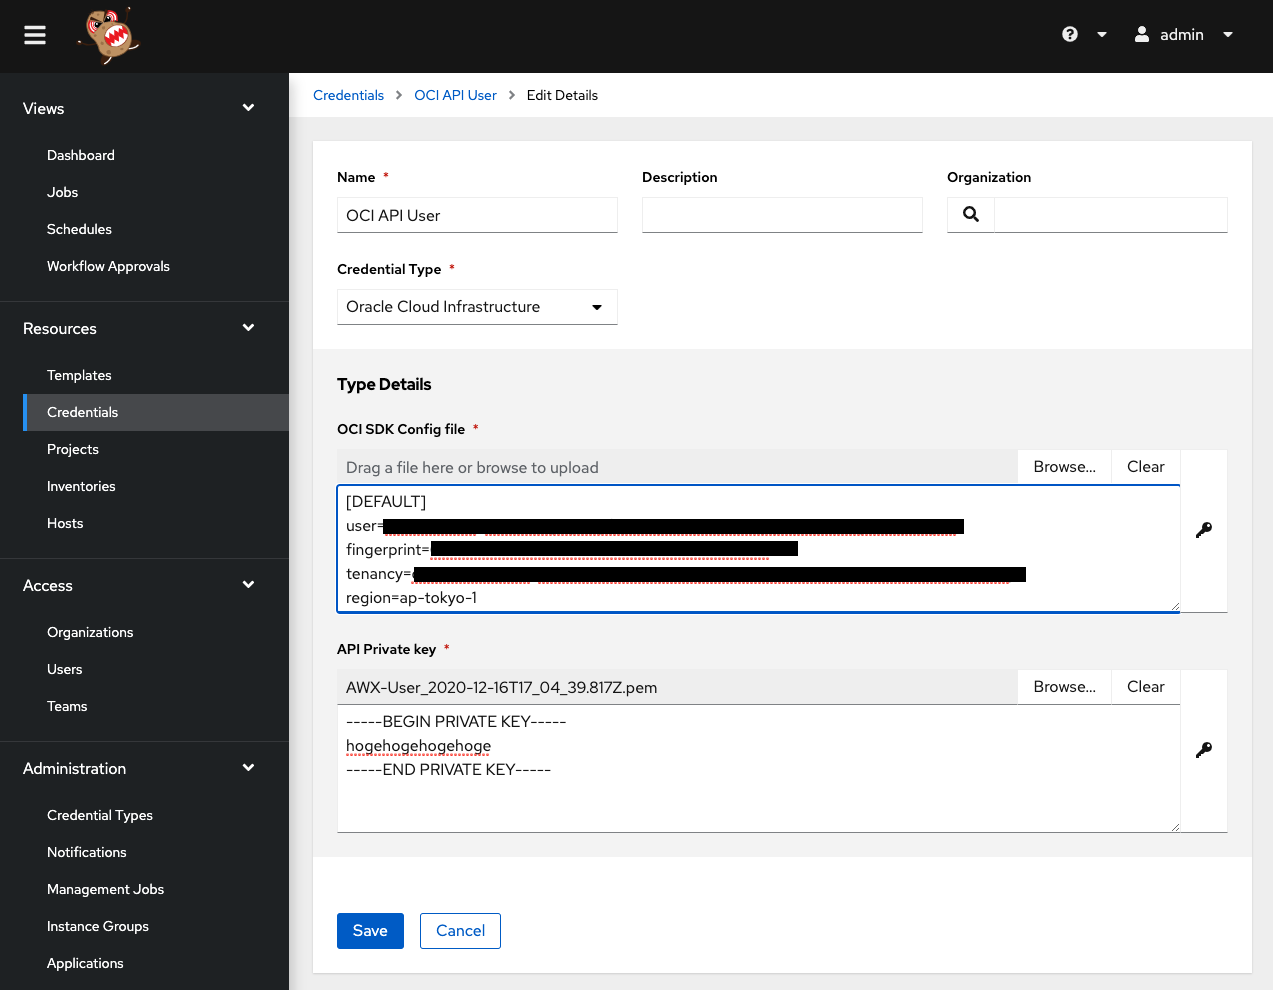
保存したコンフィグ情報の中に以下の行があります。
key_file=<path to your private keyfile> # TODO
秘密キーのファイルパスに置き換えるよう指示がありますが、処理の過程で環境変数OCI_USER_KEY_FILEの値に置き換わっていくため、そのままで問題ありません。
入力が完了したら「Save」ボタンで保存します。
プロジェクト作成
OCI公式のサンプルPlaybookからAlways Freeのインスタンス作成をベースに、以下のプロジェクトを作成しました。
├── collections
│   └── requirements.yaml
└── sample.yaml
---
collections:
  - oracle.oci
---
- name: Create OCI Always free Environment
  hosts: localhost
  connection: local
  collections:
    - oracle.oci
  vars:
    # please chenge before run
    instance_compartment: <コンパートメントOCID>
    instance_ad: "EWPC:AP-TOKYO-1-AD-1" #Availavility Domainの値は環境によって変わると思われる。

    # Ubuntu 20.04
    instance_image: "ocid1.image.oc1.ap-tokyo-1.aaaaaaaamvx4wblavkrmeyrzrsm6gzg3tc4mx22o4c5gv5nq3azwe2kyps5q"

    # common networking definitions
    quad_zero_route: "0.0.0.0/0"
    TCP_protocol: "6"
    SSH_port: "22"

    vcn_name: "myalwaysfreetestvcn"
    vcn_cidr_block: "10.0.0.0/16"
    vcn_dns_label: "alwaysfreevcn"

    ig_name: "myalwaysfreeinternetgatewayformytestvcn"

    route_table_name: "myalwaysfreeroutetable"
    # route all internet access to our Internet Gateway
    route_table_rules:
        - cidr_block: "{{ quad_zero_route }}"
          network_entity_id: "{{ ig_id }}"

    subnet_cidr: "10.0.0.48/28"
    subnet_name: "myalwaysfreetestsubnet"
    subnet_dns_label: "myfreesubnet"

    securitylist_name: "myalwaysfreesecuritylist"

    # always free shape
    instance_shape: "VM.Standard.E2.1.Micro"
    instance_hostname: "myalwaysfreetestinstance"
  tasks:
    - name: Get SSH Authorized key
      uri:
        url: https://gitlab.com/ussvgr.keys
        return_content: yes
      register: ssh_key

    - name: Dump SSH Authorized key
      debug:
        msg: "SSH Public key is {{ ssh_key.content }}"

    - name: Create a VCN
      oci_network_vcn:
        compartment_id: "{{ instance_compartment }}"
        display_name: "{{ vcn_name }}"
        cidr_block: "{{ vcn_cidr_block }}"
        dns_label: "{{ vcn_dns_label }}"
      register: result
    - set_fact:
        vcn_id: "{{ result.vcn.id }}"

    - name: Create a new Internet Gateway
      oci_network_internet_gateway:
        compartment_id: "{{ instance_compartment }}"
        vcn_id: "{{ vcn_id }}"
        name: "{{ ig_name }}"
        is_enabled: 'yes'
        state: 'present'
      register: result
    - set_fact:
        ig_id: "{{ result.internet_gateway.id }}"

    - name: Create route table to connect internet gateway to the VCN
      oci_network_route_table:
        compartment_id: "{{ instance_compartment }}"
        vcn_id: "{{ vcn_id }}"
        name: "{{ route_table_name }}"
        route_rules: "{{ route_table_rules }}"
        state: 'present'
      register: result
    - set_fact:
        rt_id: "{{ result.route_table.id }}"

    - name: Create a security list for allowing access to public instance
      oci_network_security_list:
        name: "{{ securitylist_name }}"
        compartment_id: "{{ instance_compartment }}"
        vcn_id: '{{ vcn_id }}'
        ingress_security_rules:
          - source: "{{ quad_zero_route }}"
            protocol: "{{ TCP_protocol }}"
            tcp_options:
              destination_port_range:
                min: {{ SSH_port }}
                max: {{ SSH_port }}
        egress_security_rules:
          - destination: "{{ quad_zero_route }}"
            protocol: "{{ TCP_protocol }}"
            tcp_options:
              destination_port_range:
                min: {{ SSH_port }}
                max: {{ SSH_port }}
      register: result
    - set_fact:
        instance_security_list_ocid: "{{ result.security_list.id }}"

    - name: Create a subnet to host the public instance. Link security_list and route_table.
      oci_network_subnet:
        availability_domain: "{{ instance_ad }}"
        cidr_block: "{{ subnet_cidr }}"
        compartment_id: "{{ instance_compartment }}"
        display_name: "{{ subnet_name }}"
        prohibit_public_ip_on_vnic: false
        route_table_id: "{{ rt_id }}"
        security_list_ids: [ "{{ instance_security_list_ocid }}" ]
        vcn_id: '{{ vcn_id }}'
        dns_label: "{{ subnet_dns_label }}"
      register: result
    - set_fact:
        instance_subnet_id: "{{ result.subnet.id }}"

    - name: Launch an instance
      oci_compute_instance:
        availability_domain: "{{ instance_ad }}"
        compartment_id: "{{ instance_compartment }}"
        name: "my_always_free_test_instance"
        source_details:
          source_type: image
          image_id: "{{ instance_image }}"
        shape: "{{ instance_shape }}"
        create_vnic_details:
            assign_public_ip: True
            hostname_label: "{{ instance_hostname }}"
            subnet_id: "{{ instance_subnet_id }}"
        metadata:
            ssh_authorized_keys: "{{ ssh_key.content }}"
      register: result

    - name: Print instance details
      debug:
        msg: "Launched a new instance {{ result }}"
    - set_fact:
        instance_id: "{{result.instance.id }}"

    - name: Get the VNIC attachment details of instance
      oci_compute_vnic_attachment_facts:
        compartment_id: "{{ instance_compartment }}"
        instance_id: "{{ instance_id }}"
      register: result

    - name: Get details of the VNIC
      oci_network_vnic_facts:
        id: "{{ result.vnic_attachments[0].vnic_id }}"
      register: result
    - set_fact:
        instance_public_ip: "{{result.vnic.public_ip}}"

    - name: Print the public ip of the newly launched instance
      debug:
        msg: "Public IP of launched instance {{ instance_public_ip }}"

    - name: Wait (upto 5 minutes) for port 22 to become open
      wait_for:
        port: 22
        host: '{{ instance_public_ip }}'
        state: started
        delay: 10
      vars:
        ansible_connection: local
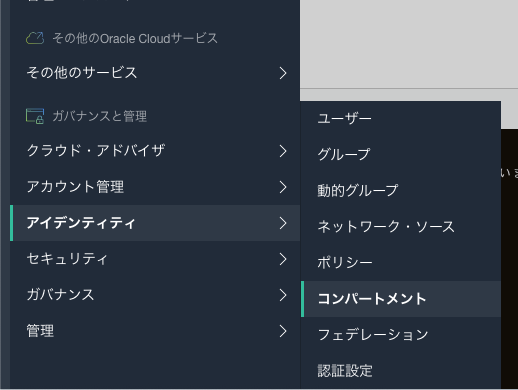
コンパートメントOCIDは、OCIコンソールの左メニュー、アイデンティティ -> コンパートメント と辿っていくと確認できます。
Availavility DomainはCloudShellなどからOCI CLIツールを利用して確認可能です。
$ oci iam availability-domain list --query 'data[*].name'
[
  "EWPC:AP-TOKYO-1-AD-1"
]
また、プロジェクトには冒頭で作成したOCI用のvenvを指定する必要がありますが、AWX 16.0.0ですと環境を選択するリストボックスが表示されませんでした。
なので、こちらもAPIで設定を追加します。
プロジェクトをいったん保管し、ブラウザのURLバーを確認しプロジェクトのIDを確認します。(下記例だと「28」です)

以下のcurlコマンドでAPIを実行します。
$ curl -X PATCH 'http://<ユーザー名>:<パスワード>@<AWXのIP>/api/v2/projects/28/' \
    -d '{"custom_virtualenv": "/opt/custom-venvs/oci/"}'  -H 'Content-Type:application/json'
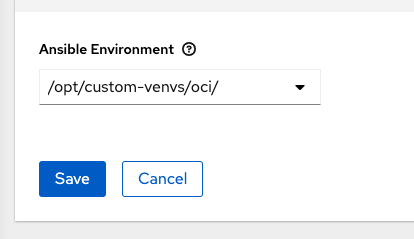
プロジェクトを再度ブラウザで確認し、設定が以下のように反映されていればOKです。
ジョブテンプレート作成
以下のようにジョブテンプレートを作成します。
- Inventory: localhostが含まれるインベントリを作成して指定
- Project: 上記で作成したプロジェクトを指定
- Playbook: sample.yaml
- Credentials: Categoryから「Oracle Cloud Infrastructure」を選び、登録したOCIの認証情報を指定
実行
ジョブテンプレートを実行してしばらく待つと、以下のように仮想サーバのパブリックIPがログに表示されます。

Playbook内で指定した鍵ペアでSSHログインして、仮想サーバが起動している事を確認してみましょう!
おわりに
OCIはAlwaysFree枠が他クラウドよりもスペックが良く、個人的な検証用途には重宝しています。
AWXでボタン1つでVMデプロイ可能になったので、作っては壊しのサイクルがより捗りそうです。
参考資料
ANSIBLE TOWERでVIRTUALENVを使ってみる | 日常系エンジニアのTech Blog
APIでのvenv設定について参考にさせていただきました。
Ansible Galaxyのoracle.ociコレクション
ociモジュールのドキュメント
めちゃくちゃ大量にあります。Oracle様の本気度合いを感じる。
