概要
Amazon Linux 2 は最初から Python2 が入っていますが、Python3 と wsgi の環境を構築します。
WSGIについてはこちら。
https://docs.python.org/ja/3/library/wsgiref.html
https://gihyo.jp/dev/feature/01/wsgi/0001
※Python をいろいろな Web サーバで使うための仕組み
Apache,Python3 のインストール
まずはApache2.4をインストールします。
sudo su
yum install httpd
続いてpython3をインストールします
yum install python3
※この文章の作成時点では /usr/bin/python3 にインストールされました。
バージョン確認
/usr/bin/python3 --version
元から入っているpython
/bin/python --version
wsgiのコンパイル準備
mod_wsgi もyumでインストールできるのですが、python2と紐付いてしまうため、
ソースコードからコンパイルします。
yum install gcc
※gccが無いと、configure時に
configure: error: no acceptable C compiler found in $PATH
というエラーになります。
yum install httpd-devel
※httpd-develが無いと、congigure時に
/bin/sh: apxs: command not found
というエラーになります。
yum install python3-devel
※python3-develが無いと、make時に
src/server/wsgi_python.h:24:10: fatal error: Python.h: No such file or directory
というエラーになります。
yum install git
git clone https://github.com/GrahamDumpleton/mod_wsgi.git
cd mod_wsgi
wsgiのコンパイル
configure(間違えたパス)
./configure --with-python=/usr/lib64/python3.7/
ではありません。
※このオプションだとmake時に
src/server/wsgi_python.h:24:10: fatal error: Python.h: No such file or directory
というエラーになります。
※python3-develが無い時と同じエラーになります。
configure(正しいパス)
./configure --with-python=/usr/bin/python3
make
make install
以下のようなメッセージが表示されれば成功です。
Libraries have been installed in:
   /usr/lib64/httpd/modules

If you ever happen to want to link against installed libraries
in a given directory, LIBDIR, you must either use libtool, and
specify the full pathname of the library, or use the `-LLIBDIR'
flag during linking and do at least one of the following:
   - add LIBDIR to the `LD_LIBRARY_PATH' environment variable
     during execution
   - add LIBDIR to the `LD_RUN_PATH' environment variable
     during linking
   - use the `-Wl,-rpath -Wl,LIBDIR' linker flag
   - have your system administrator add LIBDIR to `/etc/ld.so.conf'

See any operating system documentation about shared libraries for
more information, such as the ld(1) and ld.so(8) manual pages.
----------------------------------------------------------------------
chmod 755 /usr/lib64/httpd/modules/mod_wsgi.so
※
/etc/httpd/modules/mod_wsgi.so
が作成されます。
モジュール読み込み設定
httpd.confに書いてもいいのですが、以下にファイルを作成します。
/etc/httpd/conf.modules.d/
vim /etc/httpd/conf.modules.d/wsgi.conf
中身
LoadModule wsgi_module modules/mod_wsgi.so
httpd.confの設定を変更し、ドキュメントルートでのプログラム動作を許可します。
※この設定が無いとInternal Errorが発生します。
cp /etc/httpd/conf/httpd.conf /etc/httpd/conf/httpd.conf.`date "+%Y%m%d"`
vim /etc/httpd/conf/httpd.conf
変更点
Options Indexes FollowSymLinks
→
Options Indexes FollowSymLinks ExecCGI
# AddHandler cgi-script .cgi
→
# AddHandler cgi-script .cgi
AddHandler wsgi-script .wsgi
サーバーを再起動します。
systemctl restart httpd.service
ドキュメントルートの権限を変更します。
chmod 777 /var/www/html
※本番環境では適切な権限設定としてください。
プログラムの設置
wsgiプログラムの場合、一般的な以下のようなpythonプログラムは動作しません。
# !/bin/python
# -*- coding: utf-8 -*-

import sys, codecs
import io

print("Content-Type: text/html\n")
print("Hello World")
ブラウザ上では 404 Not Found となります。
エラーログ(/var/log/httpd/error_log)を見ると
mod_wsgi (pid=8942): Target WSGI script '/var/www/html/test.wsgi' does not contain WSGI application 'application'.
というエラーが表示されます。
githubにあるサンプルのように、application 関数が必要となります。
https://github.com/GrahamDumpleton/mod_wsgi/tree/develop/tests
hello world作成
vim /var/www/html/hello.wsgi
中身
def application(environ, start_response):
    status = '200 OK'
    output = b'Hello World!'

    response_headers = [('Content-type', 'text/plain'),
                        ('Content-Length', str(len(output)))]
    start_response(status, response_headers)

    return [output]
権限変更
chmod 755 /var/www/html/hello.wsgi
ブラウザでアクセス
http://ipアドレス/hello.wsgi
バージョン確認ページ作成
vim /var/www/html/version.wsgi
中身
import sys

def application(environ, start_response):
    status = '200 OK'
    response_headers = [('Content-type', 'text/plain')]
    start_response(status, response_headers)
    return [sys.version.encode()]
権限変更
chmod 755 /var/www/html/version.wsgi
ブラウザでアクセス
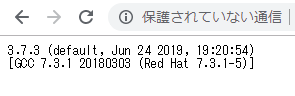
http://ipアドレス/version.wsgi
以下のようなページが出れば成功です。
お疲れ様でした。