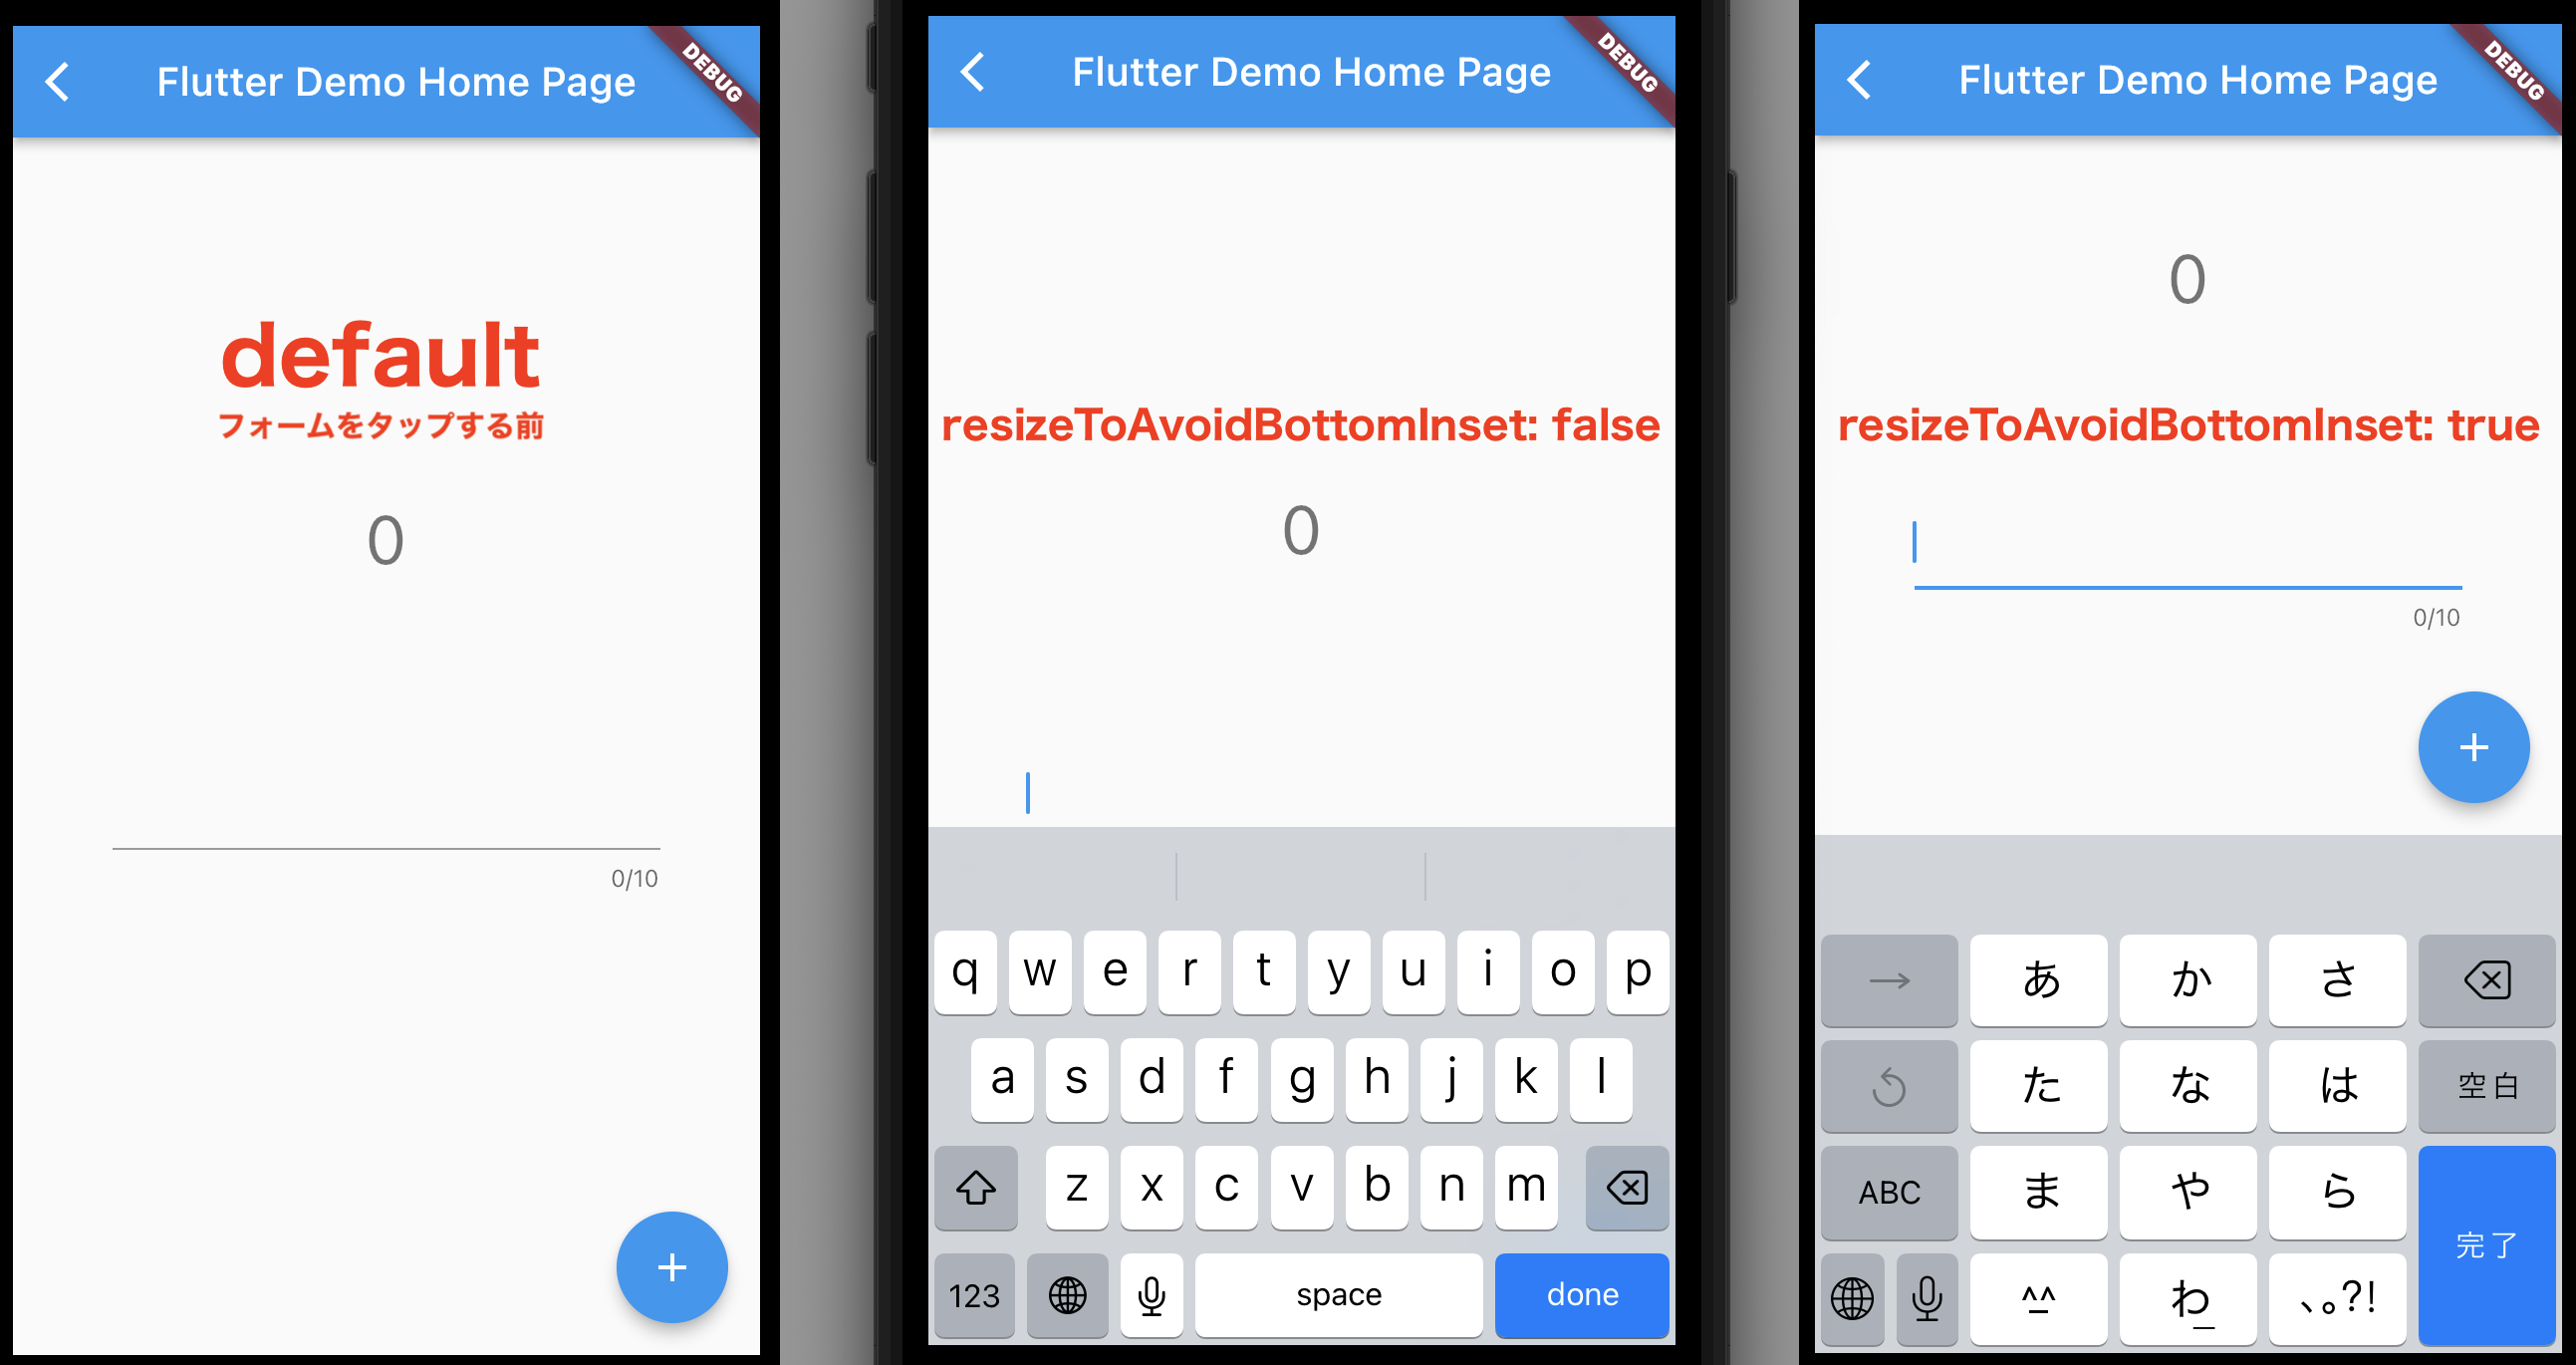
resizeToAvoidBottomInsetを使用するとwidgetとbodyが重ならないようにキーボード部分を押し上げてくれて上手くいくのですが、
増やした入力欄や下段にレイアウトしたButtonなどの影響により、
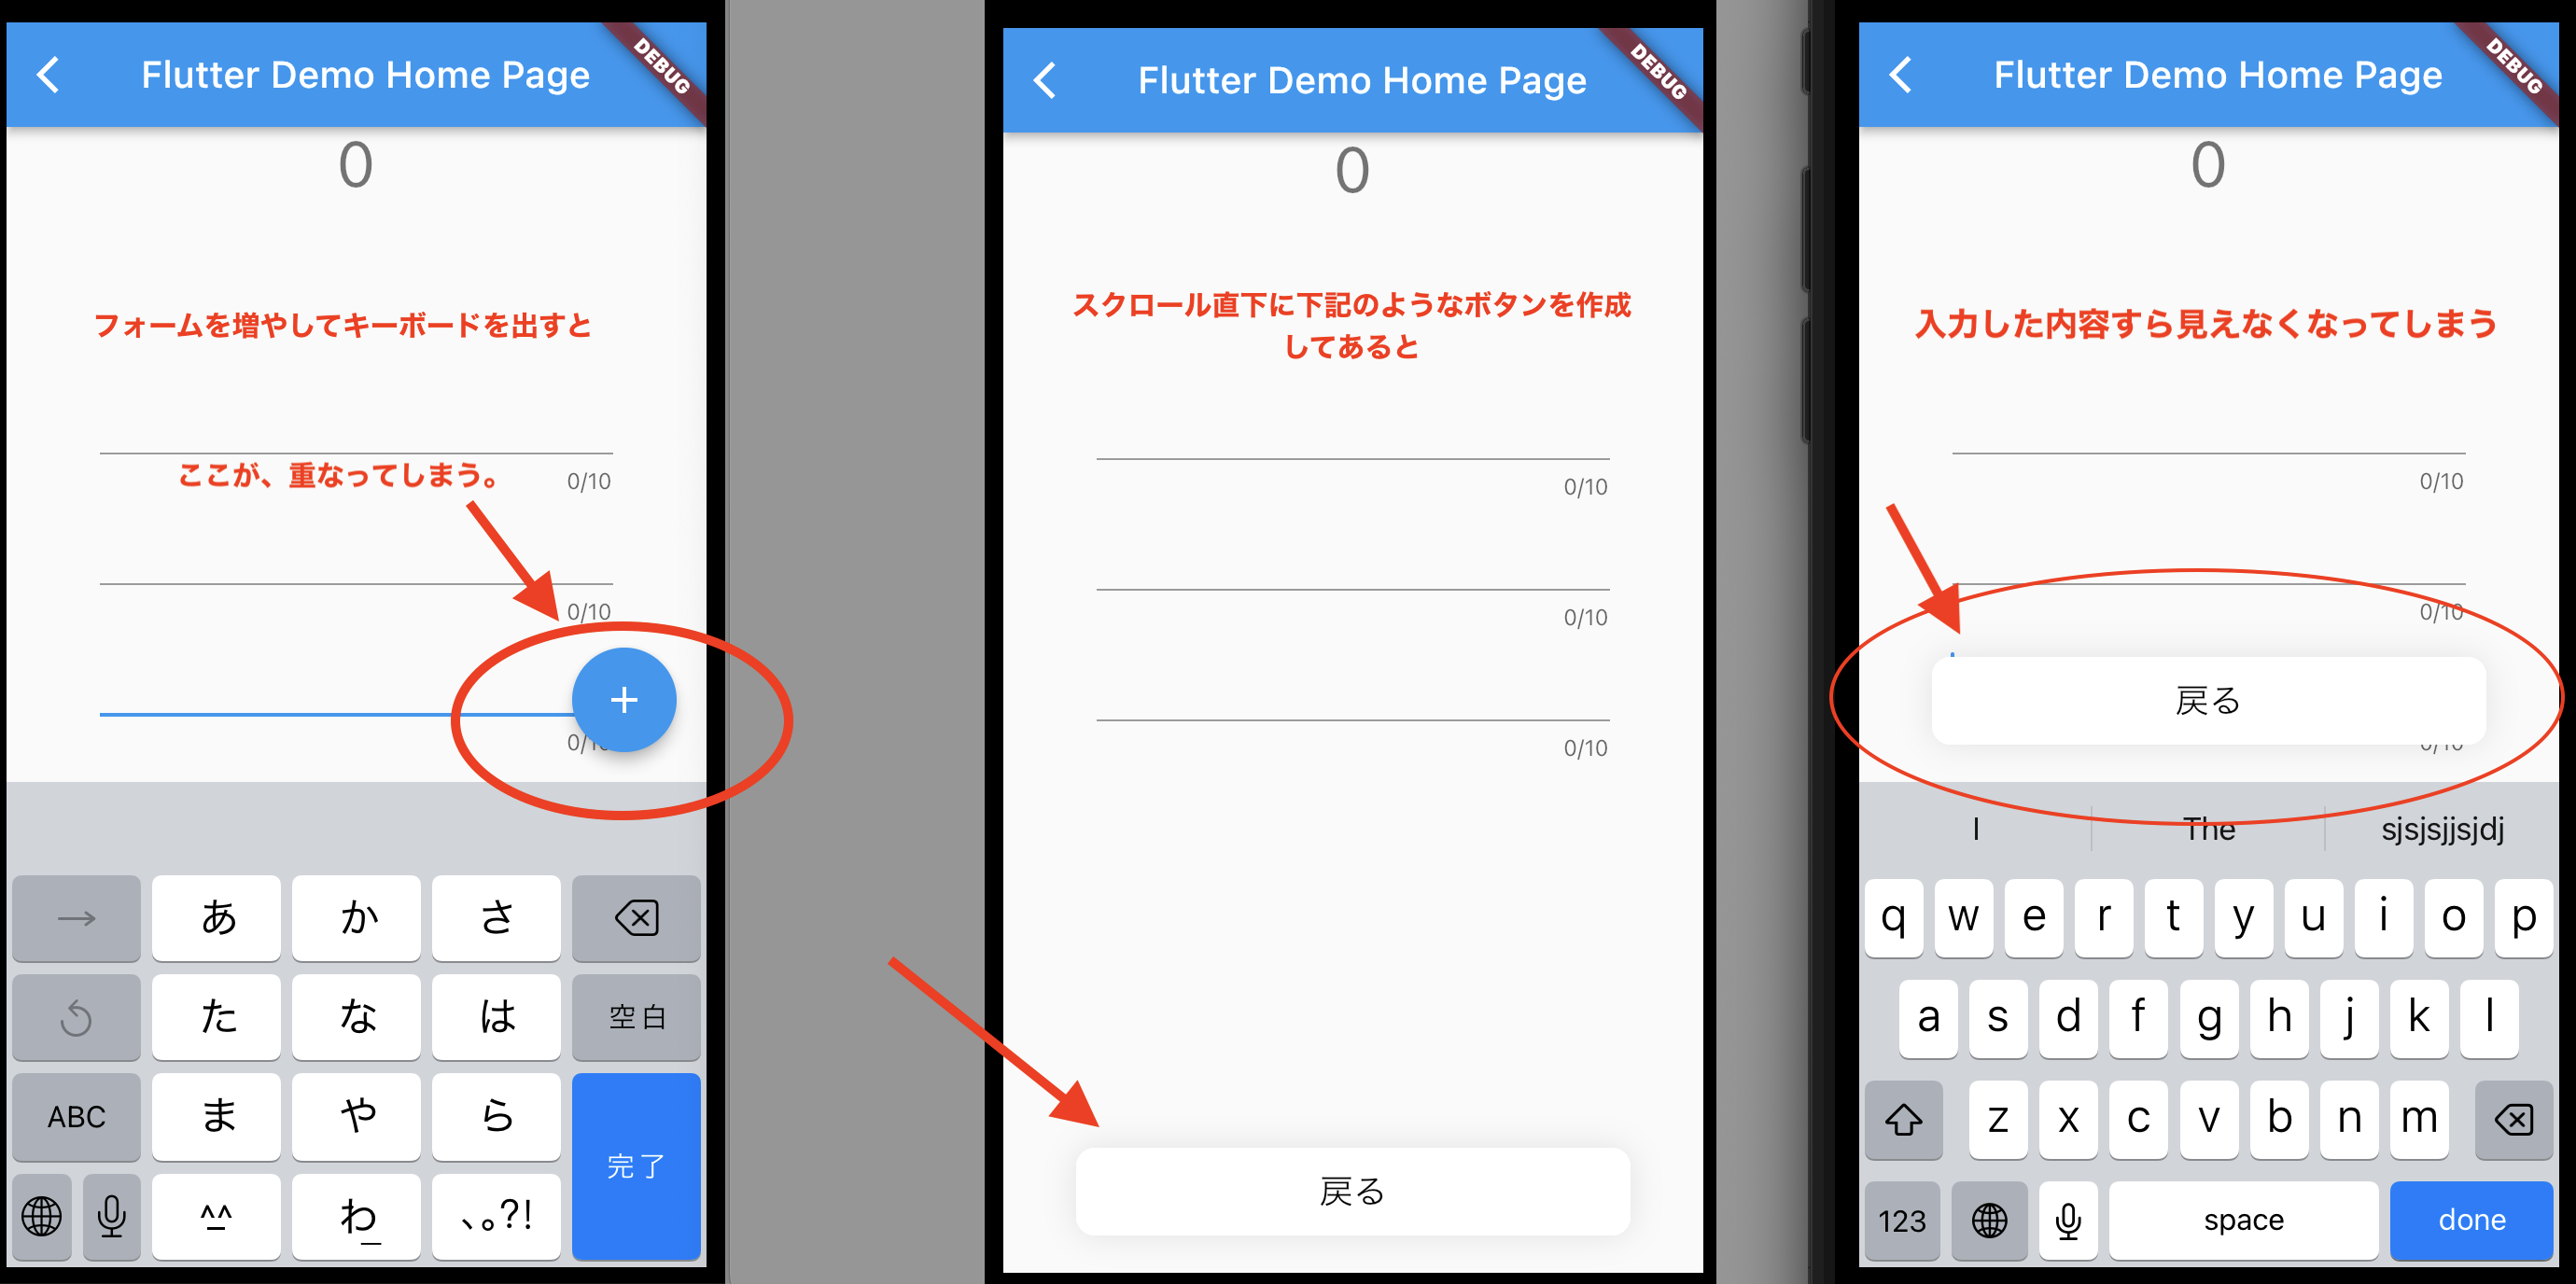
フォームの入力部分にStackされてしまい何を入力しているのかわからなくなってしまった場合の対処法です。位置調整にHooksのuseEffectを使い毎回呼ばれるようにしてあります。
 // キーボードの高さを取得してbottomSpaceにいれる
    final bottomSpace = MediaQuery.of(context).viewInsets.bottom;
    // SingleChildScrollViewを管理
    final scrollController = ScrollController();
    useEffect(() {
      // ビルド直後にscrollControllerの位置を調整
      WidgetsBinding.instance.addPostFrameCallback((_) {
        scrollController.jumpTo(scrollController.position.maxScrollExtent);
      });
      return null;
    }, const []);
bodyの部分の実装になります。こちらでStack部分のスクロール調整を行います。今回は記述していませんが、場合によってはScaffold直下にresizeToAvoidBottomInset: falseを設定して下さい。
body: Stack(children: [
        // まずこのSingleChildScrollViewでラップする必要がある
        SingleChildScrollView(
            // controllerでスクロールされる位置を制御
            controller: scrollController,
            // 入力に対してスクロールが境界を超えないように制御
            physics: ClampingScrollPhysics(),
            // 読み取り方向にスクロールさせたいのでreverseをtrueに
            reverse: true,
            // Paddingでラップしてbottom部分の余白を取ります
            child: Padding(
              padding: EdgeInsets.only(bottom: bottomSpace),
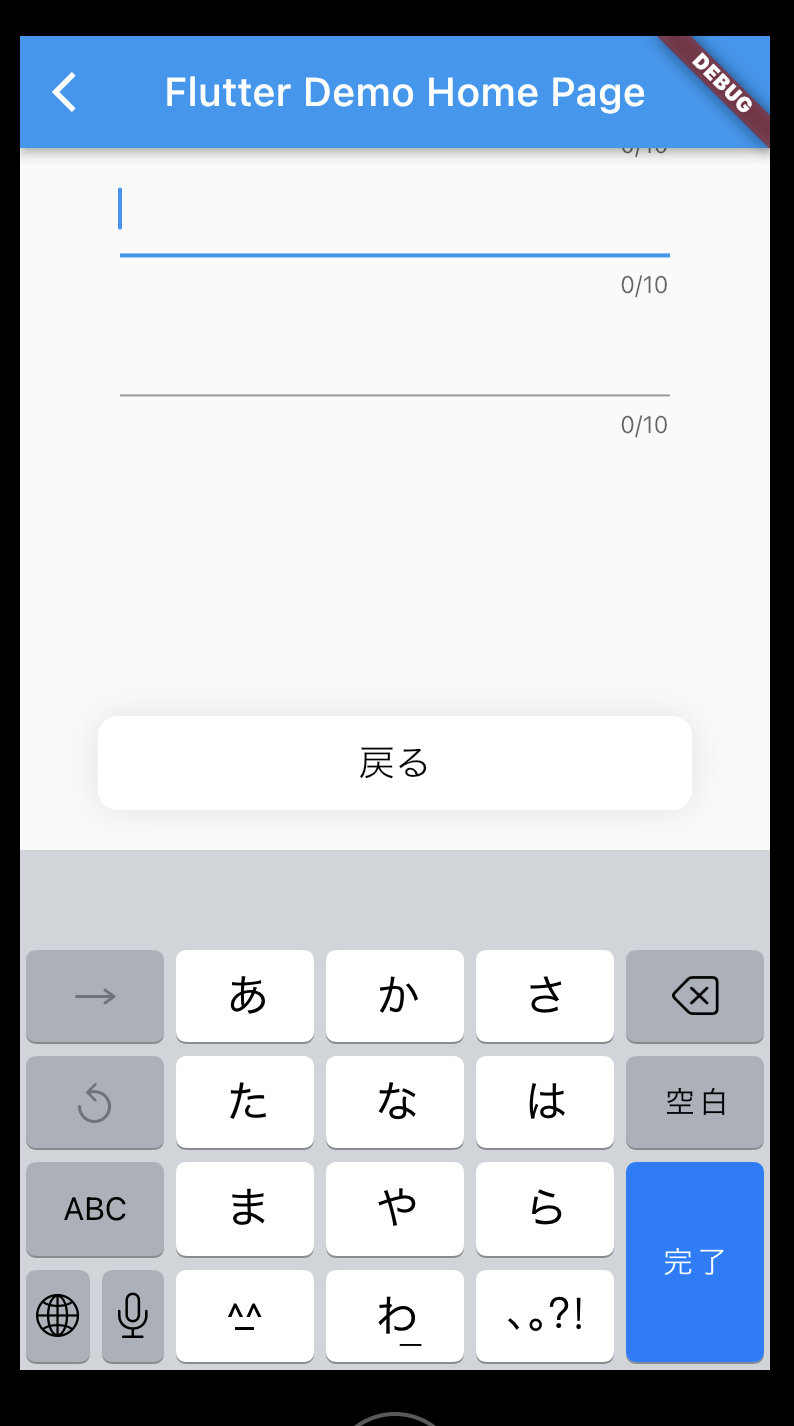
仕上がりはこんな感じになります↓
全体のコードはこちらをタップして下さい。
import 'package:flutter/material.dart';
import 'package:flutter/services.dart';
import 'package:flutter_hooks/flutter_hooks.dart';
import 'package:hooks_riverpod/hooks_riverpod.dart';

class TextView extends HookConsumerWidget {
  const TextView({Key? key, required this.title}) : super(key: key);

  final String title;

  @override
  Widget build(BuildContext context, WidgetRef ref) {
    final _controller = useTextEditingController();
    final text = useState('');

    // キーボードの高さを取得してbottomSpaceにいれる
    final bottomSpace = MediaQuery.of(context).viewInsets.bottom;
    // SingleChildScrollViewを管理
    final scrollController = ScrollController();
    useEffect(() {
      // ビルド直後にscrollControllerの位置を調整
      WidgetsBinding.instance.addPostFrameCallback((_) {
        scrollController.jumpTo(scrollController.position.maxScrollExtent);
      });
      return null;
    }, const []);

    return Scaffold(
      appBar: AppBar(title: Text(title)),
      body: Stack(children: [
        // まずこのSingleChildScrollViewでラップする必要がある
        SingleChildScrollView(
            // controllerでスクロールされる位置を制御
            controller: scrollController,
            // 入力に対してスクロールが境界を超えないように制御
            physics: ClampingScrollPhysics(),
            // 読み取り方向にスクロールさせたいのでreverseをtrueに
            reverse: true,
            // Paddingでラップしてbottom部分の余白を取ります
            child: Padding(
              padding: EdgeInsets.only(bottom: bottomSpace),
              child: Center(
                child: Column(
                  mainAxisAlignment: MainAxisAlignment.center,
                  children: <Widget>[
                    Container(
                        padding: const EdgeInsets.all(50.0),
                        child: Column(
                          children: <Widget>[
                            Text(
                              '${text.value}',
                              style: TextStyle(
                                  color: Colors.blueAccent,
                                  fontSize: 30.0,
                                  fontWeight: FontWeight.w500),
                            ),
                            new TextField(
                                controller: _controller,
                                enabled: true,
                                maxLength: 10,
                                maxLengthEnforcement:
                                    MaxLengthEnforcement.enforced,
                                style: TextStyle(color: Colors.red),
                                obscureText: false,
                                maxLines: 1,
                                onChanged: (String e) {
                                  text.value = e;
                                }),
                          ],
                        )),
                  ],
                ),
              ),
            )),
        Align(
            alignment: Alignment.bottomCenter,
            child: Container(
                height: 47,
                width: 297,
                margin: EdgeInsets.only(bottom: 20),
                decoration: BoxDecoration(
                    color: Colors.white,
                    border: Border.all(color: Colors.white),
                    borderRadius: BorderRadius.circular(10),
                    boxShadow: [
                      BoxShadow(color: Color(0x19000000), blurRadius: 14)
                    ]),
                child:
                    Row(mainAxisAlignment: MainAxisAlignment.center, children: [
                  GestureDetector(
                      onTap: () {
                        Navigator.pop(context);
                      },
                      child: Text('戻る',
                          style: TextStyle(fontSize: 18, color: Colors.black))),
                ])))
      ]),
    );
  }
}