はじめに
本記事は SwiftWednesday Advent Calendar 2023 の24日目の記事です。
昨日は @uabyss さんで swift-syntaxを用いて、簡単なコマンドラインツールを作ってみる でした。
SwiftUIにおいて、上部と下部で背景色が異なるスクロールビューの問題と解決策を紹介します。
環境
- OS:macOS Sonoma 14.0(23A344)
- Swift:5.9
「上部と下部で背景色が異なるスクロールビュー」が抱える問題
「上部と下部で背景色が異なるスクロールビュー」といわれてもピンと来ないと思うので、具体的な例を紹介します。
よくあるパターンとしては、「ヘッダーとリストで背景色が異なる」です。
以下はヘッダーの背景色が白で、リストの背景色がグレーのビューです。
スクロールビューの背景色はグレーにしています。
import SwiftUI

struct ContentView: View {
    var body: some View {
        ScrollView {
            VStack(spacing: 0) {
                // ヘッダー
                Color.white
                    .frame(height: 64)
                    .overlay {
                        Text("ヘッダー")
                    }

                // リスト
                LazyVStack {
                    rowView("りんご")
                    rowView("ふどう")
                    rowView("バナナ")
                    rowView("オレンジ")
                    rowView("りんご")
                    rowView("ふどう")
                    rowView("バナナ")
                    rowView("オレンジ")
                    rowView("りんご")
                    rowView("ふどう")
                    rowView("バナナ")
                    rowView("オレンジ")
                    rowView("りんご")
                    rowView("ふどう")
                    rowView("バナナ")
                    rowView("オレンジ")
                }
                .padding()
                .background(.gray)
            }
        }
        .background(.gray)
    }
}

// MARK: - Privates

private extension ContentView {
    func rowView(_ text: String) -> some View {
        Text(text)
            .frame(maxWidth: .infinity)
            .padding()
            .background(.white)
            .clipShape(RoundedRectangle(cornerRadius: 8))
    }
}
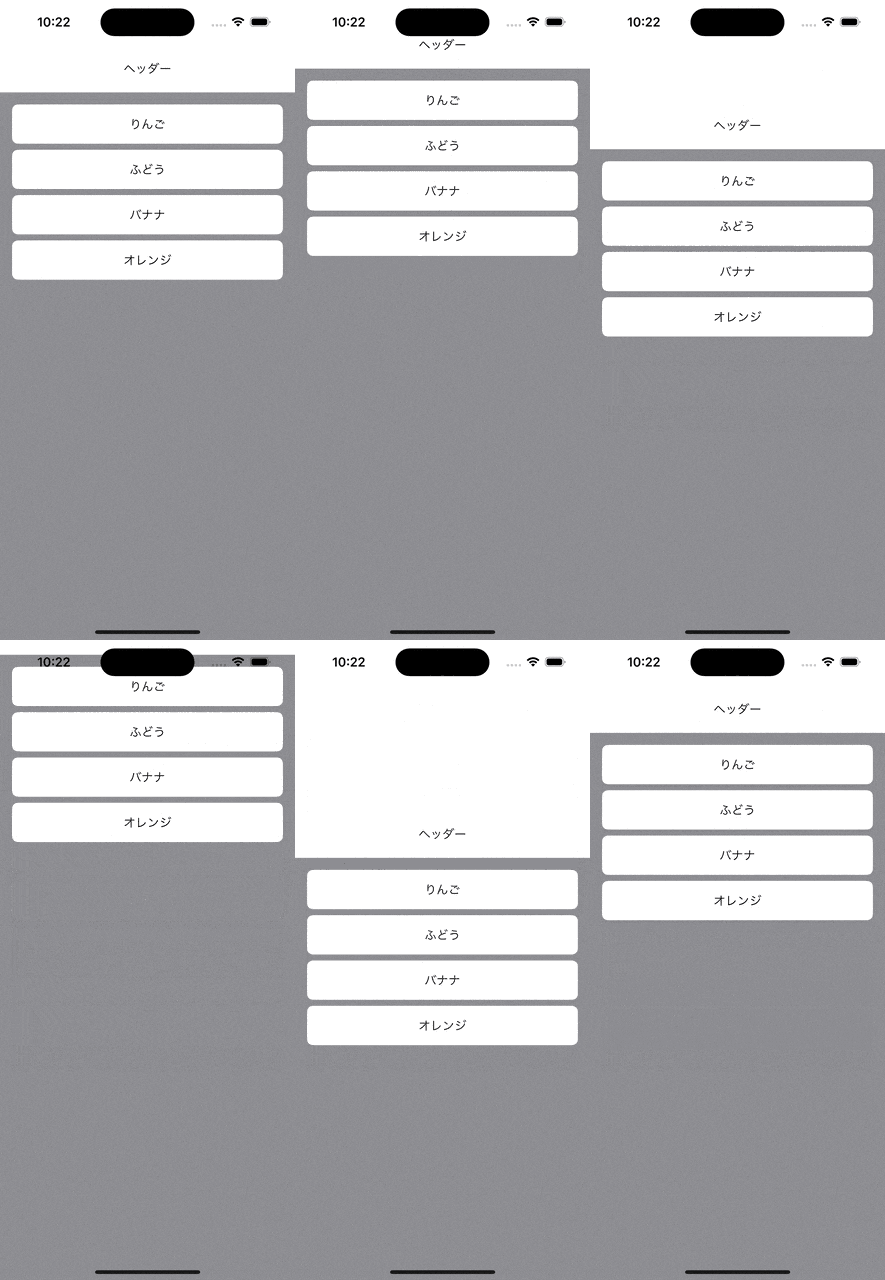
そこまで違和感はありませんが、ヘッダーの上部がグレーになっているのが気になります。

次にスクロールビューの背景色をグレーから白に変えてみます。
import SwiftUI

struct ContentView: View {
    var body: some View {
        ScrollView {
            VStack(spacing: 0) {
                // ヘッダー
                Color.white
                    .frame(height: 64)
                    .overlay {
                        Text("ヘッダー")
                    }

                // リスト
                LazyVStack {
                    rowView("りんご")
                    rowView("ふどう")
                    rowView("バナナ")
                    rowView("オレンジ")
                    rowView("りんご")
                    rowView("ふどう")
                    rowView("バナナ")
                    rowView("オレンジ")
                    rowView("りんご")
                    rowView("ふどう")
                    rowView("バナナ")
                    rowView("オレンジ")
                    rowView("りんご")
                    rowView("ふどう")
                    rowView("バナナ")
                    rowView("オレンジ")
                }
                .padding()
                .background(.gray)
            }
        }
-       .background(.gray)
+       .background(.white)
    }
}

// MARK: - Privates

private extension ContentView {
    func rowView(_ text: String) -> some View {
        Text(text)
            .frame(maxWidth: .infinity)
            .padding()
            .background(.white)
            .clipShape(RoundedRectangle(cornerRadius: 8))
    }
}
ヘッダーの違和感はなくなりましたが、今度は逆にリストの下部が白くなってしまいました。

私はこれを「上部と下部で背景色が異なるスクロールビュー」が抱える問題と呼んでいます。
本記事ではこの問題の解決策について考えます。
問題の解決策
問題の解決策をいくつか紹介します。
解決策1: スクロールビューの背景色を上部と下部で変える(手抜き)
真っ先に思いつくのが、スクロールビューの背景色を上部と下部で変えることです。
Stack Overflowに簡単な解決策がありました。
さっそく試してみます。
import SwiftUI

struct ContentView: View {
    var body: some View {
        ScrollView {
            VStack(spacing: 0) {
                // ヘッダー
                Color.white
                    .frame(height: 64)
                    .overlay {
                        Text("ヘッダー")
                    }

                // リスト
                LazyVStack {
                    rowView("りんご")
                    rowView("ふどう")
                    rowView("バナナ")
                    rowView("オレンジ")
                    rowView("りんご")
                    rowView("ふどう")
                    rowView("バナナ")
                    rowView("オレンジ")
                    rowView("りんご")
                    rowView("ふどう")
                    rowView("バナナ")
                    rowView("オレンジ")
                    rowView("りんご")
                    rowView("ふどう")
                    rowView("バナナ")
                    rowView("オレンジ")
                }
                .padding()
                .background(.gray)
            }
        }
-       .background(.white)
+       .background {
+           VStack(spacing: 0) {
+               Color.white // 上部の背景色
+               Color.gray // 下部の背景色
+           }
+       }
    }
}

// MARK: - Privates

private extension ContentView {
    func rowView(_ text: String) -> some View {
        Text(text)
            .frame(maxWidth: .infinity)
            .padding()
            .background(.white)
            .clipShape(RoundedRectangle(cornerRadius: 8))
    }
}
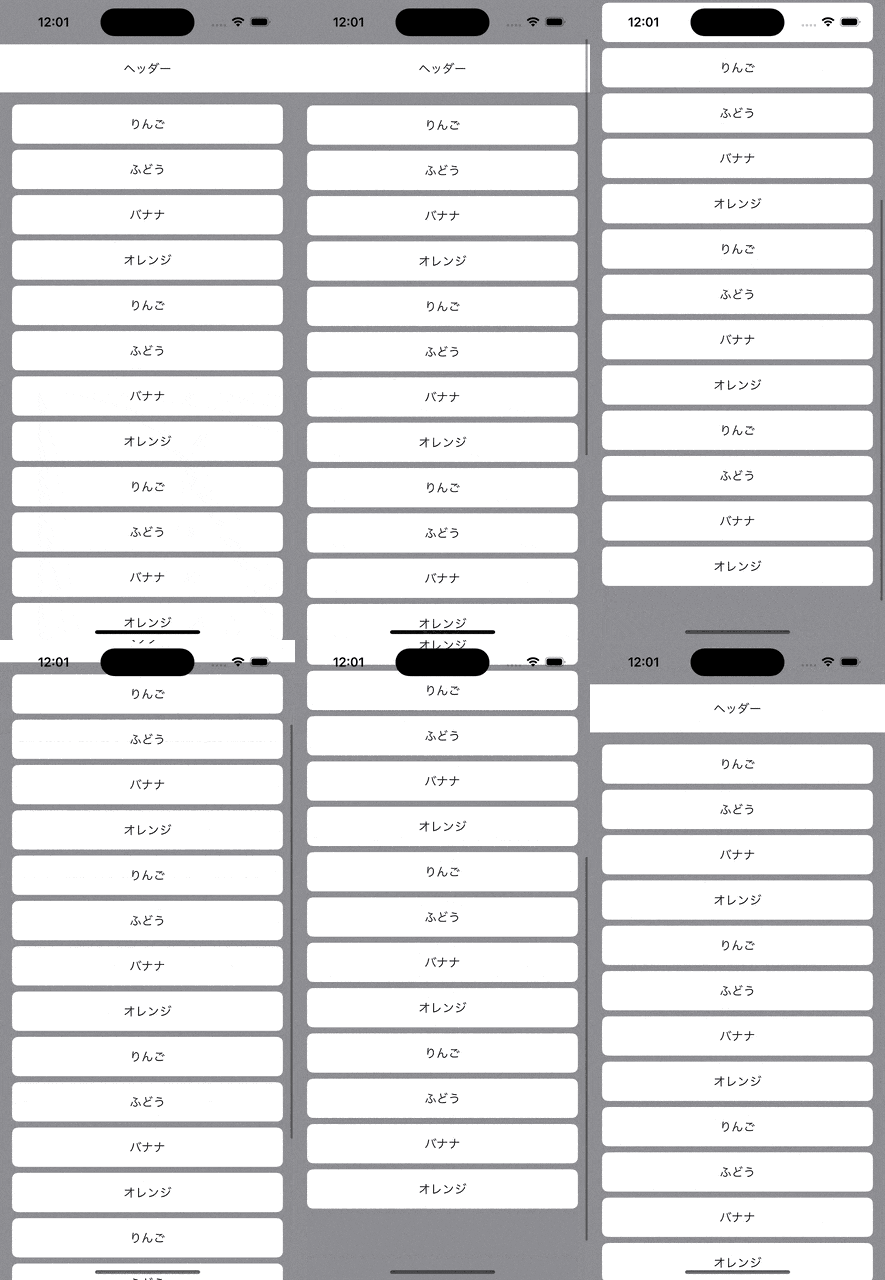
しかしこの解決策は背景色の上半分を白、下半分をグレーにしているだけなので、コンテンツの高さが小さかったり、思いっきりスクロールしたときに反対の背景色が見えてしまいます。
import SwiftUI

struct ContentView: View {
    var body: some View {
        ScrollView {
            VStack(spacing: 0) {
                // ヘッダー
                Color.white
                    .frame(height: 64)
                    .overlay {
                        Text("ヘッダー")
                    }

                // リスト
                LazyVStack {
                    rowView("りんご")
                    rowView("ふどう")
                    rowView("バナナ")
                    rowView("オレンジ")
-                   rowView("りんご")
-                   rowView("ふどう")
-                   rowView("バナナ")
-                   rowView("オレンジ")
-                   rowView("りんご")
-                   rowView("ふどう")
-                   rowView("バナナ")
-                   rowView("オレンジ")
-                   rowView("りんご")
-                   rowView("ふどう")
-                   rowView("バナナ")
-                   rowView("オレンジ")
                }
                .padding()
                .background(.gray)
            }
        }
        .background {
            VStack(spacing: 0) {
                Color.white // 上部の背景色
                Color.gray // 下部の背景色
            }
        }
    }
}

// MARK: - Privates

private extension ContentView {
    func rowView(_ text: String) -> some View {
        Text(text)
            .frame(maxWidth: .infinity)
            .padding()
            .background(.white)
            .clipShape(RoundedRectangle(cornerRadius: 8))
    }
}
コンテンツが低いと、最初から下部の背景色が見えるとわかります。

思いっきりスクロールしたときも、反対の背景色が一瞬だけ見えるとわかります。
そのためこの解決策は、コンテンツの高さが必ず画面サイズの半分より大きくなる、かつ思いっきりスクロールしたときに反対の背景色が見えるのを許容できる場合にしか使えません。
background() の中身を工夫すれば上部と下部の背景色の割合を変えられますが、それでも完全な解決策にはなりません。
解決策2: スクロールビューの背景色を上部と下部で変える(ちゃんと)
コンテンツの位置によって背景色を動的に変更することで、コンテンツが低い場合や思いっきりスクロールしても反対の背景色が見えなくなります。
ベタ書きだと可読性が低いのと、再利用できないため、上部と下部の背景色を渡せるスクロールビューのラッパーを実装しました。
こちらの実装は @ynoseda さんに教えてもらい、それを自分が使いやすいように改変したものです。
import SwiftUI

/// 上部と下部で背景色が異なるスクロールビュー
///
/// - important: `Content` 内に `LazyVStack` があると正常に動作しない
public struct DualBackgroundColorScrollView<Content: View>: View {
    private let topBackgroundColor: Color
    private let bottomBackgroundColor: Color
    private let content: () -> Content

    @State private var scrollContentViewMinY: CGFloat = 0
    @State private var scrollViewHeight: CGFloat = 0

    public var body: some View {
        ScrollView {
            content()
                .overlay {
                    GeometryReader { proxy in
                        Color.clear
                            .preference(
                                key: ScrollContentViewMinYPreferenceKey.self,
                                value: [proxy.frame(in: .global).minY]
                            )
                    }
                }
        }
        .background {
            VStack(spacing: 0) {
                topBackgroundColor
                    .frame(height: max(scrollContentViewMinY, 0))

                bottomBackgroundColor
                    .frame(height: scrollViewHeight - scrollContentViewMinY)
            }
            .ignoresSafeArea()
        }
        .overlay {
            GeometryReader { proxy in
                Color.clear
                    .onAppear {
                        scrollViewHeight = proxy.frame(in: .global).height
                    }
            }
            .ignoresSafeArea()
        }
        .onPreferenceChange(ScrollContentViewMinYPreferenceKey.self) { value in
            scrollContentViewMinY = value[0]
        }
    }

    public init(
        topBackgroundColor: Color,
        bottomBackgroundColor: Color,
        content: @escaping () -> Content
    ) {
        self.topBackgroundColor = topBackgroundColor
        self.bottomBackgroundColor = bottomBackgroundColor
        self.content = content
    }
}

// MARK: - Privates

private struct ScrollContentViewMinYPreferenceKey: PreferenceKey {
    static var defaultValue: [CGFloat] = [0]
    static func reduce(value: inout [CGFloat], nextValue: () -> [CGFloat]) {
        value.append(contentsOf: nextValue())
    }
}
DualBackgroundColorScrollView を ScrollView の代わりに使います。
import SwiftUI

struct ContentView: View {
    var body: some View {
-       ScrollView {
+       DualBackgroundColorScrollView(
+           topBackgroundColor: .white, // 上部の背景色
+           bottomBackgroundColor: .gray // 下部の背景色
+       ) {
            VStack(spacing: 0) {
                // ヘッダー
                Color.white
                    .frame(height: 64)
                    .overlay {
                        Text("ヘッダー")
                    }

                // リスト
-               LazyVStack {
+               VStack {
                    rowView("りんご")
                    rowView("ふどう")
                    rowView("バナナ")
                    rowView("オレンジ")
                    rowView("りんご")
                    rowView("ふどう")
                    rowView("バナナ")
                    rowView("オレンジ")
                    rowView("りんご")
                    rowView("ふどう")
                    rowView("バナナ")
                    rowView("オレンジ")
                    rowView("りんご")
                    rowView("ふどう")
                    rowView("バナナ")
                    rowView("オレンジ")
                }
                .padding()
                .background(.gray)
            }
        }
-       .background {
-           VStack(spacing: 0) {
-               Color.white // 上部の背景色
-               Color.gray // 下部の背景色
-           }
-       }
    }
}

// MARK: - Privates

private extension ContentView {
    func rowView(_ text: String) -> some View {
        Text(text)
            .frame(maxWidth: .infinity)
            .padding()
            .background(.white)
            .clipShape(RoundedRectangle(cornerRadius: 8))
    }
}
コンテンツが LazyVStack だと最終的な高さを最初に取得できないため、 VStack に変更しています。
工夫すれば LazyVStack にも対応できそうですが、試せていません。
これで背景色に違和感のないスクロールビューが実現できました。

実用に耐え得ると思います。
もし不具合など発見しましたら、コメントなどでご連絡いただけると助かります。
解決策3: コンテンツの上部と下部にパディングを足す
背景でなく、コンテンツの上部と下部にパディングを足す方法も思いつきました。
しかしどれくらい足せばいいかわからないですし、余計なビューの描画コストを考えると、あまりいい解決策ではないかもしれません。
そのためこの解決策は試していません。
(追記)
解決策2と同様、コンテンツの位置によってパディングの高さを動的に変更することで実現できそうです。
また描画コストが多少かかりますが、決め打ちで画面の高さをそのままパディングの高さにしてもよさそうです。
解決策4: リスト部分のみバウンドさせる
こちらの動画のように、一番下までスクロールしたときにリスト部分のみバウンドさせれば、背景色はグレーのみで済みます。
Apple製のアプリやX(旧Twitter)のタイムラインで使われているので一般的な実装だと思います。
下へスクロールしたときにヘッダーが固定されるようオフセットを動的に変更することで、リスト部分のみバウンドさせることができます。
こちらの実装は @i_ma_su_1114 さんに教えてもらい、それを私が少し改変したものです。
import SwiftUI

struct ContentView: View {
    @State private var headerInitOffset: CGFloat = 0

    private let headerHeight: CGFloat = 64

    var body: some View {
        ScrollView {
            ZStack {
                // リスト
                LazyVStack {
                    rowView("りんご")
                    rowView("ふどう")
                    rowView("バナナ")
                    rowView("オレンジ")
                    rowView("りんご")
                    rowView("ふどう")
                    rowView("バナナ")
                    rowView("オレンジ")
                    rowView("りんご")
                    rowView("ふどう")
                    rowView("バナナ")
                    rowView("オレンジ")
                    rowView("りんご")
                    rowView("ふどう")
                    rowView("バナナ")
                    rowView("オレンジ")
                }
                .padding()
                .background(.gray)
                .padding(.top, headerHeight)

                // ヘッダー
                GeometryReader { proxy in
                    Color.white
                        .frame(height: headerHeight)
                        .overlay {
                            Text("ヘッダー")
                        }
                        .offset(
                            y: proxy.frame(in: .global).minY < headerInitOffset
                            ? 0
                            : headerInitOffset - proxy.frame(in: .global).minY
                        )
                        .onAppear {
                            headerInitOffset = proxy.frame(in: .global).minY
                        }
                }
            }
        }
        .background(.gray)
    }
}

// MARK: - Privates

private extension ContentView {
    func rowView(_ text: String) -> some View {
        Text(text)
            .frame(maxWidth: .infinity)
            .padding()
            .background(.white)
            .clipShape(RoundedRectangle(cornerRadius: 8))
    }
}
これでリスト部分のみバウンドさせるスクロールビューが実現できました。
しかしこれだとヘッダーの上部の背景色がグレーなので、もう一工夫して上部の背景色のみ白にする必要があります。
上部と下部で背景色を変えるのは難しいとわかっているため、上部のセーフエリアの高さだけ白で塗り潰して実現しました。
import SwiftUI

struct ContentView: View {
    @State private var headerInitOffset: CGFloat = 0

    private let headerHeight: CGFloat = 64

    var body: some View {
+       GeometryReader { proxy in
            ScrollView {
                ZStack {
                    // リスト
                    LazyVStack {
                        rowView("りんご")
                        rowView("ふどう")
                        rowView("バナナ")
                        rowView("オレンジ")
                        rowView("りんご")
                        rowView("ふどう")
                        rowView("バナナ")
                        rowView("オレンジ")
                        rowView("りんご")
                        rowView("ふどう")
                        rowView("バナナ")
                        rowView("オレンジ")
                        rowView("りんご")
                        rowView("ふどう")
                        rowView("バナナ")
                        rowView("オレンジ")
                    }
                    .padding()
                    .background(.gray)
                    .padding(.top, headerHeight)

                    // ヘッダー
-                   GeometryReader { proxy in
+                   GeometryReader { proxy2 in
                        Color.white
                            .frame(height: headerHeight)
                            .overlay {
                                Text("ヘッダー")
                            }
+                           .overlay(alignment: .top) {
+                               Color.white
+                                   .frame(height: proxy.safeAreaInsets.top)
+                                   .offset(y: -proxy.safeAreaInsets.top)
+                           }
                            .offset(
-                               y: proxy.frame(in: .global).minY < headerInitOffset
+                               y: proxy2.frame(in: .global).minY < headerInitOffset
                                ? 0
-                               : headerInitOffset - proxy.frame(in: .global).minY
+                               : headerInitOffset - proxy2.frame(in: .global).minY
                            )
                            .onAppear {
-                               headerInitOffset = proxy.frame(in: .global).minY
+                               headerInitOffset = proxy2.frame(in: .global).minY
                            }
                    }
                }
            }
            .background(.gray)
+       }
    }
}

// MARK: - Privates

private extension ContentView {
    func rowView(_ text: String) -> some View {
        Text(text)
            .frame(maxWidth: .infinity)
            .padding()
            .background(.white)
            .clipShape(RoundedRectangle(cornerRadius: 8))
    }
}
これで完成です。
解決策2と同様、実用に耐え得ると思います。
もし不具合など発見しましたら、コメントなどでご連絡いただけると助かります。
おわりに
これで上部と下部で背景色が異なるスクロールビューを実装することになっても安心です ![]()
他の方法で対応している方がいたら、ぜひコメントなどで教えていただけると嬉しいです。
以上 SwiftWednesday Advent Calendar 2023 の24日目の記事でした。
明日も @uhooi です。


