はじめに
Java で書かれたプログラムから Raspberry Pi につないだ 1602 LCD に文字を表示するためには、Pi4J にあらかじめ用意されている汎用ライブラリが使用できます。こちらの詳細については、以下の記事をご参照ください。
1602 LCD は ROM 上に用意されている文字を表示するだけではなく、プログラムから文字パターン(ユーザー定義文字)を作成してそれを表示する機能を持っています。
この機能は上の記事で紹介した汎用ライブラリのクラスには実装されていないため、今回このクラスを拡張してユーザー定義文字を使えるようにしてみました。
1602 LCDのユーザー定義文字機能
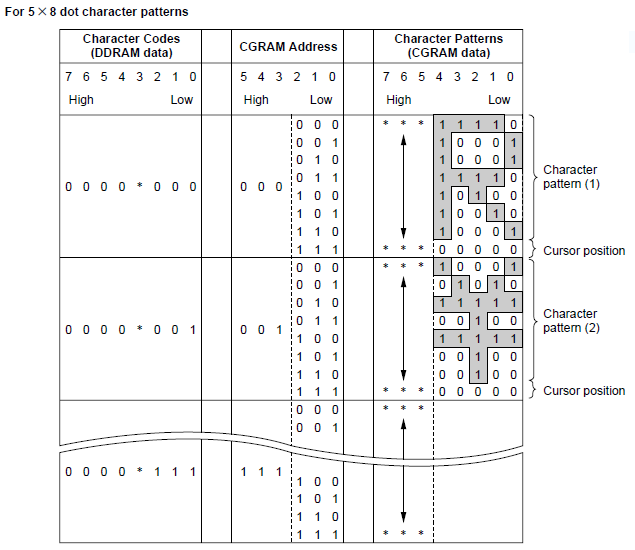
1602 LCDは CGRAM (Character Generator RAM) と呼ばれるメモリ領域を持っていて、この領域に 5×8 ドットの文字パターンを 8 パターンまで登録することができます。登録した各文字パターンは、文字コード 0 から 7 を指定することで表示することができます(8 から 15 を指定しても、0 から 7 と同じ文字パターンが表示されます)。

(データシートより引用)
プログラム
ユーザー定義文字を使えるようにするために、汎用ライブラリにある com.pi4j.component.lcd.impl.I2CLcdDisplay クラスを継承して I2C1602Lcd クラスを作成しました。
import com.pi4j.component.lcd.impl.I2CLcdDisplay;

public class I2C1602Lcd extends I2CLcdDisplay {
    protected final boolean LCD_CHR = true;
    protected final boolean LCD_CMD = false;

    public I2C1602Lcd(int i2cBus, int i2cAddress) throws Exception {
        super(2, 16, i2cBus, i2cAddress, 3, 0, 1, 2, 7, 6, 5, 4);
    }

    public void setCharacterPattern(byte characterCode, byte[] characterPattern) throws Exception {
        if (characterCode > 0x08) {
            throw new RuntimeException("Invalid character code.");
        }
        if (characterPattern.length != 8) {
            throw new RuntimeException("Wrong character pattern length.");
        }

        lcd_byte(0x40 | characterCode << 3, LCD_CMD);

        for (byte pattern : characterPattern) {
            lcd_byte(pattern, LCD_CHR);
        }
    }
}
LCD に文字を表示させるためには、まず今回作成した I2C1602Lcd クラスのインスタンスを作成します。コンストラクタは以下の形式です。i2cBus には I2C バスの番号、i2cAddress には使用しているモジュールのアドレスを、ご使用の環境に合わせて指定します。
I2C1602Lcd(int i2cBus, int i2cAddress) throws Exception
Pi4J の汎用ライブラリのクラス I2CLcdDisplay を継承しているため、そのクラスのメソッドは I2C1602Lcd クラスのインスタンスでもそのまま使用できます。
I2C1602Lcd クラスの setCharacterPattern メソッドで、ユーザー定義文字の文字コードと文字パターンを指定します。
void setCharacterPattern(byte characterCode, byte[] characterPattern) throws Exception
最初のパラメータ characterCode には、ユーザー定義文字に割り当てる文字コード(0 ~ 7)を指定します。
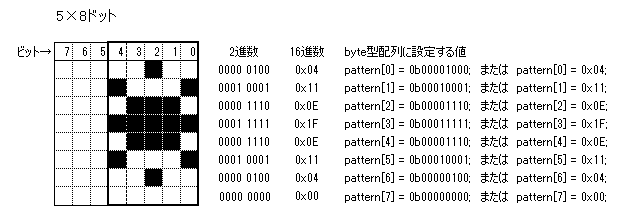
また 2 番目のパラメータ characterPattern には文字パターンを含んだ 8 個の要素をもつ byte 型の配列を指定します。下の図は表示する文字パターンと配列の各要素に設定する値の例です。
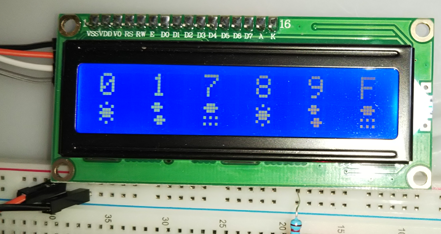
以下は今回作成したクラスを利用した簡単なデモプログラムです。3 種類のお天気マークをユーザー定義文字として登録し、それを LCD 上に表示します。
public class I2C1602LcdChPatternDemo {
    private static final int LCD_ROW_1 = 0;
    private static final int LCD_ROW_2 = 1;

    private static final byte[] patternSunnyMark  = {0x04, 0x11, 0x0E, 0x1F, 0x0E, 0x11, 0x04, 0x00};
    private static final byte[] patternCloudyMark = {0x0C, 0x1E, 0x0C, 0x00, 0x06, 0x0F, 0x06, 0x00};
    private static final byte[] patternRainyMark  = {0x0E, 0x1F, 0x0E, 0x00, 0x15, 0x00, 0x15, 0x00};

    public static void main(String[] args) throws Exception {
        I2C1602Lcd lcd = new I2C1602Lcd(1, 0x27);

        lcd.setCharacterPattern((byte)0x00, patternSunnyMark );
        lcd.setCharacterPattern((byte)0x01, patternCloudyMark);
        lcd.setCharacterPattern((byte)0x07, patternRainyMark );

        lcd.write(LCD_ROW_1, "%1X  %1X  %1X  %1X  %1X  %1X", 0x00, 0x01, 0x07, 0x08, 0x09, 0x0F);
        lcd.write(LCD_ROW_2, "%c  %c  %c  %c  %c  %c"      , 0x00, 0x01, 0x07, 0x08, 0x09, 0x0F);
    }
}
コンパイルと実行
実際にユーザー定義文字を試す場合は、上の2つのファイルを適当なディレクトリに置いてコンパイルします。
pi@raspberrypi:~ $ pi4j -c I2C1602LcdChPatternDemo.java
--------------------------------------------
Pi4J - Compiling: I2C1602LcdChPatternDemo.java
--------------------------------------------
+ javac -classpath '.:classes:*:classes:/opt/pi4j/lib/*' -d . I2C1602LcdChPatternDemo.java
pi@raspberrypi:~ $
コンパイルが終わったらルート権限で実行します。
pi@raspberrypi:~ $ sudo pi4j I2C1602LcdChPatternDemo
+ java -classpath '.:classes:*:classes:/opt/pi4j/lib/*' I2C1602LcdChPatternDemo
pi@raspberrypi:~ $

