はじめに
Raspberry Pi につないだ 1602 LCD に文字を表示させます。プログラミング言語は Java を使用しています。
Raspberry Pi の GPIO を Java から制御するためには Pi4J を使用しますが、この中には始めから LCD を制御するための汎用ライブラリが含まれています。今回はこのライブラリを使用します。
Pi4J の環境については、以下の記事の「Pi4J のインストール」をご参照ください。
準備
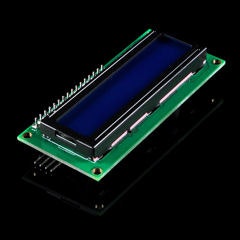
今回使用したモジュールは、1602 LCD と I2C モジュールとして PCF8574(らしきもの?)が合体しているものを使用しました。
| 表面 | 背面 |
|---|---|
 |
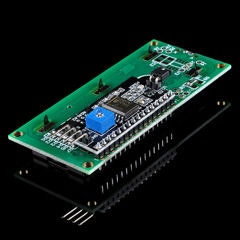 |
このモジュールは I2C で通信を行うため、Raspberry Pi の I2C 通信機能を有効にしておきます(デフォルトでは無効になっています)。
Raspbian の GUI から有効にする場合は、タスクバーの「Menu」ボタンから「設定」~「Raspberry Pi の設定」で設定パネルを開き、「インターフェイス」タブを選んで「I2C」を有効にします。コマンドラインから有効にする場合は、sudo raspi-config コマンドを入力し、「Interfacing Options」~「I2C」と選んで、最後に「Yes」を選択します。
設定した後は、念のためにリブートしておきます。
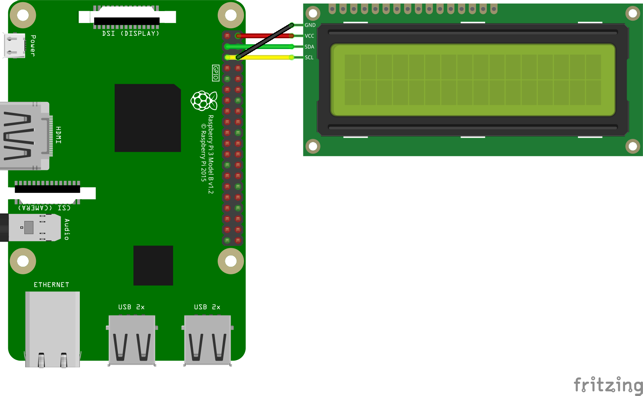
Raspberry Pi と 1602 LCD は、以下のように接続しました。
LCD 制御クラス
I2C インターフェースをもつ LCD の制御は、com.pi4j.component.lcd.impl パッケージの I2CLcdDisplay クラスを使用します。
インスタンスの作成
プログラムからLCDを制御するためには、まず I2CLcdDisplay クラスのインスタンスを作成します。コンストラクタは以下の形式です。
I2CLcdDisplay(int rows, int columns, int i2cBus, int i2cAddress, int backlightBit, int rsBit, int rwBit, int eBit, int d7, int d6, int d5, int d4)
コンストラクタには LCD の表示領域のサイズや、使用する I2C バスの番号、モジュールのアドレスの他に、I2C でモジュールとやり取りする際のビット構成を指定する必要があります。第3パラメータ(i2cBus)および第4パラメータ(i2cAddress)についてはお使いの環境に合わせて指定してください。今回使用するモジュールでは、他のパラメータは下記の値を指定してインスタンスを作成します。
I2CLcdDisplay lcd = new I2CLcdDisplay(2, 16, 1, 0x27, 3, 0, 1, 2, 7, 6, 5, 4);
第4パラメータに指定するモジュールのアドレスは、以下のコマンドで確認します。使用されている I2C モジュールにより 3F として認識されるものもあるようです。
pi@raspberrypi:~ $ sudo i2cdetect -y 1
     0  1  2  3  4  5  6  7  8  9  a  b  c  d  e  f
00:          -- -- -- -- -- -- -- -- -- -- -- -- --
10: -- -- -- -- -- -- -- -- -- -- -- -- -- -- -- --
20: -- -- -- -- -- -- -- 27 -- -- -- -- -- -- -- --
30: -- -- -- -- -- -- -- -- -- -- -- -- -- -- -- --
40: -- -- -- -- -- -- -- -- -- -- -- -- -- -- -- --
50: -- -- -- -- -- -- -- -- -- -- -- -- -- -- -- --
60: -- -- -- -- -- -- -- -- -- -- -- -- -- -- -- --
70: -- -- -- -- -- -- -- --
pi@raspberrypi:~ $
メソッド
I2CLcdDisplay クラスには、以下のメソッドが定義されています。内部処理で使われるものや、上位クラスから継承したもので不要と思われるものは割愛しています。
なお、行(row)および桁(column)の位置をパラメータとして指定する場合は、それぞれ0から数えた値を指定します。
| メソッドと機能 |
|---|
| void clear() |
|
| void clear(int row) |
|
| void clear(int row, int column, int length) |
|
| void setCursorHome() |
|
| void setCursorPosition(int row) |
|
| void setCursorPosition(int row, int column) |
|
| void write(byte data) void write(byte[] data) void write(char data) void write(char[] data) void write(String data) |
|
| void write(int row, byte data) void write(int row, byte[] data) void write(int row, char data) void write(int row, char[] data) void write(int row, String data) |
|
| void write(int row, int column, byte data) void write(int row, int column, byte[] data) void write(int row, int column, char data) void write(int row, int column, char[] data) void write(int row, int column, String data) |
|
| void write(int row, String data, LCDTextAlignment alignment) |
|
| void write(String data, Object... arguments) void write(int row, String data, Object... arguments) void write(int row, String data, LCDTextAlignment alignment, Object... arguments) void write(int row, int column, String data, Object... arguments) |
|
| void writeln(int row, String data) void writeln(int row, String data, LCDTextAlignment alignment) void writeln(int row, String data, LCDTextAlignment alignment, Object... arguments) void writeln(int row, String data, Object... arguments) |
|
| int getColumnCount() |
|
| int getRowCount() |
|
| void setBacklight(boolean backlight) |
|
| boolean isBacklight() |
|
LCD制御クラスを使用したデモ
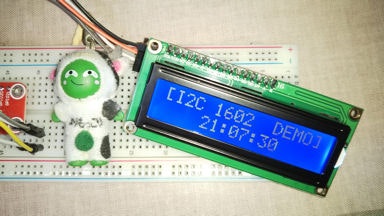
上で紹介したクラスとメソッドを使用した、デモプログラムを作成してみました。実際に動かしてみる場合は「インスタンスの作成」の項で触れたようにご自身の環境に合わせて、以下の太字の I2C バスの番号、モジュールのアドレスの部分を必要に応じて修正してください。
I2CLcdDisplay lcd = new I2CLcdDisplay(2, 16, 1, 0x27, 3, 0, 1, 2, 7, 6, 5, 4);
import java.text.SimpleDateFormat;
import java.util.Date;

import com.pi4j.component.lcd.LCDTextAlignment;
import com.pi4j.component.lcd.impl.I2CLcdDisplay;

public class I2C1602LCDDemo {
    public static final int LCD_ROW_1 = 0;
    public static final int LCD_ROW_2 = 1;

    public static final String DEMO_TITLE = "[I2C 1602  DEMO]";

    public static void main(String[] args) throws Exception {

        // for 1602 LCD + PCF8574 I2C module
        I2CLcdDisplay lcd = new I2CLcdDisplay(2, 16, 1, 0x27, 3, 0, 1, 2, 7, 6, 5, 4);

        lcd.write(LCD_ROW_1, DEMO_TITLE);
        Thread.sleep(3000);

        lcd.clear();
        Thread.sleep(1000);

        // show all characters
        for (int ch = 0x10; ch <= 0xFF; ch += 4) {
            lcd.write(LCD_ROW_1, "%02XH %02XH %02XH %02XH", ch, ch + 1, ch + 2, ch + 3);
            lcd.write(LCD_ROW_2, " %c   %c   %c   %c",      ch, ch + 1, ch + 2, ch + 3);
            Thread.sleep(800);
        }

        // show characters at specified positions
        lcd.setCursorHome();

        for (int column = 0; column < lcd.getColumnCount(); column++) {
            lcd.write((byte)0xFF);
            Thread.sleep(100);
        }
        for (int column = lcd.getColumnCount() - 1; column >= 0; column--) {
            lcd.write(LCD_ROW_2, column, (byte)0xFF);
            Thread.sleep(100);
        }

        lcd.setCursorHome();
        for (int column = 0; column < lcd.getColumnCount(); column++) {
            lcd.write(DEMO_TITLE.charAt(column));
            Thread.sleep(100);
        }

        for (int column = lcd.getColumnCount() - 1; column >= 0; column--) {
            lcd.write(LCD_ROW_2, column, ' ');
            Thread.sleep(100);
        }

        // show text alignment
        lcd.writeln(LCD_ROW_2, "< LEFT", LCDTextAlignment.ALIGN_LEFT);
        Thread.sleep(2000);

        lcd.writeln(LCD_ROW_2, "RIGHT >", LCDTextAlignment.ALIGN_RIGHT);
        Thread.sleep(2000);

        lcd.writeln(LCD_ROW_2, "< CENTER >", LCDTextAlignment.ALIGN_CENTER);
        Thread.sleep(2000);

        // show clock
        SimpleDateFormat formatter = new SimpleDateFormat("HH:mm:ss");
        while (true) {
            lcd.writeln(LCD_ROW_2, formatter.format(new Date()), LCDTextAlignment.ALIGN_CENTER);
            Thread.sleep(1000);
        }
    }
}
このプログラムを実行するには、上のファイルを適当なディレクトリに置いてコンパイルします。
pi@raspberrypi:~ $ pi4j -c I2C1602LCDDemo.java
--------------------------------------------
Pi4J - Compiling: I2C1602LCDDemo.java
--------------------------------------------
+ javac -classpath '.:classes:*:classes:/opt/pi4j/lib/*' -d . I2C1602LCDDemo.java
pi@raspberrypi:~ $
コンパイルが終わったらルート権限で実行します。文字が表示されない場合は、モジュール背面の+のつまみをドライバーで回してコントラストを調整してみて下さい。
一通りデモが終わると時計表示になりますので、Ctrl+C を入力して終了します。
pi@raspberrypi:~ $ sudo pi4j I2C1602LCDDemo
+ java -classpath '.:classes:*:classes:/opt/pi4j/lib/*' I2C1602LCDDemo
^Cpi@raspberrypi:~ $
ユーザー定義文字の表示
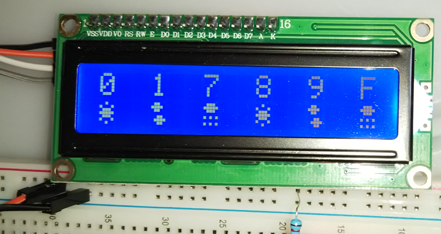
1602 LCD はプログラムから文字パターン(ユーザー定義文字)を登録して、それを表示する機能も備えています。
今回紹介した汎用ライブラリのクラスを拡張して、この機能を使用できるようにした記事を以下にまとめていますので、こちらもご参照ください。
