チュートリアル
これを進めます。
英語のためGoogle翻訳して進めます。
(わかりやすい和訳できる方の編集リクエスト歓迎です🙇♂️)
環境
- PHP 7.4.5
- Composer 1.10.5
- Laravel 7.10.3
- Lighthouse 4.12.4
- MySQL 8.0.19
使用するパッケージ
完成版のソースコード
What is GraphQL?
GraphQLは、APIのクエリ言語であり、既存のデータでこれらのクエリを実行するためのランタイムです。
GraphQLは、API内のデータの完全で理解可能な説明を提供し、クライアントに必要なものだけを正確に要求する力を与え、APIを長期間にわたって容易に進化させ、強力な開発者ツールを有効にします。
GraphQLは仕様としてのみリリースされています。
http://spec.graphql.org
GraphQLには、APIのスキーマを定義するために使用される独自の型システムがあります。
スキーマを記述するための構文は、スキーマ定義言語または短いSDLと呼ばれます。
https://www.prisma.io/blog/graphql-sdl-schema-definition-language-6755bcb9ce51
これは、SDLを使用してUserという型と、別の型のPostとの関係を定義する方法の例です。
type User {
  id: ID!
  name: String!
  posts: [Post!]!
}

type Post {
  title: String!
  author: User!
}
UserとPostの間に1対多の関係を作成しています。
User型には、Post型のリストを返すpostsフィールドがあります。
また、authorフィールドを介してPostからUserへの逆関係を定義しました。
What is Lighthouse?
LighthouseはLaravelプロジェクトと統合して、独自のGraphQLサーバーへのサービス提供を容易にします。
LighthouseでGraphQLサーバーを構築するプロセスは、3つのステップで説明できます。
- GraphQLスキーマ定義言語を使用してデータの形状を定義する
- ディレクティブを使用してスキーマに命を吹き込む
- 必要な場所にカスタム機能を追加する
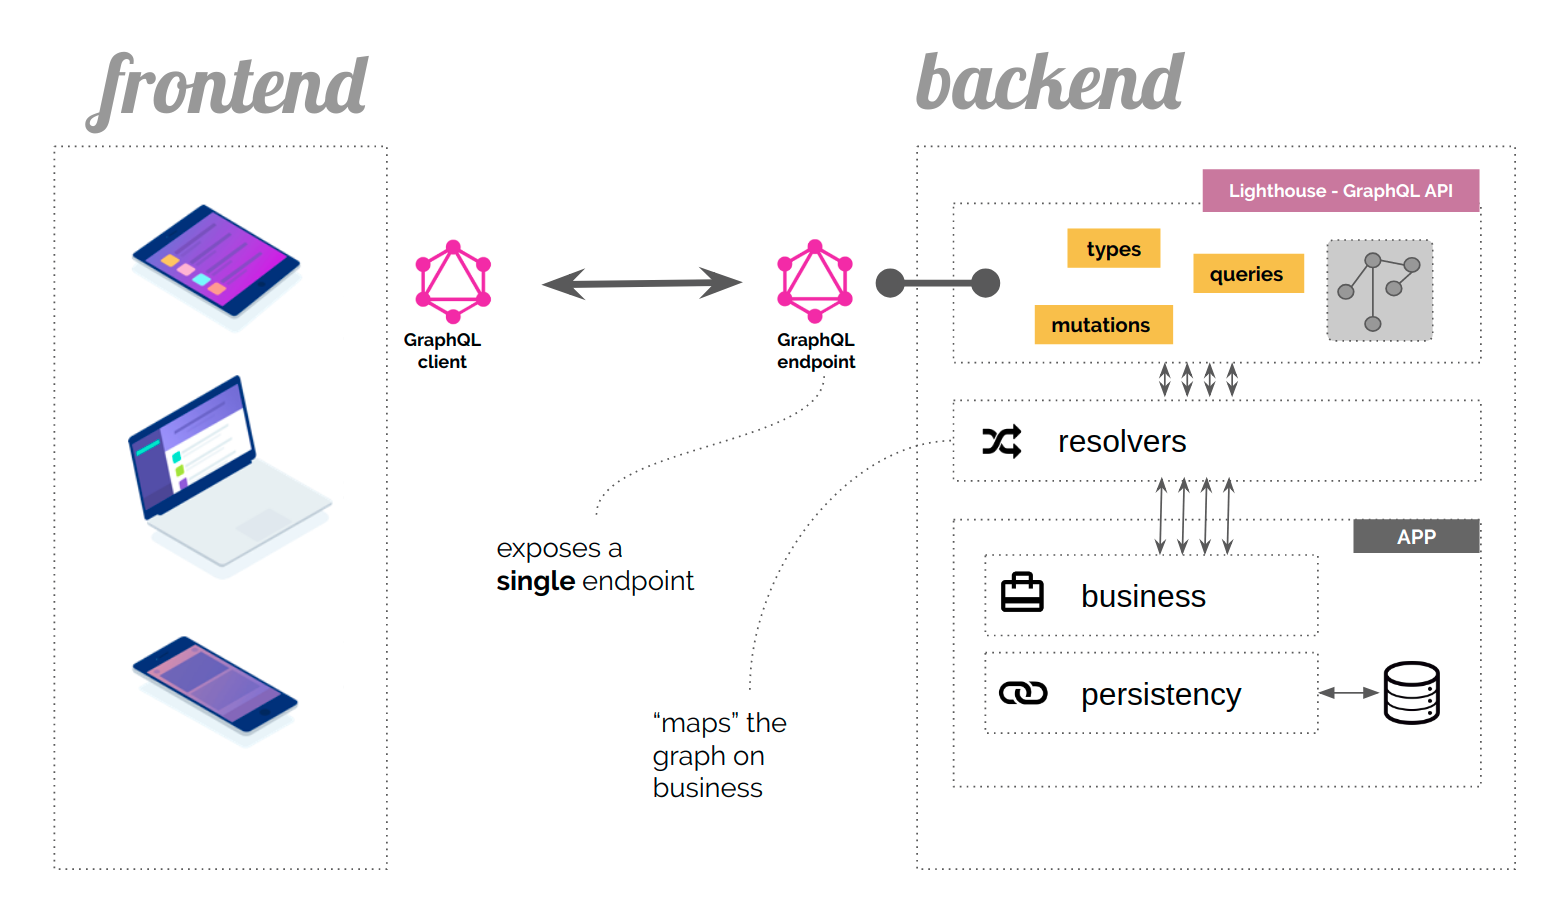
(アプリケーション中のGraphQLの役割)
Agenda
このチュートリアルでは、簡単なブログ用のGraphQL APIをゼロから作成します。
- Laravel
- Lighthouse
- GraphQL Playground
所要時間: 15分程度
Installation
Laravel プロジェクトの作成
$ laravel new lighthouse-tutorial
マイグレーション
$ php artisan migrate
テストデータの作成
$ php artisan tinker
>>> factory('App\User', 10)->create();
Lighthouse ライブラリの導入
$ composer require nuwave/lighthouse
GraphQL 実行環境ライブラリの導入
$ composer require mll-lab/laravel-graphql-playground
デフォルトスキーマの公開
$ php artisan vendor:publish --provider="Nuwave\Lighthouse\LighthouseServiceProvider" --tag=schema
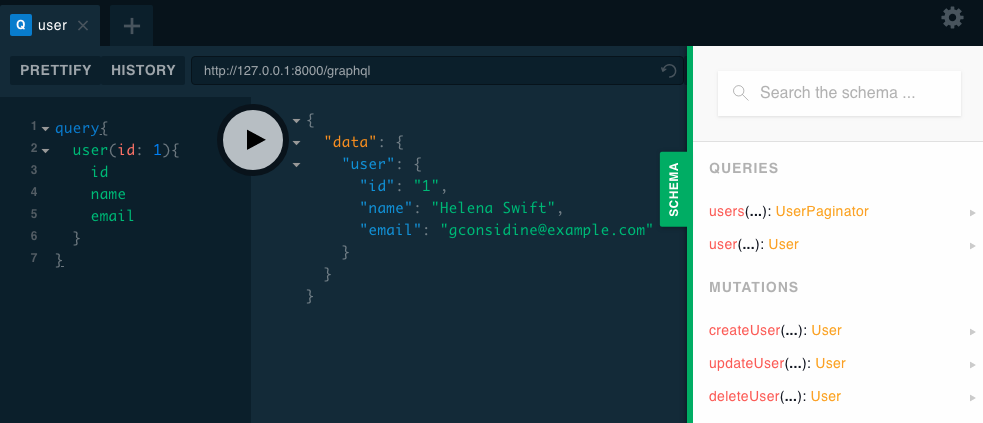
Laravelサーバーの起動し、GraphQLの実行
$ php artisan serve
{
  user(id: 1) {
    id
    name
    email
  }
}
The Models
この最初のパートでは、モデルとデータベースの移行を設定する方法を示します。
GraphQLまたはLighthouseに関連する詳細は含まれていません。
私たちのブログはいくつかの単純なルールに従っています
- ユーザーは複数の投稿を公開できます
- 各投稿には、匿名ユーザーからの複数のコメントを含めることができます
これをデータベーススキーマで次のようにモデル化できます。
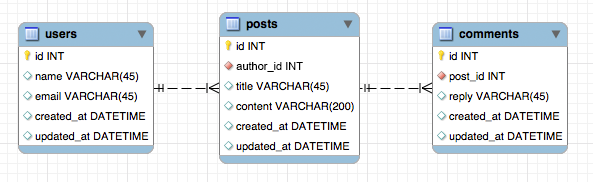
まず、投稿とコメントのモデルと移行を定義します。
$ php artisan make:model -m Post
<?php

namespace App;

use Illuminate\Database\Eloquent\Model;
use Illuminate\Database\Eloquent\Relations\HasMany;
use Illuminate\Database\Eloquent\Relations\BelongsTo;

class Post extends Model
{
    public function author(): BelongsTo
    {
        return $this->belongsTo(User::class);
    }

    public function comments(): HasMany
    {
        return $this->hasMany(Comment::class);
    }
}
<?php

use Illuminate\Support\Facades\Schema;
use Illuminate\Database\Schema\Blueprint;
use Illuminate\Database\Migrations\Migration;

class CreatePostsTable extends Migration
{
    public function up(): void
    {
        Schema::create('posts', function (Blueprint $table) {
            $table->id('id');
            $table->unsignedBigInteger('author_id');
            $table->string('title');
            $table->string('content');
            $table->timestamps();
        });
    }

    public function down(): void
    {
        Schema::dropIfExists('posts');
    }
}
$ php artisan make:model -m Comment
<?php

namespace App;

use Illuminate\Database\Eloquent\Model;
use Illuminate\Database\Eloquent\Relations\BelongsTo;

class Comment extends Model
{
    public function post(): BelongsTo
    {
        return $this->belongsTo(Post::class);
    }
}
<?php

use Illuminate\Support\Facades\Schema;
use Illuminate\Database\Schema\Blueprint;
use Illuminate\Database\Migrations\Migration;

class CreateCommentsTable extends Migration
{
    public function up(): void
    {
        Schema::create('comments', function (Blueprint $table) {
            $table->id('id');
            $table->unsignedBigInteger('post_id');
            $table->string('reply');
            $table->timestamps();
        });
    }

    public function down(): void
    {
        Schema::dropIfExists('comments');
    }
}
$ php artisan migrate
app/User.php を編集します。
<?php

namespace App;

use Illuminate\Database\Eloquent\Relations\HasMany;  // 追加
use Illuminate\Foundation\Auth\User as Authenticatable;
use Illuminate\Notifications\Notifiable;

class User extends Authenticatable
{
    use Notifiable;

    /**
     * The attributes that are mass assignable.
     *
     * @var array
     */
    protected $fillable = [
        'name', 'email', 'password',
    ];

    /**
     * The attributes that should be hidden for arrays.
     *
     * @var array
     */
    protected $hidden = [
        'password', 'remember_token',
    ];

    /**
     * The attributes that should be cast to native types.
     *
     * @var array
     */
    protected $casts = [
        'email_verified_at' => 'datetime',
    ];

    // 追加
    public function posts(): HasMany
    {
        return $this->hasMany(Post::class, 'author_id');
    }
}
The Schema
graphql/schema.graphqlを編集して、作成したEloquentモデルに基づいてブログスキーマを定義しましょう。
ルートクエリタイプに投稿を取得するための2つのクエリを追加します。
type Query {
    # 追加
    posts: [Post!]! @all
    post(id: Int! @eq): Post @find
    # .. 省略
}
- 先頭文字が
#で始まる場合と"で囲まれてる文字はコメントとして扱われます。-
"コメント",# コメント
-
Lighthouseがクエリを解決する方法を知る方法は、
コンベンションベースの命名(タイプ名Postはモデルの名前でもある)とサーバー側ディレクティブの使用の組み合わせです。
@allはすべてのPostモデルのリストを返します
@findと@eqを組み合わせて、IDで単一の投稿を取得します
データの形状を明確に定義するタイプ定義を追加します。
type User {
  id: ID!
  name: String!
  email: String!
  created_at: DateTime!
  updated_at: DateTime!
  posts: [Post!]! @hasMany
}

type Post {
  id: ID!
  title: String!
  content: String!
  author: User! @belongsTo
  comments: [Comment!]! @hasMany
}

type Comment {
  id: ID!
  reply: String!
  post: Post! @belongsTo
}
Eloquentと同様に、@belongsToディレクティブと@hasManyディレクティブを使用してタイプ間の関係を表現します。
テストデータ作成
$ php artisan make:factory PostFactory -m Post
$ php artisan make:factory CommentFactory -m Comment
$ php artisan make:seed UserSeeder
$ php artisan make:seed PostSeeder
$ php artisan make:seed CommentSeeder
UserFactory は元々用意してくれています。
<?php

/** @var \Illuminate\Database\Eloquent\Factory $factory */

use App\Post;
use Faker\Generator as Faker;

$factory->define(Post::class, function (Faker $faker) {
    return [
        'title' => $faker->sentence(),
        'content' => $faker->text(),
    ];
});
<?php

/** @var \Illuminate\Database\Eloquent\Factory $factory */

use App\Comment;
use Faker\Generator as Faker;

$factory->define(Comment::class, function (Faker $faker) {
    return [
        'reply' => $faker->sentence(),
    ];
});
<?php

use Illuminate\Database\Seeder;
use App\User;

class UserSeeder extends Seeder
{
    /**
     * Run the database seeds.
     *
     * @return void
     */
    public function run()
    {
        User::truncate();
        factory(User::class, 3)->create();
    }
}
<?php

use App\Post;
use App\User;
use Illuminate\Database\Seeder;

class PostSeeder extends Seeder
{
    /**
     * Run the database seeds.
     *
     * @return void
     */
    public function run()
    {
        Post::truncate();
        foreach (User::all() as $user) {
            factory(Post::class, 4)->create(['author_id' => $user->id]);
        }
    }
}
<?php

use App\Comment;
use App\Post;
use Illuminate\Database\Seeder;

class CommentSeeder extends Seeder
{
    /**
     * Run the database seeds.
     *
     * @return void
     */
    public function run()
    {
        Comment::truncate();
        foreach (Post::all() as $post) {
            factory(Comment::class, 5)->create(['post_id' => $post->id]);
        }
    }
}
<?php

use Illuminate\Database\Seeder;

class DatabaseSeeder extends Seeder
{
    /**
     * Seed the application's database.
     *
     * @return void
     */
    public function run()
    {
        $this->call(UserSeeder::class);
        $this->call(PostSeeder::class);
        $this->call(CommentSeeder::class);
    }
}
$ php artisan db:seed
$ php artisan serve
The Result
{
  posts {
    id
    title
    author {
      name
    }
    comments {
      id
      reply
    }
  }
}

データベース内のすべての投稿のリストと、そのすべてのコメントおよび作成者の名前を取得できます。
今回はGraphQLの機能と、Lighthouseを使用してLaravelで独自のサーバーを簡単に構築する方法を学びました。
To be continued ...
- ページネーション
- Eloquentモデルの作成と更新
- バリデーション
追記: 後半の記事を書きました。