JupyterNotebookのnbextensionを使ってみて覚えておくと便利な技術集を書きました。
- インストール
- コンフィグ
- コンフィグファイルの作成
- ブラウザの指定
- 自動保存
- nbextensions
- インプット関連
- アウトプット関連
- マークダウン関連
- jupyter設定関連
- カーネル関連
- 参考
- 関連
- 参考一覧
- 自分のページ
インストール
公式 ipython-contrib/jupyter_contrib_nbextensions
$ conda install -c conda-forge jupyter_contrib_nbextensions
cssとか落としてくれるので、これが一番楽
コンフィグ
コンフィグファイルの作成
$ jupyter notebook --generate-config
ブラウザの指定
指定しなければデフォルトで開くブラウザでJupyterNotebookが開く。
今後キーバインドがかぶることがよくあるので、jupyter notebookを開くブラウザは「いつも使っていないもの」=「ショートカットキーがカスタマイズされていないもの」を選んでいる。
作成された~\.jupyter\jupyter_notebook_config.pyの中の#c.NotebookApp.browser = ''という行を探してブラウザ指定。
- linuxであれば
c.NotebookApp.browser = u'/usr/bin/firefox %s' - windowsであれば
webbrowser.registerしてやってから、レジスターされたブラウザを指定する。
import webbrowser
webbrowser.register('chrome', None, webbrowser.GenericBrowser('C:\\Program Files (x86)\\Google\\Chrome\\Application\\chrome.exe'))
c.NotebookApp.browser = 'chrome'
参考:
自動保存
jupyter notebookはデフォルトで2分ごと?に保存をかけてくれる。
(以下で説明するnbextensionのautosavetimeで保存間隔変えられる)
~/.jupyter/jupyter_notebook_config.pyに以下を書き込むと
- '--to script' で.pyファイル
- '--to html' で.htmlファイル
- '--to markdown' で.mdファイル
- '--to latex' でtexファイル
が作成される。
import os
from subprocess import check_call

def post_save(model, os_path, contents_manager):
    """post-save hook for converting notebooks to .py scripts
    ipynbが保存されるたびに[py, html, md, tex, pdf]を作成する。"""
    if model['type'] != 'notebook':
        return # only do this for notebooks
    d, fname = os.path.split(os_path)
    base, ext = os.path.splitext(fname)
    check_call(['jupyter', 'nbconvert', '--to', 'script', fname], cwd=d)
    check_call(['jupyter', 'nbconvert', '--to', 'html', fname], cwd=d)
    check_call(['jupyter', 'nbconvert', '--to', 'markdown', fname], cwd=d)
    # check_call(['jupyter-nbconvert', '--to', 'latex', fname, '--template', 'jsarticle.tplx'], cwd=d)
    # check_call(['extractbb', base+'_files/*.png'], cwd=d)
    # check_call(['platex', '-interaction=nonstopmode', '-synctex=1', '-kanji=utf8', '-guess-input-enc' , base+'.tex'], cwd=d)
    # check_call(['dvipdfmx', base+'.dvi'], cwd=d)

c.FileContentsManager.post_save_hook = post_save
- TeXとかはうまくいかなかったのでコメントアウト。
- .texまでは作られるけど、環境によって.xbb作成されなかったりする。
- '--to pdf'もやってみたが、日本語pdfはスタイルの問題からpdfには直接できないみたい。
- TeXファイルだけ自動生成して、texから自分の手法でコンパイルするしかない?
- 以下の TeXの生成 の章でTeX ->PDFやってる。
- スタイルを日本語版のjsarticleにする方法は次で説明。
- まだ英語だけの.ipynbで試してはいない。
import os
from subprocess import check_call

def post_save(model, os_path, contents_manager):
    """post-save hook for converting notebooks to .py scripts
    ipynbが保存されるたびに[py, html, md, tex, pdf]を作成する。"""
    if model['type'] != 'notebook':
        return # only do this for notebooks
    d, fname = os.path.split(os_path)
    check_call(['jupyter', 'nbconvert', '--to', 'script', fname], cwd=d)
    check_call(['jupyter', 'nbconvert', '--to', 'html', fname], cwd=d)
    check_call(['jupyter', 'nbconvert', '--to', 'markdown', fname], cwd=d)
    check_call(['jupyter', 'nbconvert', '--to', 'latex', '--template', 'jsarticle.tplx', 'lualatex', fname], cwd=d)

c.FileContentsManager.post_save_hook = post_save
TeXの生成
日本語を使う場合はメニューバーのExport as PDFは使えない。
なぜなら\documentclass[a4paper,dvipdfmx]{jsarticle}のdocumentclassが英語版で生成されるので。
そこでjsarticleをスタイルに適用したtexファイルを作成する
テンプレートファイル(jsarticle.tplx)使う
テンプレートファイル(ここではjsarticle.tplxとする)を用意すればjsarticleに書き換えて生成してくれる。
nbconvertコマンドを実行する際に、
- nbコマンドのディレクトリに
.tplxファイルが存在する - nbconvertのオプションに
--template jsarticle.tplxを指定する。
jupyter nbconvert --to latex --template jsarticle.tplx lualatex <filename>を実行
具体的なやり方としては次のようにする。
1. jsarticle.tplxをtexの環境変数の通っているところ(platex.exeあるところなど)にいれておく
- <...>\Anaconda3\Lib\site-packages\nbconvert\templates\latex`以下にjsarticle.tplxファイルを作成する。
<...>は自分のAnacondaディレクトリ。僕の場合は
C:\tools\Anaconda3\。
- jsarticleに自動的に変えるコマンド
jupyter-nbconvert --to latex %1 --template jsarticle.tplxをターミナルに打ち込む。%1がファイル名、%2はファイルベースネーム。 - 画像をpngとしてエクスポートする。画像はワークディレクトリ以下のファイルベースネームをフォルダ名に下ディレクトリ以下に保存される。
extractbb %2_files/*.png
% Default to the notebook output style
((* if not cell_style is defined *))
    ((* set cell_style = 'style_ipython.tplx' *))
((* endif *))

% Inherit from the specified cell style.
((* extends cell_style *))

%===============================================================================
% Latex Article
%===============================================================================

((* block docclass *))
\documentclass[a4paper,dvipdfmx]{jsarticle}
((* endblock docclass *))
参考:
はしくれエンジニアもどきのメモ - Jupyter nbconvert(ファイル変換)メモ
Qiita - Jupyter notebook で HTML も自動作成
SublimeText3でTeXのbuild
ここまではsublimetext-build形式で書いて、build(ctrl+b)で実行させた。(ゆえにファイル名が%1とか引数だったりするのである。)
{
    "cmd":["Jupyter2PDF.bat","$file","$file_base_name"],
}
@echo off
jupyter-nbconvert --to latex %1 --template jsarticle.tplx
extractbb %2_files/*.png
platex走らせる
ココより下は%1, %2を引数としてではなく、ファイル名に打ち直さないといけない。
- platexをコマンドライン上で走らせる。
platex %2.tex.styファイルがないとかわめきだすけど、すべてEnter押し続けて続行させる。 - dvipdfmxをコマンドラインで走らせる。
dvipdfmx %2.dvi
SumatraPDFでpdf開く
ここまででpdfが作成された。
- pdfクリックしたときにtexソースに行きたいときはreuse-instanceでSumatraPDFを起動させる。
SumatraPDF -reuse-instance %2.pdf
nbextensions
nbextentionでチェックを入れたりすると~/.jupyter/nbconfig/notebook.jsonに設定が保存される。
僕の環境はこんな感じ
{
  "code_format_hotkey": "Ctrl-Alt-D",
  "kse_rebinds": {
    "command": [
      {
        "action_name": "auto:autogenerated-function () {\n                    IPython.notebook.edit_mode();\n                    return false;\n                }",
        "from": "esc"
      }
    ],
    "edit": [
      {
        "action_name": "jupyter-notebook:run-cell-and-insert-below",
        "from": "alt-enter"
      },
      {
        "to": "alt-enter",
        "action_name": "auto:autogenerated-function () {\n                    var cell = IPython.notebook.get_selected_cell();\n                    var mode = cell.mode;\n                    cell.execute();\n                    if (mode === \"edit\") IPython.notebook.edit_mode();\n                    return false;\n                }",
        "from": "ctrl-enter"
      }
    ]
  },
  "limit_output": 1000,
  "stored_keymap": "sublime",
  "load_extensions": {
    "exercise/main": false,
    "collapsible_headings/main": true,
    "python-markdown/main": true,
    "autosavetime/main": true,
    "spellchecker/main": false,
    "dragdrop/main": true,
    "nbpresent/js/nbpresent.min": true,
    "highlighter/highlighter": true,
    "hide_input/main": true,
    "runtools/main": false,
    "hinterland/hinterland": false,
    "contrib_nbextensions_help_item/main": true,
    "keyboard_shortcut_editor/main": true,
    "init_cell/main": true,
    "splitcell/splitcell": true,
    "toggle_all_line_numbers/main": false,
    "freeze/main": true,
    "hide_input_all/main": true,
    "move_selected_cells/main": true,
    "nb_anacondacloud/main": true,
    "select_keymap/main": true,
    "nb_conda/main": true,
    "code_prettify/code_prettify": true,
    "ruler/main": false,
    "navigation-hotkeys/main": true,
    "limit_output/main": false,
    "printview/main": true,
    "nbextensions_configurator/config_menu/main": true,
    "jupyter-js-widgets/extension": true,
    "execute_time/ExecuteTime": true,
    "toc2/main": true,
    "scratchpad/main": true,
    "search-replace/main": false,
    "codefolding/main": true,
    "exercise2/main": false,
    "qtconsole/qtconsole": true
  },
  "kse_show_rebinds": true,
  "autosavetime_starting_interval": "5"
}
JupyterNotebook設定関連
Nbextensions edit menu item
"nbextensions_configurator/config_menu/main": true,
メニューバーEditにnbextension configが追加され、それをクリックすることでnbextension画面に移れる。
通常ブラウザのアドレス欄にlocalhost:8888/nbextensions/と入力しなければならないところ、わかりやすくて便利。

Nbextensions dashboard tab
"nbextensions_configurator/config_menu/main": true,
JupyterNotebookホーム画面のメニューバーにnbextension設定メニューが現れる。
Nbextensions edit menu itemとどちらかだけでも設定しておきたい。

Select CodeMirror Keymap
"select_keymap/main": true,
vimやSublimetextのキーマップをデフォルトより濃く設定できる?
例えば、デフォルトでキーマップをSublimeを入れても、「カッコ内の選択」ctrl+shift+mや「複数行の選択」ctrl+alt+up<down>ができなかったが、これをTrueにすると実行可能。
便利で仕方がない「選択文字列の複数選択」ctrl+dはブラウザの「ブックマークを登録」とよくかぶるのでアドオンでキーを変更しちゃう。
FirefoxならMenu Wizard
ChromeならKeyconfig
Split Cells Notebook
"splitcell/splitcell": true,
左右段落に分ける。
ショートカットキーはShift+S
"stored_keymap": "sublime"
Collapsible Headings
"collapsible_headings/main": true,
見出し(Heading)(マークダウンセルの行頭# )の階層ごとに、cell を閉じることができる。

インプット関連
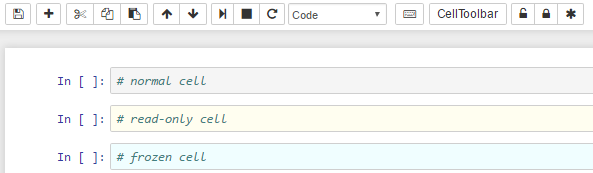
Freeze
"freeze/main": true,
read-only: 実行はできるけど書き換え不可
frozen: 書き込みも実行も不可
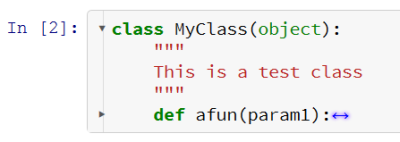
Codefolding
"codefolding/main": true,
インデント分けしたコードを折りたたむ。
ショートカットキーはalt+f
Hide input
"hide_input/main": true,
個別にセルの入力を隠す。

Hide input all
"hide_input_all/main": true,
すべてのセルの入力を隠す。
結果だけを出力できて、pdfやプレゼンの作成には便利。

Move selected cells
"move_selected_cells/main": true,
Alt+↑ / Alt+↓でセルの移動ができるらしいが、僕の環境でなぜかできない
Code prettify
"code_prettify/code_prettify": true,
有効にすると現れるハンマーアイコンを押すとpythonコードをpep8などに沿うように直してくれる。
pythonコードの修正はyapfを落とさないといけない。
conda install --channel https://conda.anaconda.org/conda-forge yapf
試していないけど、Rならinstall.packages("formatR", repos = "http://cran.rstudio.com")
javascriptならnpm install js-beautifyでフォーマットするモジュール落とさないといけない。

"toggle_all_line_numbers/main": true,
全てのセルに行番号つける。
各セルにセル番号つけることはjupyter-notebookのデフォルト設定(ショートカットL)で可能だから、使わない。

Limit Output
"limit_output/main": true,
~\.jupyter\jupyter_notebook_config.pyに以下の関数書き込むと、1000行以上の出力が出たとき自動的にoutputを折りたたんでくれる。
from notebook.services.config import ConfigManager
cm = ConfigManager().update('notebook', {'limit_output': 1000})
アウトプット関連
"execute_time/ExecuteTime": true,
実行時間を表示する。
メニューバーのCellから選択したセルだけ / 全てのセルで実行時間表示切替可能。
Printview
"printview/main": true
Download as...をしなくてもhtmlやpdf形式に変換したプレビューが簡単に見れる。
マークダウン関連
"highlighter/highlighter": true,
マークダウンセルのハイライト
"dragdrop/main": true,
画像の埋め込み。
マークダウンセルに
<img src="http://127.0.0.1:8888/notebooks/myimage.png"/>
みたいに書いてもいいけど、D&Dで捗りたい方向け。
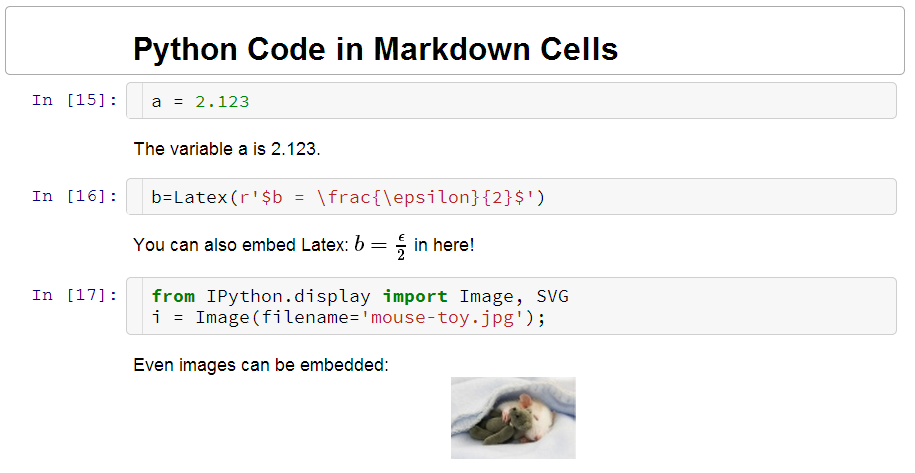
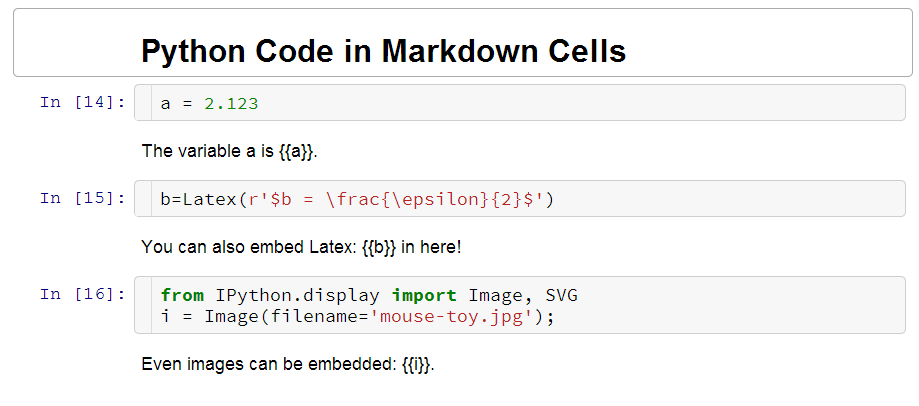
Python Markdown
"python-markdown/main": true,
pythonコードとマークダウンのミックス。
カーネル関連
"keyboard_shortcut_editor/main": true,
キーボードショートカット一覧にkeyboardショートカットの編集アイコンがつく。
キーボードショートカットの呼び出しは、コマンドパレット(ctrl+shift+p)からshow keyboard shortcutで探すか、ノーマルモードでhを押す。

Launch QTConsole
"qtconsole/qtconsole": true,
現在のカーネル上のオブジェクトとか引き継いでqtcosele立ち上げる。 styleがデフォルトの白色のままなのが気に食わない。 ←解決。以下のようにjupyter_qtconsole_config.pyに書き込む
~/.jupyter/jupyter_qtconsole_config.pyを作成して
c.JupyterWidget.syntax_style = "monokai"
と打ち込んでおけば、qtconsole立ち上げる時に常にmonokaiスタイルで立ち上がる。
ちょっとお試ししたいだけなら以下に挙げるScratchpadがおすすめ
Scratchpad notebook extension
"scratchpad/main": true,
現在のカーネルを汚さずに、お手軽にコードを試したいときに便利。
画面右に入力画面表示して
ショートカットキーはctrl+b

Navigation-Hotkeys
"navigation-hotkeys/main": true
新しいショートカットキーを追加する(らしい)
Edit-mode hotkeys:
pageup - scroll page up
pagedown - scroll page down
Alt- + - Split cell and keep cursor position
Alt- - - Combine cell and keep cursor position
Alt-n - Toggle line number display in current codecell
Shift-Enter - Execute cell, goto next cell and stay in edit mode if next cell is a code cell or unredered markdown cell
Ctrl-Enter - Execute cell and stay in edit mode if cell is a code cell
Ctrl-y - toggle celltype between markdown and code
Command-mode hotkeys:
esc - toggle to edit mode
home - Go to top of notebook
end - Go to bottom of notebook
pageup - scroll page up
pagedown - scroll page down
参考
はしくれエンジニアもどきのメモ - Jupyter Notebookの拡張機能を使ってみる
Qiita - extensionを追加してもっと快適なJupyter環境を構築する
関連
参考一覧
- 公式 ipython-contrib/jupyter_contrib_nbextensions
- Jupyterのショートカット
- stack overflow - Launch IPython notebook with selected browser
- ねこゆきのメモ - ipython notebookで起動ブラウザを指定
- はしくれエンジニアもどきのメモ - Jupyter nbconvert(ファイル変換)メモ
- Qiita - Jupyter notebook で HTML も自動作成
- はしくれエンジニアもどきのメモ - Jupyter Notebookの拡張機能を使ってみる
- Qiita - extensionを追加してもっと快適なJupyter環境を構築する
自分のページ
JupyterNotebookショートカットキー、TeX、画像埋め込み等、被る(コピペ)情報が多い
JupyterNotebookだけでなく、Jupyter, Ipythonも含めたpythonの開発環境の説明