はじめに
5年以上前の
という記事を参考にしてTWSNMPシリーズにPKIの仕組みを組み込んでいます。
この開発のための2025年の状況に合わせて勝手に復刻してみました。
学習するPKIの構成
最終的にGo言語で作りたいPKIの仕組みは、

のような構成です。
root CA(認証局)の秘密鍵は隠しておきたいという真面目な人向けに
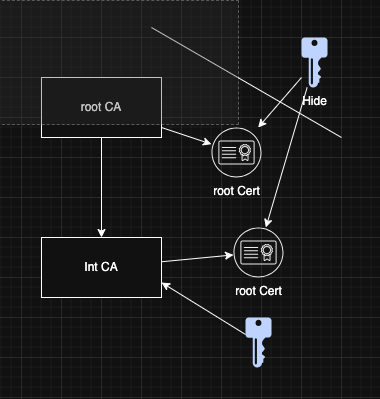
のようroot CAと中間CAに分けて、中間CAの秘密鍵だけ使う仕組みも解説します。
鍵ペアーの作成
昔は、RSA主流でしたが、最近は、ECDSAという鍵も使われるようになってきました。
ECDSAはサイズが小さいなど良いことがありますが、暗号化に使えない(署名だけ)という制限があるので、
SCEPで使えませんでした。
RSAの鍵を作る
GO言語なら
	key, err := rsa.GenerateKey(rand.Reader, 4096)
	if err != nil {
		panic(err)
	}
だけでできます。
ECDSAの鍵を作る
こちらも
	key, err := ecdsa.GenerateKey(elliptic.P256(), rand.Reader)
	if err != nil {
		panic(err)
	}
だけですみます。
root CAを作る
root CAは自分の秘密鍵で署名したCA有効と書いてある証明書を作ればよいです。この秘密鍵で、他の証明書の署名するのが仕事です。
処理の流れとしては
- 秘密鍵を作る
- 自分の秘密鍵で証明書に署名する
RSAの鍵でroot CAを作る
Go言語書くと
func CreateRootCACertificateRSA() {
	key, err := rsa.GenerateKey(rand.Reader, 4096)
	if err != nil {
		panic(err)
	}
	rootCAPrivateKey = key
	rootCAPublicKey := &key.PublicKey
	subject := pkix.Name{
		CommonName:   "ca.example.com",
		Organization: []string{"Example Org"},
	}
	tmpl := &x509.Certificate{
		SerialNumber:          serial,
		Subject:               subject,
		NotAfter:              time.Now().AddDate(1, 0, 0).UTC(),
		NotBefore:             time.Now().UTC(),
		IsCA:                  true,
		MaxPathLen:            int(1),
		KeyUsage:              x509.KeyUsageDigitalSignature | x509.KeyUsageCertSign | x509.KeyUsageCRLSign,
		BasicConstraintsValid: true,
	}
	rootCACertificate, err = x509.CreateCertificate(rand.Reader, tmpl, tmpl, rootCAPublicKey, rootCAPrivateKey)
	if err != nil {
		panic(err)
	}
	OutPem(rootCACertificate, "./rootCA.crt", "CERTIFICATE")
	OutPem(x509.MarshalPKCS1PrivateKey(key), "./rootCA.key", "RSA PRIVATE KEY")
	serial.Add(serial, big.NewInt(1))
}
だけです。ポイントは、x509.CreateCertificateの引数で自分の公開鍵と秘密鍵を指定するところです。
これで、自己署名の証明証(オレオレ)になります。IsCAをtrueにします。KeyUsageにKeyUsageCertSignが入っているの証明書のサインできるということです。
OutPemという関数がでてきますが、PEM形式で証明書や秘密鍵を保存するものです。
func OutPem(data []byte, filename, pemType string) {
	pemdata := pem.EncodeToMemory(
		&pem.Block{
			Type:  pemType,
			Bytes: data,
		},
	)
	f, err := os.Create(filename)
	if err != nil {
		panic(err)
	}
	defer f.Close()
	if _, err := f.Write(pemdata); err != nil {
		panic(err)
	}
}
ECDSAの鍵でCAを作る
func CreateRootCACertificateECDSA() {
	key, err := ecdsa.GenerateKey(elliptic.P256(), rand.Reader)
	if err != nil {
		panic(err)
	}
	rootCAPrivateKey = key
	rootCAPublicKey := &key.PublicKey
	subject := pkix.Name{
		CommonName:   "ca.example.com",
		Organization: []string{"Example Org"},
	}
	tmpl := &x509.Certificate{
		SerialNumber:          serial,
		Subject:               subject,
		NotAfter:              time.Now().AddDate(1, 0, 0).UTC(),
		NotBefore:             time.Now().UTC(),
		IsCA:                  true,
		MaxPathLen:            int(1),
		KeyUsage:              x509.KeyUsageDigitalSignature | x509.KeyUsageCertSign | x509.KeyUsageCRLSign,
		BasicConstraintsValid: true,
	}
	rootCACertificate, err = x509.CreateCertificate(rand.Reader, tmpl, tmpl, rootCAPublicKey, rootCAPrivateKey)
	if err != nil {
		panic(err)
	}
	OutPem(rootCACertificate, "./rootCA.crt", "CERTIFICATE")
	if b, err := x509.MarshalECPrivateKey(key); err == nil {
		OutPem(b, "./rootCA.key", "EC PRIVATE KEY")
	}
	serial.Add(serial, big.NewInt(1))
}
のような感じです。鍵の種類だけ違いますが流れは同じです。
中間CAを作る
Root CAの秘密鍵をしまっておいて、普段使うの秘密鍵は配下CAのものを使うという安全
策のために中間CAを作ります。
func CreateIntermediateCACertificate() {
	key, err := ecdsa.GenerateKey(elliptic.P256(), rand.Reader)
	if err != nil {
		panic(err)
	}
	intermediateCAPrivateKey = key
	intermediateCAPublicKey = &key.PublicKey

	subject := pkix.Name{
		CommonName:   "intca.example.com",
		Organization: []string{"Example Org"},
	}
	tmpl := &x509.Certificate{
		SerialNumber:          serial,
		Subject:               subject,
		NotAfter:              time.Now().AddDate(1, 0, 0).UTC(),
		NotBefore:             time.Now().UTC(),
		IsCA:                  true,
		MaxPathLen:            int(1),
		KeyUsage:              x509.KeyUsageDigitalSignature | x509.KeyUsageCertSign | x509.KeyUsageCRLSign,
		BasicConstraintsValid: true,
	}
	rootCACertificateX509, err := x509.ParseCertificate(rootCACertificate)
	if err != nil {
		panic(err)
	}
	intermediateCACertificate, err = x509.CreateCertificate(rand.Reader, tmpl, rootCACertificateX509, intermediateCAPublicKey, rootCAPrivateKey)
	if err != nil {
		panic(err)
	}
	OutPem(intermediateCACertificate, "./intermediateCA.crt", "CERTIFICATE")
	if b, err := x509.MarshalECPrivateKey(key); err == nil {
		OutPem(b, "./intermediateCA.key", "EC PRIVATE KEY")
	}
	serial.Add(serial, big.NewInt(1))
}
root CAの場合と流れは同じですが違っているのは、 x509.CreateCertificateの引数に、中間CAの公開鍵にroot CAの秘密鍵で署名するという指定です。自己署名ではなく、親のCAが指定されています。
なので中間です。
この後、証明書を発行する時に、中間CAの証明書と秘密鍵を使えば、rootの秘密鍵は使わずにすみます。
でも、話が複雑になるので、この後の説明では、中間CAはお休みしてもらいます。
証明書要求CSRを作る
CAに証明を発行してもらうためには、証明書要求を作るます。CAが署名する前の雛形みたいなものです。
RSA鍵の証明書要求を作る
鍵がRSAの場合は
func CreateCertificateRequestRSAKey(bits int) {
	key, err := rsa.GenerateKey(rand.Reader, bits)
	if err != nil {
		panic(err)
	}
	publicKey := &key.PublicKey
	kex, err := marshalKeyUsage(x509.KeyUsageDigitalSignature | x509.KeyUsageCertSign | x509.KeyUsageCRLSign)
	if err != nil {
		panic(err)
	}
	tmp := &x509.CertificateRequest{
		PublicKeyAlgorithm: x509.RSA,
		PublicKey:          publicKey,
		SignatureAlgorithm: x509.SHA256WithRSA,

		Subject: pkix.Name{
			CommonName:         "www.example.org",
			OrganizationalUnit: []string{"Example Org Unit"},
			Organization:       []string{"Example Org"},
			Country:            []string{"JP"},
		},

		DNSNames:        []string{"www.example.com", "www.example.co.jp"},
		EmailAddresses:  []string{"test@examle.com"},
		IPAddresses:     []net.IP{net.ParseIP("192.168.1.1")},
		ExtraExtensions: []pkix.Extension{kex},
	}
	csrRSA, err = x509.CreateCertificateRequest(rand.Reader, tmp, key)
	if err != nil {
		panic(err)
	}
	OutPem(csrRSA, "./rsa.csr", "CERTIFICATE REQUEST")
	OutPem(x509.MarshalPKCS1PrivateKey(key), "./rsa.key", "RSA PRIVATE KEY")
}
です。
ECDSA鍵の証明書要求を作る
func CreateCertificateRequestECDSAKey() {
	key, err := ecdsa.GenerateKey(elliptic.P256(), rand.Reader)
	if err != nil {
		panic(err)
	}
	publicKey := &key.PublicKey
	kex, err := marshalKeyUsage(x509.KeyUsageDigitalSignature | x509.KeyUsageCertSign | x509.KeyUsageCRLSign)
	if err != nil {
		panic(err)
	}
	tmp := &x509.CertificateRequest{
		PublicKeyAlgorithm: x509.ECDSA,
		PublicKey:          publicKey,
		SignatureAlgorithm: x509.ECDSAWithSHA256,

		Subject: pkix.Name{
			CommonName:         "www.example.org",
			OrganizationalUnit: []string{"Example Org Unit"},
			Organization:       []string{"Example Org"},
			Country:            []string{"JP"},
		},
		DNSNames:        []string{"www.example.com", "www.example.co.jp"},
		EmailAddresses:  []string{"test@examle.com"},
		IPAddresses:     []net.IP{net.ParseIP("192.168.1.1")},
		ExtraExtensions: []pkix.Extension{kex},
	}
	csrECDSA, err = x509.CreateCertificateRequest(rand.Reader, tmp, key)
	if err != nil {
		panic(err)
	}
	OutPem(csrECDSA, "./ecdsa.csr", "CERTIFICATE REQUEST")
	if b, err := x509.MarshalECPrivateKey(key); err == nil {
		OutPem(b, "./ecdsa.key", "EC PRIVATE KEY")
	}
}
鍵を作るところだけでなく
		PublicKeyAlgorithm: x509.ECDSA,
		PublicKey:          publicKey,
も変わっています。
証明書要求(CSR)から証明書(cert)を発行する
CAがCSRから証明書を発行するというのは、CSRを元にしてCAの署名書と秘密鍵で署名するということです。
流れは、
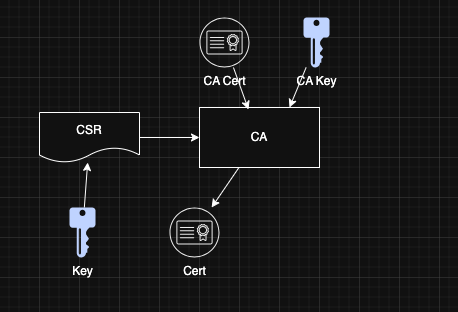
です。
予告
この後、続きで
- CRL/OCSP編
- SCEP編
- ACME編
の記事を書こうと思っています。
その後、このPKIの機能をTWSNMPシリーズ
に組み込む予定です。