前回までのあらすじ
前回の記事
NonVRでどこでもドアのポータルより手前のオブジェクトを消したけど、VRで見たら消えてなかった。。。
アジェンダ
- なぜVRだとポータルより前のオブジェクトが消えなかったのか
- VR対応のCalculateObliqueMatrix
- 動作確認
- 問題
- 雑感
記事の最後にサンプルプロジェクトのgithubのリンクを張っておきます。
動作環境
- Windows 10
- Unity 2019.3.14f1
- XR Plug-in + Mock HMD Loader
- XR Plug-in + SteamVR Unity Plugin v2.6.0b1
注意事項
SteamVRデバイスはBeta版でのみ確認(XR PluginのSteamVR向けは2020/05/27時点でbetaのみ)。
正式版と動作が異なる可能性があります。
なぜVRだとポータルより前のオブジェクトが消えなかったのか
原因
理由は単純でVRで使用するCameraのViewMatrix, ProjectionMatrixが左目、右目で分けられているからです。
前回使用したcamera.projectionMatrixはNonVR(デスクトップ)向けのプロパティだったため、VRの場合は機能しないみたいです。
左目、右目のMatrixは以下のメソッドで設定することになります。
ViewMatrix, ProjectionMatrixは両目で異なるのか
異なります。
ViewMatrixは想像がつくと思いますが、左目と右目の位置が異なるため、座標変換行列も異なります。
ProjectionMatrixも同様に異なると考えたほうが良いです。
「視錐台の形は両目で同じっぽいから、ProjectionMatrixも両目で同じじゃないの?」って思う方がいるかもしれませんが、ProjectionMatrix自体もライブラリ依存やデバイス依存となります。
実際、OpenVR経由(非Unity経由)でHTC Viveで使用されるProjectionMatrixを取得したところ、右目と左目でProjectionMatrixは異なっていました。
以下は両目の視錐台が異なる場合のイメージです。
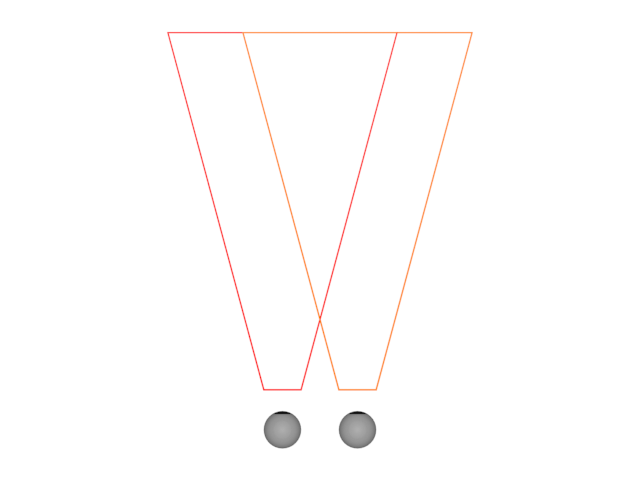
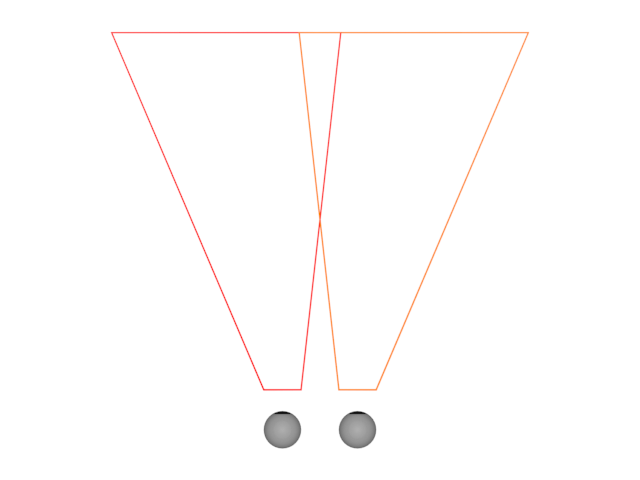
何が言いたいのかというと、「ちゃんと左右の目それぞれでMatrix計算しましょう」ということです!
VR対応のCalculateObliqueMatrix
残念ながらUnityのCamera.CalculateObliqueMatrixはNonVR向けしかないようです。。。
ということで用意しました。
    /// <summary>
    /// Oblique near-plane projection matrix を計算して返す
    /// </summary>
    ///
    /// <param name="projectionMatrix">
    /// Near-Planeを傾ける対象のprojection matrix。
    /// </param>
    ///
    /// <param name="clipPlane">
    /// clip planeを表すVector4 (Camera.CalculateObliqueMatrixの引数と同様)]
    /// </param>
    /// <returns> Oblique near-plane projection matrix </returns>
    public static Matrix4x4 CalculateObliqueMatrix(Matrix4x4 projectionMatrix, Vector4 clipPlane)
    {
        Vector4 nearClipInProj = new Vector4(
            Mathf.Sign(clipPlane.x), Mathf.Sign(clipPlane.y),
            1.0f, 1.0f);
        Vector4 q = projectionMatrix.inverse * nearClipInProj;
        Vector4 c = clipPlane * (2.0F / (Vector4.Dot(clipPlane, q)));

        projectionMatrix.SetRow(2, c - projectionMatrix.GetRow(3));

        return projectionMatrix;
    }
以下のコードを引用させていただきました。
Oblique near-plane clipping (Unity forums)
原理を知りたい方は以下の論文が参考になります。
Oblique View Frustum Depth Projection and Clipping
CalculateObliqueMatrix 改変版
逆行列計算が省略されたバージョンです。
Modifying the Projection Matrix to Perform Oblique Near-Plane Clipping より引用、改変させていただきました。
    public static Matrix4x4 CalculateObliqueMatrixSimple(Matrix4x4 projectionMatrix, Vector4 clipPlane) {
        Vector4 q = new Vector4(
          (Mathf.Sign(clipPlane.x) + projectionMatrix.m02) / projectionMatrix.m00,
          (Mathf.Sign(clipPlane.y) + projectionMatrix.m12) / projectionMatrix.m11,
          -1.0f,
          (1.0f + projectionMatrix.m22) / projectionMatrix.m23
        );

        Vector4 c = clipPlane * (2.0f / Vector4.Dot(clipPlane, q));
        c.z += 1.0f;

        projectionMatrix.SetRow(2, c);

        return projectionMatrix;
    }
使い方はProjectionMatrixを渡すこと以外はCamera.CalculateObliqueMatrixと同様です。
使い方のイメージ
以下のUpdateStereoProjectionMatrixに"Camera"と"clipPlaneとして使うTransform"を渡してください。
※clipPlaneとしてTransformを使う話は前回の記事を参照ください。
    private static void UpdateStereoProjectionMatrix(Camera camera, Transform clipPlaneTransform) {
        // Reset customized projection matrix
        camera.ResetStereoProjectionMatrices();

        // Need both projection matrices to be calculated.
        // If one matrix is changed, the other is changed to unit.
        Matrix4x4 leftProjMatrix = CalculateObliqueMatrix(camera, Camera.StereoscopicEye.Left, clipPlaneTransform);
        Matrix4x4 RightProjMatrix = CalculateObliqueMatrix(camera, Camera.StereoscopicEye.Right, clipPlaneTransform);

        camera.SetStereoProjectionMatrix(Camera.StereoscopicEye.Left, leftProjMatrix);
        camera.SetStereoProjectionMatrix(Camera.StereoscopicEye.Right, RightProjMatrix);
    }

    private static Matrix4x4 CalculateObliqueMatrix(Camera camera, Camera.StereoscopicEye eye, Transform clipPlaneTransform) {

        // Require the projection matrix of the specified eye to be reset previously
        // but it is impossible because of no method to reset only either,
        // so this method should be private for now.

        Matrix4x4 baseViewMatrix = camera.GetStereoViewMatrix(eye);
        Matrix4x4 baseProjMatrix = camera.GetStereoProjectionMatrix(eye);

        Vector3 clipPlaneNormal = baseViewMatrix.MultiplyVector(clipPlaneTransform.forward);
        Vector3 clipPlanePosition = baseViewMatrix.MultiplyPoint(clipPlaneTransform.position);

        Vector4 clipPlane = CalculateClipPlane(clipPlaneNormal, clipPlanePosition);

        return CalculateObliqueMatrix(baseProjMatrix, clipPlane);
    }
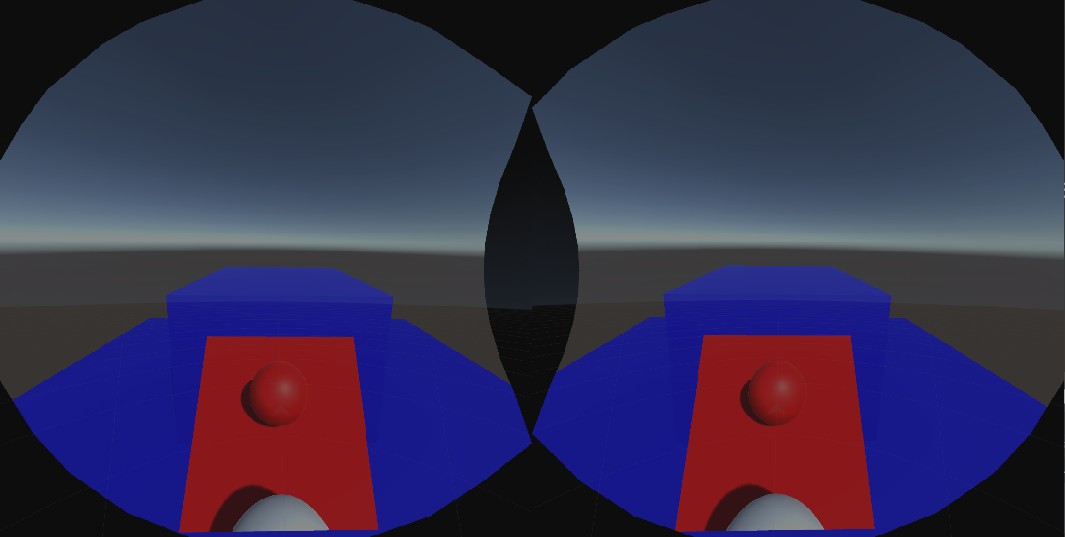
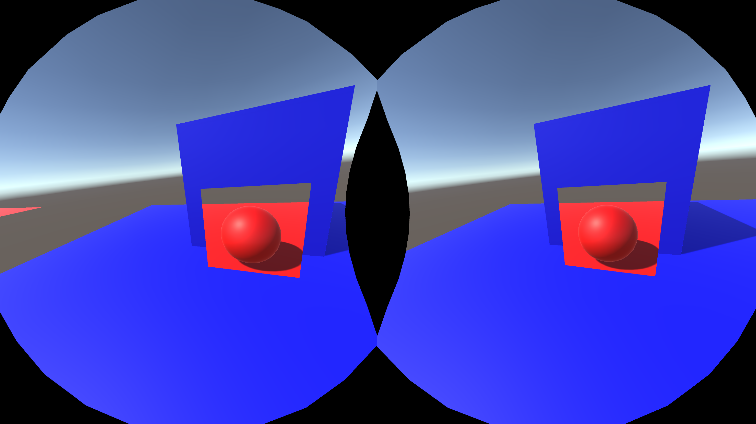
動作確認
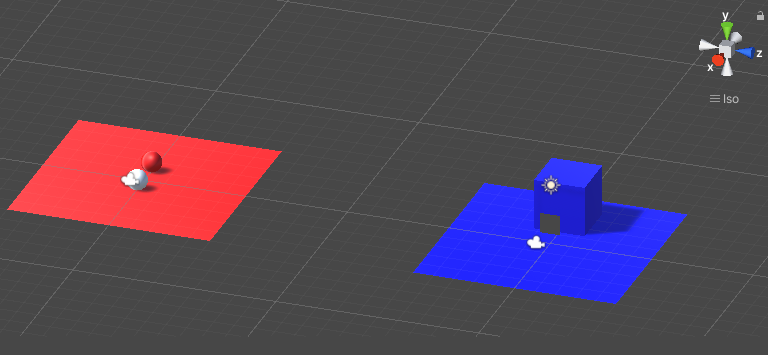
前回と同様にVRを使って青の空間にあるポータルから赤の空間をのぞいてみましょう!
赤の空間にあるカメラとポータルの間にある白球は描画されないはずです。

結果
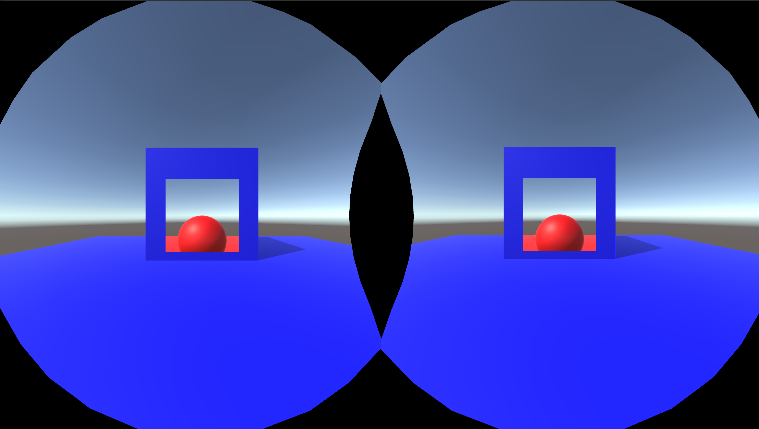
違う角度から見ても、白球は描画されなくなりました!
※もし実機で動作がおかしければコメントいただければと思います
問題
ここで1つ問題があります。
Multi Pass以外では Oblique Near-Plane Clipping は使えない
実はCamera.SetStereoProjectionMatrixはRenderModeがMulti Pass以外では機能しません!
Single Pass Instancedはパフォーマンス面で何かとメリットがあるので、これは結構致命的な問題かも。。。
ちなみにSingle Pass Instancedの状態で上記メソッドをコールすると以下の警告ログが出ます。
警告ログ
Can't set custom eye projection matrix when not in multipass mode
UnityEngine.Camera:SetStereoProjectionMatrix(StereoscopicEye, Matrix4x4)
雑感
まさかの3年越しの更新です。もし続きを待っていた方がいらっしゃたら本当にごめんなさい。。。
Unity 5.6.1f1からUnity 2019.3.14f1になっていますね(バージョンの表記方法すら違うw)。
UnityのVR対応もXR Pluginというものに移行するようですが、SteamVR向けの正式バージョンが出なくてつらいです。
仕方ないのでOculusかWindowsMRあたりの購入を考えたんですが、コロナ事情のせいか在庫がまったくなく。。。
あと、Single Pass InstancedでProjectionMatrixが改変できないのは、個人的にすごく残念に感じています。
代替手段が判明したら、共有しようと思います。
この3年間、記事は書かなかったんですがUnity自体には触れていました。
そして、今は「Depth Maskって柔軟性が微妙かな」って結論になっています。
もちろん、グラフィックメモリの消費が少なくて済むなどのメリットはあると思いますが、ポータルにエフェクトを入れたい場合はRenderTextureに落としたほうが何かと都合がいいかなって思っています。
さて、次は趣向を変えてFrustum Cullingを記事にしようと思います。
ClipPlaneを傾けていますので、何か悪影響が出ていないかが気になっています。
それでは!
サンプルプロジェクト
-
github.com/tsgcpp/WarpGateVR
- すみません、publicにしました。