q40.zipをダウンロードすると学習用と評価用のコードがあった。
train.pyを見るとcifar10のデータセットを使い、7層の全結合層で11クラスの多クラス分類を学習している。
cifar10の10クラスに、flagクラスを11番目のクラスとして追加して学習している。flagの教師データは32x32サイズのQRコードのようだが学習に使用したflag.pngは当然入手できない。
flag.pngを適当なQRコードで作成して、学習、評価を行ってみると、問題文と同様に、学習したflag.pngの推論結果が99.5%となった。
学習に使用したflag.pngをなんとかして復元する問題のようだ。
pythonにはqrcodeモジュールがあり、文字列からQRコードを生成できるので、遺伝的アルゴリズムなどを使ってflag.pngを類推できないかやってみたが、無理そうだった。そもそも同じ文字列でも作成されるQRコードが、ライブラリによって違うようなので、この方法でflag.pngを類推するのは無理そう。
もう一度学習用スクリプトを見ると、教師データにflag.pngのQRコードが5000枚も重複して入っている。これだけ多いと、ネットワークのモデルの重み係数にQRコードの画像情報が入っているかもと考えた。
このあたりは、すごく適当な思い付きなので、全然間違っていましたらご指摘お願いします。
以下のpythonコードを書き、実行してみた。
実行方法は以下
python3 flag_test.py no_flag_0.png
内容は、no_flag_0.pngを入力としてネットワークの順伝搬を行い、出力の10番目の要素(flagのクラス)から、逆伝搬した勾配を求めて、
最初のdense層の重み係数を勾配の大きさで重みづけて足し合わせて、最後に画像化を行った。
# -*- coding: utf-8 -*-

import os, sys
os.environ["TF_CPP_MIN_LOG_LEVEL"] = "2"
import tensorflow as tf # v2.5.0
from tensorflow import keras
import numpy as np
import cv2
import keras.backend as K

def load_image(f):
    return tf.io.decode_image(tf.io.read_file(f), channels=1, dtype=tf.float32)

# モデル読み込み
input_model = tf.keras.models.load_model("model")
# 画像読み込み
image = tf.expand_dims(load_image(sys.argv[1]), axis=0)
input_model.summary()

# 勾配計算用
grad_model = tf.keras.models.Model([input_model.inputs], [input_model.get_layer('dense').output, input_model.output])

with tf.GradientTape() as tape:
    conv_outputs, predictions = grad_model(image)
    loss = predictions[:, 10]
    #print(conv_outputs.shape)
    #print(predictions.shape)

# 勾配を計算
output = conv_outputs[0]
#print(output.shape)
grads = tape.gradient(loss, conv_outputs)[0]
#print(grads.shape)

# 正の勾配のみ
gate_f = tf.cast(output > 0, 'float32')
gate_r = tf.cast(grads > 0, 'float32')
#guided_grads = gate_f * gate_r * grads
guided_grads = gate_r * grads
#print(guided_grads.shape)
guided_grads = np.array(guided_grads)

feature = np.zeros((1024), dtype=np.float32)
# 最初のdense層(1024->512)の重み係数
l1= input_model.layers[1]
l1w = l1.get_weights()
maps = l1w[0]
for n in range(512):
    fmap = maps[:,n]
    # flagクラスの正の勾配で重みづけて加算
    feature = feature + fmap * guided_grads[n]
# 0-255にして画像に保存
featmin = min(feature)
featmax = max(feature)
feature = (feature - featmin) * 255.0 / (featmax - featmin)
featimg = feature.astype(np.uint8).reshape([32, 32])
#th, im_th = cv2.threshold(featimg, 128, 255, cv2.THRESH_BINARY)
cv2.imwrite('flag.png', featimg)
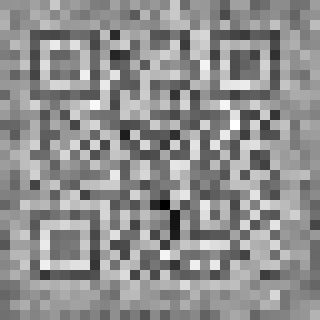
実行すると以下のflag.pngが得られた。
これを拡大し、スマホのQRコードリーダーで読むと、正解のFLAGが得られた。

NearestNeighbourで拡大したものは以下