はじめに
OpenVINOはIntelが提供しているディープラーニングの推論エンジンライブラリです。
OpenVINOを使うことでTensorflowやPytorchで学習したモデルをロードし、高速に推論を実行することができます。
Tensorflowで推論を実行するよりも、数倍の実行時間短縮の効果を得られます。
さすがIntelというところでしょうか、OpenVINOのドキュメントは公式に丁寧にまとめられており、
https://docs.openvinotoolkit.org/latest/index.html
また公式のフォーラムも活発なので、
https://community.intel.com/t5/Intel-Distribution-of-OpenVINO/bd-p/distribution-openvino-toolkit
OpenVINOを利用するには特に困らないのですが、__Tensorflow(Keras)の学習から、C++/OpenVINOの推論まで一気通貫で実行するチュートリアル__があると、使ってみるハードルが下がるかなと思い、この記事を書いています。
このチュートリアルは実行可能な形式でGithubリポジトリにアップロードしてあります。
https://github.com/tomoyaeibu/openvino2020.3.1-mnist-sample
LGTMややってみました報告をもらうと嬉しいのでぜひお願いします!
この記事では
以下のような人に役に立ちそうなチュートリアルです。
- 開発環境ではTensorflowで学習と推論を実行していたが、本番環境では高速に推論を実行する必要がある。
- C++のシステムに推論を実行する機能を組み込みたい。
- OpenVINOを使って推論を実行しようとしたが、なぜかうまく行かないので成功例を見たい。
- 説明書を読まない派なので、動作するサンプルコードを改変して開発を進めたい。
目次
OpenVINOとは?
OpenVINO Toolkitはディープラーニングの推論を高速で実行するためのツール群です。
高速な推論を実現するためのポイントは以下の2点です。
- 学習済みモデルを最適化して推論に特化したフォーマットに変換する。
- Intelのデバイスに最適化された、フォワード処理を使って推論する。
なのでOpenVINO Toolkitには以下のようなものが含まれています。
- 様々なフォーマットの学習済みモデルを最適化/変換するオプティマイザ
- 推論を高速に実行するための推論エンジンAPI(PythonとC++)
- 変換後のモデルを詳細を解析するための便利ツール
- 推論処理のボトルネックを解析するための便利ツール
OpenVINO と TensorRT
推論エンジンの選択肢にはIntelのOpenVINOのほかにNvidiaのTensorRTがあります。
どちらも同じようなお作法で使うことができますが、OpenVINOはIntelのデバイスで、TensorRTはNvidiaのデバイスでしか使えません。
開発ターゲットの環境や要件に合わせて選択することになると思います。
- Intelのデバイス:CoreやXeon、Myriad
- Nvidiaのデバイス:GeforceやTesla、Jetson
「いいから一番速いやつをくれ」、という要望に対しては、なかなか答えづらいです。
一般的にニューラルネットワークの計算処理にはGPUが向いているということで、TensorRTを推したくなりますが、OpenVINOではデバイスによってはキャリブレーション(≠最適化)を経たINT8精度での実行により、かなりの高速化が可能なようです。
https://docs.openvinotoolkit.org/latest/openvino_docs_IE_DG_Int8Inference.html
コストのことも考えると、実行環境と最適化手法次第ですね。
学習と推論のチュートリアル
早速、チュートリアルを開始します。
以下のような環境でチュートリアルを作成しました。
| チュートリアルを作成したときに使った環境 | |
|---|---|
| Date | 2020/12/28 |
| PC | Leonovo ThinkPad X280 |
| OS | Windows 10 |
| Python | 3.6.5 |
| Tensorflow | 1.15 (CPU) |
| numpy | 1.19.3 (1.19.4はエラーが発生するのでダウングレード) |
| h5py | 2.10 (3.1はエラーが発生するのでダウングレード) |
| C++のビルド環境 | VisualStudio 2019 |
| OpenVINO | 2020.3 (Stable) |
| OpenVINOのインストールパス | C:\Program Files (x86)\IntelSWTools\openvino |
OpenVINOはTensorflow 2.xにも対応しているようですが、まだβ版のようです。
Tensorflow 2.xでも試してみたのですが、うまく行かなかったのでおとなしくTensorflow 1.15を使うことをおススメします。
https://docs.openvinotoolkit.org/latest/openvino_docs_MO_DG_prepare_model_convert_model_Convert_Model_From_TensorFlow.html#Convert_From_TF2X
OpenVINOの環境構築をする
まずはOpenVINOのインストールなど、環境構築をしていきます。
OpenVINOの環境構築については別の方の記事がわかりやすいので、省略します。
OpenVINO (2019.R1) Windows10版のインストールとサンプルのテスト
(@hanapageさん!参考にさせていただきました!)
- この環境構築は「推論エンジンライブラリを使ったC++のアプリケーションのビルド」には必要ですが、ビルド済みのアプリケーションの実行には必要ありません。dllをアプリケーションに付属すればアプリケーションで推論の実行ができます。つまりデプロイ環境では環境構築の必要がありません。
- このチュートリアルでは最新のStableバージョンであるOpenVINO 2020.3を使用しています。
Python/Tensorflow(keras)で学習したモデルを変換する。
Python/Tensorflow(keras)を使ってクラス分類のモデルを作成し、OpenVINOのモデルオプティマイザを使って最適化/変換を実行します。
このチュートリアルではmnist(手書き文字)のシンプルなクラス分類を例にします。
Pythonのスクリプトの全文はGithubリポジトリにアップロードしました。
https://github.com/tomoyaeibu/openvino2020.3.1-mnist-sample/blob/main/training.py
#######################################################################################
# %% Load data.
#
#

# mnistデータをダウンロードする。
mnist = tf.keras.datasets.mnist
(x_train, y_train), (x_test, y_test) = mnist.load_data()

# [0,1]に収まるよう正規化する。
x_train, x_test = x_train / 255.0, x_test / 255.0
x_train = x_train.reshape(x_train.shape[0], 28, 28, 1)
x_test  = x_test.reshape(x_test.shape[0], 28, 28, 1)
print(x_train.shape, x_test.shape); print()

#######################################################################################
# %% Setting model.
#
#

# クラス分類のモデルを定義する。
model = Sequential([
    Conv2D(50, (5, 5), activation='relu', input_shape=(28, 28, 1)),
    Conv2D(50, (3, 3), activation='relu'),
    MaxPooling2D(pool_size=(2, 2)),
    Flatten(),
    Dropout(0.2),
    Dense(100, activation='relu'),
    Dropout(0.4),
    Dense(10, activation='softmax')
])

# モデルをコンパイルする。
model.compile(optimizer='adam',
              loss='sparse_categorical_crossentropy',
              metrics=['accuracy'])

#######################################################################################
# %% Training.
#
#

# 学習時にベストなモデルだけを保存するように設定する。
modelCheckpoint = ModelCheckpoint(filepath = 'model.h5',
                                  monitor = 'val_loss',
                                  verbose = 1,
                                  save_best_only = True,)
# Early Stoppingを設定する。
EarlyStopping = EarlyStopping(monitor='val_loss', patience=2, verbose=1, mode='auto')

# 学習を実行する。
hist = model.fit(x_train, y_train, validation_split=0.1, epochs=5, verbose=1,
                  callbacks=[modelCheckpoint, EarlyStopping])
学習が完了すると学習済みモデルがmodel.h5として出力されます。
この学習済みモデルはHDF5フォーマットなので、まずはFreeze Graph処理を行いProtocol Bufferフォーマットに変換します。
これによって学習に必要な領域が削除され、推論にしか使えない状態でモデルがファイルに出力されます。
#######################################################################################
# %% Utility.
#
#

def backup_raw(imarray, filepath): # float64
    backup = imarray.tobytes()

    with open(filepath, "wb") as fout:
        fout.write(backup)

    return backup

def convert_kerasmodel_to_frozen_pb(kerasmodelpath, pbmodelname):
    output_pb = os.path.splitext(os.path.basename(pbmodelname))[0] + ".pb"
    output_pb_path = Path(output_pb)

    #%% Reset session
    tf.keras.backend.clear_session()
    tf.keras.backend.set_learning_phase(0)

    model = tf.keras.models.load_model(kerasmodelpath, compile=False)
    session = tf.compat.v1.keras.backend.get_session()

    input_names = sorted([layer.op.name for layer in model.inputs])
    output_names = sorted([layer.op.name for layer in model.outputs])

    graph = session.graph

    #%% Freeze Graph
    with graph.as_default():
        # Convert variables to constants
        graph_frozen = tf.compat.v1.graph_util.convert_variables_to_constants(session, graph.as_graph_def(), output_names)
        # Remove training nodes
        graph_frozen = tf.compat.v1.graph_util.remove_training_nodes(graph_frozen)

        with open(output_pb, 'wb') as output_file :
            output_file.write(graph_frozen.SerializeToString())

        print ('Inputs = [%s], Outputs = [%s]' % (input_names, output_names))

#######################################################################################
# %% Evaluation
#
#

# ベストなモデルをロードする。
best_model = load_model('model.h5')

# OpenVINOの結果と比較できるように入力データを保存し、推論結果を出力する。
backup_raw(x_test[5], 'x_test[5].raw')
np.set_printoptions(suppress=True)
print(x_test[5].shape)

start = time.perf_counter()
score_result = best_model.predict(x_test)[5]
end = time.perf_counter()
print("Time taken for inference : [{0}] ms".format(end-start))
print(score_result)

# OpenVINOのオプティマイザで変換できるようにfrozon_pb形式でモデルを保存する。
convert_kerasmodel_to_frozen_pb("model.h5", "model.pb")
(28, 28, 1)
Time taken for inference : [2.8801844] ms
[0.00000004 0.9999782  0.00000129 0.00000004 0.00001199 0.00000002
 0.00000262 0.00000498 0.00000056 0.00000028]

WARNING:tensorflow:From .\training_tf1.15.py:43: The name tf.keras.backend.get_session is deprecated. Please use tf.compat.v1.keras.backend.get_session instead.

WARNING:tensorflow:From .\training_tf1.15.py:53: convert_variables_to_constants (from tensorflow.python.framework.graph_util_impl) is deprecated and will be removed in a future version.
Use `tf.compat.v1.graph_util.convert_variables_to_constants`
WARNING:tensorflow:From C:\Projects\openvino2020.3.1-mnist-sample\venv-tf-1.15\lib\site-packages\tensorflow_core\python\framework\graph_util_impl.py:277: extract_sub_graph (from tensorflow.python.framework.graph_util_impl) is deprecated and will be removed in a future version.
Instructions for updating:
Use `tf.compat.v1.graph_util.extract_sub_graph`
WARNING:tensorflow:From .\training_tf1.15.py:55: remove_training_nodes (from tensorflow.python.framework.graph_util_impl) is deprecated and will be removed in a future version.
Instructions for updating:
Use `tf.compat.v1.graph_util.remove_training_nodes`
Inputs = [['conv2d_input']], Outputs = [['dense_1/Softmax']]
変換が完了するとmodel.pbとしてProtocol Bufferフォーマットで学習済みモデルが保存されます。
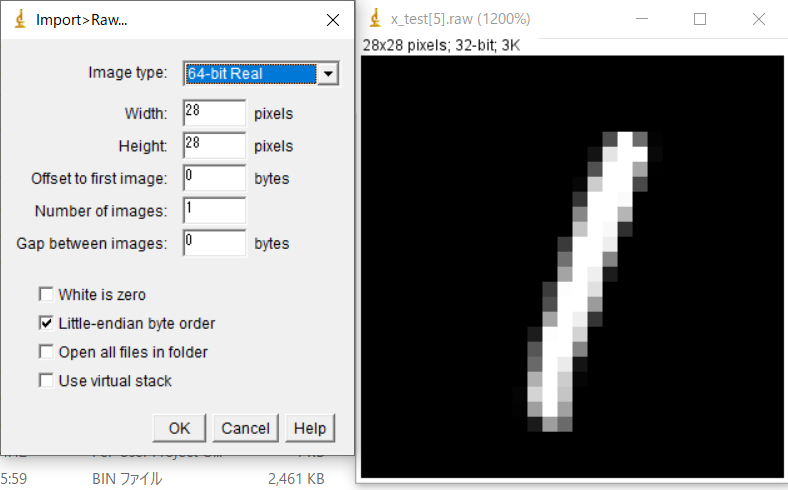
ついでに次のチャプタでPython/Tensorflowの推論結果とC++/OpenVINOの推論結果が一致することを確かめるために、入力データのndarrayのうち1つをバイナリファイルで書き出しました。
次のチャプタで説明しますが、C++/OpenVINOのコードでは、入力データはFP32(32bitFloat)のバイナリデータで指定することになるため、ここではデータの[Numbers, Width, Height, Channels]のインデックス順がわからなくならないように、バイナリデータにしてしまうのが都合が良いです。
バイナリデータなのでImageJなどを使うと画像データとして表示することができます。
(pythonのFloatはFP64であることに注意してください。)
 |
|---|
次にOpenVINOのモデルオプティマイザを使ってmodel.pbをOpenVINO IRフォーマットに変換します。
C:\Program Files (x86)\IntelSWTools\openvino\deployment_tools\model_optimizer>python mo.py --input_model {model.pbが存在するディレクトリ}\model.pb --output_dir {model.pbが存在するディレクトリ} --input_shape [1,28,28,1]
Model Optimizer arguments:
Common parameters:
        - Path to the Input Model:      {model.pbが存在するディレクトリ}\model.pb
        - Path for generated IR:        {model.pbが存在するディレクトリ}
        - IR output name:       model
        - Log level:    ERROR
        - Batch:        Not specified, inherited from the model
        - Input layers:         Not specified, inherited from the model
        - Output layers:        Not specified, inherited from the model
        - Input shapes:         [1,28,28]
        - Mean values:  Not specified
        - Scale values:         Not specified
        - Scale factor:         Not specified
        - Precision of IR:      FP32
        - Enable fusing:        True
        - Enable grouped convolutions fusing:   True
        - Move mean values to preprocess section:       False
        - Reverse input channels:       False
TensorFlow specific parameters:
        - Input model in text protobuf format:  False
        - Path to model dump for TensorBoard:   None
        - List of shared libraries with TensorFlow custom layers implementation:        None
        - Update the configuration file with input/output node names:   None
        - Use configuration file used to generate the model with Object Detection API:  None
        - Use the config file:  None
Model Optimizer version:

[ SUCCESS ] Generated IR version 10 model.
[ SUCCESS ] XML file: {model.pbが存在するディレクトリ}\model.xml
[ SUCCESS ] BIN file: {model.pbが存在するディレクトリ}\model.bin
[ SUCCESS ] Total execution time: 5.50 seconds.
It's been a while, check for a new version of Intel(R) Distribution of OpenVINO(TM) toolkit here https://software.intel.com/en-us/openvino-toolkit/choose-download?cid=&source=upgrade&content=2020_3_LTS or on the GitHub*
変換が完了するとmodel.xmlとmodel.binとして、OpenVINO IRフォーマットで学習済みモデルが出力されます。
チュートリアルの次のチャプタでは、この2つのモデルファイルをOpenVINO推論エンジンライブラリでロードして実際に推論を実行します。
__[TIPS] input_shapeを指定しないとエラーになる。__
mo.pyのパラメータのほとんどは省略できるようですが、--input_shapeを指定しないと、ERRORが発生しました。
--input_shapeを変換前のモデルファイルからうまく読み込むことができれば省略できますが、基本的には指定してあげたほうがよさそうです。
今回は、28x28x1なので、(Numbers, Width, Height, Channels)のフォーマットで-input_shape [1,28,28,1]を指定します。
↓エラーの内容↓
[ ERROR ]  Shape [-1 28 28] is not fully defined for output 0 of "reshape_input". Use --input_shape with positive integers to override model input shapes.
[ ERROR ]  Cannot infer shapes or values for node "reshape_input".
[ ERROR ]  Not all output shapes were inferred or fully defined for node "reshape_input".
 For more information please refer to Model Optimizer FAQ (https://docs.openvinotoolkit.org/latest/_docs_MO_DG_prepare_model_Model_Optimizer_FAQ.html), question #40.
[ ERROR ]
[ ERROR ]  It can happen due to bug in custom shape infer function <function Parameter.infer at 0x000000C17FA6DD08>.
[ ERROR ]  Or because the node inputs have incorrect values/shapes.
[ ERROR ]  Or because input shapes are incorrect (embedded to the model or passed via --input_shape).
[ ERROR ]  Run Model Optimizer with --log_level=DEBUG for more information.
[ ERROR ]  Exception occurred during running replacer "REPLACEMENT_ID" (<class 'extensions.middle.PartialInfer.PartialInfer'>): Stopped shape/value propagation at "reshape_input" node.
 For more information please refer to Model Optimizer FAQ (https://docs.openvinotoolkit.org/latest/_docs_MO_DG_prepare_model_Model_Optimizer_FAQ.html), question #38.
__[TIPS] 対応するレイヤーに気を付けよう。__
このチュートリアルでは、以下のルートで学習済みモデルの変換をしました。
HDF5 -> [Freeze Graph] -> Prorocol Buffer -> [OpenVINOモデルオプティマイザ] -> OpenVINO IR
このルートで変換するためには、モデルが使用しているネットワークレイヤーが、FreezeとOpenVINOモデルオプティマイザが対応しているレイヤーである必要があります。
OpenVINOモデルオプティマイザで対応していないレイヤーを最適化しようとすると、「そのようなレイヤーは知らないので解釈できません。カスタムレイヤープラグイン機能でレイヤーを定義してください。」というようなエラーが発生します。
[OpenVINOモデルオプティマイザ]が対応しているレイヤーはOpenVINOのドキュメントにまとめられています。
https://docs.openvinotoolkit.org/latest/openvino_docs_MO_DG_prepare_model_Supported_Frameworks_Layers.html#tensorflow_supported_operations
__[TIPS] 他にも変換ルートがある。__
OpenVINOモデルオプティマイザが対応しているモデルファイルのフォーマットには、ほかにもONNXやCaffeなどがあります。
それぞれが対応しているネットワークレイヤーが微妙に違うので、特定のルートでの変換ができなかった場合は、ほかのルートでも試してみましょう。
https://docs.openvinotoolkit.org/latest/openvino_docs_MO_DG_prepare_model_Supported_Frameworks_Layers.html#onnx_supported_operators
ONNXを使う場合のルートは以下のようになります。
HDF5 -> [keras2onnx] -> ONNX -> [OpenVINOモデルオプティマイザ] -> OpenVINO IR
私が担当しているプロジェクトでは、Metric LearningのためのKeras.layers.Lambdaを使った場合に、keras2onnxルートだとエラーが発生し、Freeze Graphルートだと正常に変換ができました。
x = layers.Dense(512, activation='relu')(x)
x = layers.Dropout(0.5)(x)
x = layers.Lambda(lambda xx: metric_alpha*(xx)/K.sqrt(K.sum(xx**2)))(x) #metric learning

x = layers.Dense(1, activation='sigmoid')(x)
ちなみにOpenVINOではなくTensorRTの場合だとKeras.layers.Lambdaを使っていてもkeras2Onnxルートで推論を実行できました。
各モジュールに相性がありそうなので色々なルートを試してみましょう。
C++/OpenVINOで高速に推論を実行する
前チャプタで出力されたmodel.xmlとmodel.binをロードして推論を実行します。
次のような流れで推論を実行します。
1. Load inference engine instance (推論エンジンインスタンスの作成)
2. Read IR Generated by ModelOptimizer (学習済みモデルのロード)
3. Configure input & output(入力レイヤーと出力レイヤーの設定)
4. Loading model to the device(モデルをデバイスへ展開)
5. Create infer request(推論インスタンスを作成)
6. Prepare input(入力データをロード)
7. Do inference(推論を実行)
8. Process output(推論結果を取得)
C++のコードはGithubリポジトリにアップロードしました。
https://github.com/tomoyaeibu/openvino2020.3.1-mnist-sample/blob/main/main.cpp
1. Load inference engine instance (推論エンジンインスタンスの作成)
2. Read IR Generated by ModelOptimizer (学習済みモデルのロード)
const std::string input_model = "model.xml";

// --------------------------- 1. Load inference engine instance -------------------------------------
Core ie;
// -----------------------------------------------------------------------------------------------------

// --------------------------- 2. Read IR Generated by ModelOptimizer (.xml and .bin files) ------------
CNNNetwork network = ie.ReadNetwork(input_model, input_model.substr(0, input_model.size() - 4) + WEIGHTS_EXT);
network.setBatchSize(1);
// -----------------------------------------------------------------------------------------------------
学習済みモデルファイルを指定して、モデルをロードします。
指定するのはmodel.xmlとmodel.binのどちらも必要です。
3. Configure input & output(入力レイヤーと出力レイヤーの設定)
// --------------------------- 3. Configure input & output ---------------------------------------------
// --------------------------- Prepare input blobs -----------------------------------------------------
InputInfo::Ptr input_info = network.getInputsInfo().begin()->second;
std::string input_name = network.getInputsInfo().begin()->first;

input_info->setLayout(Layout::NCHW);
input_info->setPrecision(Precision::FP32);

// --------------------------- Prepare output blobs ----------------------------------------------------
DataPtr output_info = network.getOutputsInfo().begin()->second;
std::string output_name = network.getOutputsInfo().begin()->first;

output_info->setPrecision(Precision::FP32);
// -----------------------------------------------------------------------------------------------------
入力レイヤーと出力レイヤーの設定をします。
全ての設定の中でここが最も重要です。この設定を間違うと推論結果が想定していない値になります。
setLayout(Layout::NCHW);には正しいデータインデックスのオーダーを指定してください。
このオーダーはモデルを作成したときに使ったライブラリやその設定に依存しているので確認しましょう。
(※正直なところTensorflowのデフォルトはNWHCなのでNWHCが正しいんじゃないかと思っているが、
なぜかNCHWで正しく動作する。理解のための調査中です。)
setPrecision(Precision::FP32);には入力データおよび出力データの数値精度を設定してください。
このチュートリアルでは入力データを[0,1]で浮動小数点に変換しているので、入力データの数値精度はFP32です。
([0,1]に正規化していなければ、[0,255]なのでU8です。)
出力データの数値精度についてはモデルオプティマイザで指定できます。
デフォルトのまま変換しているので、出力データの数値精度はFP32です。
4. Loading model to the device(モデルをデバイスへ展開)
const std::string device_name = "CPU";

// --------------------------- 4. Loading model to the device ------------------------------------------
ExecutableNetwork executable_network = ie.LoadNetwork(network, device_name);
// -----------------------------------------------------------------------------------------------------
device_nameには推論に使用するデバイスに対応する文字列を指定します。
CPUの内蔵グラフィックスを使用できる場合は"GPU.x"(xはDevice Number)を指定します。
他に指定できるデバイスはOpenVINOのドキュメントで説明されています。
https://docs.openvinotoolkit.org/latest/openvino_docs_IE_DG_InferenceEngine_QueryAPI.html#query_api_in_the_core_class
5. Create infer request(推論インスタンスを作成)
// --------------------------- 5. Create infer request -------------------------------------------------
InferRequest infer_request = executable_network.CreateInferRequest();
// -----------------------------------------------------------------------------------------------------
4までが推論の設定でここからが実際に推論を実行するためのコードになります。
infer_requestはスレッドセーフなので、infer_requestをマルチスレッドのそれぞれのスレッドで生成することで、複数のinfer_requestを並列に処理することもできます。
6. Prepare input(入力データをロード)
inline void readRawFileFp64(const std::string& fileName, float* buffer, int inH, int inW, int inC)
{
	std::vector<double> temp(inH * inW * inC);

	std::ifstream file(fileName, std::ios::in | std::ios::binary | std::ios::ate);
	file.seekg(0, std::ios::end);
	int size = file.tellg();
	file.seekg(0, std::ios::beg);
	file.read((char*)(temp.data()), size);
	file.close();

	for (int itr = 0; itr < inH * inW * inC; itr++)
	{
		buffer[itr] = (float)temp[itr];
	}
}

void rawToBlob(const std::string rawFilePath, InferenceEngine::Blob::Ptr& blob)
{
	InferenceEngine::SizeVector blobSize = blob->getTensorDesc().getDims();
	const size_t width = blobSize[3];
	const size_t height = blobSize[2];
	const size_t channels = blobSize[1];
	float* blob_data = blob->buffer().as<float*>();

	std::vector<float> input(width * height * channels);
	readRawFileFp64(rawFilePath, input.data(), width, height, channels);

	for (int index = 0; index < width * height * channels; index++)
	{
		blob_data[index] = input[index];
	}
}
// --------------------------- 6. Prepare input --------------------------------------------------------
Blob::Ptr imgBlob = infer_request.GetBlob(input_name);
rawToBlob(input_image_path, imgBlob);
// -----------------------------------------------------------------------------------------------------
Blobと呼ばれるポインタに入力データをコピーします。
コピーする際にデータの標準化などのデータ前処理をすると良いです。
このチュートリアルでは学習スクリプトで出力したndarrayのバイナリデータを、そのままの値、インデックスオーダーでBlobにコピーします。
ndarrayのバイナリデータがFP64(Double)で、入力データのフォーマットがFP32(Float)なので、doubleからfloatへのキャストをしています。
7. Do inference(推論を実行)
// --------------------------- 7. Do inference --------------------------------------------------------
# auto t_infer_start = std::chrono::high_resolution_clock::now();

infer_request.Infer();

# auto t_infer_end = std::chrono::high_resolution_clock::now();
# float infer_ms = std::chrono::duration<float, std::milli>(t_infer_end - t_infer_start).count();
# printf("Time taken for inference : %lf ms\n", infer_ms);
// -----------------------------------------------------------------------------------------------------
実際に推論を実行します。
このチュートリアルでは同期的に実行していますが、推論処理が完了するまで非同期的に待機することも可能です。
8. Process output(推論結果を取得)
int ProcessOutput(InferRequest& async_infer_request, const std::string& output_name)
{
	int result = 0;
	float buf = 0;

	try
	{
		const float* oneHotVector = (async_infer_request.GetBlob(output_name))->buffer().as<float*>();

		for (int i = 0; i < 10; i++)
		{
			printf("%d : %lf \n", i, oneHotVector[i]);
		}

		for (int i = 0; i < 10; i++)
		{
			if (oneHotVector[i] > buf)
			{
				buf = oneHotVector[i];
				result = i;
			}
		}
	}
	catch (const std::exception & ex)
	{
		OutputDebugStringA(ex.what());
		result = -1;
	}

	return result;
}
// --------------------------- 8. Process output ------------------------------------------------------
int result = ProcessOutput(infer_request, output_name);
printf("result = %d\n", result);
// -----------------------------------------------------------------------------------------------------
最後に推論の結果を取得します。
出力結果もBlobと呼ばれるポインタに格納されるため、1つ1つ取り出します。
このチュートリアルでは出力データがFP32のためFloatのポインタとして出力結果を取り出します。
VisualStudioのプロジェクト設定
このC++のコードをビルドして実行するためにはプロジェクトの設定を正しく行う必要があります。
| チュートリアルを作成したときに使った環境 | |
|---|---|
| C/C++ -> 追加のインクルードディレクトリ | ・C:\Program Files (x86)\IntelSWTools\openvino\inference_engine\samples\cpp\common ・C:\Program Files (x86)\IntelSWTools\openvino\opencv\include ・C:\Program Files (x86)\IntelSWTools\openvino\deployment_tools\inference_engine\include |
| リンカ -> 入力 -> 追加の依存ファイル |
[Releaseビルドの場合] ・C:\Program Files (x86)\IntelSWTools\openvino\opencv\lib\opencv_core430.lib ・C:\Program Files (x86)\IntelSWTools\openvino\opencv\lib\opencv_imgcodecs430.lib ・C:\Program Files (x86)\IntelSWTools\openvino\opencv\lib\opencv_imgproc430.lib ・C:\Program Files(x86)\IntelSWTools\openvino\deployment_tools\inference_engine\lib\intel64\Release\inference_engine_legacy.lib ・C:\Program Files (x86)\IntelSWTools\openvino\deployment_tools\inference_engine\lib\intel64\Release\inference_engine.lib ・C:\Program Files (x86)\IntelSWTools\openvino\deployment_tools\inference_engine\lib\intel64\Release\inference_engine_c_api.lib ・C:\Program Files (x86)\IntelSWTools\openvino\deployment_tools\inference_engine\lib\intel64\Release\inference_engine_nn_builder.lib [Debugビルドの場合] ・C:\Program Files (x86)\IntelSWTools\openvino\opencv\lib\opencv_core430d.lib ・C:\Program Files (x86)\IntelSWTools\openvino\opencv\lib\opencv_imgcodecs430d.lib ・C:\Program Files (x86)\IntelSWTools\openvino\opencv\lib\opencv_imgproc430d.lib ・C:\Program Files (x86)\IntelSWTools\openvino\deployment_tools\inference_engine\lib\intel64\Debug\inference_engine_legacy.lib ・C:\Program Files (x86)\Intel\openvino\deployment_tools\inference_engine\lib\intel64\Debug\inference_engine.lib ・C:\Program Files (x86)\IntelSWTools\openvino\deployment_tools\inference_engine\lib\intel64\Debug\inference_engine_c_api.lib ・C:\Program Files (x86)\IntelSWTools\openvino\deployment_tools\inference_engine\lib\intel64\Debug\inference_engine_nn_builder.lib |
| ビルドイベント -> ビルド後イベント | 下記記述 |
@rem For inference engine.
xcopy "C:\Program Files (x86)\IntelSWTools\openvino\inference_engine\bin\intel64\$(Configuration)" $(SolutionDir)$(Platform)\$(Configuration)\ /D /S /R /Y /I /K
xcopy "C:\Program Files (x86)\IntelSWTools\openvino\deployment_tools\inference_engine\external\tbb\bin\tbb.dll" $(SolutionDir)$(Platform)\$(Configuration)\ /D /S /R /Y /I /K
xcopy "C:\Program Files (x86)\IntelSWTools\openvino\deployment_tools\ngraph\lib\ngraph.dll" $(SolutionDir)$(Platform)\$(Configuration)\ /D /S /R /Y /I /K

@rem For opencv function.
xcopy "C:\Program Files (x86)\IntelSWTools\openvino\opencv\bin\opencv_core430.dll" $(SolutionDir)$(Platform)\$(Configuration)\ /D /S /R /Y /I /K
xcopy "C:\Program Files (x86)\IntelSWTools\openvino\opencv\bin\opencv_imgcodecs430.dll" $(SolutionDir)$(Platform)\$(Configuration)\ /D /S /R /Y /I /K
xcopy "C:\Program Files (x86)\IntelSWTools\openvino\opencv\bin\opencv_imgproc430.dll" $(SolutionDir)$(Platform)\$(Configuration)\ /D /S /R /Y /I /K
@rem For inference engine.
xcopy "C:\Program Files (x86)\IntelSWTools\openvino\inference_engine\bin\intel64\$(Configuration)" $(SolutionDir)$(Platform)\$(Configuration)\ /D /S /R /Y /I /K
xcopy "C:\Program Files (x86)\IntelSWTools\openvino\deployment_tools\inference_engine\external\tbb\bin\tbb_debug.dll" $(SolutionDir)$(Platform)\$(Configuration)\ /D /S /R /Y /I /K
xcopy "C:\Program Files (x86)\IntelSWTools\openvino\deployment_tools\ngraph\lib\ngraphd.dll" $(SolutionDir)$(Platform)\$(Configuration)\ /D /S /R /Y /I /K

@rem For opencv function.
xcopy "C:\Program Files (x86)\IntelSWTools\openvino\opencv\bin\opencv_core430d.dll" $(SolutionDir)$(Platform)\$(Configuration)\ /D /S /R /Y /I /K
xcopy "C:\Program Files (x86)\IntelSWTools\openvino\opencv\bin\opencv_imgcodecs430d.dll" $(SolutionDir)$(Platform)\$(Configuration)\ /D /S /R /Y /I /K
xcopy "C:\Program Files (x86)\IntelSWTools\openvino\opencv\bin\opencv_imgproc430d.dll" $(SolutionDir)$(Platform)\$(Configuration)\ /D /S /R /Y /I /K
設定済みのソリューションファイルとプロジェクトファイルをGithubリポジトリにアップロードしました。
https://github.com/tomoyaeibu/openvino2020.3.1-mnist-sample
Python/TensorflowとC++/OpenVINOの実行結果の比較
Python/Tensorflowの推論結果と、C++/OpenVINOの推論結果を比較してみましょう。
(28, 28, 1)
Time taken for inference : [2.8801844] ms
[0.00000004 0.9999782  0.00000129 0.00000004 0.00001199 0.00000002
 0.00000262 0.00000498 0.00000056 0.00000028]
Time taken for inference : 1.889800 ms
0 : 0.000000
1 : 0.999978
2 : 0.000001
3 : 0.000000
4 : 0.000012
5 : 0.000000
6 : 0.000003
7 : 0.000005
8 : 0.000001
9 : 0.000000
result = 1
推論結果の精度を比較
推論結果の値を見ると一致していることがわかります。
正確に精度を比較するためにはもう少し詳細に値を見ないといけませんが、この結果でわかる範囲でも小数点以下第6位までは一致しています。
モデルオプティマイザの設定でFP32からFP16に変更することで、推論結果の精度を犠牲にして推論速度を上げることもできます。
ただデバイスにCPUを使っている場合はFP16を使うことができないのでまだ試していません。
別のデバイスで実行する機会があれば試してみようと思います。
推論結果の実行時間を比較
BatchSize=1で1回の推論しかしない、という条件ですが、C++/OpenVINOの方が高速に推論できていることがわかります。
BatchSizeを増やしたり、infer_requestを複数のコアで並列に処理するなどの工夫を加えることで、もっと高速化を図ることができます。
別の機会で検証をしたらまた記事にしたいと思います。
ちょっとした小話
- 私が担当しているプロジェクトでは、Conv3Dを使った3次元データのクラス分類モデルを、OpenVINOで実行できています。3次元データを入力する場合は
setLayout(Layout::NCDHW);です。setLayout(Layout::NWHDC);は選択肢として用意されていません。 - 私が担当しているプロジェクトでは、既存のシステムに推論機能を組み込みたいのですが、既存のシステムはVisualStudio2010でのビルドしかできませんでした。つまり既存のシステムのプロジェクトで推論機能はビルドできないということです。そこで推論機能だけをdllに切り出してVisualStudio2017でビルドしたうえで、そのdllを既存のシステムからロードし、推論メソッドをコールすることで組み込みを実現しました。