はじめに
OpenID Connect関連のテストをするためにLibertyからGoogleのOpenID Connect Providerを利用する構成を行った時のメモです。
GoogleのOpenID Provider(OP)のサービスを利用し、LibertyをRelying Party(RP)として構成し、簡易的なサンプルアプリでOpenID Connectのフローを流してみます。
基本は以下の記事をなぞって動かしています。
参考: Single sign-on with Google on Liberty
OpenID Connectについては以下の辺りを参考に...
一番分かりやすい OpenID Connect の説明
環境
Windows7
Eclipse 4.7 (Oxygen)
WebSphere Liberty 17.0.0.x
構成
Libertyの準備
今後テストすることを考えて、EclipseからLiberty作って管理します。
こちらの手順を参考に...
LibertyによるWebサービスアプリ開発メモ: (1)環境構築
記事の記述に従って、server.xmlに以下のフィーチャーを追加します。
<featureManager>
    <feature>ssl-1.0</feature>
    <feature>servlet-3.0</feature>
    <feature>appSecurity-2.0</feature>
    <feature>openidConnectClient-1.0</feature>
    <feature>localConnector-1.0</feature>
    <feature>jsp-2.3</feature>
</featureManager>
openidConnectClientが入ってなかったので認識されませんでした。
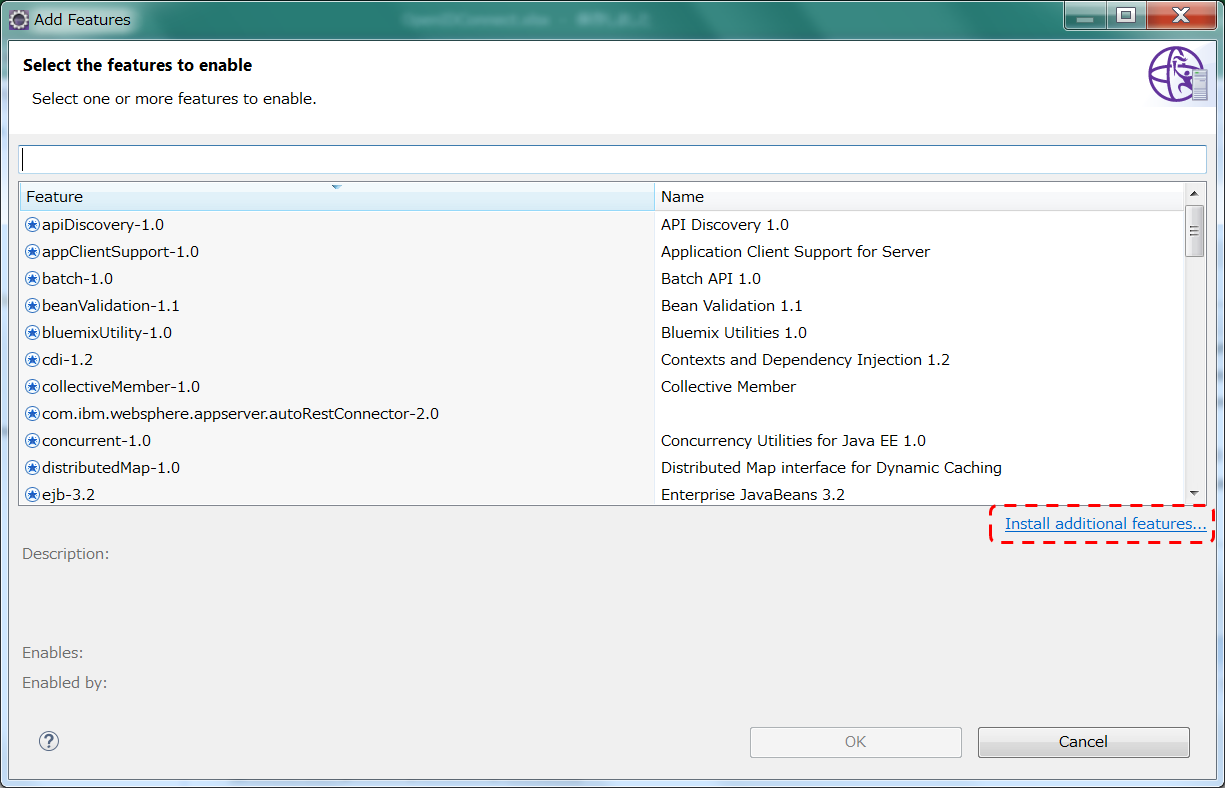
server.xmlのDesignのビューからフィーチャーのAddを押す。
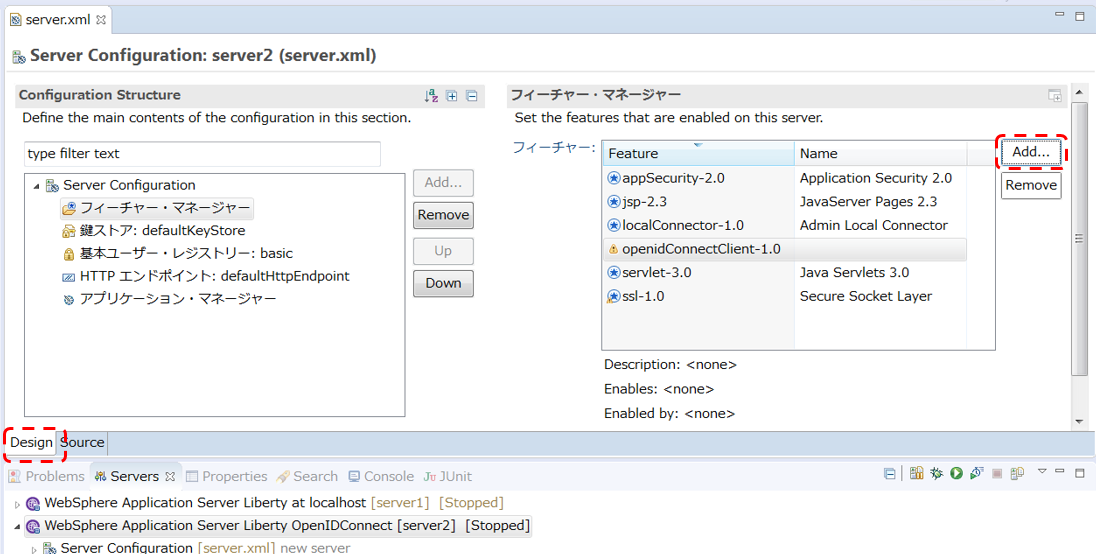
ここからOpenID Connect Clientをインストールする。
あとjsp, servletフィーチャーも警告が出てたのでそれぞれ2.3, 3.1に変えておく。
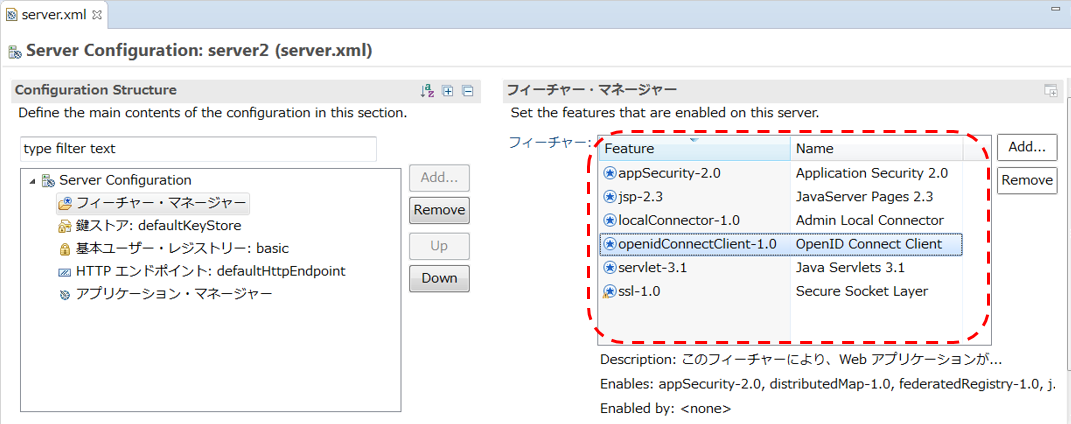
さらにキーストアの定義も追加。
最終的に変更部分はこんな感じ。
    <!-- Enable features -->
<featureManager>
    <feature>ssl-1.0</feature>
    <feature>servlet-3.1</feature>
    <feature>appSecurity-2.0</feature>
    <feature>openidConnectClient-1.0</feature>
    <feature>localConnector-1.0</feature>
    <feature>jsp-2.3</feature>
</featureManager>

    <keyStore id="defaultKeyStore" password="keyspass" />
一旦Libertyを起動/停止させる。
ここで、keysotreが作成されます。(...\resources\security\key.jks)
ブラウザから以下にアクセスして、Googleの証明書(GTSGIAG3.crt)をダウンロードします。
https://pki.goog/
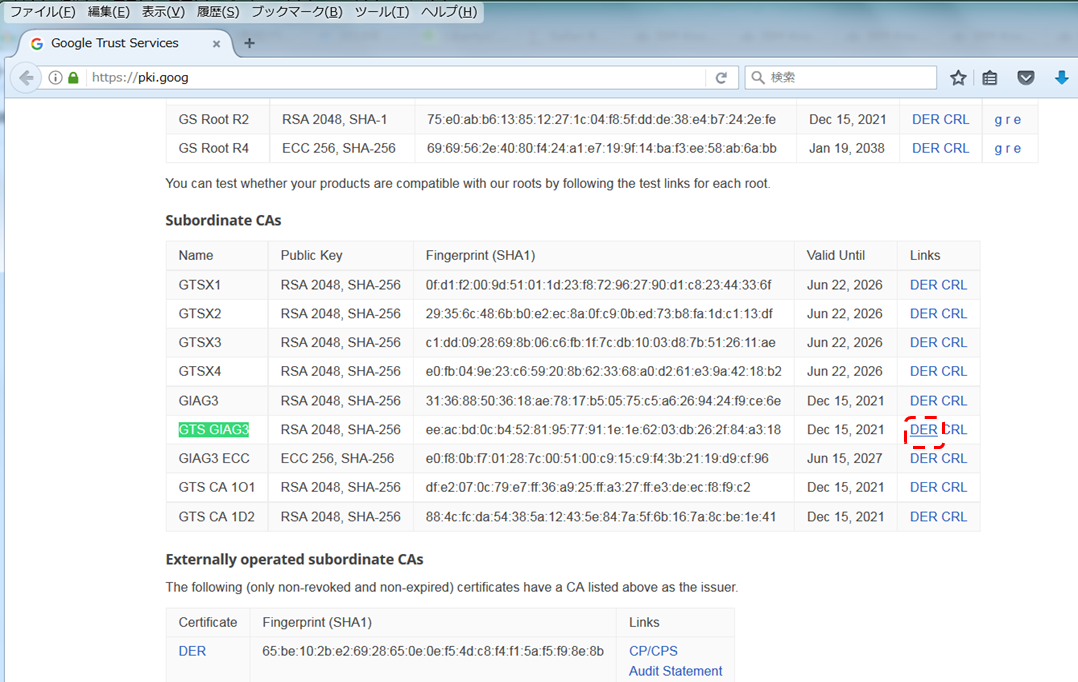
(GTS GIAG3のDERファイルをダウンロード)
入手した証明書をキーストア(key.jks)に追加します。
キーストア(key.jks)のあるディレクトリに移って、Java提供のkeytoolコマンドで、入手した証明書をキーストアにインポートします。
C:\Users\IBM_ADMIN>cd C:\x\IBM\WebSphere\Liberty_Test\usr\servers\server2\resources\security

C:\x\IBM\WebSphere\Liberty_Test\usr\servers\server2\resources\security>dir
 ドライブ C のボリューム ラベルがありません。
 ボリューム シリアル番号は A8F7-9750 です

 C:\x\IBM\WebSphere\Liberty_Test\usr\servers\server2\resources\security のディレクトリ

2018/06/07  13:45    <DIR>          .
2018/06/07  13:45    <DIR>          ..
2018/06/07  13:45             2,158 key.jks
2018/06/07  13:45               905 ltpa.keys
               2 個のファイル               3,063 バイト
               2 個のディレクトリ  30,946,590,720 バイトの空き領域

C:\x\IBM\WebSphere\Liberty_Test\usr\servers\server2\resources\security>keytool -importcert -keystore key.jks -storepass keyspass -alias googleG3 -file C:\temp\GTSGIAG3.crt -noprompt
証明書は鍵ストアに追加されました
一旦Libertyは置いておく...
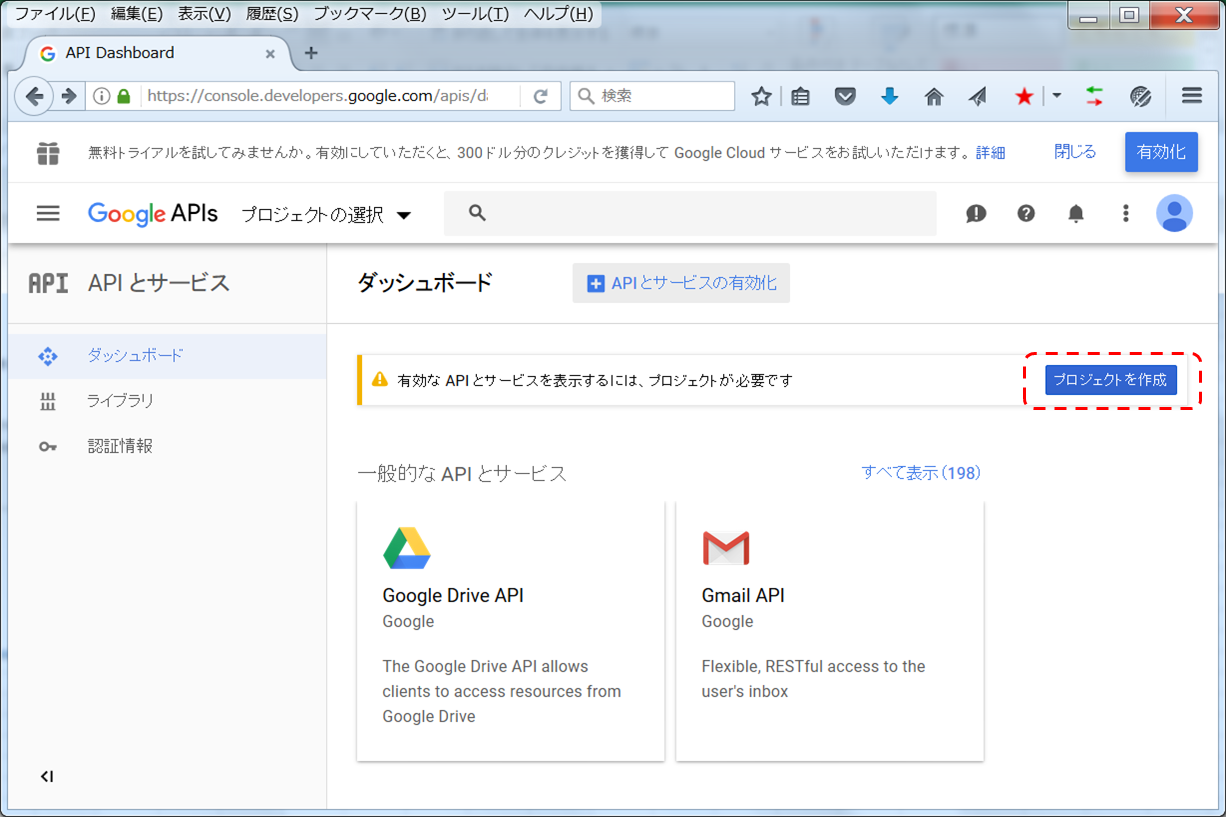
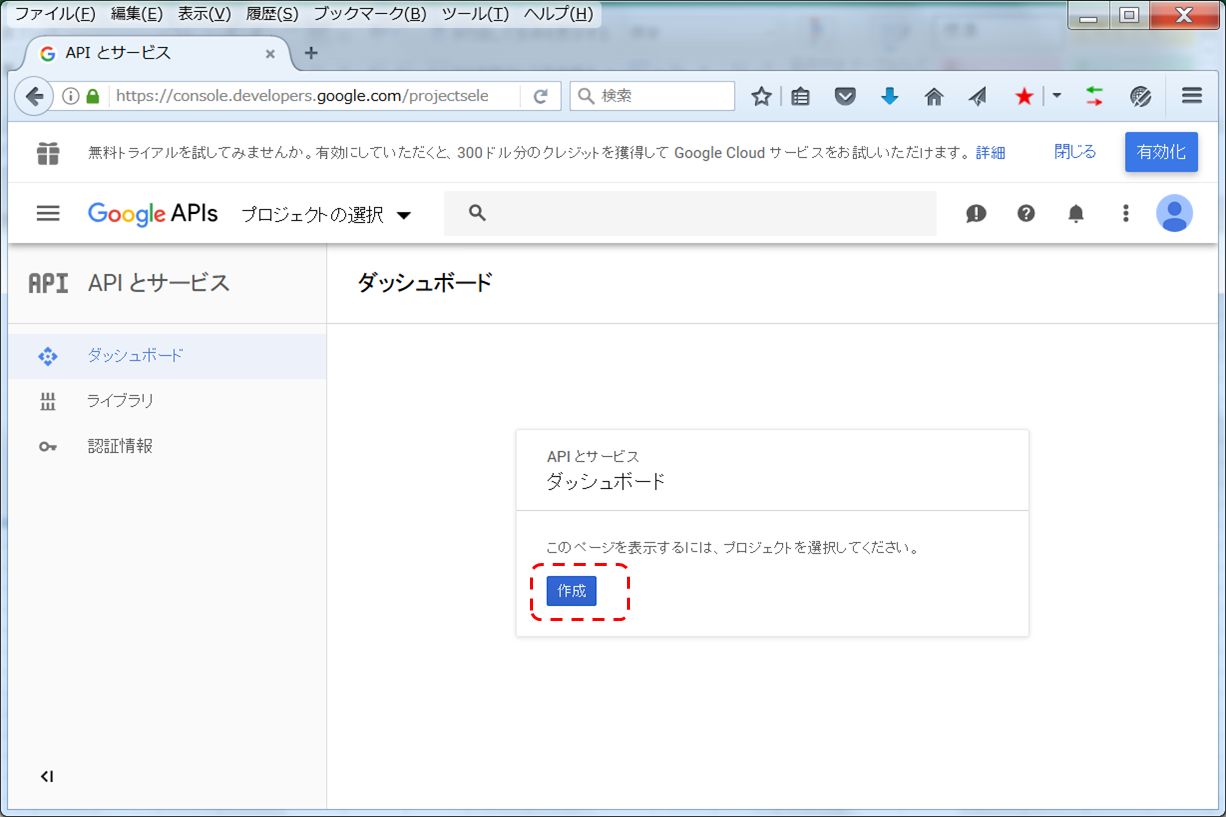
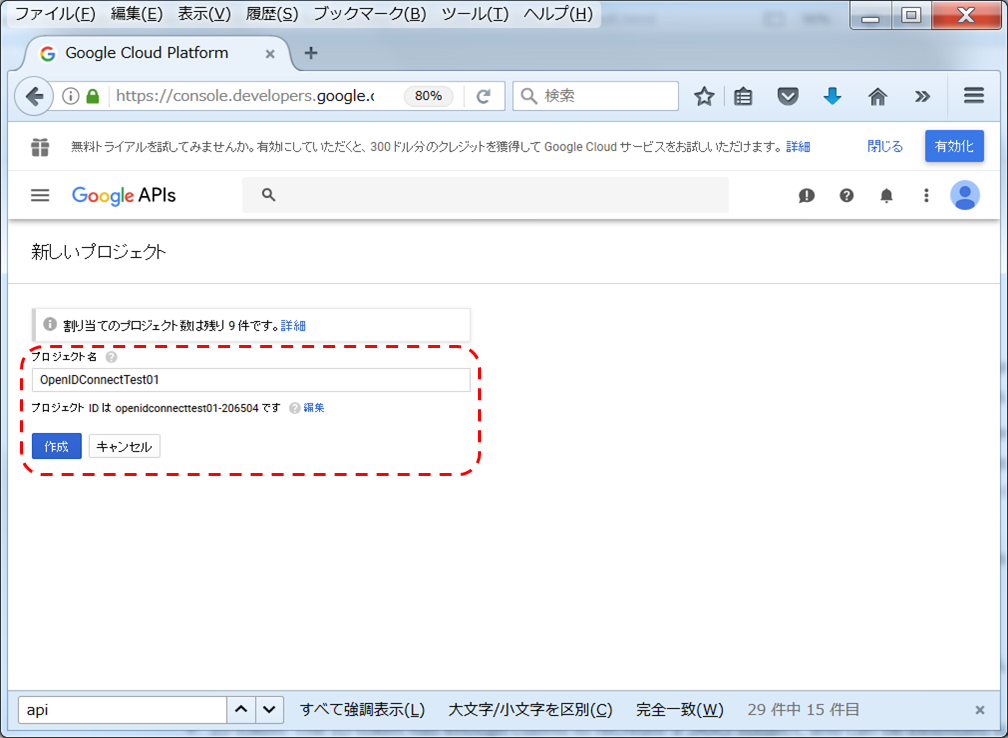
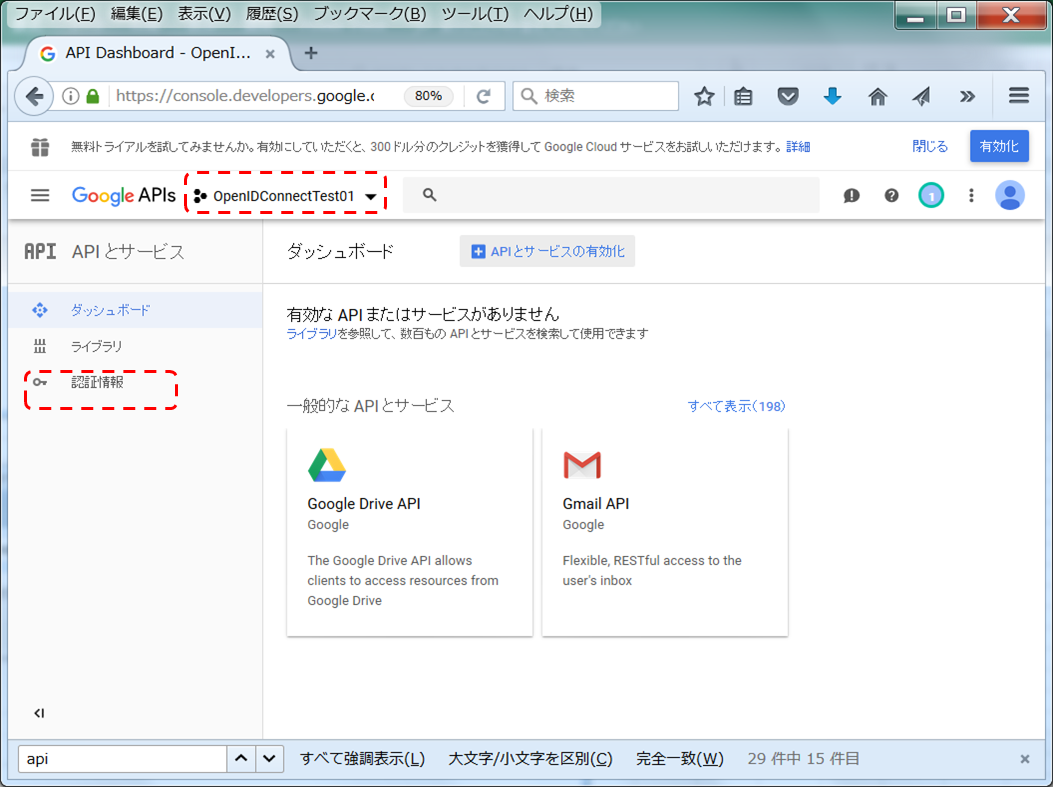
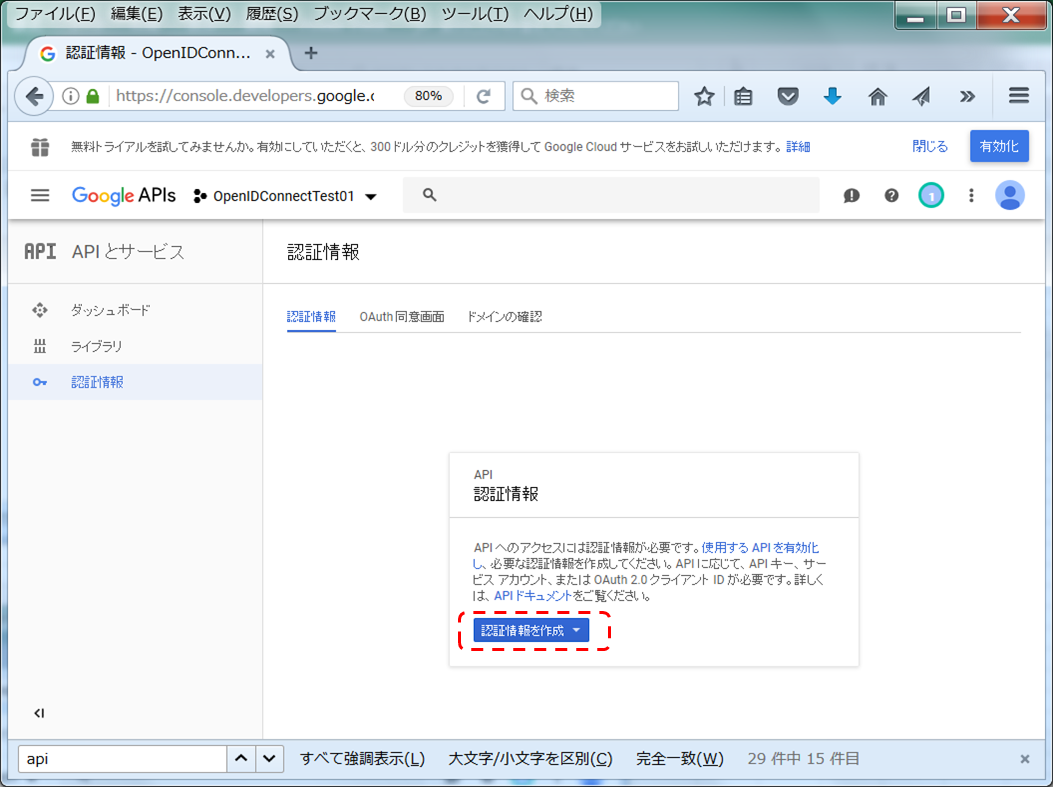
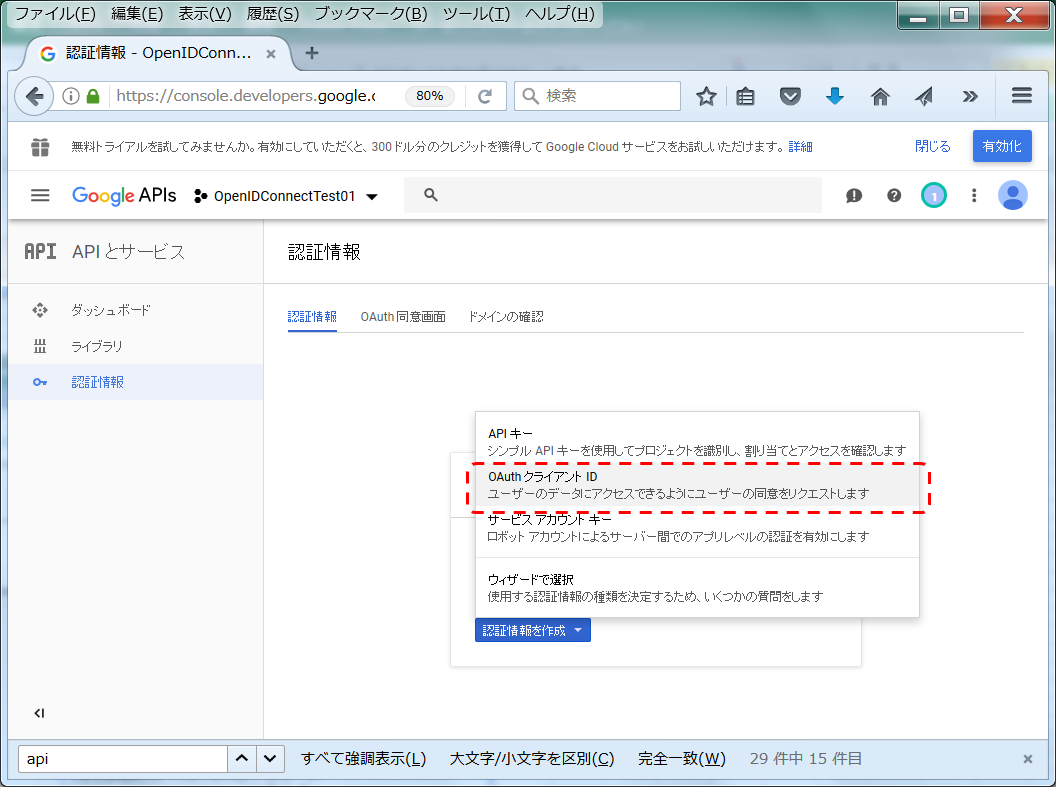
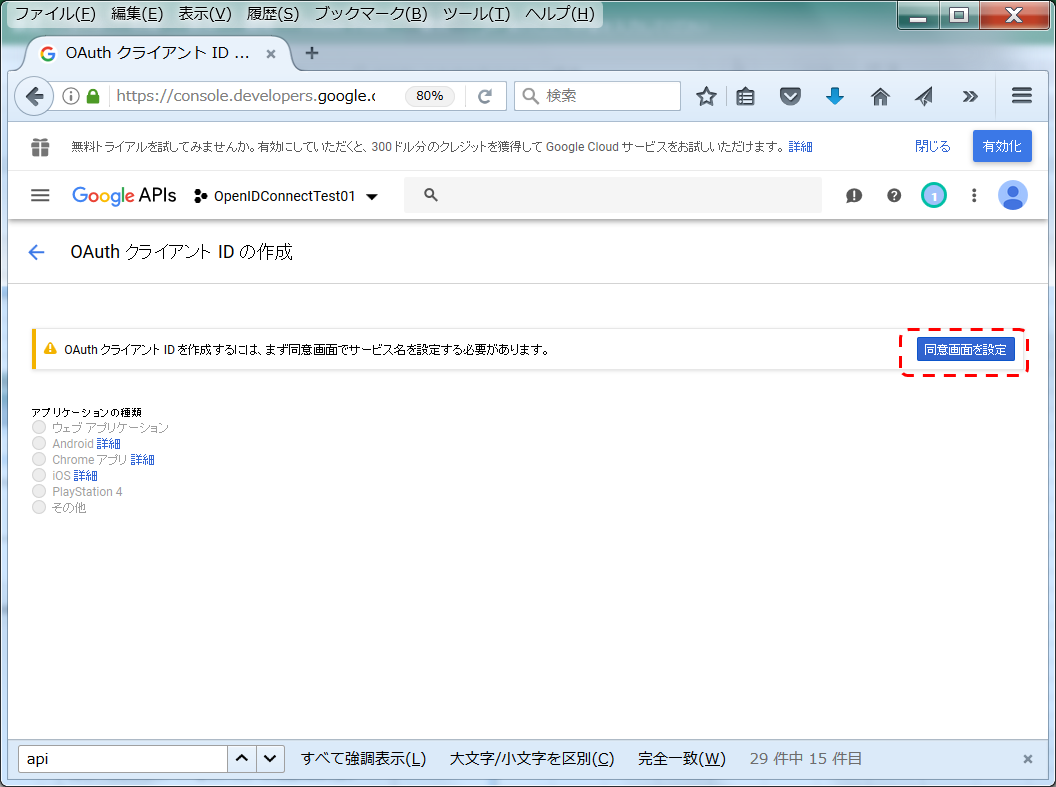
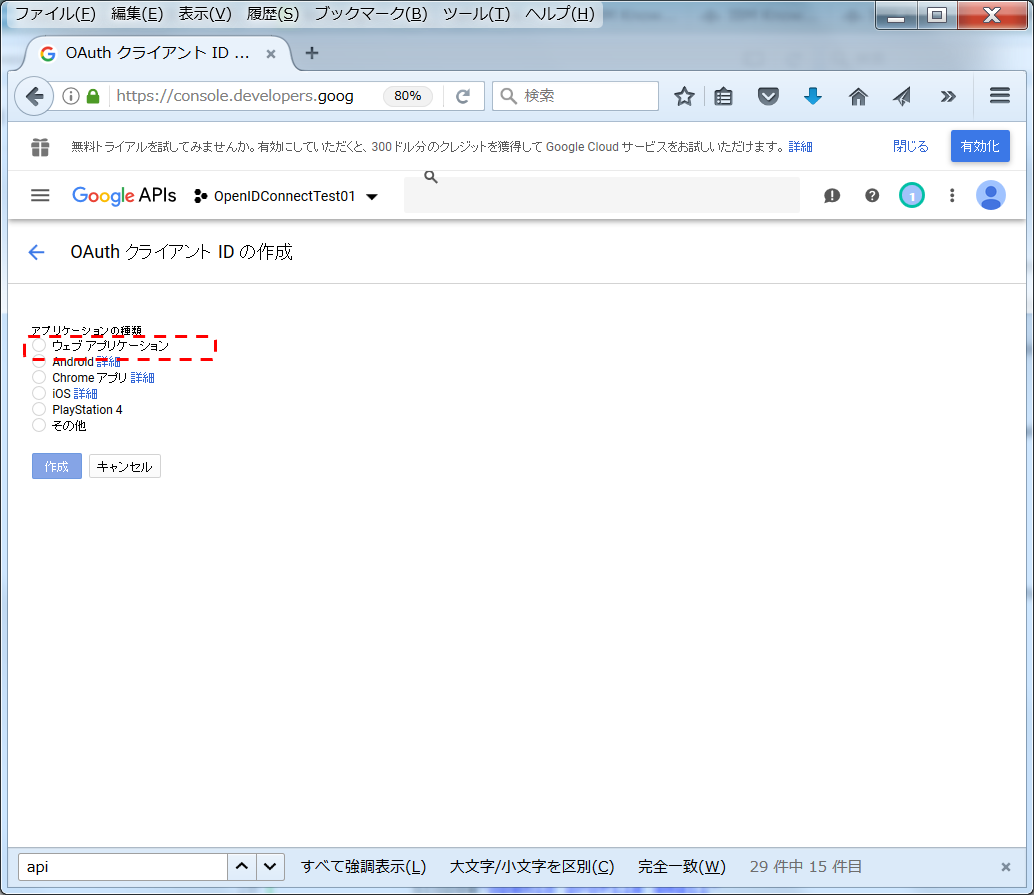
GoogleサイトでのOAuthクライアント登録
以下にアクセスしてプロジェクトを作成
https://console.developers.google.com/apis/dashboard
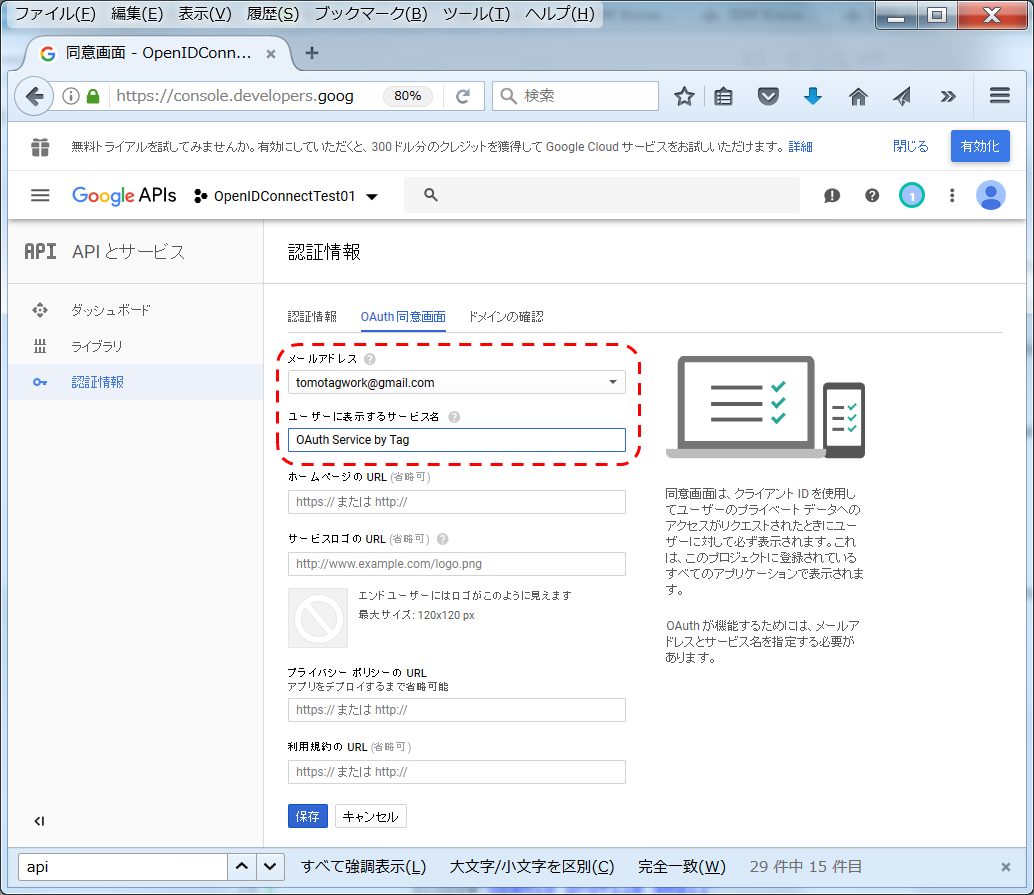
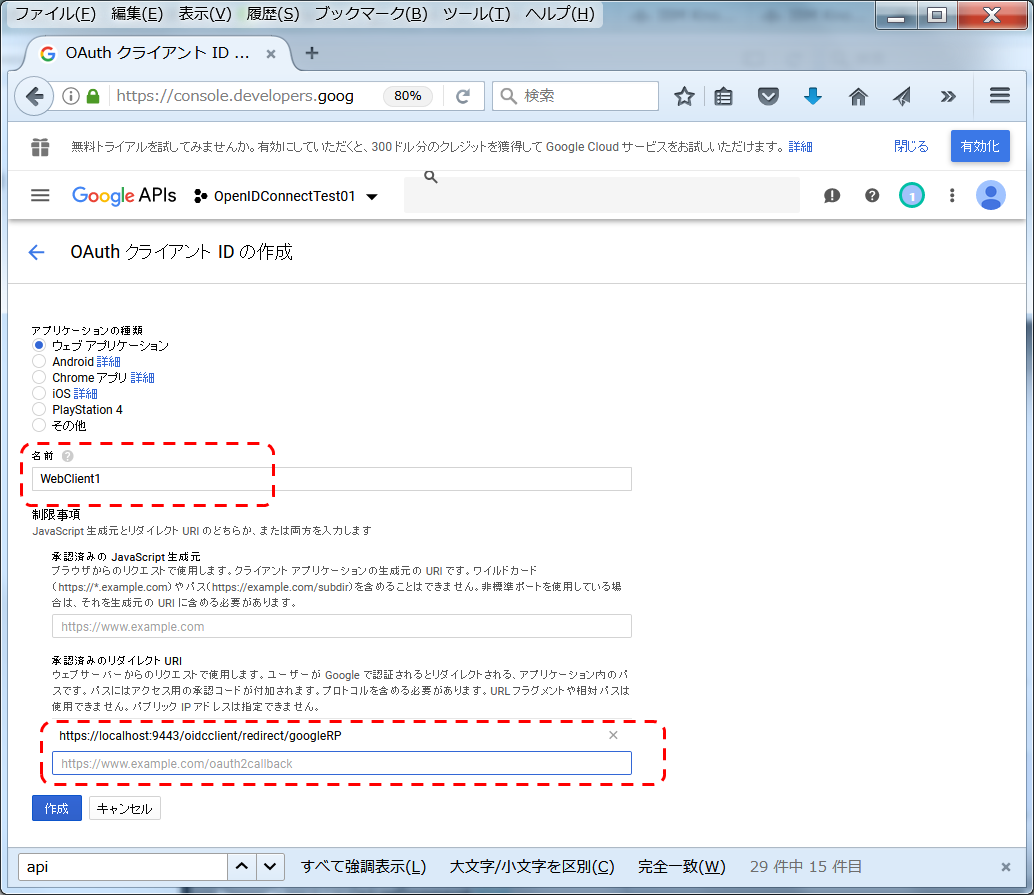
※リダイレクトURIは、とりあえずローカルPCのLibertyサーバーを想定しているので、localhost:xxx というようにローカルのPCのLibertyのhttps構成に基づきURIを指定しています。
こんな感じでクライアントIDとクライアントシークレットが入手できます。
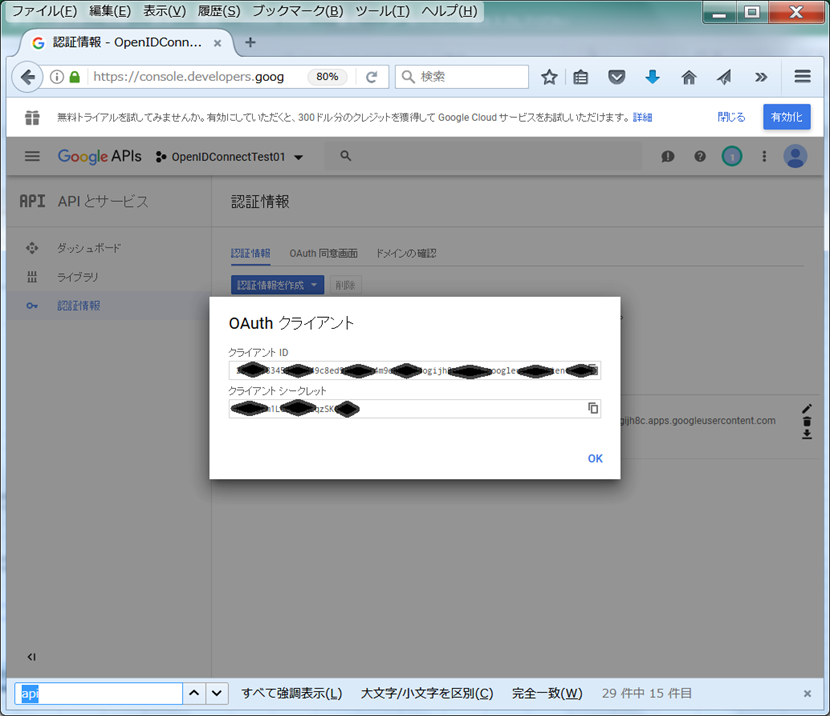
この値をコピーしておきます。
Liberty設定追加
Libertyの設定に戻って...
<openidConnectClient
    authorizationEndpointUrl="https://accounts.google.com/o/oauth2/auth"
    clientId="xxxxx"
    clientSecret="xxxxx"
    id="googleRP"
    issuerIdentifier="accounts.google.com"
    grantType="implicit"
    jwkEndpointUrl="https://www.googleapis.com/oauth2/v2/certs"
    scope="openid profile email"
    signatureAlgorithm="RS256"
    tokenEndpointUrl="https://www.googleapis.com/oauth2/v3/token"
    userIdentityToCreateSubject="email">
</openidConnectClient>


<application type="war" id="testpage" name="testpage" location="${server.config.dir}/apps/testpage.war">
  <application-bnd>
    <security-role name="All Role">
       <special-subject type="ALL_AUTHENTICATED_USERS" />
    </security-role>
  </application-bnd>
</application>
※clientId, clientSecretには、Googleのサイトで入手したクライアントID、クライアントシークレットの値を指定します。
※ここでは、参照記事の指定に加えて、grantType="implicit"を追加しています。
サンプルアプリケーションの準備
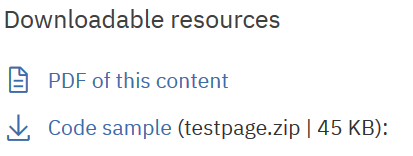
以下のサイトから、サンプルアプリケーション(testpage.zip)をダウンロード
https://www.ibm.com/developerworks/websphere/library/techarticles/1502_odonnell/1502_odonnell.html#artdownload
zipを解凍してwarファイルをLibertyのパス(server.xmlに指定したパス)に配置します。(例 C:\x\IBM\WebSphere\Liberty_Test\usr\servers\server2\apps\testpage.war)
あとはLibertyを再起動すればOK
動作確認
ブラウザから以下のURLでテストアプリにアクセスしてみます。
https://localhost:9443/testpage/
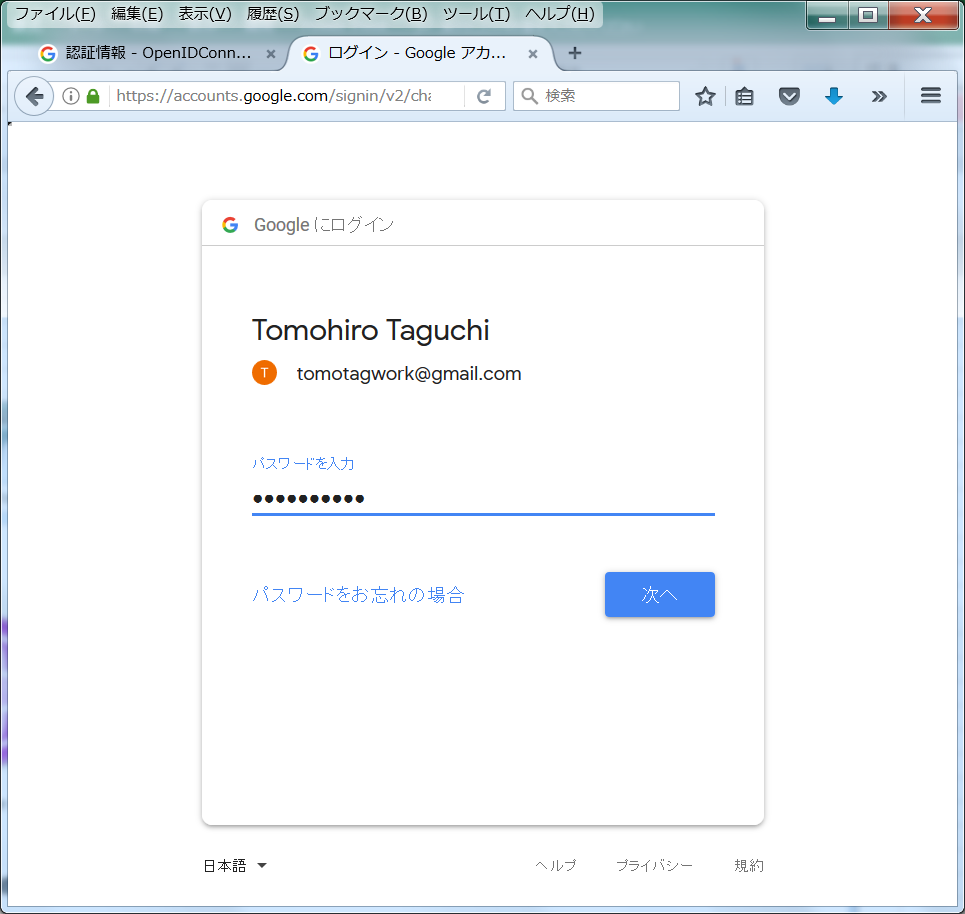
すると...Googleの認証画面に飛ばされました!
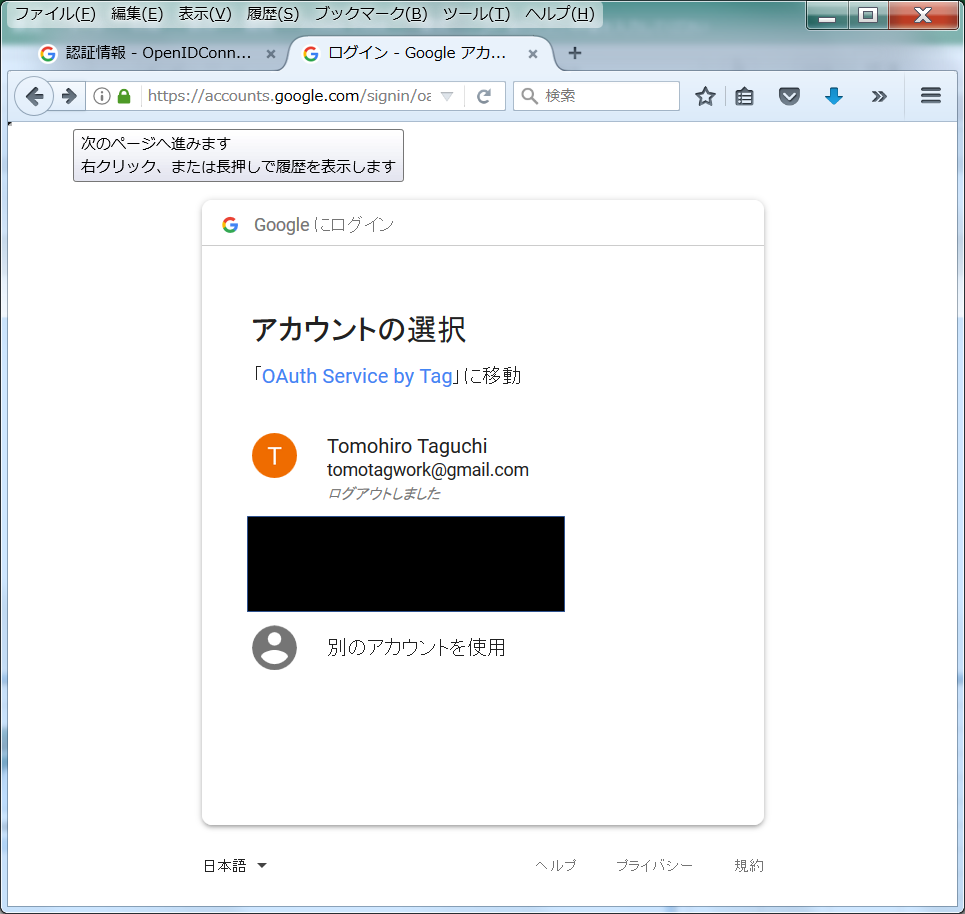
そこでGoogleのIDで認証を行うと...
目的のアプリケーションにアクセスでき、結果が表示されました!
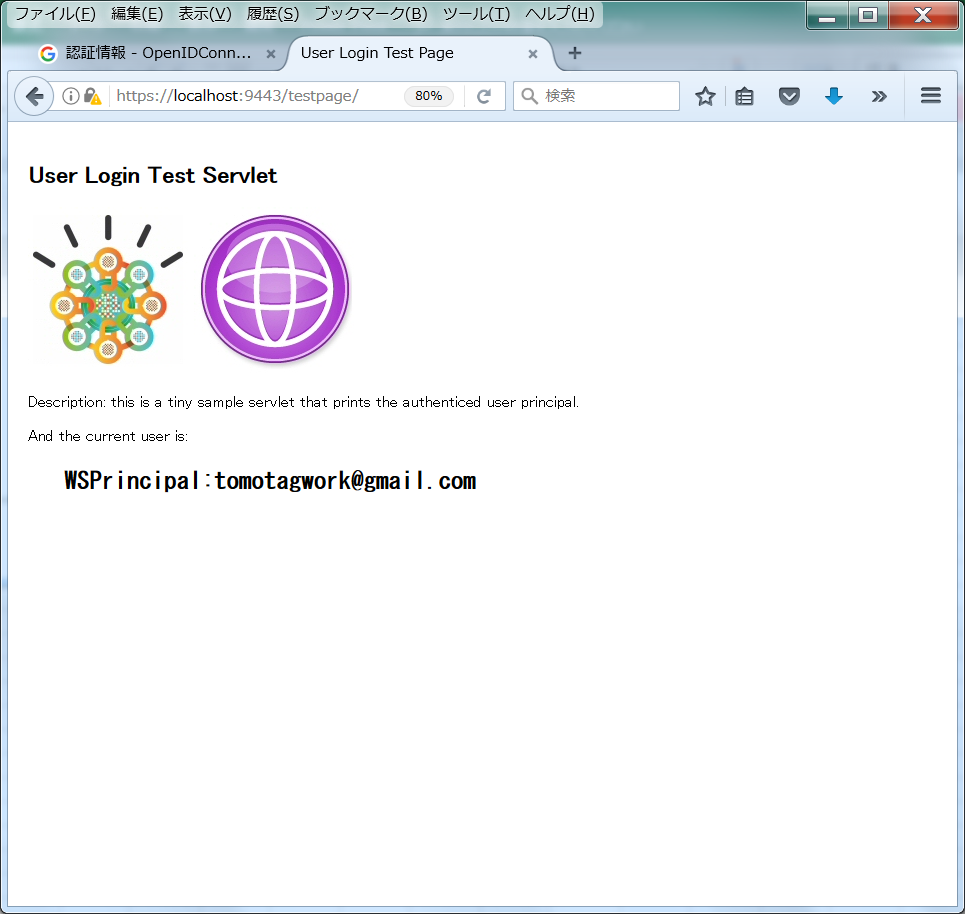
期待した通りに動いたようです!
ちなみに、このページが表示される直前のフローをブラウザの開発ツールで見てみると...
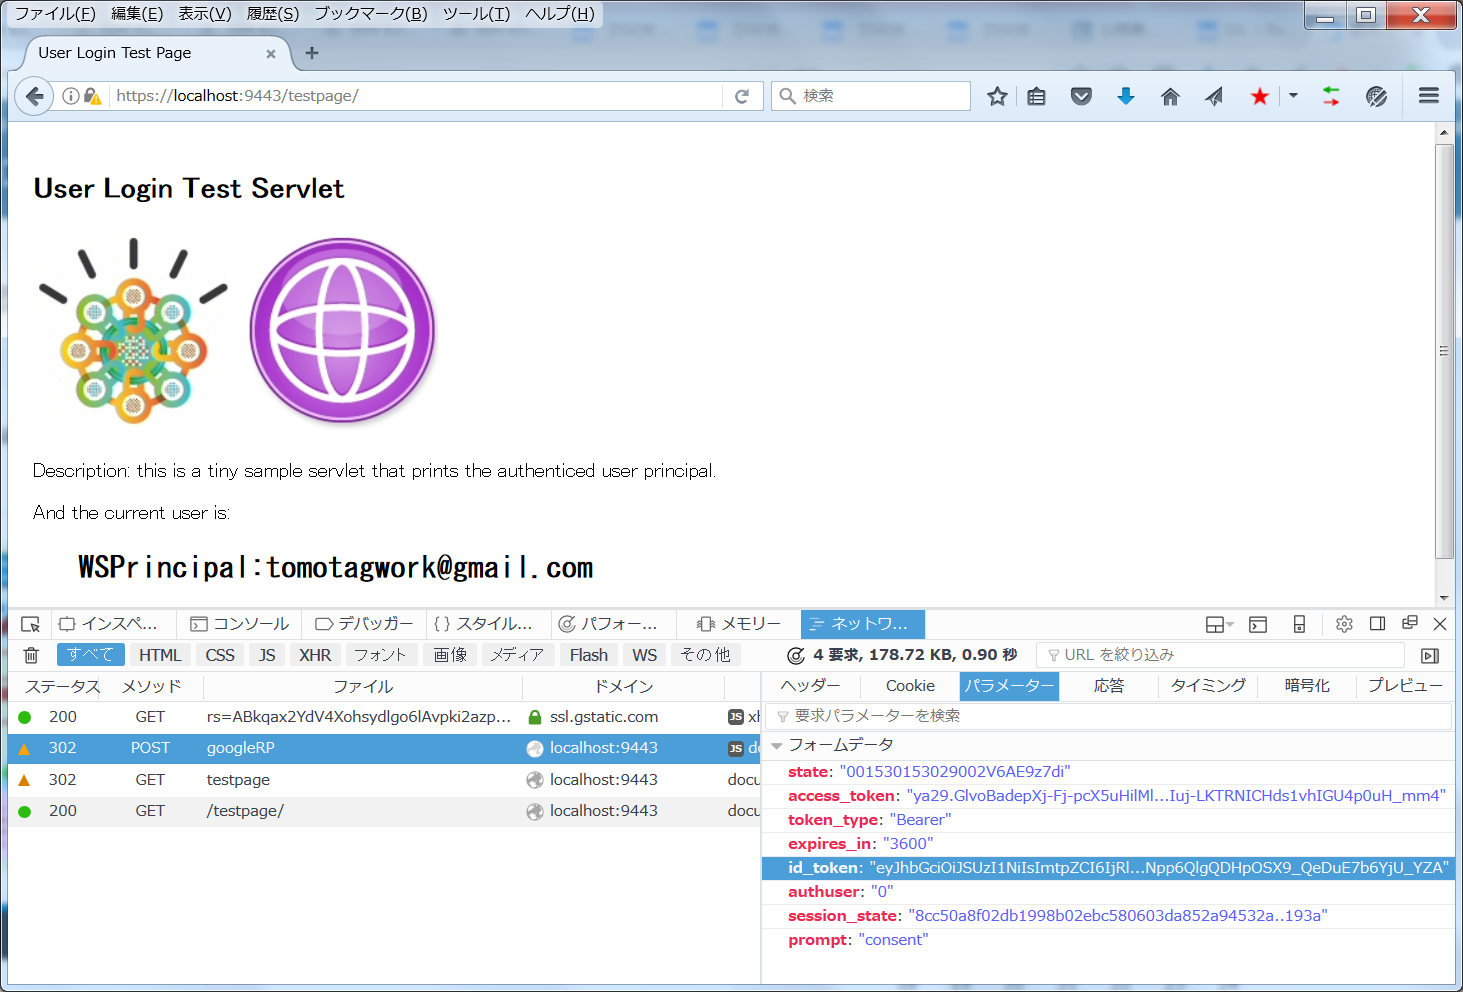
POST https://localhost:9443/oidcclient/redirect/googleRPというようなリクエストが出ていて、リクエストのqueryパラメーター"id_token"でJWT形式のトークンが渡されているのが確認できました。
補足: サンプルWAR
サンプルのWARをちょっと覗いてみると...
コードの実体としてはこれだけ。JSPの中でuser principalの情報を取得して表示しているだけ。
<%@ page language="java" contentType="text/html; charset=UTF-8"
pageEncoding="UTF-8"
import="java.util.List"
import="java.util.Map"
import="java.util.ArrayList"
import="java.util.Collection"
%>

<!DOCTYPE html PUBLIC "-//W3C//DTD HTML 4.01 Transitional//EN" "http://www.w3.org/TR/html4/loose.dtd">
<html>
<head>
<meta http-equiv="Content-Type" content="text/html; charset=utf-8">
<title>User Login Test Page</title>
</head>
<body style="margin:10px; padding:10px">
<h2>User Login Test Servlet</h2>
<IMG src="data:image/jpeg;base64,/9j/4AAQSkZJRgABAgIAyADIAAD//gEC0B8yA7 ...
<IMG src="data:image/jpeg;base64,/9j/4AAQSkZJRgABAgEASABIAAD//gECAMKdCN...
<br>
<br>
Description: this is a tiny sample servlet that prints the authenticed user principal.<br>
<br>
<%
Object o = request.getUserPrincipal();
if (o == null) {
%>user principal is null<%
} else {
%>And the current user is:<h2><pre>   <%=o.toString()%></pre></h2><%
}
%>
</body>
</html>
requestオブジェクトのgetUserPrincipal()でユーザー情報を取得してそれを画面に表示させているだけですね。
web.xmlの設定は以下の通り。
<?xml version="1.0" encoding="UTF-8"?>
<web-app xmlns:xsi="http://www.w3.org/2001/XMLSchema-instance"
    xmlns="http://java.sun.com/xml/ns/j2ee" xmlns:javaee="http://java.sun.com/xml/ns/javaee"
    xmlns:web="http://java.sun.com/xml/ns/javaee/web-app_2_5.xsd"
    xsi:schemaLocation="http://java.sun.com/xml/ns/j2ee http://java.sun.com/xml/ns/j2ee/web-app_2_4.xsd"
    id="WebApp_ID" version="2.4">
    <display-name>Demo Servlet</display-name>
    <welcome-file-list>
        <welcome-file>index.html</welcome-file>
        <welcome-file>index.htm</welcome-file>
        <welcome-file>index.jsp</welcome-file>
        <welcome-file>default.html</welcome-file>
        <welcome-file>default.htm</welcome-file>
        <welcome-file>default.jsp</welcome-file>
    </welcome-file-list>
    <security-role>
        <role-name>All Role</role-name>
    </security-role>

    <security-constraint>
        <web-resource-collection>
            <web-resource-name>Demo Servlet</web-resource-name>
            <url-pattern>/*</url-pattern>
            <http-method>GET</http-method>
            <http-method>PUT</http-method>
            <http-method>POST</http-method>
            <http-method>DELETE</http-method>
        </web-resource-collection>
        <auth-constraint>
            <role-name>All Role</role-name>
        </auth-constraint>
        <user-data-constraint>
            <transport-guarantee>NONE</transport-guarantee>
        </user-data-constraint>
    </security-constraint>

</web-app>