はじめに
Jenkinsを活用してメインフレーム・アプリケーションの管理をどのように行えるのかを探っていく連載記事です。
今回は、Pipelineを直接Jenkinsに設定するのではなく、GitのRepositoryに管理する方法を試してみます。
関連記事
Jenkins - z/OS連携: (1) 概要
Jenkins - z/OS連携: (2) Pipelineの利用
Jenkins - z/OS連携: (3) Pipeline+Gitの利用
Jenkins - z/OS連携: (4) Pipeline+Git+Webhookの利用
Jenkins - z/OS連携: (5) Pipeline+Git+DBBの利用
Jenkins - z/OS連携: (6) Jenkins Pipeline利用シナリオ
環境情報
前回同様、OpenShift上のWaziの環境を利用します。
z/OS(Sandbox)
z/OS V2.4
DBB V1.1.0
Git for z/OS V2.14.4_zos_b09
Jenkins Server
Waziの手順に従い、Sandboxと同OpenShift上にJenkins Serverを構成
参考: Configuring a Jenkins server in OpenShift
Jenkins V2.235.5
Git plugin V4.2.2
Git client plugin V3.4.2
SSH Build Agents plugin V1.31.5
SSH Credentials plugin V1.18.1
Git Server
GitHub Enterprise Server V2.21.14
(社内で使用しているGitHub Enterpriseの環境があったのでそのまま利用)
Proxy
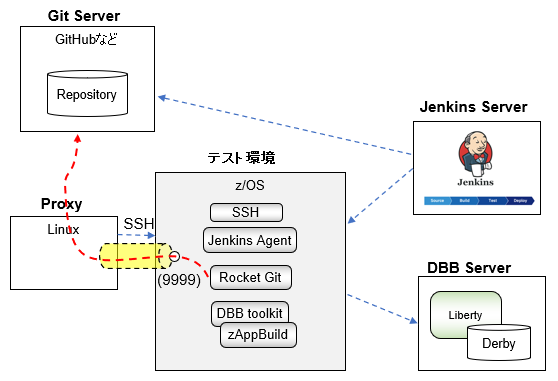
WaziのSandboxはz/OSから外に対してTCPのコネクションが張れない状態のため、間にLinuxのサーバーを立ててSSHを利用したSOCKS5 Proxyを構成しておきます。
Linuxのサーバーは、SSHクライアントでz/OSに接続でき、かつ、Git Serverにアクセスできることが前提です。SOCKS5 Proxyの構成としては、Linuxサーバーから以下のコマンドを実行してSSHのセッションを張っておけばOKです。(公開鍵認証の設定をしている想定)
ssh -f -N -R 9999 -o 'StrictHostKeyChecking no' -o 'ServerAliveInterval=60' -o 'ServerAliveCountMax=3' -i /tmp/id_rsa JENKINS@wazi-ssh.wazi-test01
オプション補足:
- -f: バックグラウンドで動作させる。
- -N: リモートでコマンドを実行しないことを意味する。
- -R: SOCKS5 proxyとして動作する際のリモート側のポートを指定。
- StrictHostKeyCheking no: 接続先ホストのフィンガープリントのチェックを無視する。
- serverAliveInterval, ServerAliveCountMax: sshのセッションがタイムアウトしないようにするためのkeepaliveの設定。
- -i: 認証に使用するPrivate Keyを指定。
これで、z/OS側としては、localhost:9999をproxyとして設定してgitアクセスを行えばよいことになります。SOCKS5 Proxyはサーバーの名前解決もProxy側で行ってくれるようなので、z/OS側はGit Serverのサーバー名(github.comなど)にアクセスできなくてもOKです。
※注意
sshのオプションで-R 9999という指定ができるようになったのは比較的新しいバージョンからのようです。こちらで確認した所では以下の状況でした。
RHEL V7.9: openssh-clients.x86_64 7.4p1-21.el7 =>NG
RHEL V8.2: openssh-clients.x86_64 8.0p1-4.el8_1 => OK
古いバージョンのopenssh-clientを使用している場合は、sshを二段階で実行することで実現可能です(まずローカルでproxy構成してからポートフォワードする)。
参考:
with SSH only: reverse tunnel web access via ssh SOCKS proxy
接続先のサーバーへインターネット接続を共有しつつssh接続する
PipelineをGit上に配置するシナリオ
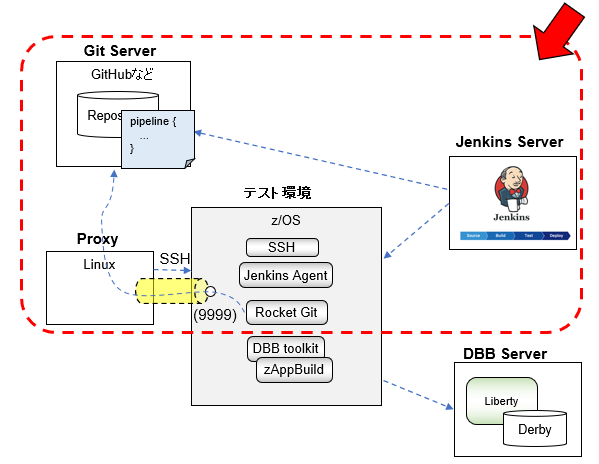
次に、Pipelineの定義を直接Jenkins上に書くのではなく、GitHub上に配置してそれを実行するようにしてみます。
範囲としてはこんな感じです。
Git Serverの準備
Repository作成
通常のGitのソース管理のように、Repositoryを作成してそこにPipeline Scriptのファイルを配置しておきます。ここでは、Jenkinsfileという名前でPipeline Scriptを作成し、wazi-sandbox01-pipeline01というリポジトリに配置しています。
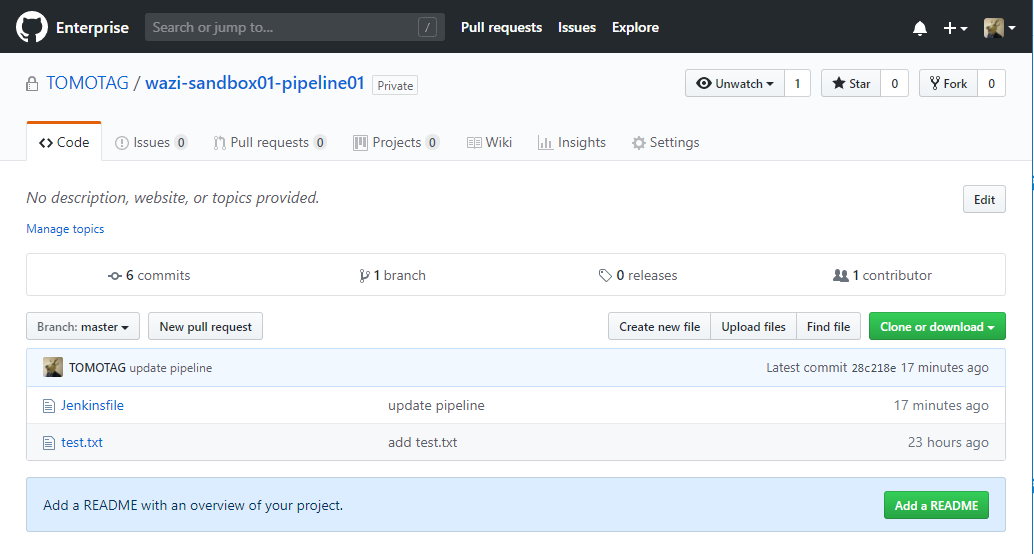
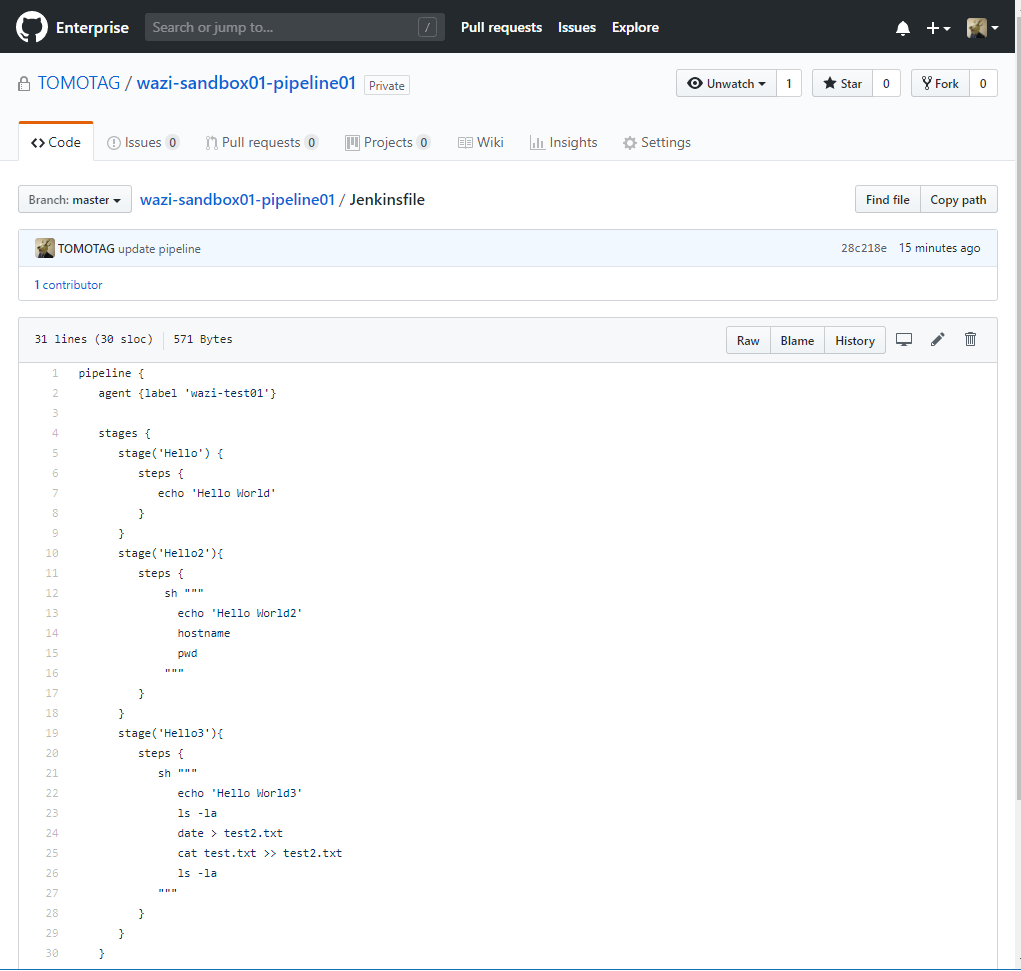
pipeline scriptの中の処理は、前回の記事とは少し変更し、git repository上にあるファイルを参照する処理を追加しています。
アクセス・トークンの生成
今回、Git Serverとしては既存のGitHub Enterpriseを利用しています。この環境の認証時にはSSOのために社内の別の認証サーバーに飛ばされてしまうので、ユーザーID/パスワードでの認証がそのまま使えません。
ここでは、アクセス・トークンを使います。
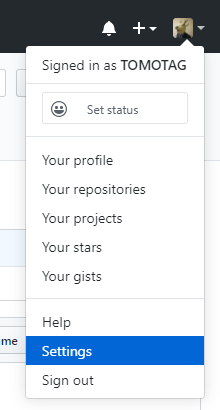
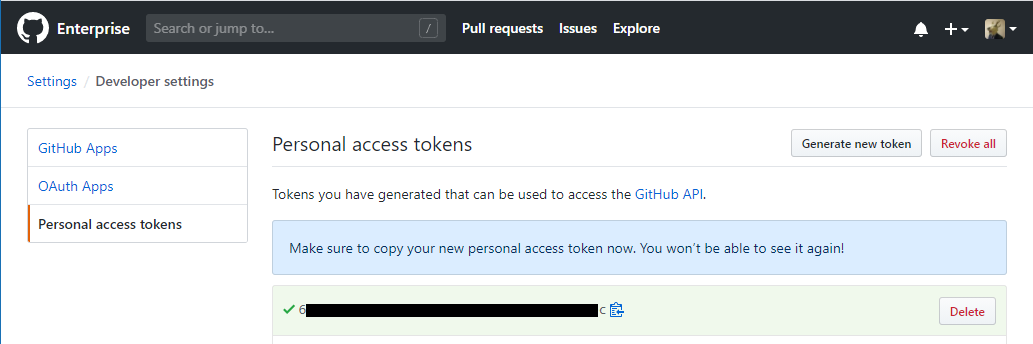
メニューからSettingsを選択
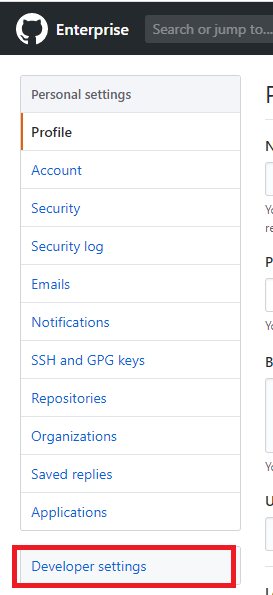
Developer Settingsをクリック
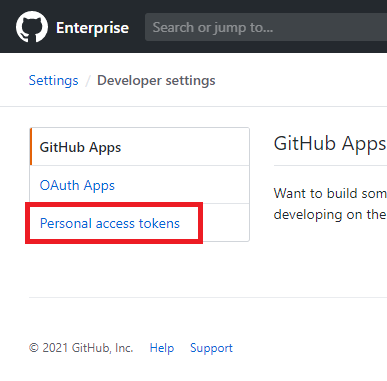
Personal Access Tokensをクリック
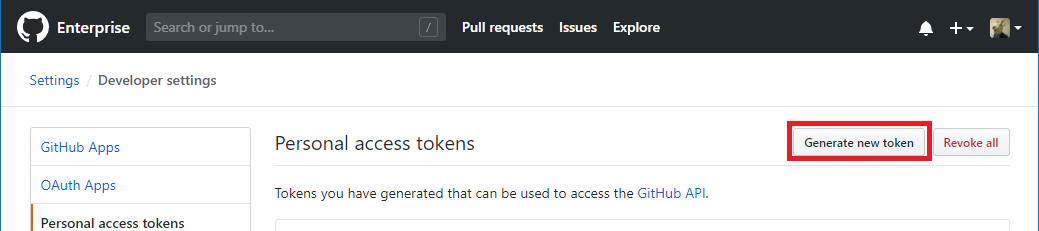
Generate new tokenをクリック
名前と適宜権限を設定してGenerate
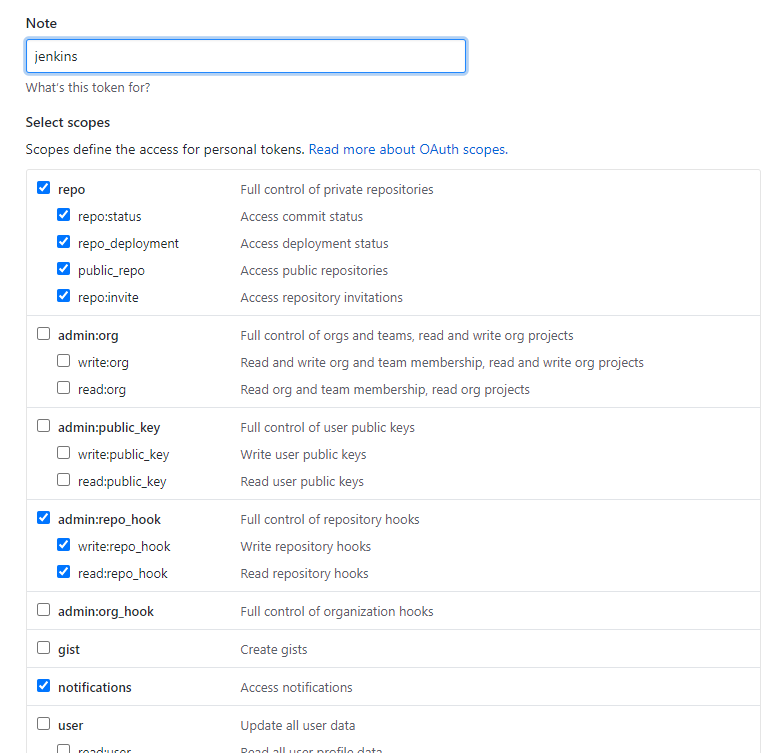
アクセス・トークン(以下黒塗りした部分)が生成されるので、これをメモっておきます。
Git Client設定(Git for z/OS)
今回実施するシナリオでは、Pipeline ScriptをGit Repositoyに配置しているだけのシンプルな例を試す予定ですが、このような構成を取るとターゲットのノード上でRepositoryをLocalにクローンする処理が自動的に行われます。そのため、Git Clientとしての設定をz/OS上に行っておく必要があります。
Proxy設定
z/OSのUSSにJenkins用のユーザー(ここではJENKIN2を想定)でログインし、Proxy経由でGit Serverにアクセスするための設定を行っておきます。ホームディレクトリに.gitconfigファイルを作成し、以下の設定を記載します。
[http]
        proxy = socks5h://127.0.0.1:9999
        sslverify = false
構成確認
JENKIN2:/u/JENKIN2: >git config --list
http.proxy=socks5h://127.0.0.1:9999
hhtp.sslverify=false
手動でgit cloneができるか確認しておきます。ユーザー名とパスワードが聞かれるので入力します。ユーザー名は任意でよく、パスワードには上で生成したアクセス・トークンを指定します。
JENKIN2:/u/JENKIN2/test: >git clone https://github.xxx.xxx/TOMOTAG/wazi-sandbox01-pipeline01.git
Cloning into 'wazi-sandbox01-pipeline01'...
Username for 'https://github.xxx.xxx':
Password for 'https://git@github.xxx.xxx':
remote: Enumerating objects: 16, done.
remote: Counting objects: 100% (16/16), done.
remote: Compressing objects: 100% (8/8), done.
remote: Total 16 (delta 4), reused 16 (delta 4), pack-reused 0
Unpacking objects: 100% (16/16), done.

JENKIN2:/u/JENKIN2/test: >ls
wazi-sandbox01-pipeline01

JENKIN2:/u/JENKIN2/test: >ls -la wazi-sandbox01-pipeline01
total 66
drwxr-xr-x   3 JENKIN2  SYS1        8192 Mar 12 22:14 .
drwxr-xr-x   3 JENKIN2  SYS1        8192 Mar 12 22:13 ..
drwxr-xr-x   8 JENKIN2  SYS1        8192 Mar 12 22:14 .git
-rw-r--r--   1 JENKIN2  SYS1         476 Mar 12 22:14 Jenkinsfile
-rw-r--r--   1 JENKIN2  SYS1          14 Mar 12 22:14 test.txt
gitでアクセスできることが確認できたので、上のディレクトリは削除しておきます。
環境変数設定用スクリプト準備
Jenkinsから実行される処理でgitを利用することになりますが、その際git関連の環境変数などを設定しておくためのスクリプトを用意しておきます。DBBを導入するとサンプルが提供されているのでそれをそのまま使います。Wazi Sandboxだと/usr/lpp/IBM/dbb/conf/gitenv.shに提供されています。
#! /bin/sh
#
# Licensed materials - Property of IBM
# 5655-AC5 Copyright IBM Corp. 2018, 2018
# All rights reserved
# US Government users restricted rights  -  Use, duplication or
# disclosure restricted by GSA ADP schedule contract with IBM Corp.
#
###############################################################################################
##  Sample shell script used to set Rocket's Git environment variables from Jenkins
##
##  The Rocket Git documentation located in /<installDir>/share/doc/git/<version>/README.ZOS
##  instructs users to create and update new and existing and environment variables for
##  the Git client to run.  Normally this would be achieved by adding them to the user's
##  .profile login script.  However the Jenkins slave runs in a non-login shell so the .profile
##  script is not executed automatically.  This shell script can be executed by both the users
##  .profile script and the Jenkins slave at startup
##
##  Setup Instructions:
##  1) Replace all references to "rsusr" with the appropriate install directory name
##  2) In the Jenkins Agent definition configuration add the path to this file in the
##     Prefix Start Slave Command field
##
###############################################################################################
# git the environment variables
 export GIT_SHELL=/rsusr/rocket/bin/bash
 export GIT_EXEC_PATH=/rsusr/rocket/libexec/git-core
 export GIT_TEMPLATE_DIR=/rsusr/rocket/share/git-core/templates
 export GIT_MAN_PATH=/rsusr/rocket/man

#common the environment variables
 export PATH=/rsusr/rocket/bin:$PATH
 export MANPATH=/rsusr/rocket/man/:$MANPATH
 export PERL5LIB=/rsusr/rocket/share/perl/5.24.1:$PERL5LIB

#ASCII support the environment variables
 export _BPXK_AUTOCVT=ON
 export _CEE_RUNOPTS="FILETAG(AUTOCVT,AUTOTAG) POSIX(ON)"
 export _TAG_REDIR_ERR=txt
 export _TAG_REDIR_IN=txt
 export _TAG_REDIR_OUT=txt

#set git editor to create comments on encdoing ISO8859-1
SandboxではGIT_EXEC_PATHに指定されている/rsusr/rocket/libexecが無かったのでシンボリック・リンクを作成しておきます。
> ln -s /usr/lpp/Rocket/rsusr/ported/libexec /rsusr/rocket/libexec
確認
JENKIN2:/rsusr/rocket: >ls -la
total 2160
drwxr-xr-x  10 1638     501         8192 Mar  1 02:58 .
drwxr-xr-x   3 OMVSKERN SYS1        8192 Sep 21 13:39 ..
-rw-r--r--   1 1638     501          778 Nov  1  2019 README
drwxr-xr-x   2 1638     501         8192 Oct  6 15:07 bin
-rw-r--r--   1 OMVSKERN SYS1      999936 Sep 24 06:44 gzip-1.6-edc_b0005.160229.tar
drwxr-xr-x  11 OMVSKERN 501         8192 Nov  1  2019 include
drwxr-xr-x   6 OMVSKERN 501         8192 Nov  1  2019 lib
lrwxrwxrwx   1 OMVSKERN 501           36 Mar  1 02:58 libexec -> /usr/lpp/Rocket/rsusr/ported/libexec
drwxr-xr-x   3 1638     501         8192 Nov 20  2013 man
drwxr-xr-x   2 OMVSKERN 501         8192 Nov  1  2019 sbin
drwxr-xr-x   9 1638     501         8192 Nov  1  2019 share
drwxr-xr-x   6 OMVSKERN 501         8192 Nov  1  2019 ssl
drwxr-xr-x   4 OMVSKERN 501         8192 Nov  1  2019 var
Jenkins: ノード構成
前回作成したノードの構成を一部カスタマイズし、Git関連のオプションを追加します。

起動時の主要パラメータ補足:
| パラメーター | 値 |
|---|---|
| Javaのパス | /usr/lpp/java/J8.0_64/bin/java |
| JVMオプション | -Xquickstart -Dfile.encoding=UTF-8 -Xnoargsconversion -Dorg.jenkinsci.plugins.gitclient.CliGitAPIImpl.user.name.file.encoding=IBM-1047 -Dorg.jenkinsci.plugins.gitclient.CliGitAPIImpl.user.password.file.encoding=IBM-1047 -Dorg.jenkinsci.plugins.gitclient.CliGitAPIImpl.user.passphrase.file.encoding=IBM-1047 |
| Prefix Start Agent Command | . /usr/lpp/IBM/dbb/conf/gitenv.sh && export GIT_CONFIG_NOSYSTEM=0 && export JAVA_HOME=/usr/lpp/java/J8.0_64 && export IBM_JAVA_ENABLE_ASCII_FILETAG=ON && env && |
| Suffix Start Agent Command | -text(先頭にブランクを入れる) |
JVMオプション:
この後、Pipelineの定義の所で出てきますが、Git Serverアクセス時に使用する認証情報(アクセス・トークン)はJenkins上で管理されます。この認証情報はSlaveノード(z/OS)に転送してそれを使用してgitが使用することになります。z/OSはUSS上も基本は文字コードをEBCDICで扱いますので、認証情報がきちんとコード変換されないとgitコマンド実行時に認証に失敗してしまいます。このコード変換を行わせるためにJVMのオプションでencodingの指定を行うパラメータを指定しています。
Prefix Start Agent Command:
Jenkinsから起動される処理でgitを使う際に必要な環境変数を有効化しています。
Jenkins: Pipeline定義
前回同様、新規ジョブの作成からパイプラインを選択します。
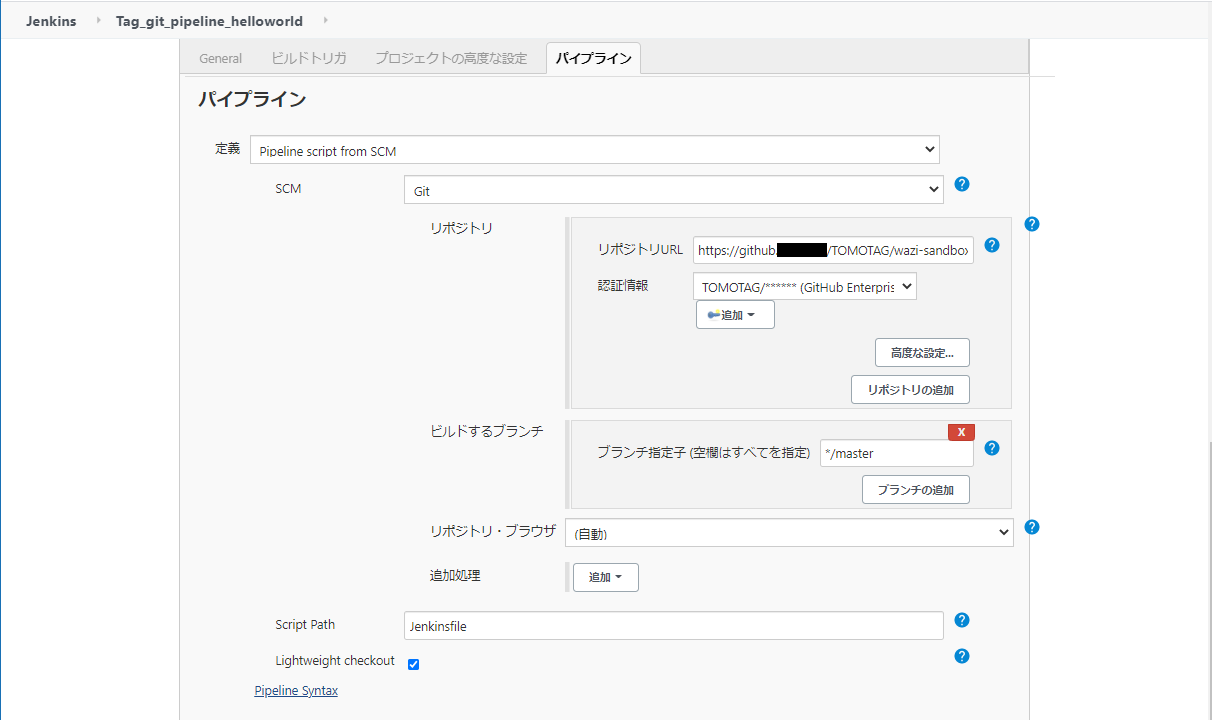
- 定義: Pipelie script from SCM を選択
- SCM: Gitを選択
- リポジトリ: Pipeline scriptを配置したリポジトリのURLを指定します(https)。認証情報としてはパスワードにアクセス・トークンを設定したものを指定します。
- ビルドするブランチ: */masterを指定
- Script Path: Pipeline Scriptを記載したファイルのパスを指定します。
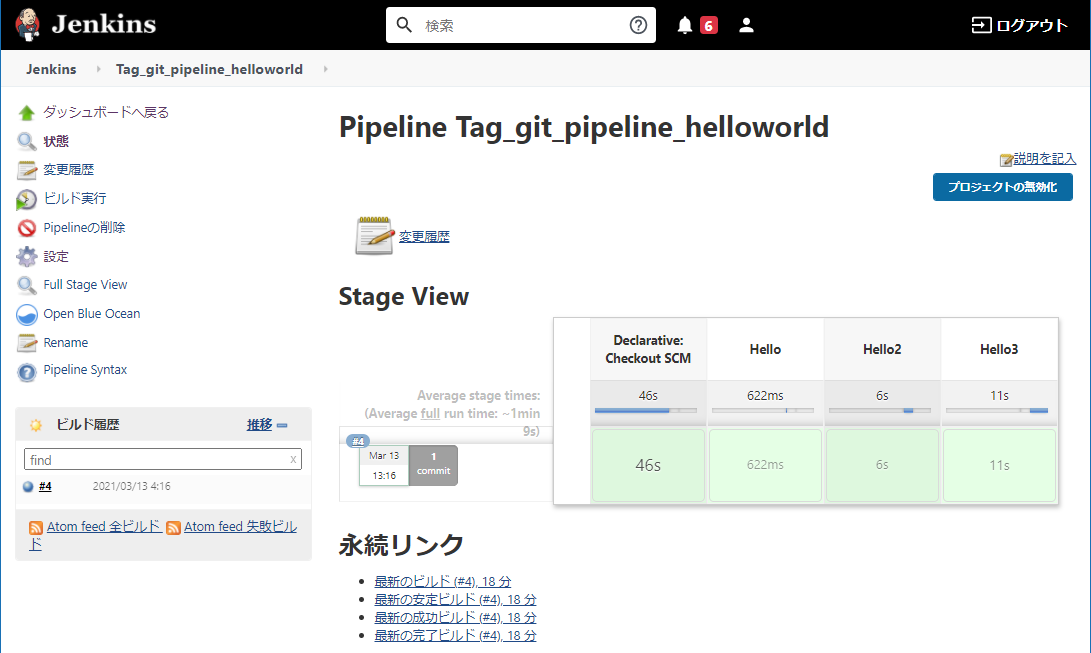
Pipeline実行
Pipelineを開いて左側のメニューからビルド実行を選択
ログを確認
パイプライン実行時のログ
Started by user IAM#tomotag@xxxxx
Obtained Jenkinsfile from git https://github.xxx.xxx/TOMOTAG/wazi-sandbox01-pipeline01.git
Running in Durability level: MAX_SURVIVABILITY
[Pipeline] Start of Pipeline
[Pipeline] node
Running on wazi-test01 in /u/JENKIN2/agent/wazi-test01/workspace/Tag_git_pipeline_helloworld
[Pipeline] {
[Pipeline] stage
[Pipeline] { (Declarative: Checkout SCM)
[Pipeline] checkout
using credential TOMOTAG
Cloning the remote Git repository
Cloning repository https://github.xxx.xxx/TOMOTAG/wazi-sandbox01-pipeline01.git
 > git init /u/JENKIN2/agent/wazi-test01/workspace/Tag_git_pipeline_helloworld # timeout=10
Fetching upstream changes from https://github.xxx.xxx/TOMOTAG/wazi-sandbox01-pipeline01.git
 > git --version # timeout=10
 > git --version # 'git version 2.14.4_zos_b09'
using GIT_ASKPASS to set credentials GitHub Enterprise Token
Using name charset 'IBM1047'
Using password charset 'IBM1047'
 > git fetch --tags --progress -- https://github.xxx.xxx/TOMOTAG/wazi-sandbox01-pipeline01.git +refs/heads/*:refs/remotes/origin/* # timeout=10
 > git config remote.origin.url https://github.xxx.xxx/TOMOTAG/wazi-sandbox01-pipeline01.git # timeout=10
 > git config --add remote.origin.fetch +refs/heads/*:refs/remotes/origin/* # timeout=10
 > git config remote.origin.url https://github.xxx.xxx/TOMOTAG/wazi-sandbox01-pipeline01.git # timeout=10
Fetching upstream changes from https://github.xxx.xxx/TOMOTAG/wazi-sandbox01-pipeline01.git
using GIT_ASKPASS to set credentials GitHub Enterprise Token
Using name charset 'IBM1047'
Using password charset 'IBM1047'
 > git fetch --tags --progress -- https://github.xxx.xxx/TOMOTAG/wazi-sandbox01-pipeline01.git +refs/heads/*:refs/remotes/origin/* # timeout=10
Checking out Revision 28c218ef9c25a3caff26418d0f60f94b194df3c1 (refs/remotes/origin/master)
 > git rev-parse refs/remotes/origin/master^{commit} # timeout=10
 > git rev-parse refs/remotes/origin/origin/master^{commit} # timeout=10
 > git config core.sparsecheckout # timeout=10
 > git checkout -f 28c218ef9c25a3caff26418d0f60f94b194df3c1 # timeout=10
Commit message: "update pipeline"
 > git rev-list --no-walk 39f6d8a2f6c3efe7da6f8ccecef86e20bc685238 # timeout=10
[Pipeline] }
[Pipeline] // stage
[Pipeline] withEnv
[Pipeline] {
[Pipeline] stage
[Pipeline] { (Hello)
[Pipeline] echo
Hello World
[Pipeline] }
[Pipeline] // stage
[Pipeline] stage
[Pipeline] { (Hello2)
[Pipeline] sh
+ echo Hello World2
Hello World2
+ hostname
S0W1.DAL-EBIS.IHOST.COM
+ pwd
/u/JENKIN2/agent/wazi-test01/workspace/Tag_git_pipeline_helloworld
[Pipeline] }
[Pipeline] // stage
[Pipeline] stage
[Pipeline] { (Hello3)
[Pipeline] sh
+ echo Hello World3
Hello World3
+ ls -la
total 66
drwxr-xr-x   3 JENKIN2  SYS1        8192 Mar 13 04:17 .
drwxr-xr-x   6 JENKIN2  SYS1        8192 Mar 13 04:16 ..
drwxr-xr-x   5 JENKIN2  SYS1        8192 Mar 13 04:17 .git
-rw-r--r--   1 JENKIN2  SYS1         571 Mar 13 04:17 Jenkinsfile
-rw-r--r--   1 JENKIN2  SYS1          14 Mar 13 04:17 test.txt
+ date
+ 1> test2.txt
+ cat test.txt
+ 1>> test2.txt
+ ls -la
total 68
drwxr-xr-x   3 JENKIN2  SYS1        8192 Mar 13 04:17 .
drwxr-xr-x   6 JENKIN2  SYS1        8192 Mar 13 04:16 ..
drwxr-xr-x   5 JENKIN2  SYS1        8192 Mar 13 04:17 .git
-rw-r--r--   1 JENKIN2  SYS1         571 Mar 13 04:17 Jenkinsfile
-rw-r--r--   1 JENKIN2  SYS1          14 Mar 13 04:17 test.txt
-rw-r--r--   1 JENKIN2  SYS1          40 Mar 13 04:17 test2.txt
[Pipeline] }
[Pipeline] // stage
[Pipeline] }
[Pipeline] // withEnv
[Pipeline] }
[Pipeline] // node
[Pipeline] End of Pipeline
Finished: SUCCESS
Git Repository上のPipeline Scriptを少し変更してもう一度Pipelineを実行してみます。
パイプライン実行時のログ(2回目)
Started by user IAM#xxxxx
Obtained Jenkinsfile from git https://github.xxx.xxx/TOMOTAG/wazi-sandbox01-pipeline01.git
Running in Durability level: MAX_SURVIVABILITY
[Pipeline] Start of Pipeline
[Pipeline] node
Running on wazi-test01 in /u/JENKIN2/agent/wazi-test01/workspace/Tag_git_pipeline_helloworld
[Pipeline] {
[Pipeline] stage
[Pipeline] { (Declarative: Checkout SCM)
[Pipeline] checkout
using credential TOMOTAG
 > git rev-parse --is-inside-work-tree # timeout=10
Fetching changes from the remote Git repository
 > git config remote.origin.url https://github.xxx.xxx/TOMOTAG/wazi-sandbox01-pipeline01.git # timeout=10
Fetching upstream changes from https://github.xxx.xxx/TOMOTAG/wazi-sandbox01-pipeline01.git
 > git --version # timeout=10
 > git --version # 'git version 2.14.4_zos_b09'
using GIT_ASKPASS to set credentials GitHub Enterprise Token
Using name charset 'IBM1047'
Using password charset 'IBM1047'
 > git fetch --tags --progress -- https://github.xxx.xxx/TOMOTAG/wazi-sandbox01-pipeline01.git +refs/heads/*:refs/remotes/origin/* # timeout=10
Checking out Revision 14458b810af011f2b714fea0a460f48f40eb8410 (refs/remotes/origin/master)
 > git rev-parse refs/remotes/origin/master^{commit} # timeout=10
 > git rev-parse refs/remotes/origin/origin/master^{commit} # timeout=10
 > git config core.sparsecheckout # timeout=10
 > git checkout -f 14458b810af011f2b714fea0a460f48f40eb8410 # timeout=10
Commit message: "update pipeline"
 > git rev-list --no-walk 28c218ef9c25a3caff26418d0f60f94b194df3c1 # timeout=10
[Pipeline] }
[Pipeline] // stage
[Pipeline] withEnv
[Pipeline] {
[Pipeline] stage
[Pipeline] { (Hello)
[Pipeline] echo
Hello World
[Pipeline] }
[Pipeline] // stage
[Pipeline] stage
[Pipeline] { (Hello2)
[Pipeline] sh
+ echo Hello World2
Hello World2
+ hostname
S0W1.DAL-EBIS.IHOST.COM
+ pwd
/u/JENKIN2/agent/wazi-test01/workspace/Tag_git_pipeline_helloworld
[Pipeline] }
[Pipeline] // stage
[Pipeline] stage
[Pipeline] { (Hello3)
[Pipeline] sh
+ echo Hello World3
Hello World3
+ ls -la
total 68
drwxr-xr-x   3 JENKIN2  SYS1        8192 Mar 13 04:41 .
drwxr-xr-x   6 JENKIN2  SYS1        8192 Mar 13 04:16 ..
drwxr-xr-x   5 JENKIN2  SYS1        8192 Mar 13 04:41 .git
-rw-r--r--   1 JENKIN2  SYS1         600 Mar 13 04:41 Jenkinsfile
-rw-r--r--   1 JENKIN2  SYS1          14 Mar 13 04:17 test.txt
-rw-r--r--   1 JENKIN2  SYS1          40 Mar 13 04:17 test2.txt
+ date
+ 1> test2.txt
+ cat test.txt
+ 1>> test2.txt
+ ls -la
total 68
drwxr-xr-x   3 JENKIN2  SYS1        8192 Mar 13 04:41 .
drwxr-xr-x   6 JENKIN2  SYS1        8192 Mar 13 04:16 ..
drwxr-xr-x   5 JENKIN2  SYS1        8192 Mar 13 04:41 .git
-rw-r--r--   1 JENKIN2  SYS1         600 Mar 13 04:41 Jenkinsfile
-rw-r--r--   1 JENKIN2  SYS1          14 Mar 13 04:17 test.txt
-rw-r--r--   1 JENKIN2  SYS1          40 Mar 13 04:42 test2.txt
+ cat test2.txt
Sat Mar 13 04:42:07  2021
test
test
test[Pipeline] }
[Pipeline] // stage
[Pipeline] }
[Pipeline] // withEnv
[Pipeline] }
[Pipeline] // node
[Pipeline] End of Pipeline
Finished: SUCCESS
Pipeline Scriptで定義したStage("Hello", "Hello2", "Hello3")の前に、"Declarative: Checkout SCM"というStageが実行されています。
1度目は最初にz/OS上でgit cloneが走りリポジトリをローカルにクローンしていますが、2度目はfetchして差分を取得するような動きになっているのが分かります。
まとめ
今回の試した内容は以下のイメージです。
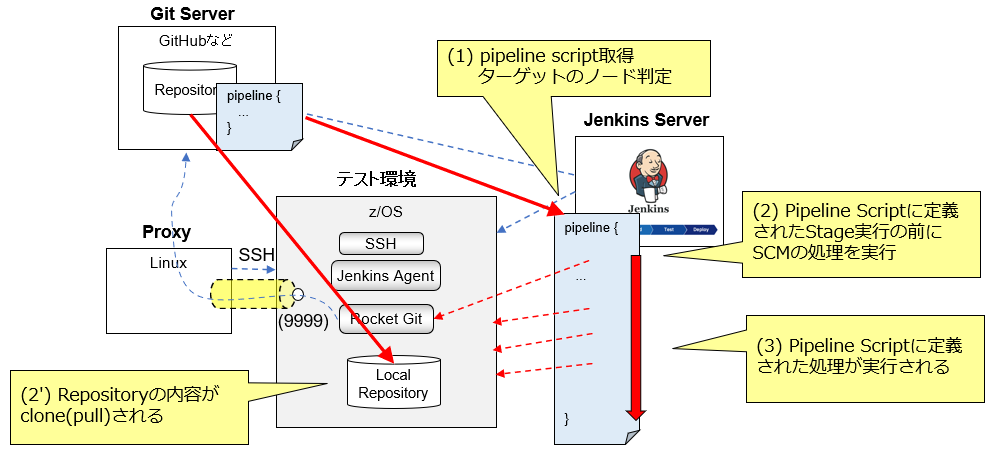
最初はPipeline ScriptをGit Repositoryから取ってくるだけで、その後の動きは前回の例と同じなのかなと思っていましたが、Declarative Pipelineの記述の仕方の場合、Git Repositoryをクローンする所も自動的にやってくれるようです。
参考: Jenkins User Handbook - Using a Jenkinsfile
By default the agent directive ensures that the source repository is checked out and made available for steps in the subsequent stages`
ソースと一緒にビルド/テスト/デプロイ用のPipelineファイルを同じRepositoryに管理しておけばよさそう、というのがよく分かりますね。あとはpipelineの記述次第。