VirtualBoxを使ったMininet環境の構築は、基本的にMininetが公式に配布しているVMのImageをそのまま使えばよいが、今回は事情があってバニラなUbuntu上にMininetをソースからビルドする必要があったので、その手順を残しておく。
環境
- macOS Big Sur Version 11.6.1
- Intel Core
- VirtualBox 6.1.28
- Ubuntu 20.04.3 (VM Image)
- Mininet 2.3.0
事前条件
- VirtualBoxのインストール
Ubuntu Imageのダウンロード
こちらのページで Ubuntu Desktop > Ubuntu Desktop 20.04.3 LTS を選択し、ubuntu-20.04.3-desktop-amd64.iso
をダウンロード。(バージョンは執筆時点とは異なっているかも)
ダウンロードしたイメージファイルは次のステップで使う。
VMの作成
VirtualBoxを起動し、新規VMを作成する。
以下は作成時の設定の抜粋
- Name: mininet(任意)
- Type: Linux
- Version: Ubuntu (64-bit)
- Memory Size: 2048MB
- HardDisk: Create a virtual hard disk now
- Hard disk file type: VDI
- Storage on physical hard disk: Dynamically allocated
- File Size: 20GB
作成したVMを起動するとディスクの選択画面になるので、先のステップでダウンロードしたUbuntuのイメージ(ここではubuntu-20.04.3-desktop-amd64.iso)を指定する。
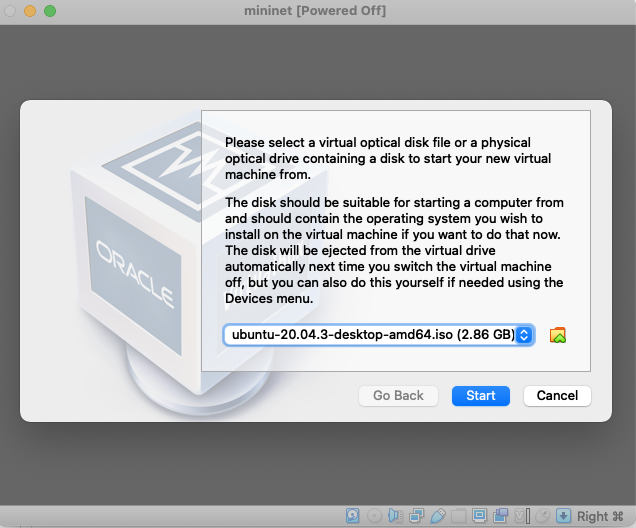
しばらくするとUbuntuが起動する。
Ubuntuのセットアップ
初期設定
VMを起動すると初期設定画面に移るので、以下の手順で進めていく
Install
- Install Ubuntu
Keyboard layout
- Japanese > Japanese
Updates and other software
- What apps would you to install to start with? > Minimal installation
- Other options > Download updates while installing Ubuntu
Installation type
- Erase disk and install Ubuntu
Where are you?
- Tokyo
Who are you?
任意のユーザー名とパスワードを入力する。今回は、
username: mininet
password: mininet
と仮定して進める。
インストールの実行
"Install now" をクリックしてインストールを実行する。かなり時間がかかるが、しばらくするとUbuntuのインストールが完了するので、画面の指示に従ってVMを再起動する。
再起動したら "Connect Your Online Accounts" や "Livepatch"、"Help improve Ubuntu"、"Privacy" の案内が出るが、skipして問題ない。
※自分の環境ではこの時点でSoftware Updaterの案内が出たので、素直にインストールを行なった。
ssh-serverのセットアップ(オプション)
いちいちVMのGUIからTerminalを開いて作業するのは面倒なので、ホストマシンから公開鍵認証でssh接続できるように設定しておく。
以下の記事を参照。
Mininetのインストール
Download/Get Started With Mininet - Mininet#option-2-native-installation-from-sourceを参考にソースからMininetをビルドする。
以下に手順を示す。
- gitリポジトリをクローン
$ sudo apt install -y git
$ git clone git://github.com/mininet/mininet
- gitリポジトリのタグからブランチを切る
$ cd mininet
$ git checkout -b mininet-2.3.0 2.3.0
$ cd ..
- インストールスクリプトを実行
$ pwd
/home/mininet

$ mininet/util/install.sh -a
Mininetの動作確認
basicなトポロジーでpingallのテストを実行し、Mininetが動作することを確認する。
コマンド例
$ sudo mn --switch ovsbr --test pingall
出力例
*** Creating network
*** Adding controller
*** Adding hosts:
h1 h2
*** Adding switches:
s1
*** Adding links:
(h1, s1) (h2, s1)
*** Configuring hosts
h1 h2
*** Starting controller
c0
*** Starting 1 switches
s1 ...
*** Waiting for switches to connect
s1
*** Ping: testing ping reachability
h1 -> h2
h2 -> h1
*** Results: 0% dropped (2/2 received)
*** Stopping 1 controllers
c0
*** Stopping 2 links
..
*** Stopping 1 switches
s1
*** Stopping 2 hosts
h1 h2
*** Done
completed in 0.349 seconds