はじめに
自宅サーバーの自分用備忘録兼アイデアプールです.
たまたまディスクイメージを保存してあったubuntu 18.04 LTS を前提にしています.
もくじ
IP関連
$ sudo apt install net-tools
これでifconfig等が使えるようになる.
今後このマシンのLocal IPは${L_IP}, Global IPは${G_IP}とする.
sshサーバ
$ sudo apt install openssh-server
公開鍵認証するために
$ sudo mkdir /home/${USER_NAME}
$ sudo mkdir /home/${USER_NAME}/.ssh
$ sudo chmod 700 /home/${USER_NAME}/.ssh
$ sudo vim /home/${USER_NAME}/.ssh/authorized_keys
# ホストマシンの公開鍵を記入
$ sudo chmod 600 /home/${USER_NAME}/.ssh/authorized_keys
パスワード認証をオフにして, 公開鍵認証だけに
$ sudo vim /etc/ssh/sshd_config
# PasswordAuthentication no
# PubkeyAuthentication yes
# を設定
sshdを再起動
$ sudo systemctl restart sshd
ホストマシンからssh
$ ssh ${USER_NAME}@${L_IP}
GitLabサーバ
依存インストール
$ sudo apt install curl openssh-server ca-certificates
$ sudo apt install postfix
GitLabパッケージの登録
curl -sS https://packages.gitlab.com/install/repositories/gitlab/gitlab-ce/script.deb.sh | sudo bash
GitLabのインストール
$ sudo apt install gitlab-ce
GitLabのConfiguration
$ sudo vim /etc/gitlab/gitlab.rb
# external_urlでURLを決める
$ sudo gitlab-ctl reconfigure
Webサーバ
apache2のインストール
$ sudo apt install apache2
サーバ名の変更
$ sudo vim /etc/apache2/apache2.conf
# ServerNameを設定
初期設定では/var/www/html/がルートディレクトリになる.
ルートディレクトリの変更
$ sudo vim /etc/apache2/apache2.conf
# <Directory "ルートにしたいディレクトリ">
#        Options Indexes FollowSymLinks
#        AllowOverride None
#        Require all granted
# </Directory>

$ sudo vim /etc/apache2/sites-available/000-default.conf
# DocumentRoot を ルートにしたいディレクトリ に変更
ポートの変更
httpは80番だが, 変えたいとき用
今回は8080番に設定する
$ sudo vim /etc/apache2/apache2.conf
# ServerName www.example.com:8080
$ sudo vim /etc/apache2/ports.conf
# Listen 8080 に変更
apacheを再起動
$ sudo systemctl restart apache2
カメラ画像のストリーミング
mjpg-streamerをインストールする
$ sudo apt-get install subversion imagemagick libjpeg-dev
$ svn checkout svn://svn.code.sf.net/p/mjpg-streamer/code/ mjpg-streamer
$ cd mjpg-streamer/mjpg-streamer/
$ make
$ sudo make install
mjpg-streamerを起動する
解像度を1280×720、fpsを30、ポートを14230で起動
バックグラウンド化するため -b を追加
mjpg_streamer -i "/usr/local/lib/input_uvc.so -y -q 100 -r 1280x720 -f 30" -o "/usr/local/lib/output_http.so -w ~/Documents/mjpg-streamer/mjpeg-streamer/www -p 14230" -b
ブラウザでhttp://${L_IP}:14230/?action=streamにアクセスすると再生される.
パケットキャプチャ
ubuntuにはプリインストールされているtcpdumpを使用する
今回は同一LAN上のhttp/httpsプロトコルを傍受する
$ sudo tcpdump -vvv port 80 or port 443
ストレージサーバ
owncloudsを用いる
インストール
$ sudo wget -nv https://download.owncloud.org/download/repositories/10.0.3/Ubuntu_17.04/Release.key -O Release.key
$ sudo apt-key add - < Release.key
$ sudo echo 'deb http://download.owncloud.org/download/repositories/10.2/Ubuntu_18.04/ /' > /etc/apt/sources.list.d/owncloud.list
$ sudo apt-get update
$ sudo apt-get install owncloud-files
apacheの設定
Webサーバを参照
デフォルトだと/var/www/owncloudsに実体がインストールされるので, apacheのパスを通す
依存の解決
Webページにアクセスすると, モジュール XXX がインストールされてませんと表示されるので, aptで取得する
$ sudo apt install -y php-xxx
# mb multibyteは、`php-mbstring`をインストール
$ sudo systemctl restart apache2
グローバル化
今までの章では同一LANでのアクセスを前提としていた.
外部からでもアクセスするための設定を行う
固定IP化
ubuntuインストール時に設定できる
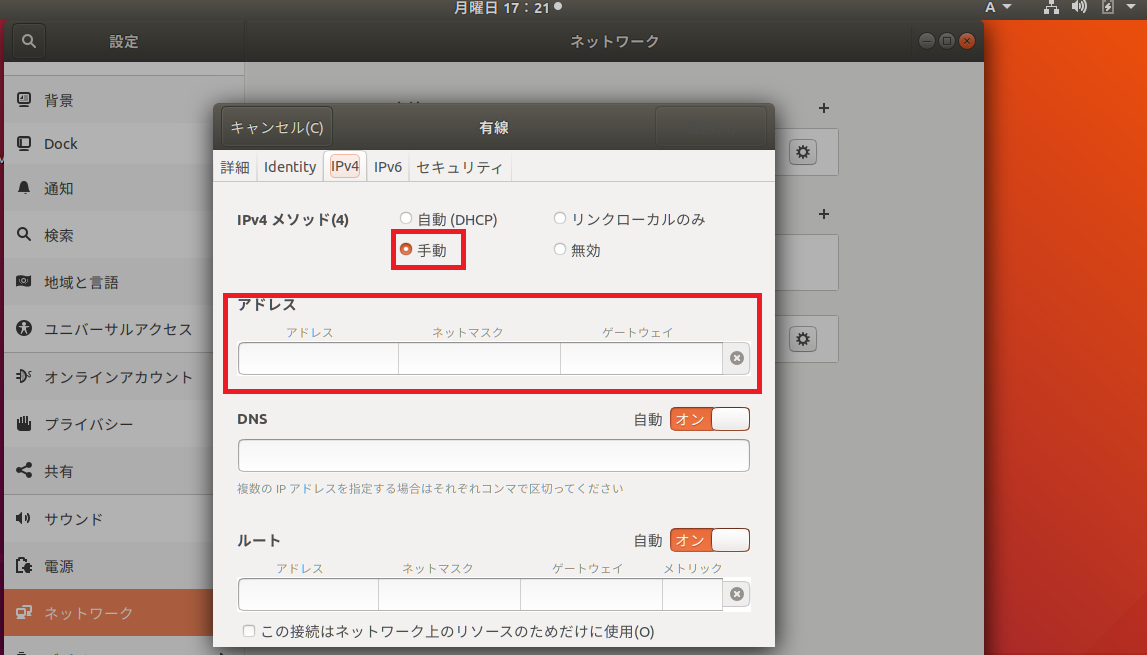
新しく設定する場合はGUIで設定可能

ifconfigで調べた情報をもとに, アドレス・ネットマスク・ゲートウェイを適切に設定
ポートマッピング
ルータのグローバルIPにアクセスした際に, 自宅サーバのポートに関する設定
UPnPクライアントを用いる
インストール
$ sudo apt install miniupnpc
ポート一覧
グローバルIPも取得できる
$ upnpc -l
ポートマッピング追加
これはhttp用(80番)の設定
httpd, ssh等も同様に行う
$ upnpc -a ${L_IP} 80 80 tcp
# ローカルIP 内向きポート番号 外向きポート番号 通信プロトコル(tcp/udp)
ポートマッピング削除
$ upnpc -d ${L_IP} 80
# ローカルIP 外向きポート番号
DDNS
グローバルIPを名前解決するためのDDNS
自宅で契約しているルータのグローバルIPが一ヶ月起きに変わるので利用
mydnsというオンラインサービスを用いた.
登録
サイトに登録後, DOMAIN INFOで使いたい名前${MYDNS_NAME}を設定
CRONの設定
mydnsでは一定周期ごとにグローバルIPを通知しなければIPが削除されてしまう
グローバルIPを通知するshellscriptをcronに設定する必要がある
$ crontab -e
# 0,30 * * * * wget -q -O - --http-user=${MYDNS_USER_ID} --http-password=${MYDNS_PASS} http://www.mydns.jp/logwww.in.html
# これで30分ごとにIPを通知
アクセス
http(80番ポート)の場合
ブラウザでhttp://${MYDNS_NAME}.mydns.jp:80 にアクセスできる
ssh(22番ポート)の場合
$ ssh ${USER_NAME}@${MYDNS_NAME}.mydns.jp:22
参考
https://webnetforce.net/web-camera-mjpg-streamer/
https://www.yokoweb.net/2018/05/04/ubuntu-18_04-server-gitlab-install/
https://thr3a.hatenablog.com/entry/20140625/1403638550
http://bashalog.c-brains.jp/09/10/15-132615.php
http://d.hatena.ne.jp/konbunori/20110328/1301250660
https://qiita.com/t-kumarr/items/d1880382ebbb06a8fafc