はじめに
go_routerを使うと、Flutterでの画面の遷移を簡潔に制御できます。以下は、go_routerで遷移処理を全て書いた場合の例です。
class AppRouteKeys {
  static const home = 'home';
  static const counseling = 'counseling';
  static const counselingPayment = 'counselingPayment';
  static const counselingPaymentComplete = 'counselingPaymentComplete';
  static const inquiry = 'inquiry';
  static const setting = 'setting';
}

final GlobalKey<NavigatorState> rootNavigatorKey =
    GlobalKey<NavigatorState>(debugLabel: 'root');
final GlobalKey<NavigatorState> homeNavigatorKey =
    GlobalKey<NavigatorState>(debugLabel: 'home');

final routes = [
  ShellRoute(
    navigatorKey: homeNavigatorKey,
    builder: (context, state, child) => RootPage(page: child),
    routes: [
      GoRoute(
          path: '/home',
          name: AppRouteKeys.home,
          builder: (context, state) => const HomePage()),
      GoRoute(
          path: '/inquiry',
          name: AppRouteKeys.inquiry,
          builder: (context, state) => const InquiryPage()),
      GoRoute(
          path: '/setting',
          name: AppRouteKeys.setting,
          builder: (context, state) =>
              SettingPage(initTab: state.uri.queryParameters['tab'])),
    ],
  ),
  GoRoute(
      path: '/counseling/:counselingId',
      name: AppRouteKeys.counseling,
      parentNavigatorKey: rootNavigatorKey,
      builder: (context, state) => CounselingPage(
          counselingId: int.parse(state.pathParameters['counselingId']!)),
      routes: [
        GoRoute(
          path: 'payment',
          name: AppRouteKeys.counselingPayment,
          parentNavigatorKey: rootNavigatorKey,
          builder: (context, state) => PaymentPage(
              counselingId: int.parse(state.pathParameters['counselingId']!)),
          routes: [
            GoRoute(
                path: 'complete',
                name: AppRouteKeys.counselingPaymentComplete,
                parentNavigatorKey: rootNavigatorKey,
                builder: (context, state) => PaymentCompletePage(
                    counselingId:
                        int.parse(state.pathParameters['counselingId']!))),
          ],
        ),
      ]),
];

final router = GoRouter(
  navigatorKey: rootNavigatorKey,
  initialLocation: '/home',
  routes: routes,
);
以上が遷移の定義で実際に呼び出して移動する場合は、以下のように呼び出します。どこに移動したいかは明確ですが、画面に対して、 pathParametersやqueryParametersを渡すことによって、画面間のデータの受け渡しが可能になります。しかし、そのデータがその画面に合っているかどうかは、自分で確認しなければなりません。
context.pushNamed(
  AppRouteKeys.counseling,
  pathParameters: {'counselingId': '1'},
);
context.pushNamed(AppRouteKeys.setting,
  queryParameters: {'tab': 'counseling'})
これを、go_router_builderを使った形に書き換えると、必要なpathParametersやqueryParametersの定義がわかり、タイプチェックするように書き出されるので、必要な変数を渡すミスを防ぐことができます。実際にどのように変換するのか、この記事で説明したいと思います。
サンプルについて
今回の実装例のサンプルを用意しました。各状態をbranchで置いているので、参考にしてください。
| branch | 内容 |
|---|---|
| base | go_routerのみ |
| use-go_router_builder | go_router_builderに定義の置き換え |
| add-transition-page | 遷移処理と移動処理を書き換え |
go_routerの定義を置き換える
先ほどの例で、routesを定義している部分で全体の遷移が決まりますが、この部分をgo_router_builderの定義に置き換えていきます。配列でShellRouteとGoRouteは、TypedShellRouteとTypedGoRouteに置き換えられます。ルートになるTypedGoRouteはアノテーションで定義して、TypedGoRouteで使用するgo_router_builderの遷移設定のクラスを定義します。先ほどの例を書き直すと以下のようになります。
part 'app_routing.g.dart';

@TypedShellRoute<RootRoute>(
  routes: [
    TypedGoRoute<HomeRoute>(
      path: '/home',
      name: AppRouteKeys.home,
    ),
    TypedGoRoute<InquiryRoute>(
      path: '/inquiry',
      name: AppRouteKeys.inquiry,
    ),
    TypedGoRoute<SettingRoute>(
      path: '/setting',
      name: AppRouteKeys.setting,
    )
  ],
)
class RootRoute extends ShellRouteData {
  static final GlobalKey<NavigatorState> $navigatorKey = homeNavigatorKey;
  const RootRoute();

  @override
  Widget builder(BuildContext context, GoRouterState state, Widget navigator) {
    return RootPage(page: navigator);
  }
}

@TypedGoRoute<CounselingRoute>(
  path: '/counseling/:counselingId',
  name: AppRouteKeys.counseling,
  routes: [
    TypedGoRoute<PaymentRoute>(
      path: 'payment',
      name: AppRouteKeys.counselingPayment,
    ),
    TypedGoRoute<PaymentCompleteRoute>(
      path: 'complete',
      name: AppRouteKeys.counselingPaymentComplete,
    ),
  ],
)
class CounselingRoute extends GoRouteData {
  static final GlobalKey<NavigatorState> $parentNavigatorKey = rootNavigatorKey;
  final int counselingId;

  const CounselingRoute({
    required this.counselingId,
  });

  @override
  Widget build(BuildContext context, GoRouterState state) {
    return CounselingPage(
      counselingId: counselingId,
    );
  }
}
ShellRouteData、GoRouteDataを継承して新たなクラスを定義します。navigatorKeyやparentNavigatorKeyはstaticなプロパティとして定義し、pathParametersやqueryParametersはコンストラクタで渡すように定義します。
class PaymentRoute extends GoRouteData {
  final int counselingId; // pathParameters

  const PaymentRoute({
    required this.counselingId,
  });

  @override
  Widget build(BuildContext context, GoRouterState state) {
    return PaymentPage(
      counselingId: counselingId,
    );
  }
}

class SettingRoute extends GoRouteData {
  final String? tab; // queryParameters

  const SettingRoute({
    this.tab,
  });

  @override
  Widget build(BuildContext context, GoRouterState state) {
    return SettingPage(
      initTab: tab,
    );
  }
}
build_runnerの実行
定義した内容もビルドしないと、利用できません。build_runnerを実行してファイルを生成します。
flutter packages pub run build_runner build
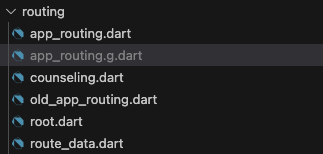
実行すると、app_routing.g.dartが生成され、呼び出しに必要なExtensionやGoRouterに渡す$appRoutesを生成します。
final typedRouter = GoRouter(
  navigatorKey: rootNavigatorKey,
  initialLocation: '/home',
  routes: $appRoutes,
);
遷移処理を修正
context.pushNamedを使って遷移処理を記述していましたが、移動を必要なパラメータを忘れずに呼び出して定義できます。
PaymentRoute(counselingId: 1).push(context);
SettingRoute(tab: 'counseling').push(context);
GoRouteDataを別ファイルに定義する
go_router_builderのルートで利用するGoRouteの定義は、アノテーションで定義する必要はありますが、階層下の場合は同じファイルで定義する必要はないので、partで分割したほうが整理しやすいと思います。
part 'counseling.dart';
part 'root.dart';
part of 'app_routing.dart';

class PaymentRoute extends GoRouteData {
  static final GlobalKey<NavigatorState> $parentNavigatorKey = rootNavigatorKey;
  final int counselingId;

  const PaymentRoute({
    required this.counselingId,
  });

  @override
  Widget build(BuildContext context, GoRouterState state) {
    return PaymentPage(
      counselingId: counselingId,
    );
  }
}

class PaymentCompleteRoute extends GoRouteData {
  static final GlobalKey<NavigatorState> $parentNavigatorKey = rootNavigatorKey;
  final int counselingId;

  const PaymentCompleteRoute({
    required this.counselingId,
  });

  @override
  Widget build(BuildContext context, GoRouterState state) {
    return PaymentCompletePage(
      counselingId: counselingId,
    );
  }
}
part of 'app_routing.dart';

class HomeRoute extends GoRouteData {
  @override
  Widget build(BuildContext context, GoRouterState state) {
    return HomePage();
  }
}

class InquiryRoute extends GoRouteData {
  @override
  Widget build(BuildContext context, GoRouterState state) {
    return InquiryPage();
  }
}

class SettingRoute extends GoRouteData {
  final String? tab;

  const SettingRoute({
    this.tab,
  });

  @override
  Widget build(BuildContext context, GoRouterState state) {
    return SettingPage(
      initTab: tab,
    );
  }
}
画面の遷移処理をカスタマイズする
GoRouteDataで遷移に必要な定義のみを書いていましたが、builder以外にbuildPageを使うと、遷移の際のトランジションを個別に定義できます。GoRouteDataに個別に書くと、遷移処理の統一もできないので、別途抽象クラスを定義して、それを利用する形にすれば、トランジションをまとめられます。
以下のようにGoRouteDataを継承したクラスを作成します実際のトランジションは、transitionsBuilderに記述します。
abstract class BottomGoRouteData extends GoRouteData {
  const BottomGoRouteData();

  @override
  CustomTransitionPage<void> buildPage(
    BuildContext context,
    GoRouterState state,
  ) {
    return CustomTransitionPage<void>(
      // 画面に必要な情報を引き継ぐ
      key: state.pageKey,
      name: state.name ?? state.path,
      arguments: <String, String>{
        ...state.pathParameters,
        ...state.uri.queryParameters,
      },

      // トランジションの構成
      opaque: false,
      transitionDuration: const Duration(milliseconds: 500),
      reverseTransitionDuration: const Duration(milliseconds: 400),
      child: build(context, state),
      transitionsBuilder: (
        context,
        animation,
        secondaryAnimation,
        child,
      ) {
        return SlideTransition(
          position: animation.drive(
            Tween<Offset>(
              begin: const Offset(0, 1),
              end: Offset.zero,
            ).chain(
              CurveTween(
                curve: animation.status == AnimationStatus.reverse
                    ? Curves.easeInCubic
                    : Curves.easeOutCubic,
              ),
            ),
          ),
          child: child,
        );
      },
    );
  }
}
実際に利用する際には、GoRouteDataを使っていた部分をBottomGoRouteDataに置き換えるだけで利用できます。
class CounselingRoute extends BottomGoRouteData {
  static final GlobalKey<NavigatorState> $parentNavigatorKey = rootNavigatorKey;
  final int counselingId;

  const CounselingRoute({
    required this.counselingId,
  });

  @override
  Widget build(BuildContext context, GoRouterState state) {
    return CounselingPage(
      counselingId: counselingId,
    );
  }
}
まとめ
go_routerだけでも十分利用できますが、遷移時に必要なパラメータを渡す場合は、慎重になる必要がありました。go_router_builderを使うと、必要なパラメータの型や内容を把握できるので、繊維に失敗することがなくなります。go_routerを使う場合は、ぜひ、go_router_builderを利用してください。
最後に、株式会社MG-DXでは自社のサービスとして、医療機関、薬局向けに薬急便のサービスを提供しています。基本はWebでのサービスですが、Flutterで、iOS/Windows向けのアプリを作っています。開発に興味がある方は、是非お問合せください。
