この記事は↓のアドベントカレンダーの参加記事です。
TRTC Web SDK を使うと、サクッとビデオ通話を行うアプリケーションが作れる、という話を聞いたので、試しにドキュメント (https://web.sdk.qcloud.com/trtc/webrtc/doc/en/index.html) を読んでみてサンプルアプリ (tomoasleep/hello-trtc) を作ってみました。
こういう感じのビデオ通話アプリを作ってみたのですが、バックエンドは基本 Tencent 側がやってくれて、フロントエンドを書くだけで簡単に動かせました ![]() どういう感じで作れるか紹介していこうと思います。
どういう感じで作れるか紹介していこうと思います。
1. Tencent Cloud 上でアプリケーションを設定する
ビデオ通話のバックエンドは Tencent Cloud を用いるのでまずはそれの設定を行います。
↓ からアカウントの作成やログインが行えるので、まずはアカウントを作成します。
https://www.tencentcloud.com/en/account/register?
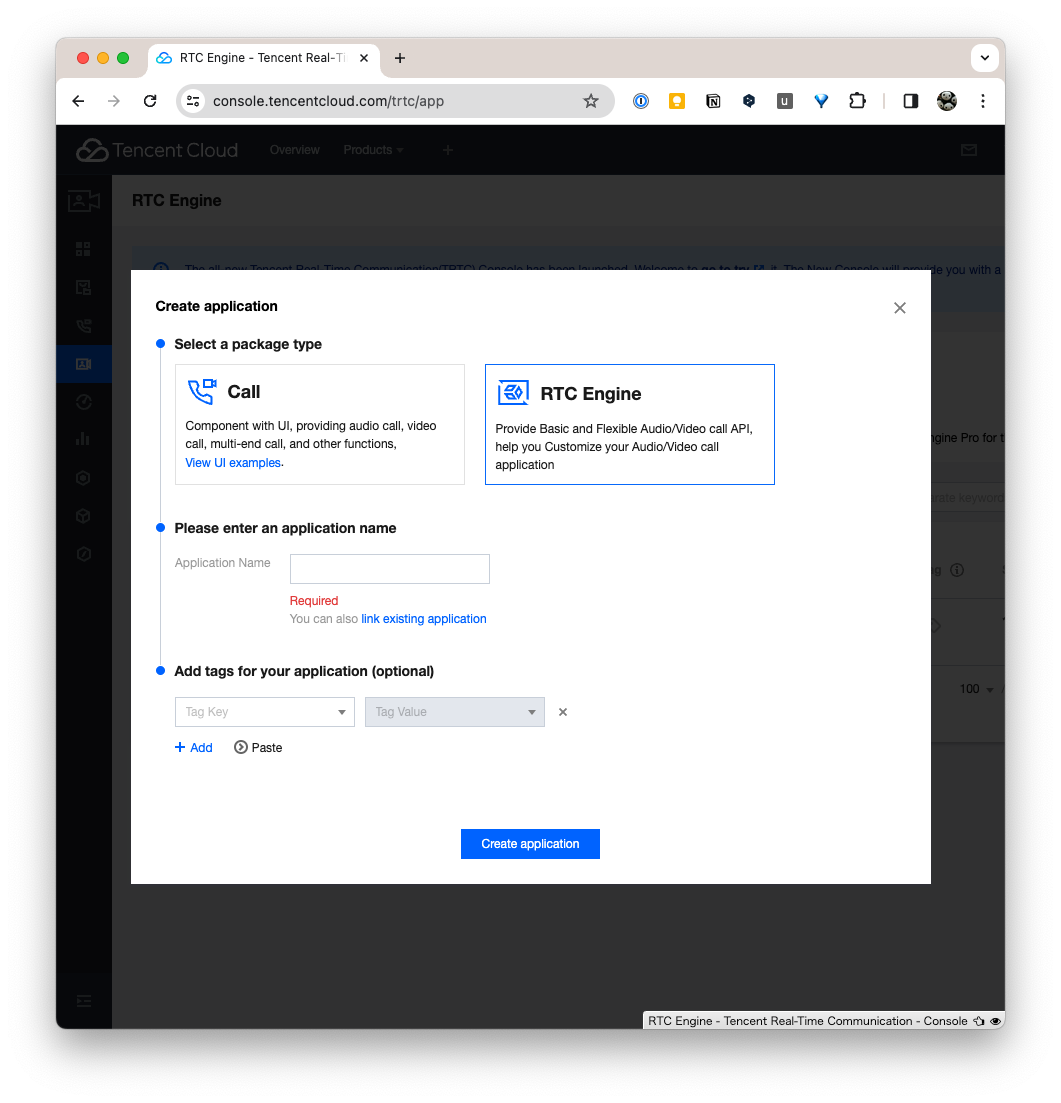
アカウントを作成したら、 https://console.tencentcloud.com/trtc/app からアプリケーションを作成します。
package type は RTC Engine で、 application name は適当でOKです。
作成したら、アプリケーションの内容が表示されるので、 SDKAppID, SecretKey の値を覚えておきます。
Tencent Cloud 上ではこれだけで OK です。
2023/12 時点だと、アカウント作成時から1年間は毎月10000分無料利用できるようです。
Ref: https://www.tencentcloud.com/campaign/freetier
(※ https://console.trtc.io/overview からも設定等が可能です。こっちは RTC 関連に絞られているので分かりやすい)
2. Web フロントエンドの実装を行う
ということで、フロントエンドの実装を行います。公式で (非 React ですが) チュートリアルがあるので、これを参考にしつつ、 Next.js 向けに書いてみます。
今回は create-next-app で作った Next.js 14 アプリケーションをベースに作ります。
今回実装したサンプルコードは、↓にあります。
2-1. ユーザーの signature を計算する Server Action を作る
TRTC アプリケーションに接続するコードは大まかに以下の通りになっています。
TRTC 側では Room とそれに参加している User の管理を行ってくれるので、クライアント側では User として Room に参加する、という形で接続が行えます。
const client = TRTC.createClient({
  mode: "rtc",
  sdkAppId, // アプリケーションの SDKAppID
  userId, // ユーザーID
  userSig, // ユーザーの署名データ
  useStringRoomId: true,
});

await client.join({
  roomId // 部屋 ID
});
User の情報として必要なのが、 id と sig (署名) です。 TRTC 側では全 User の管理や登録は行わないので、 User の認証に sig を利用します。
sig の生成には SecretKey を使うので、別でサーバーを立てて…ということになるのですが、ここでは Server Action を使ってみます。
今回は userId, roomId はユーザーに入力してもらって、それを元に Server Action で userSig を計算します。
"use server";

import { Api } from "tls-sig-api-v2";

// sdkAppId はクライアントに公開してしまって OK
const sdkAppId = Number(process.env.NEXT_PUBLIC_TRTC_SDK_APP_ID);

export async function generateSig(userId: string): Promise<string> {
  // SecretKey は sig の生成に使うので、クライアントへの公開は NG
  const sdkSecretKey = process.env.TRTC_SECRET_KEY;
  if (!sdkSecretKey) {
    throw new Error("secret key is not given");
  }

  const api = new Api(sdkAppId, sdkSecretKey);

  return api.genSig(userId, 86400 /* 1day */);
}
export default function Home() {
  // ...

  return (
    <LoginForm
      onSubmit={async ({ roomId, userId }) => {
        const userSig = await generateSig(userId);
        setUserSession({ userId, userSig });
        setRoomId(roomId);
      }}
    />
  );
2-2. 通話画面を作る
2-1 で作成した usersig と userId, roomId を元に接続と通話を行います。
接続に必要なコードは、チュートリアル (https://web.sdk.qcloud.com/trtc/webrtc/doc/en/tutorial-11-basic-video-call.html) などを参考にすると以下の通りになります。
function connectTRTC({ userId, userSig, roomId, localStreamContainerId, remoteStreamContainerId }) {
  const client = TRTC.createClient({
    mode: "rtc",
    sdkAppId, // アプリケーションの SDKAppID
    userId, // ユーザーID
    userSig, // ユーザーの署名データ
    useStringRoomId: true,
  });

  client.on("stream-added", (event) => {
    const remoteStream = event.stream;
    client.subscribe(remoteStream);
  });

  client.on("stream-subscribed", (event) => {
    const remoteStream = event.stream;
    remoteStream.play(remoteStreamContainerId); // 指定した id の HTML 要素に、他の参加者を表示する
  });

  await client.join({ roomId });

  const localStream = TRTC.createStream({
    userId,
    audio: true,
    video: true,
  });
  await localStream.initialize();
  localStream.play(localStreamContainerId);  // 指定した id の HTML 要素に、自分を表示する
  await client.publish(localStream);
}
これを React 環境で使えるように useEffect などを用いて Hook 化して、 React コンポーネントから接続するようにします。
export function VideoChat({ roomId, userId, userSig }) {
  const remoteStreamContainerId = useId();
  const localStreamContainerId = useId();

  const useTRTC({
    roomId,
    userId,
    userSig,
    localStreamContainerId,
    remoteStreamContainerId,
  });

  return (
    <div className="container mx-auto">
      <div id={localStreamContainerId} />
      <div id={remoteStreamContainerId} />
    </div>
  );
}
2-3. 接続デバイスを変更できるようにする
実際のビデオ通話では、通話に使いたいカメラやマイクを変更したいことがあります。
TRTC Web SDK では、デバイスのリストの取得や、変更も簡単に行うことが可能です。
以下のようなコードで接続デバイスを変更する機能を実装できます
export function Selector({
  localStream,
  kind,
}: {
  localStream: LocalStream | null;
  kind: MediaDeviceKind;
}) {
  const { data: devices } = useAsyncValue(async () => {
    const devices = await TRTC.getDevices(); // デバイス一覧を取得
    return devices.filter((device) => device.kind === kind);
  });

  if (!devices || !localStream) {
    return <div>loading...</div>;
  }

  return (
    <div>
      <select
        onChange={(event) => {
          if (event.target.value) {
            localStream.switchDevice(
              kind === "videoinput" ? "video" : "audio",
              event.target.value
            ); // 通話に使うデバイスを設定
          }
        }}
      >
        {devices.map((device) => {
          return (
            <option key={device.deviceId} value={device.deviceId}>
              {device.label}
            </option>
          );
        })}
      </select>
    </div>
  );
}
という感じで作ったのが以下の画面です。 (アイコンで隠している部分が、実際にはカメラで録画している内容になります。)
2-4. 他にも色々な設定を簡単に行える
他にも色々設定が簡単に行なえます。公式チュートリアルに色々載っているので参考になると思います。
おわりに
今回試しに Tencent RTC Web SDK を触ってみたのですが、ビデオ通話アプリをバックエンド構築がほぼ不要で作れるので、通話機能だったりストリーミング機能を高速でサービスインのに非常に向いているなと感じました。
今回のサンプルアプリは、何も知らない状態から半日ぐらいで作ったのですが、設定もわかりやすく、殆どの時間をフロントエンドの実装に集中することができたので、開発体験としては結構良いんじゃないかと思います。
サンプル実装は↓で作ってみたので、興味がある人はそちらも見てみてください。


