これまた仕事で重量測定と重量に応じた結果表示のニーズが出てきたので、プロトタイプを作ってみました。
1. タッチパネルディスプレイのセットアップ
表示だけならHDMI接続のディスプレイでも無機質なCLIでもいいのですが、使用する対象は自分のようななんちゃってプログラマーではなく素人です。
なのでGUI表示&タッチパネルを用いた簡単な操作ができるようタッチパネルディスプレイを手配します。
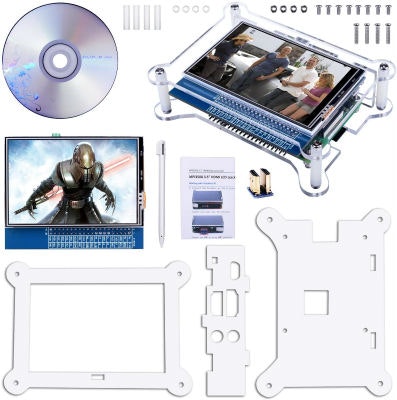
https://www.amazon.co.jp/dp/B075K56C12/
これならGPIOを占有しないので、ロードセル接続に最適ですね!
セットアップ方法は先人の方が分かりやすく紹介していただいているので、リンクを貼っておきます。
neuralassemblyのメモ:Raspberry PiのGPIOが引き出せる小型タッチスクリーンが届いたので電子工作に使ってみた
https://neuralassembly.blogspot.com/2017/12/raspberry-pigpio.html
2. 重量測定用ロードセル・アンプ
raspberrypiで重量測定するにはA/Dコンバータのhx711をロードセルアンプとして用いるのが簡単で一般的みたいです。
(ノイズが多いので予算に余裕があれば仕様はお勧めしないと書いてあるところもありますが…)
今回、ロードセルも欲しかったので下記のMAX5kgのロードセル・hx711に加えて重量測定用テーブル一式がそろったキットを買いました。
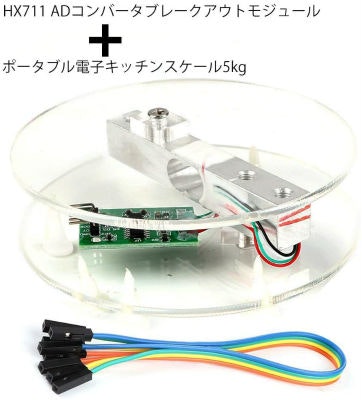
2.1. hx711とraspbberrypiとの接続
hx711のキットに付属のフラットケーブルでraspberrypiと接続します。
| hx711 | raspberypi |
|---|---|
| GND | GND(6pin) |
| DT | GPIO5(29pin) |
| SCK | GPIN6(31pin) |
| VCC | 5V(4pin) |
2.2. hx711のセットアップ
githubからpythonのhx711ライブラリを入手します。
$ git clone https://github.com/tatobari/hx711py
Cloning into 'hx711py'...
remote: Counting objects: 77, done.
remote: Compressing objects: 100% (7/7), done.
remote: Total 77 (delta 3), reused 5 (delta 2), pack-reused 68
Unpacking objects: 100% (77/77), done.
実際に実行してみます。
$ python hx711/example.py
Tare done! Add weight now...
490
458
445
451
459
483
467
486
511
412
^CCleaning... ←ctrl+c で終了
Bye!
正しく接続されているならこのように数値がパラパラと出るはずです。
さて、この数値はロードセルの出力をただ表示しているだけなので、キャリブレーションして重量に相当する数値にしないといけません。
例えば重量が明確な分銅(無ければキッチンスケールなどで重量が分かっているものを錘とする)をロードセルに乗せたとき
Tare done! Add weight now...
458
445
451 ←ココで錘を載せる
4475
13929
212399
212419
212441
212402
212399
212460
212422
212385
212456
212424
212463
212451
212455
212379
212438
212457
212451
212390
^CCleaning...
Bye!
のような結果が得られたとします。
この場合、数値が安定している212399~212390の平均値を実際の重量で割った数値を補正値にします。
錘の重量が200gとすると、212417(平均値)/200g(実際の重量)=1062 が補正値ということです。
補正値は example.py の中の referenceUnit に代入します。
…
# referenceUnit = 1
referenceUnit = 1062
…
ですね。
これで(ノイズや温度などの外乱はともかく)実際の重量を得ることができるようになりました。
3. TkinterでGUI表示
自己満足なら無機質なCLI表示で十分なんですが、素人さん相手に「すごーい!」って言われたいならGUI表示は必要でしょう(笑)
でも実際、GUI表示できるだけでぐーんとプログラムの完成度が違って見え、上司や同僚からのウケは変わってくるはずです。
今回は下記サイトを参考にTkinterでGUI表示してみることにしてみました。
※Tkinterについて語れるほど私に知識はありません。詳しくはググってください。
設備のマニアどっとこむ:ラズパイとTkinterで温度のGUI監視
http://setsubi.no-mania.com/raspberry%20pi/%E3%83%A9%E3%82%BA%E3%83%91%E3%82%A4%E3%81%A8tkinter%E3%81%A7%E6%B8%A9%E5%BA%A6%E3%81%AEgui%E7%9B%A3%E8%A6%96
コードの全文は以下の通りです。
分かりやすいように重量と100円玉を載せた数に応じた表示を行うようにしています。
冗長ですがexample.pyから追記・修正される方のためにコメントアウトした部分はそのまま残しておきます。
※日本語をUTF-8で表示するので、sudo raspi-configで文字コードをja_JP.UTF-8 UTF-8にしておかないと表示が文字化けします。
# ! /usr/bin/python3
# -*- coding: utf-8 -*-

import time
import sys
import math
import tkinter as tk

EMULATE_HX711=False

# referenceUnit = 1
referenceUnit = 1062

if not EMULATE_HX711:
    import RPi.GPIO as GPIO
    from hx711 import HX711
else:
    from emulated_hx711 import HX711

def cleanAndExit():
    print("Cleaning...")

    if not EMULATE_HX711:
        GPIO.cleanup()

    print("Bye!")
    root.destroy()
    root.quit()
    sys.exit()

hx = HX711(5, 6)

# I've found out that, for some reason, the order of the bytes is not always the same between versions of python, numpy and the hx711 itself.
# Still need to figure out why does it change.
# If you're experiencing super random values, change these values to MSB or LSB until to get more stable values.
# There is some code below to debug and log the order of the bits and the bytes.
# The first parameter is the order in which the bytes are used to build the "long" value.
# The second paramter is the order of the bits inside each byte.
# According to the HX711 Datasheet, the second parameter is MSB so you shouldn't need to modify it.
hx.set_reading_format("MSB", "MSB")

# HOW TO CALCULATE THE REFFERENCE UNIT
# To set the reference unit to 1. Put 1kg on your sensor or anything you have and know exactly how much it weights.
# In this case, 92 is 1 gram because, with 1 as a reference unit I got numbers near 0 without any weight
# and I got numbers around 184000 when I added 2kg. So, according to the rule of thirds:
# If 2000 grams is 184000 then 1000 grams is 184000 / 2000 = 92.
# hx.set_reference_unit(113)
hx.set_reference_unit(referenceUnit)

hx.reset()

hx.tare()

print("Tare done! Add weight now...")

# to use both channels, you'll need to tare them both
# hx.tare_A()
# hx.tare_B()

# while True:
#    try:
        # These three lines are usefull to debug wether to use MSB or LSB in the reading formats
        # for the first parameter of "hx.set_reading_format("LSB", "MSB")".
        # Comment the two lines "val = hx.get_weight(5)" and "print val" and uncomment these three lines to see what it prints.

        # np_arr8_string = hx.get_np_arr8_string()
        # binary_string = hx.get_binary_string()
        # print binary_string + " " + np_arr8_string

        # Prints the weight. Comment if you're debbuging the MSB and LSB issue
#        val = hx.get_weight(5)
#        print(val)


        # To get weight from both channels (if you have load cells hooked up
        # to both channel A and B), do something like this
        #val_A = hx.get_weight_A(5)
        #val_B = hx.get_weight_B(5)
        #print "A: %s  B: %s" % ( val_A, val_B )

#        hx.power_down()
#        hx.power_up()
#        time.sleep(0.1)

#    except (KeyboardInterrupt, SystemExit):
#        cleanAndExit()

def zero():
    hx.reset()
    hx.tare()

root = tk.Tk()
root.geometry("800x500")
root.title(u"重量計")

sbtn = tk.Button(root, text='終了',font = ('', 50), command=cleanAndExit)
sbtn.pack(side = 'bottom')

zbtn = tk.Button(root, text='ゼロリセット',font = ('', 30), command=zero)
zbtn.pack(side = 'bottom')

title = tk.Label(text='重量[g]',font = ('', 70))
title.pack()

while True:
    val = hx.get_weight(5)
    print(val)
    weight = tk.Label(text='{:.1f}'.format(val),font = ('', 70))
    weight.pack()

    txit = tk.Label(text='',font = ('', 70))
    if val >= 3.8 and val <= 5.8:
        txit = tk.Label(text='100円玉1枚',font = ('', 70))
    elif val >= 8.1 and val <= 11.0:
        txit = tk.Label(text='100円玉2枚',font = ('', 70))
    elif  val >= 12.6 and val <= 16.1:
        txit = tk.Label(text='100円玉3枚',font = ('', 70))
    elif  val >= 17.2 and val <= 21.2:
        txit = tk.Label(text='100円玉4枚',font = ('', 70))
    elif  val >= 21.7 and val <= 26.2:
        txit = tk.Label(text='100円玉5枚',font = ('', 70))

    txit.pack()

    weight.update()
    txit.update()
    weight.forget()
    txit.forget()
    hx.power_down()
    hx.power_up()
    time.sleep(0.5)

root.mainloop()
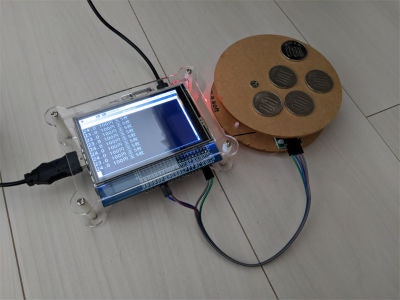
ゼロリセットのボタンで0gリセット、終了ボタンでプログラムを終了するようにしました。
実際に動作させた結果が以下です。
あとはautostartで自動起動するなどすればより本物の計測器っぽくてかっこいいですね!
お疲れ様でした。