1. はじめに
AITRIOS LocalEditionでは推論結果をLocal Consoleでtxtファイルに出力する機能があります。
ただ、この推論結果ファイルはファイル保存時にはAIH-IVRW2などから送信されたメタデータをそのまま保存しているので、そのままでは推論結果を他のアプリケーションで使用することができません。
そこで、Local Edition v1.4.0.aのセットアップファイルに含まれるLocal_Edition_get_started_for_AIH-IVRW2_ja_v1.4.0_00.pdfにて Appendix B: 推論結果ファイルのデシリアライズ として紹介されている内容を環境構築方法からまとめてみました。
なお、より技術的な内容は https://qiita.com/SSS-izumuhosoi/items/a90e2ab84fe6b613be79 で紹介されています。
2. FlatBuffers(flatcコマンド)のインストール
推論結果ファイルをデシリアライズするには、推論結果メタデータ用のPythonコードの生成する必要があります。
ここでは例として物体検出の推論結果をJSON化するとします。
objectdetection.fbsはLocal Editionのセットアップファイルを解凍したLocal_Edition_V1.4.0.a\EdgeAppの中にありますので、このコマンドを実行する場所にあらかじめコピーしておいてください。
※分類の推論結果をJSON化する場合は、classification.fbsに読み替えてください。
Local Edition v1.4.0.a
├── Brain Builder/
│
├── EdgeApp/
|   ├── classification.fbs                                <-Classifier:分類用
|   ├── ClassifierPPLParameterSample.json
|   ├── DetectorPPLParameterSample_after_v24.09.json
|   ├── objectdetection.fbs                               <-Detector:物体検出用
|   ├── vision_app_classification_v1.1.2_signed.aot
|   └── vision_app_objectdetection_v1.1.2_bb24.09.7.aot
│
├── EdgeDeviceFW /
└── Local Console /
ここでは仮にDeserializing_detectionのディレクトリ内で実行するものとします。
まずはflatbuffersをインストールしましょう。
【2025.2.16追記】
windowsでもflatcコマンドが使えることが分かったので追記します。
2-1. Windowsの場合
windowsの場合は https://github.com/google/flatbuffers/releases からビルド済みの Windows.flatc.binary.zip をダウンロードし、解凍したフォルダ内のflatc.exeを利用してJSON化に必要なPythonファイルを作成します。
flatc.exeをDeserializing_detectionフォルダの中、つまりobjectdetection.fbsと同じ階層にコピーして、下記のコマンドを実行してください。
Powershellでは正常に実行できなかったので、コマンドプロンプト(cmd.exe)で実行してください
flatc -p objectdetection.fbs
無事実行できると、このようにSmartCameraのディレクトリができます。
Deserializing_detection /
├── flatc.exe
├── objectdetection.fbs
│
└─ SmartCamera /
   ├── __init__.py
   ├── BoundingBox.py
   ├── BoundingBox2d.py
   ├── GeneralObject.py
   ├── ObjectDetectionData.py
   └── ObjectDetectionTop.py
2-2. Linux環境の場合(WSL環境のUbuntu20.04で動作確認済み)
インストール手順は
を参考にしています。
まずはLinux環境で下記のコマンドを実行します。
実行してしばらくするとインストールが完了し、バージョンが表示されます。
$ sudo snap install flatbuffers
flatbuffers v2.0.0 from Wouter van Oortmerssen (aardappel) installed
念のため、flatbuffersの情報を表示させて正しくインストールできたか確認してみます。
$ snap info flatbuffers
name:      flatbuffers
summary:   FlatBuffers compiler
publisher: Wouter van Oortmerssen (aardappel)
store-url: https://snapcraft.io/flatbuffers
license:   unset
description: |
  FlatBuffers compiler

  NOTE: This snap also ships the necessary header files required to compile
  projects using flatbuffers, however, for the compilation to work, you have
  to manually add the following path in your project's configuration:

  /snap/flatbuffers/current/include

  If you need to use flatbuffers headers from a location other than the above
  path, it is recommended to not use this snap as that could cause a mismatch.
commands:
  - flatbuffers.flatc
snap-id:      Z71fPDiExOysj6Q1UVLP8DkDjZZ7kQ9b
tracking:     latest/stable
refresh-date: today at 15:18 JST
channels:
  latest/stable:    v2.0.0   2021-06-11 (1575) 1MB -
  latest/candidate: ↑
  latest/beta:      ↑
  latest/edge:      v25.2.10 2025-02-11 (2551) 1MB -
installed:          v2.0.0              (1575) 1MB -
問題ないようなので、下記のコマンドを実行してJSON化に必要なPythonファイルを作成します。
flatc -p objectdetection.fbs
無事実行できると、このようにSmartCameraのディレクトリができます。
Deserializing_detection /
├── objectdetection.fbs
│
└─ SmartCamera /
   ├── __init__.py
   ├── BoundingBox.py
   ├── BoundingBox2d.py
   ├── GeneralObject.py
   ├── ObjectDetectionData.py
   └── ObjectDetectionTop.py
3. 推論結果デシリアライズ環境の構築
2-1. ないし2-2. で扱った、Deserializing_detectionディレクトリを丸ごとLocal Consoleで作られる画像と推論結果メタデータの保存先のフォルダと同じ場所にコピーしてしまいます。
OneDriveであればOneDrive\ドキュメント\local-console\1883になります。
また、flatbuffersはこれから実行するPythonスクリプトでも必要になるので、githubのリポジトリから必要なファイルを入手しコピーします。
必要なファイルをツリー構造で示すとこのようになります。
local-console / 1883
                │
                ├── Deserializing_detection /
                │   ├── Detection_json.py
                |   |   ↑ 次章で説明
                │   ├── objectdetection.fbs
                │   │
                │   ├─ SmartCamera /
                │   │  ├── __init__.py
                │   │  ├── BoundingBox.py
                │   │  ├── BoundingBox2d.py
                │   │  ├── GeneralObject.py
                │   │  ├── ObjectDetectionData.py
                │   │  └── ObjectDetectionTop.py
                │   │
                │   └─ flatbuffers /
                │    ↑ https://github.com/google/flatbuffers/tree/master/python/flatbuffers以下を丸ごとコピーする
                │
                ├── images /
                │
                └── inferences /
                    └ 20250209055824064.txt
4. 推論結果をデシリアライズするPythonコードの作成・実行
推論結果をデシリアライズするPythonコードの内容は下記のとおりです。
objectdetection.fbsと同じ階層に保存します。
import os
import sys
import base64
import json
sys.path.append(os.path.dirname(os.path.dirname(os.path.dirname(os.path.dirname(os.path.abspath(__file__))))))
from SmartCamera import ObjectDetectionTop
from SmartCamera import BoundingBox
from SmartCamera import BoundingBox2d

if __name__ == '__main__':

    inference_dir = '../Inferences'
    # Process all inference result files in the inference_dir
    for inf_file in os.listdir(inference_dir) :
        inf_path = './{0}/{1}'.format(inference_dir,inf_file)
        # Read one file in the folder.
        with open(inf_path, 'r', encoding='utf-8') as json_file:
            buf = json.load(json_file)
        # Base64 decode the string in the file.
        if 'O' in buf['Inferences'][0]:
            buf_decode = base64.b64decode(buf['Inferences'][0]['O'])
        else:
            with open('decoded_result_ObjectDetection.json', 'w', encoding='utf-8') as file:
                json.dump(buf, file, ensure_ascii=False, indent=4)
    # Deserialize the Base64-decoded string.
    ppl_out = ObjectDetectionTop.ObjectDetectionTop.GetRootAsObjectDetectionTop(buf_decode, 0)
    obj_data = ppl_out.Perception()
    res_num = obj_data.ObjectDetectionListLength()
    # Store the deserialized data in json format.
    buf['Inferences'][0].pop('O')
    for i in range(res_num):
        obj_list = obj_data.ObjectDetectionList(i)
        union_type = obj_list.BoundingBoxType()
        if union_type == BoundingBox.BoundingBox.BoundingBox2d:
            bbox_2d = BoundingBox2d.BoundingBox2d()
            bbox_2d.Init(obj_list.BoundingBox().Bytes, obj_list.BoundingBox().Pos)
            buf['Inferences'][0][str(i + 1)] = {}
            buf['Inferences'][0][str(i + 1)]['C'] = obj_list.ClassId()
            buf['Inferences'][0][str(i + 1)]['P'] = obj_list.Score()
            buf['Inferences'][0][str(i + 1)]['X'] = bbox_2d.Left()
            buf['Inferences'][0][str(i + 1)]['Y'] = bbox_2d.Top()
            buf['Inferences'][0][str(i + 1)]['x'] = bbox_2d.Right()
            buf['Inferences'][0][str(i + 1)]['y'] = bbox_2d.Bottom()
    # Output a json file.
    with open('./{0}/decoded_{1}'.format(inference_dir,inf_file), 'w', encoding='utf-8') as file:
        json.dump(buf, file, ensure_ascii=False, indent=4)
このPythonスクリプトを
python .\Detection_json.py
で実行します。
実行すると、推論結果のメタデータを保存しているinferencesフォルダの中のファイルが自動的にJSON形式に変換されます。
変換前
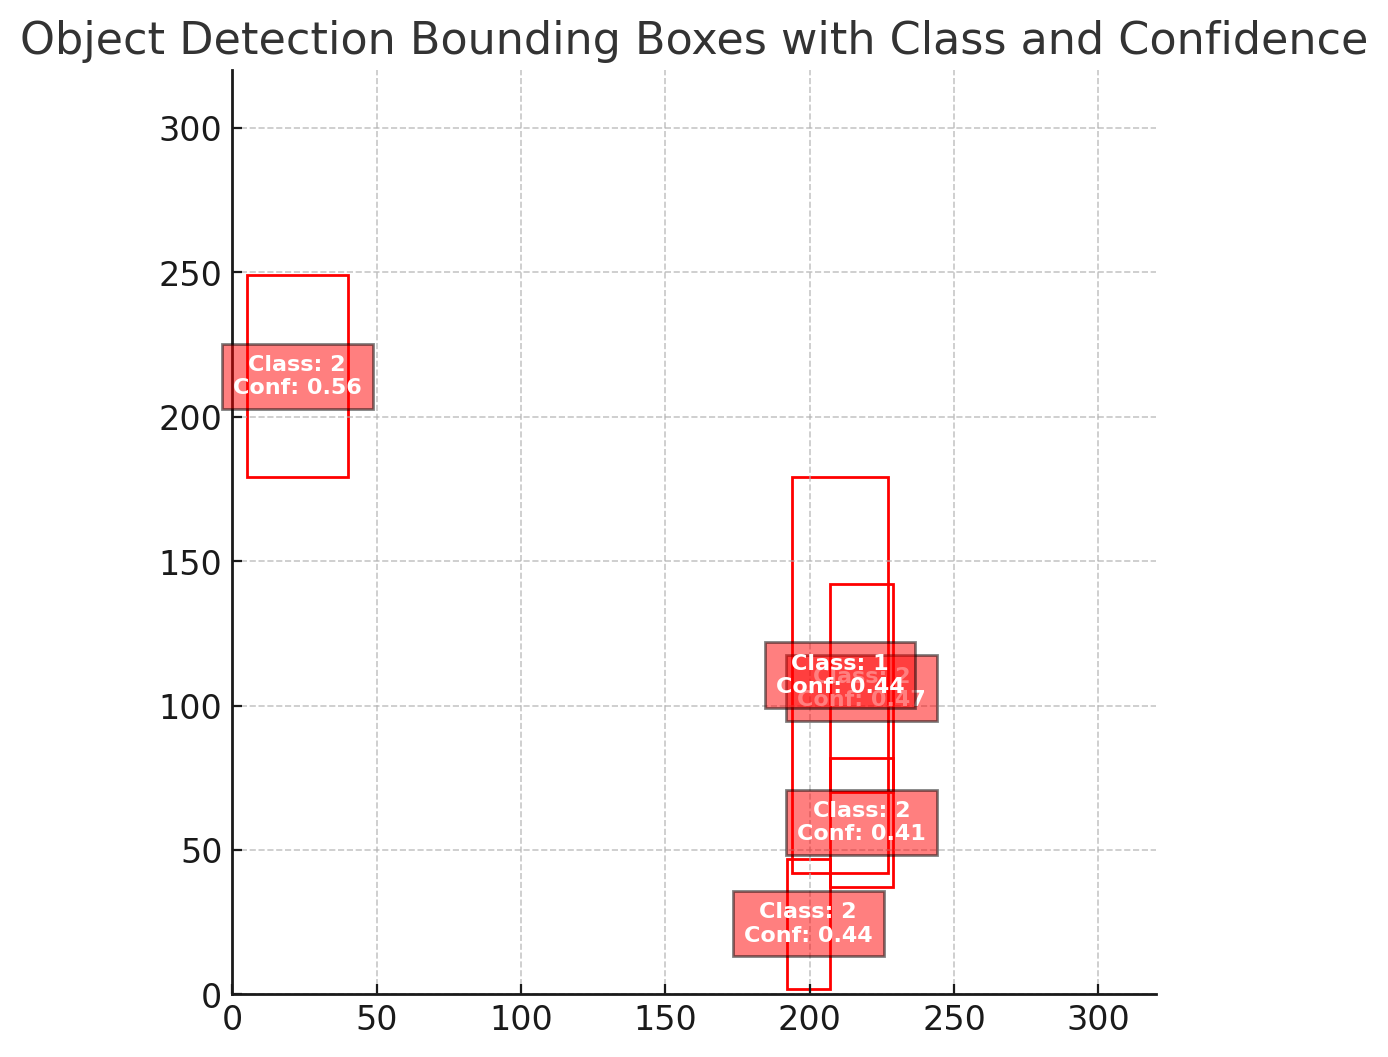
{"DeviceID":"Aid-12345678-1234-1234-1234-123456789012","ModelID":"1234567890123456","Image":true,"Inferences":[{"T":"20250209055824064","O":"DAAAAAAABgAKAAQABgAAAAwAAAAAAAYACAAEAAYAAAAEAAAABQAAAMAAAACIAAAAXAAAADAAAAAEAAAAYP///wAAAAECAAAACAAAAAAA0D5U////zwAAACUAAADlAAAAUgAAAIj///8AAAABAgAAAAgAAAAAAOA+fP///8AAAAACAAAAzwAAAC8AAACw////AAAAAQEAAAAIAAAAAADgPqT////CAAAAKgAAAOMAAACzAAAA2P///wAAAAECAAAACAAAAAAA8D7M////zwAAAEYAAADlAAAAjgAAAAwAFAAIAAcADAAQAAwAAAAAAAABAgAAABQAAAAAABA/DAAUAAQACAAMABAADAAAAAUAAACzAAAAKAAAAPkAAAA="}]}
変換後
{
    "DeviceID": "Aid-12345678-1234-1234-1234-123456789012",
    "ModelID": "1234567890123456",
    "Image": true,
    "Inferences": [
        {
            "T": "20250209055824064",
            "1": {
                "C": 2,
                "P": 0.5625,
                "X": 5,
                "Y": 179,
                "x": 40,
                "y": 249
            },
            "2": {
                "C": 2,
                "P": 0.46875,
                "X": 207,
                "Y": 70,
                "x": 229,
                "y": 142
            },
            "3": {
                "C": 1,
                "P": 0.4375,
                "X": 194,
                "Y": 42,
                "x": 227,
                "y": 179
            },
            "4": {
                "C": 2,
                "P": 0.4375,
                "X": 192,
                "Y": 2,
                "x": 207,
                "y": 47
            },
            "5": {
                "C": 2,
                "P": 0.40625,
                "X": 207,
                "Y": 37,
                "x": 229,
                "y": 82
            }
        }
    ]
}
これを実際に図として表現すると、おそらくこのような形になるはずです。(ChatGPTに描いてもらいました)
5. さいごに
目標としてはLocal Consoleなしに単体のアプリケーションでAITRIOSのエッジカメラの検出結果のメタデータを扱えるようにしたいのですが、まだその方法が分かっていないので前段階として推論結果をJSON化する方法をまとめてみました。