はじめに
FFmpegを使ってマルチメディアプログラミングをする方法を記載します。
OSはWindowsを使います。
FFmpegとは
from Wikipedia
FFmpeg is a free software project that produces libraries and programs for handling multimedia data.
from Official site
A complete, cross-platform solution to record, convert and stream audio and video.
上記から特徴は以下であることが分かります。
- **multimediaを扱う。**audio/video record, convert, streaming
- free software
- cross-platform
FFmpegは次のライブラリを含みます。
libavcodec(decode/encode)
libavformat(demux/mux)
libswresample(audio format change)
動作ソフトバージョン
- FFmpeg
Zeranoe's FFmpeg Builds Home Page: <http://ffmpeg.zeranoe.com/builds/>
FFmpeg version: 20160812-e8b355a base on FFmpeg3.0.1
- Visual Studio / Visual C++
Microsoft Visual Studio Community 2015
Version 14.0.25425.01 Update 3
Microsoft .NET Framework
Version 4.6.01038

Visual C++ 2015   00322-20000-00000-AA216
Microsoft Visual C++ 2015
セットアップ
Visual Studio
-
Microsoft Visual Studio Community 2015をインストールします。
-
Visual C++をインストールします。
Visual Studio 2015 では、既定で Visual C++ がインストールされません。 インストール時に、
[カスタム] インストールを選択してから、必要な C++ コンポーネントを選択します。 または、
Visual Studio が既にインストールされている状態で、[ファイル |新規作成 |プロジェクト
|C++] を選択すると、必要なコンポーネントをインストールするように求められます。
Windows用FFmpeg
http://ffmpeg.zeranoe.com/builds/ にアクセスします。
dev/share両方をダウンロードします。
- Visual C++ Win32コンソールアプリケーションを作成します。
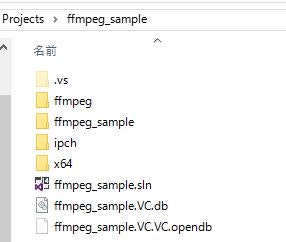
ffmpeg_sampleという名前のソリューションを作成します。
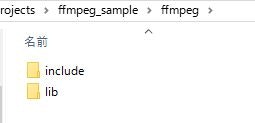
プロジェクトフォルダ内にffmpegフォルダを作成します。次のようなフォルダ構成になります。
作成したffmpeg以下にffmpeg/include、ffmpeg/libの2フォルダを作成します。
各フォルダに次の通り、ダウンロードしたFFmpegの内容をコピーします。
ffmpeg/include <- copy <- FFmpeg/win64-dev/include
ffmpeg/lib <- copy <- FFmpeg/win64-dev/lib and FFmpeg/win64-shared/bin
- include / lib パス設定
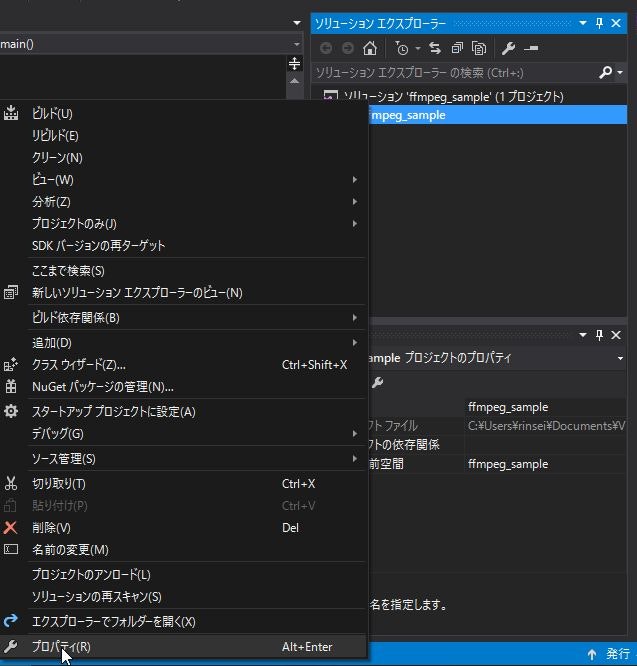
ソリューションエクスプローラでffmpegプロジェクトを選択して右クリックします。
プロパティを選択します。

プラットフォームを"すべてのプラットフォーム"にします。
[構成プロパティ]-[C/C++]-[全般]を選択します。

[追加のインクルードディレクトリ]に以下を入力します。
$(SolutionDir)\ffmpeg\include;%(AdditionalIncludeDirectories)
[追加の#usingディレクトリ]に以下を入力します。
$(SolutionDir)\ffmpeg\lib
[構成プロパティ]-[リンカー]-[全般]を選択します。
[追加のライブラリディレクトリ]に以下を入力します。
$(SolutionDir)\ffmpeg\lib;%(AdditionalLibraryDirectories)
[構成プロパティ]-[デバッグ]を選択します。
コマンドに以下を入力します。
$(TargetPath)
[構成プロパティ]-[リンカー]-[入力]を選択します。
[追加の依存ファイル]に以下を入力します。
avcodec.lib
avdevice.lib
avfilter.lib
avformat.lib
avutil.lib
postproc.lib
swresample.lib
swscale.lib
[構成プロパティ]-[ビルドイベント]-[リンク前のイベント]を選択します。
コマンドラインに以下を入力します。
copy "$(SolutionDir)ffmpeg\lib\avcodec-57.dll" "$(TargetDir)"
copy "$(SolutionDir)ffmpeg\lib\avdevice-57.dll" "$(TargetDir)"
copy "$(SolutionDir)ffmpeg\lib\avfilter-6.dll" "$(TargetDir)"
copy "$(SolutionDir)ffmpeg\lib\avformat-57.dll" "$(TargetDir)"
copy "$(SolutionDir)ffmpeg\lib\avutil-55.dll" "$(TargetDir)"
copy "$(SolutionDir)ffmpeg\lib\postproc-54.dll" "$(TargetDir)"
copy "$(SolutionDir)ffmpeg\lib\swresample-2.dll" "$(TargetDir)"
copy "$(SolutionDir)ffmpeg\lib\swscale-4.dll" "$(TargetDir)"
コンテナからVideo ESを取り出してデコードする。
環境設定が成功しているかどうかをチェックします。
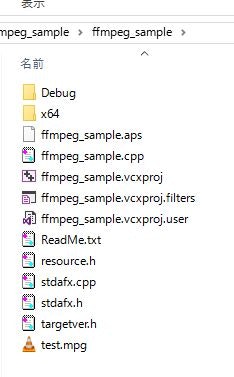
- test.mpgというファイル名のTSファイルをffmpeg_sample/ffmpeg_sample以下に作成します。
- 以下をffmpeg_sample.cppに入力します。
- プラットフォームをx64にします。
- コンパイルして実行できればビルド環境構築に成功しています。
# include "stdafx.h"
extern "C" {
# include <libavcodec/avcodec.h>
# include <libavformat/avformat.h>
}

int main()
{
	av_register_all();

	const char *filename = "test.mpg";
	AVFormatContext *format_context = NULL;
	int ret = -1;
	ret = avformat_open_input(&format_context, filename, NULL, NULL);
	if (ret < 0) {
		printf("cannot open file. filename=%s, ret=%08x\n", filename, AVERROR(ret));
		return -1;
	}

	ret = avformat_find_stream_info(format_context, NULL);
	if (ret < 0) {
		printf("avformat_find_stream_info error. ret=%08x\n", AVERROR(ret));
		return -1;
	}

	AVStream *video_stream = NULL;
	for (unsigned int i = 0; i < format_context->nb_streams; i++) {
		if (format_context->streams[i]->codecpar->codec_type == AVMediaType::AVMEDIA_TYPE_VIDEO) {
			// found Video stream
			video_stream = format_context->streams[i];
			break;
		}
	}
	if (video_stream == NULL) {
		printf("video_stream not found\n");
		return -1;
	}

	AVCodec *video_codec = avcodec_find_decoder(video_stream->codecpar->codec_id);
	if (video_codec == NULL) {
		printf("avcodec_find_decoder codec not found. codec_id=%d\n", video_stream->codecpar->codec_id);
		return -1;
	}

	AVCodecContext *video_codec_context = avcodec_alloc_context3(video_codec);
	if (video_codec_context == NULL) {
		printf("avcodec_alloc_context3 error.\n");
		return -1;
	}

	ret = avcodec_open2(video_codec_context, video_codec, NULL);
	if (ret < 0) {
		printf("avcodec_open2 error. ret=%08x\n", AVERROR(ret));
		return -1;
	}

	AVFrame *frame = av_frame_alloc();
	AVPacket packet;
	int frame_number = 0;
	while (1) {
		// read ES
		if ((ret = av_read_frame(format_context, &packet)) < 0) {
			printf("av_read_frame eof or error. ret=%08x\n", AVERROR(ret));
			break; // eof or error
		}
		if (packet.stream_index == video_stream->index) {
			// decode Video ES
			if ((ret = avcodec_send_packet(video_codec_context, &packet)) < 0) {
				printf("avcodec_send_packet error. ret=%08x\n", AVERROR(ret));
			}
			if ((ret = avcodec_receive_frame(video_codec_context, frame)) < 0) {
				if (ret != AVERROR(EAGAIN)) {
					printf("avcodec_receive_frame error. ret=%08x\n", AVERROR(ret));
					break;
				}
			}
			else {
				printf("decode finished. frame_number=%d\n", ++frame_number);
			}
		}
		else {
			// does not Video ES.
		}
		av_packet_unref(&packet);
	}

	getchar(); // wait user input

	return 0;
}


