はじめに
この記事は、現在(2023年8月4日時点)パブリックプレビュー中のCognitive Searchのベクトル検索機能について、ベクトルDBの構築手順を解説する記事です。公式ドキュメントにはクイックスタート記事も公開されており、こちらのブログで日本語で丁寧に解説してくれています。
公式ドキュメントのクイックスタートを読んでいると、下記の課題に遭遇します。
- PDFなどのドキュメントはどのように扱えばいいか?
- チャンク分割やベクトル生成は具体的にどのように行えばよいか?
- 言語アナライザーを日本にするにはどこを変えればよいか?
- インデックスを自動更新するにはどうすれば良いか?
このような課題に対して、Azure公式のGitHubリポジトリにあるcognitive-search-vector-prにあるインデックス作成ツール(azure-search-vector-ingestion-python-sample.ipynb)を実行することで、簡単にベクトルDBを構築することが可能です。
こちらのインデックス作成ツールの簡単な仕様です。
- 対象ドキュメント形式
- 〇:TXT, PDF
- △:html -> ところどころ/n/tが含まれていて検索のノイズになる/上手くベクトル化できていない
- ×:PPTX, DOCX, XLSX -> 生インデックスは作成できるが、チャンク分割されたインデックスは上手く生成されない。コードを改造すればできるかもしれない
- データソース:Blob Storage(Data Lake Storage Gen2)
- チャンク分割対応
- ベクトル埋め込み対応
- インデクサーによるインデックスの定期更新
こちらコードをそのまま使うとインデックスの言語アナライザーが英語になるので、こちらのレポジトリをフォークして日本語修正を加えたレポジトリを公開しました。
現在Cognitive SearchのPythonSDKはリリース前のプレビュー版であるため、破壊的変更が入っています。
公開当初[8/4]はazure-search-documents==11.4.0a20230509004で記事を書きましたが、こちらのバージョンがpip installできないとのお問合せがあり、8/9にazure-search-documents==11.4.0b6のバージョンで動作確認をし、Gitレポジトリと記事を更新しました。
インデックス作成ツールの全体の流れ
ツールを実行する上での簡易アーキテクチャは下記のとおりです。
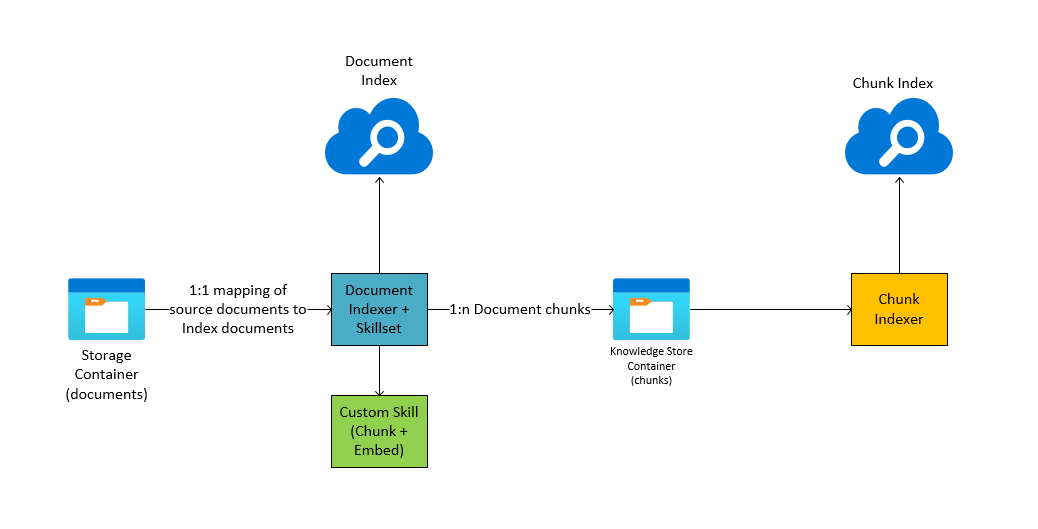
インデックス作成ツール(azure-search-vector-ingestion-python-sample.ipynb)の処理の流れは下記の通りです。
- 必要なライブラリをインストール
- 同じ名前のインデックスが作成されていれば削除
- Blob Storageにコンテナを作成し、ドキュメントをアップロード
- ドキュメントのインデックスを作成
- インデックスを作成(チャンク分割前のインデックス)
- スキルセットを作成(チャンク分割・ベクトル生成のカスタムスキル定義)
- データソースを作成
- インデクサーを作成・実行(インデックスを作成し、ナレッジストアにスキル適応後のデータを保存)
- チャンク分割・ベクトル生成後のインデックス作成
- インデックスを作成(ベクトル検索のアルゴリズムもココで指定)
- データソースを作成(ナレッジストアのコンテナを指定)
- インデクサーを作成・実行
- [定期実行]インデクサーのスケジュール実行でインデックスを更新
(※インデックス作成ツールの手動実行は初回のみでOK)
事前準備
利用するAzureのサービスは下記の通りです。
- Azure OpenAI (Embedding用途)
- Azure Blob Storage (Data Lake Storage Gen2)
- Azure Cognitive Search
- Azure Functions (Custom Skill用途)
Azure OpenAIのリソース作成
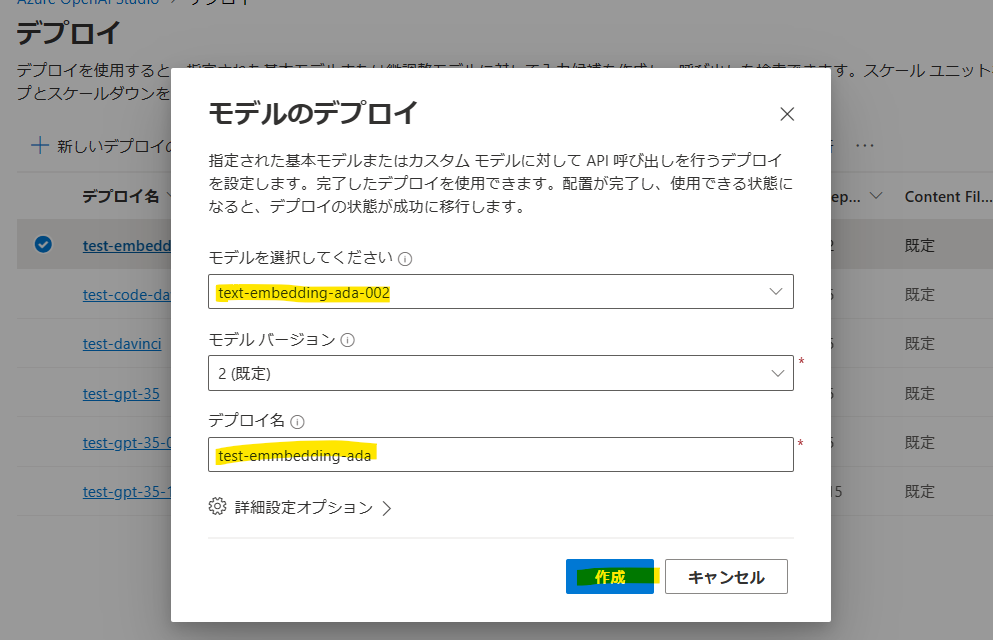
ベクトル生成のためにOpenAIのEmmbeddingモデルをデプロイします。Azure Portalの検索窓から「openai」で検索します。
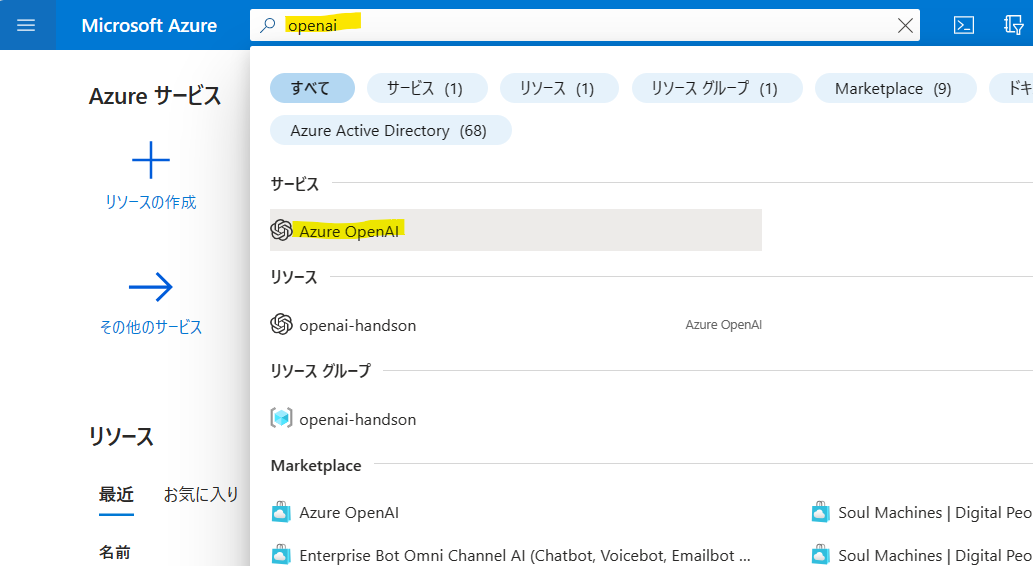
OpenAIのリソースがない場合は作成しましょう。
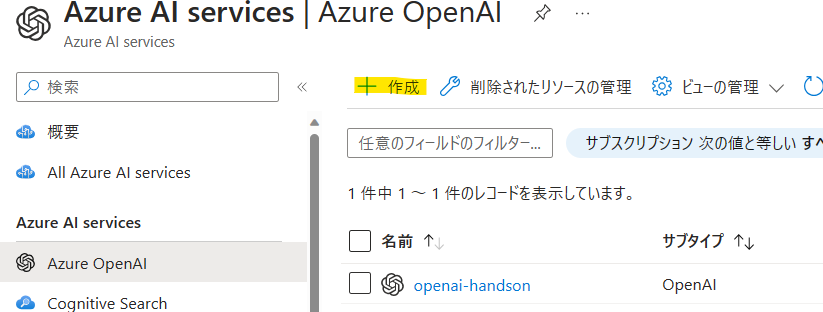
リソースができたらAzure OpenAI Studioへ移動します。
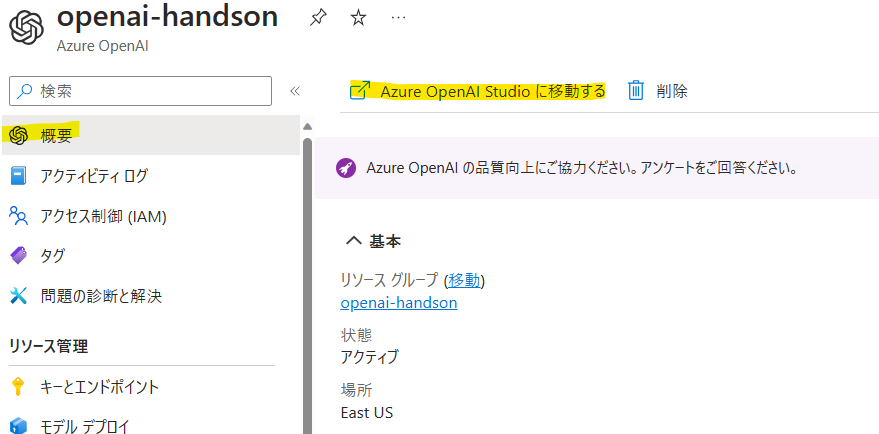
[デプロイ]->[新しいデプロイの作成]をクリック。
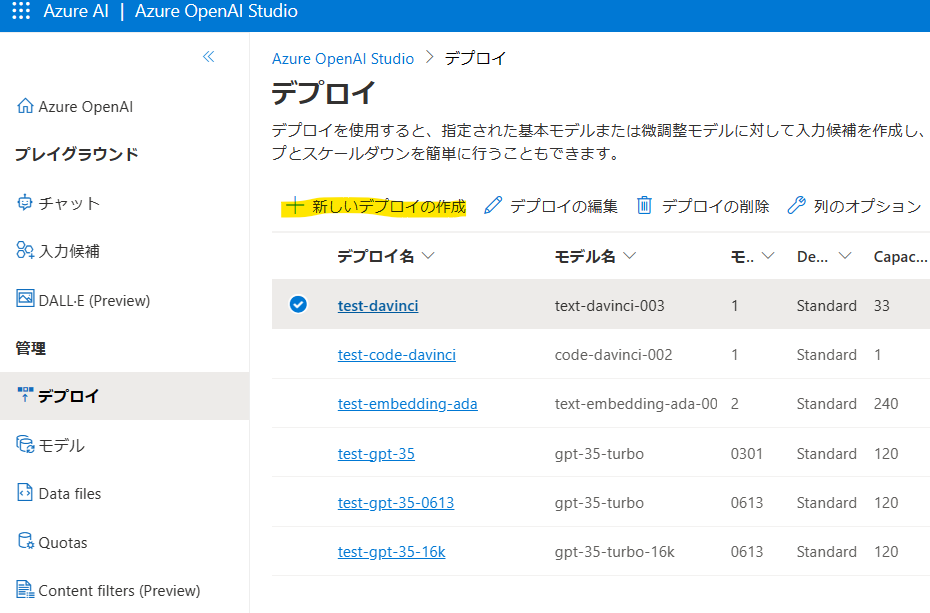
text-embedding-ada-002のモデルをデプロイしましょう。
Blob Storageのリソース作成
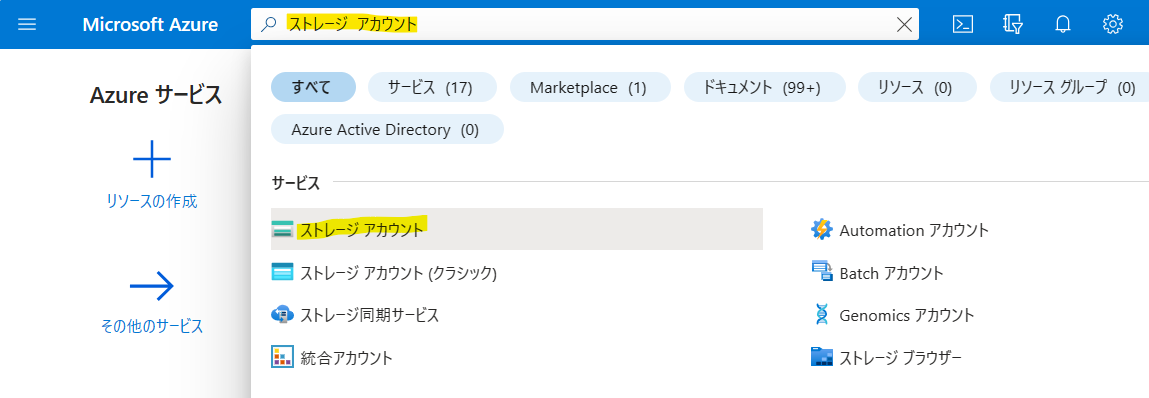
次にBlob Storageを作成します。Azure Portalの検索窓から「ストレージ アカウント」で検索し、クリックします。
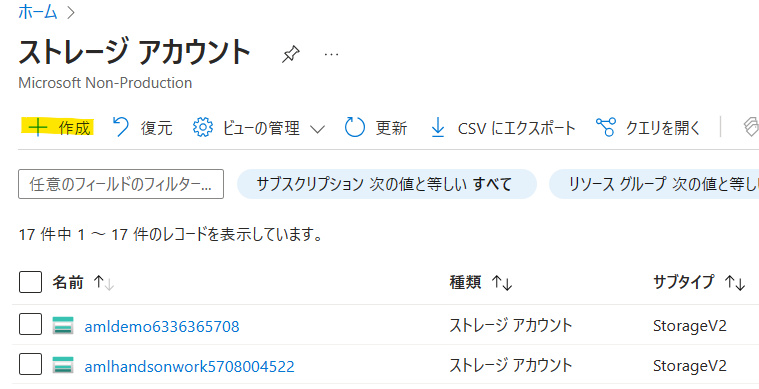
[作成]をクリックします。
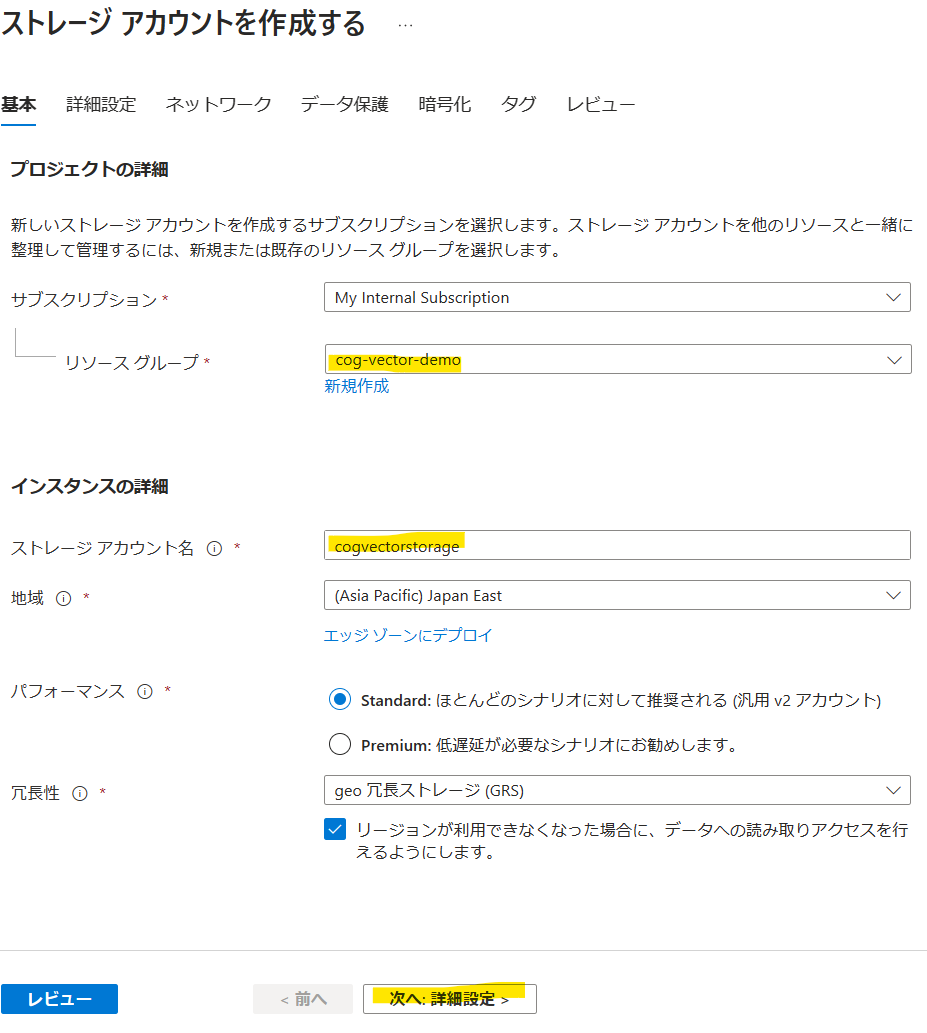
リソースグループとアカウント名を入力し、[次へ:詳細設定]をクリックします。
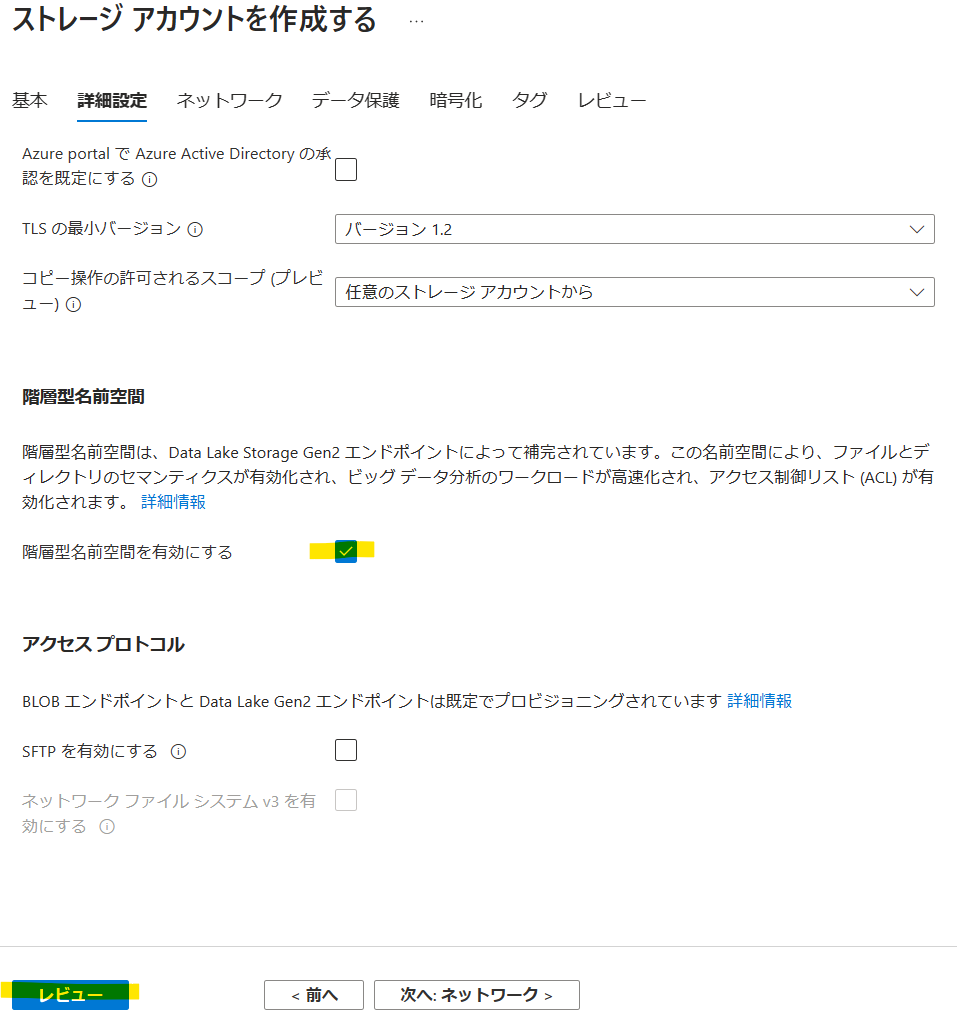
[階層型名前空間を有効にする]にチェックを入れてAzure Data Leke Storage Gen2に変更し、[レビュー]をクリック、リソースを作成します。
Cognitive Searchのリソース作成
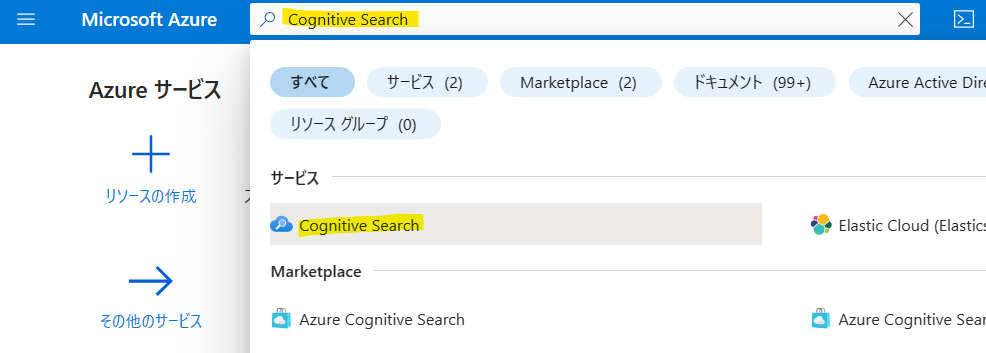
Azue Portalの検索窓から「Cognitive Search」で検索します。
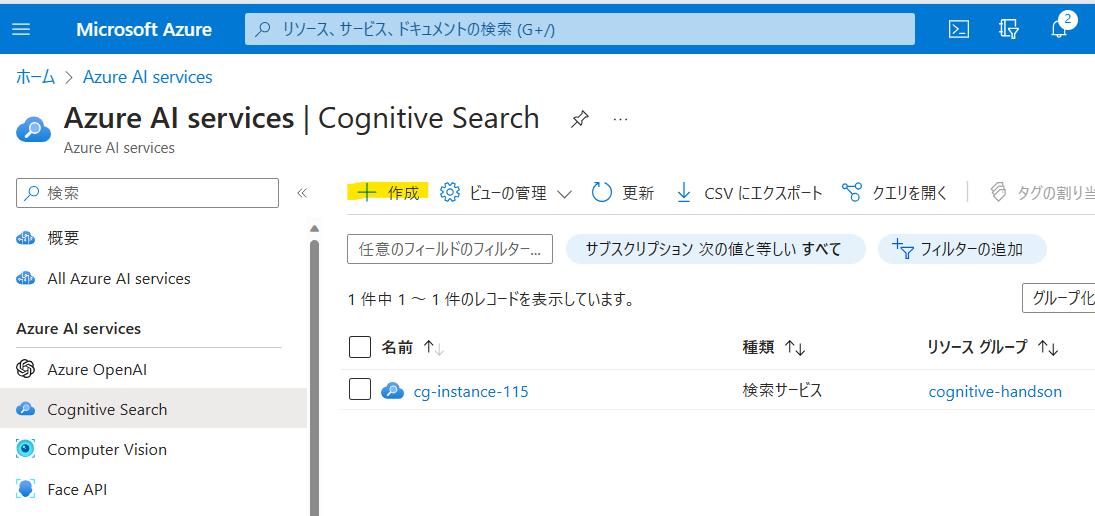
[作成]をクリックします。
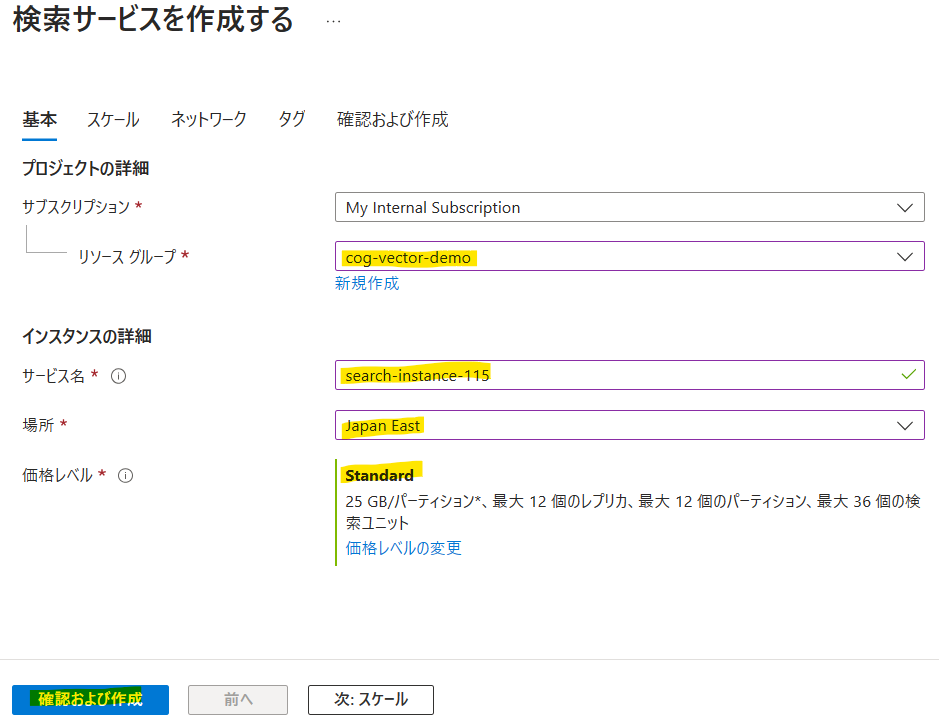
価格レベルは、検証用途であれば「Basic」で問題ないですが、本番用途であればインデックスサイズの制限の都合上「Standard」以上で選択することを推奨します。[確認および作成]をクリックしてリソースを作成しましょう。
ベクトルインデックスのサイズに関してはこちらの公式をご参照ください。
Functionsのリソース作成
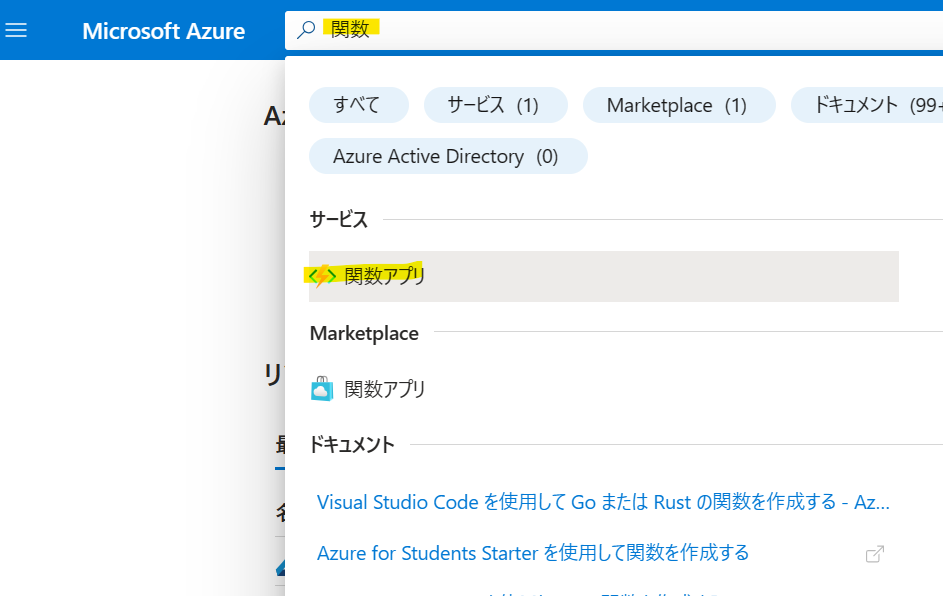
Functionsのリソースを作成します。検索窓から「関数アプリ」を検索します。
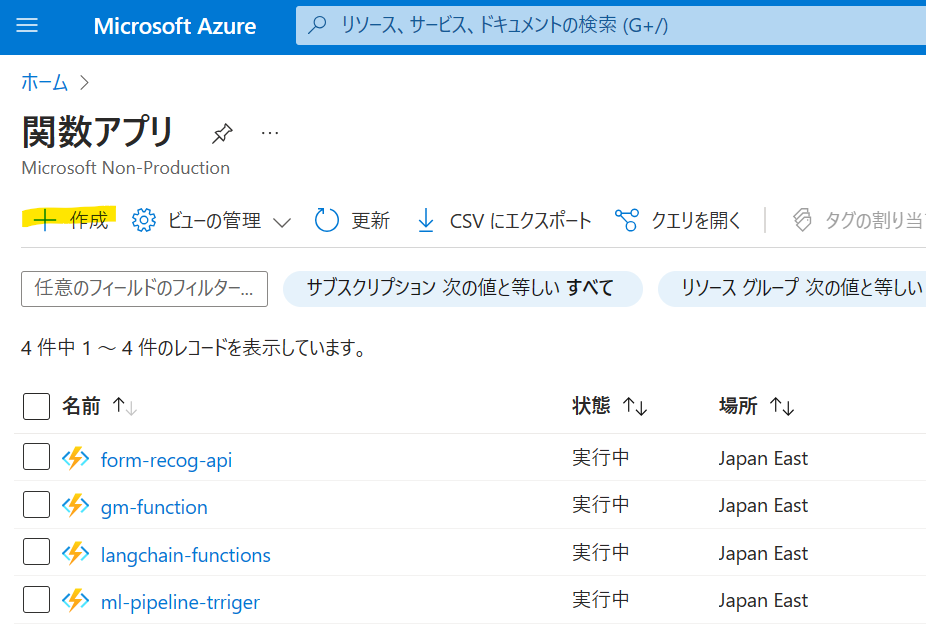
[作成]をクリックします。
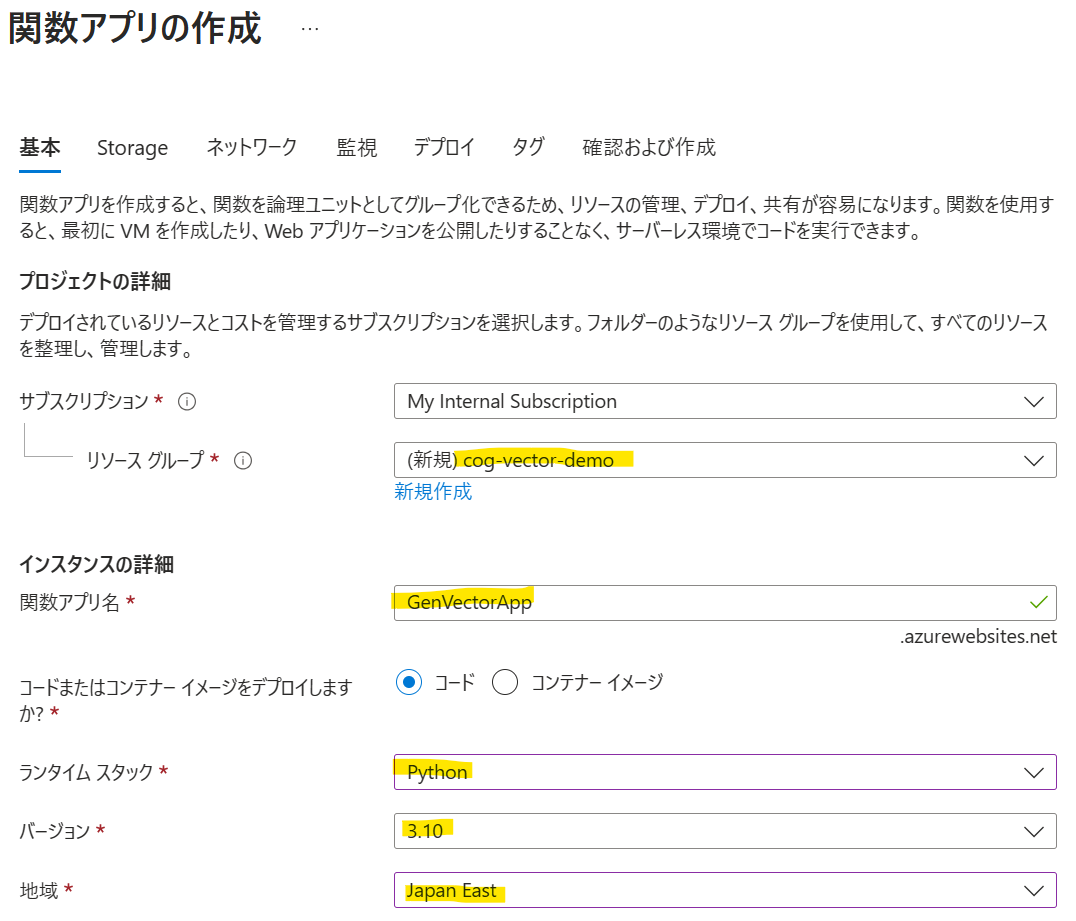
ランタイムは「Python」を選択し、バージョンは「3.10」を選択します。
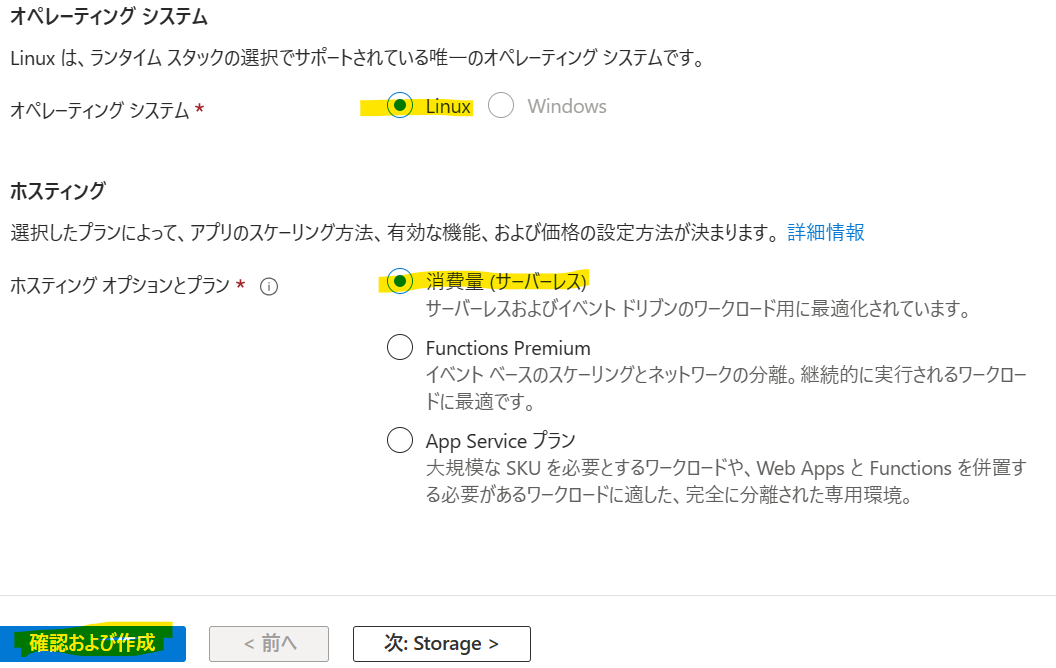
ホスティングは今回「消費量(サーバレス)」を選択します。大量のワークロードが想定される場合や閉域化を想定したVnet統合を構成したい場合は「Functions Premium」を選択してください。
FunctionsにCustom Skillをデプロイ
Azure FunctionsにCustom Skillをデプロイします。このカスタムスキルはテキストをチャンク分割し、チャンク毎のベクトルを生成して返却する関数です。
開発環境
今回記事で使う開発環境は下記の通りです。
- Ubuntu 22.04(WSL2)
- Python 3.10.6
- Azure CLI 2.49.0
- Azure Functions Core Tool 4.0.5198
Azure CLIのインストール方法はこちら
Azure Functions Core Toolのインストール方法はこちら
Cutome SKillのコードはこちらのレポジトリからgit cloneで引っ張ってきます。
こちらのレポジトリにはCognitive Searchと連携できるカスタムスキルのテンプレートが管理されています。チャンク分割+ベクトル生成のスキルはazure-search-power-skills/Vector/EmbeddingGeneratorになります。
$ git clone https://github.com/Azure-Samples/azure-search-power-skills/tree/main
$ cd azure-search-power-skills/Vector/EmbeddingGenerator
Pythonのライブラリをインストールします。
$ pip install -r requirements.txt
次にlocal.settings.jsonを作成し、ローカル実行用の環境変数を入力します。
$ vi local.settings.json
{
  "IsEncrypted": false,
  "Values": {
    "FUNCTIONS_WORKER_RUNTIME": "python",
    "AzureWebJobsStorage": "UseDevelopmentStorage=true",
    "AzureWebJobsFeatureFlags": "EnableWorkerIndexing",
    "AZURE_OPENAI_API_KEY": "<YOUR AZURE OPENAI API KEY>",
    "AZURE_OPENAI_API_VERSION": "<YOUR AZURE OPENAI API VERSION>",
    "AZURE_OPENAI_EMBEDDING_DEPLOYMENT": "<YOUR AZURE OPENAI EMBEDDING MODEL DEPLOYMENT>",
    "AZURE_OPENAI_SERVICE_NAME": "<YOUR AZURE OPENAI SERVICE NAME>"
  }
}
必須項目は下記の通りです。
| 項目 | 説明 | 例 |
|---|---|---|
| AZURE_OPENAI_API_KEY | Azure OpenAIのAPIキー | XXXXXXXX |
| AZURE_OPENAI_API_VERSION | Azure OpenAIのAPIのバージョン | 2023-05-15 |
| AZURE_OPENAI_EMBEDDING_DEPLOYMENT | Embeddingモデルのデプロイ名 | test-embedding-ada |
| AZURE_OPENAI_SERVICE_NAME | Azure OpenAIのリソース名 | openai-handson |
オプションで設定できる項目は下記の通りです。
| 項目 | 説明 | 規定値 |
|---|---|---|
| AZURE_OPENAI_EMBEDDING_SLEEP_INTERVAL_SECONDS | 埋め込みの生成を連続して試行する間の待機秒数 | 1 |
| NUM_TOKENS | 各チャンクのトークン数 | 2048 |
| MIN_CHUNK_SIZE | 各チャンクに必要な最小サイズ | 10 |
| TOKEN_OVERLAP | 後続のチャンク間で重複できるトークンの数 | 0 |
私は下記のように設定しました。Retrival-Augmented Generationの構成で社内ドキュメント検索を実装する場合、OpenAIのgpt-35-turboモデルのトークン制限が約4000文字なので、チャンクを1000文字前後で区切っておき、検索結果Top3の3000文字程度をプロンプトに入れ込むとちょうど良く収まるので、NUM_TOKENSは1024にしています。
{
  "IsEncrypted": false,
  "Values": {
    "FUNCTIONS_WORKER_RUNTIME": "python",
    "AzureWebJobsStorage": "UseDevelopmentStorage=true",
    "AzureWebJobsFeatureFlags": "EnableWorkerIndexing",
    "AZURE_OPENAI_API_KEY": "XXXX",
    "AZURE_OPENAI_API_VERSION": "2023-05-15",
    "AZURE_OPENAI_EMBEDDING_DEPLOYMENT": "test-embedding-ada",
    "AZURE_OPENAI_SERVICE_NAME": "openai-handson",
    "NUM_TOKENS": "1024",
    "TOKEN_OVERLAP": "128"
  }
}
次にテスト用のデータsample.jsonを作成します。
$ vi sample.json
{
    "values": [
        {
            "recordId": "1234",
            "data": {
                "document_id": "12345ABC",
                "text": "This is a test document and it is big enough to ensure that it meets the minimum chunk size.",
                "filepath": "foo.md",
                "fieldname": "content"
            }
        }
    ]
}
func startコマンドを実行し、ローカルにFucntionsのサーバを起動します。
$ func start
Found Python version 3.10.6 (python3).

Azure Functions Core Tools
Core Tools Version:       4.0.5198 Commit hash: N/A  (64-bit)
Function Runtime Version: 4.21.1.20667

[2023-07-31T12:07:23.888Z] Worker process started and initialized.

Functions:

        TextEmbedder:  http://localhost:7071/api/chunk-embed

For detailed output, run func with --verbose flag.
[2023-07-31T12:07:54.212Z] Executing 'Functions.TextEmbedder' (Reason='This function was programmatically called via the host APIs.', Id=579ea84b-1ebe-444a-bd0e-c46eca0f9088)
sample.jsonをボディにPOSTでリクエストを投げると、レスポンスが返ってくることを確認します。
$ curl -X POST -H "Content-Type: application/json" -d '@sample.json' http://localhost:7071/api/chunk-embed
{
    "values": [
        {
            "recordId": "1234",
            "data": {
                "chunks": [
                    {
                        "content": "This is a test document and it is big enough to ensure that it meets the minimum chunk size.",
                        "id": null,
                        "title": "foo.md",
                        "filepath": "foo.md",
                        "url": null,
                        "embedding_metadata": {
                            "fieldname": "content",
                            "docid": "12345ABC",
                            "index": 0,
                            "offset": 0,
                            "length": 92,
                            "embedding": [
                                0.00544198,
                                0.006466314,
                                0.013019379,
                                . . .
                            ]
                        }
                    }
                ],
                "total_files": 1,
                "num_unsupported_format_files": 0,
                "num_files_with_errors": 0,
                "skipped_chunks": 0
            },
            "errors": null,
            "warnings": null
        }
    ]
}
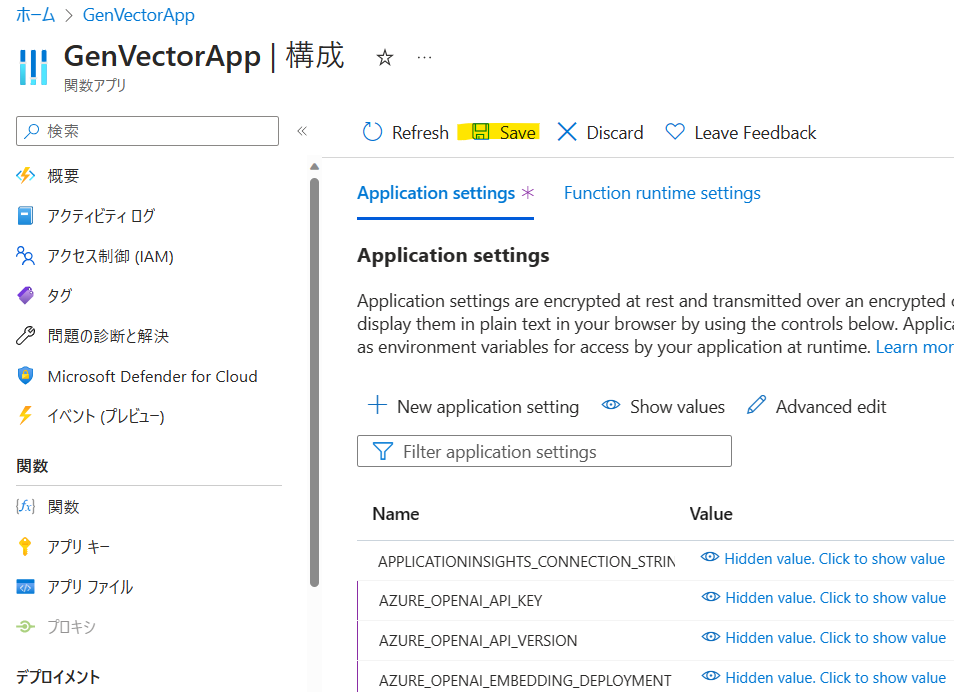
テストした関数をAzure Functionsにデプロイします。デプロイ前にリソースの環境変数を設定しておきましょう。Azure Portalから先ほど作成したFunctionsのリソースへアクセスし、[構成]-> [Advanced edit]をクリックします。
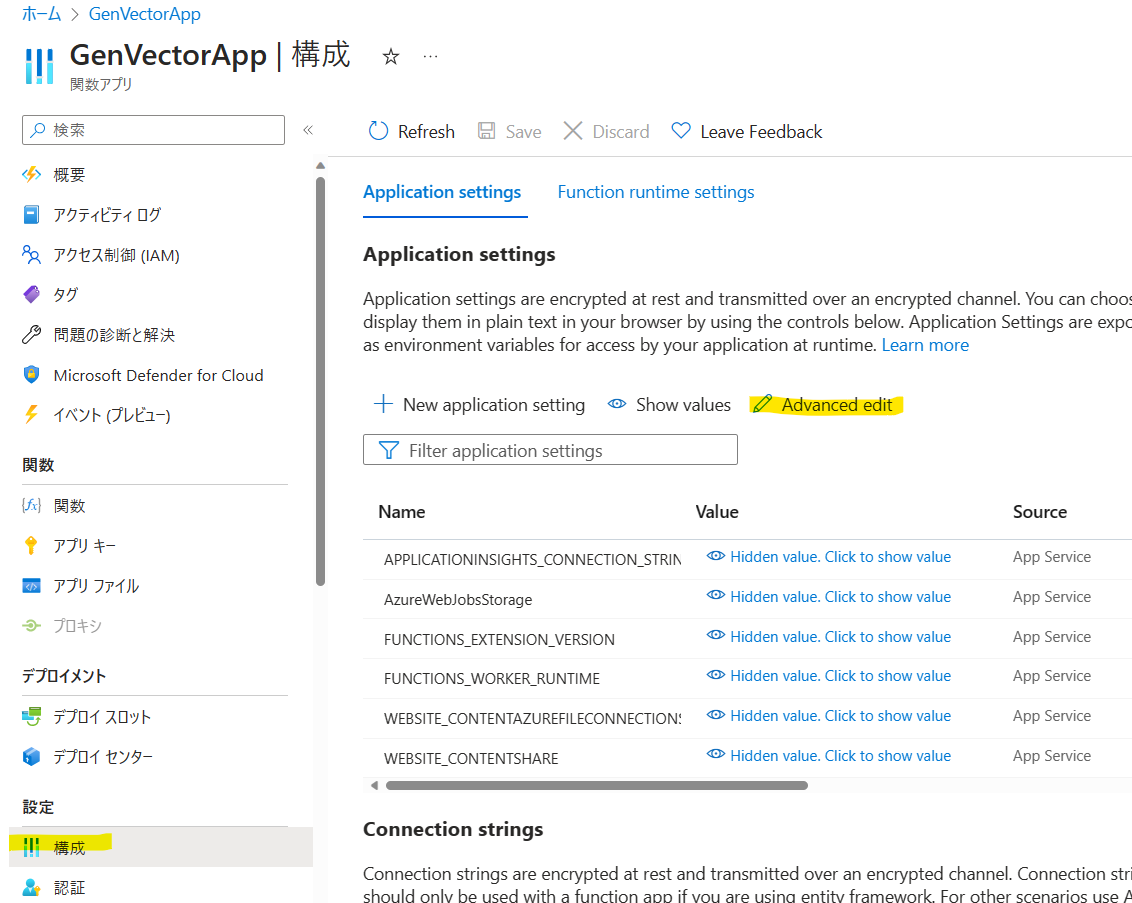
既存の環境変数に新規で環境変数を追加します。
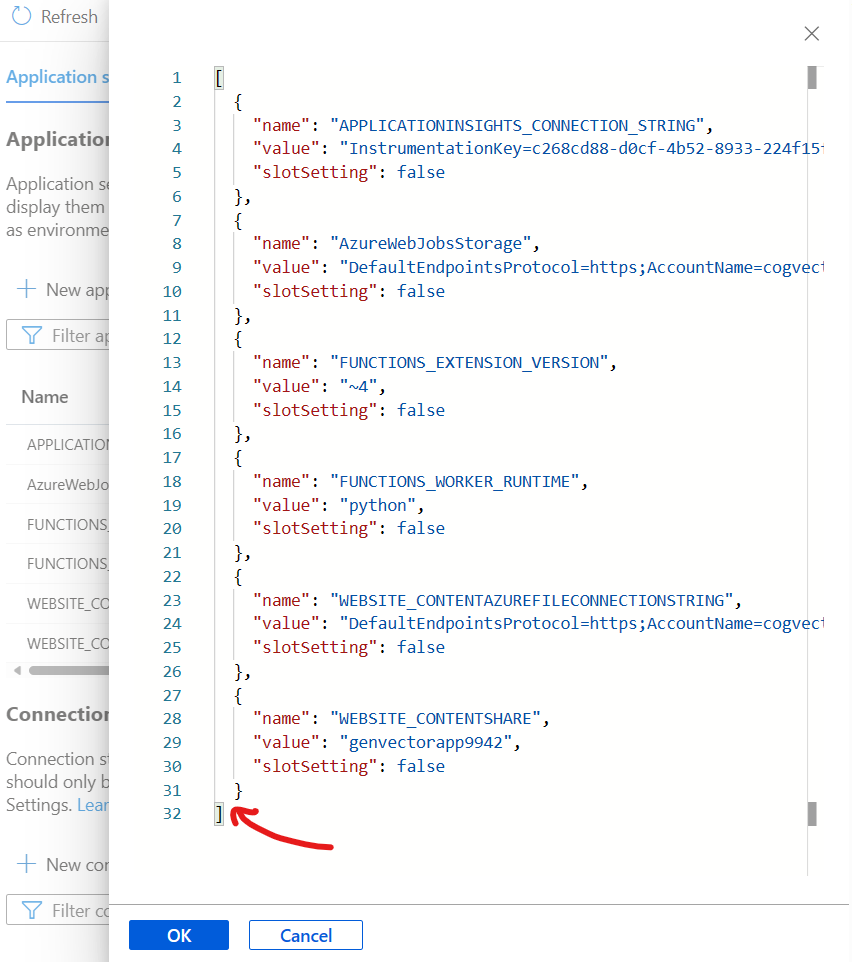
今回追加する設定は下記になります。配列の中身だけコピーして、ご自身の環境にカスタマイズしてから追加してください。
[
  {
    "name": "AZURE_OPENAI_API_KEY",
    "value": "XXXX",
    "slotSetting": false
  },
  {
    "name": "AZURE_OPENAI_API_VERSION",
    "value": "2023-05-15",
    "slotSetting": false
  },
  {
    "name": "AZURE_OPENAI_EMBEDDING_DEPLOYMENT",
    "value": "test-embedding-ada",
    "slotSetting": false
  },
  {
    "name": "AZURE_OPENAI_SERVICE_NAME",
    "value": "openai-handson",
    "slotSetting": false
  },
  {
    "name": "NUM_TOKENS",
    "value": "1024",
    "slotSetting": false
  },
  {
    "name": "TOKEN_OVERLAP",
    "value": "128",
    "slotSetting": false
  },
  {
    "name": "AzureWebJobsFeatureFlags",
    "value": "EnableWorkerIndexing",
    "slotSetting": false
  }
]
リソース側の準備が完了したので、ロカールでテストしたコードをFunctionsにアップロードしましょう。az loginで認証していただき、下記コマンドで関数をデプロイします。GenVectorAppの部分はご自身の関数の名前を入力してください。
$ az login
$ func azure functionapp publish GenVectorApp
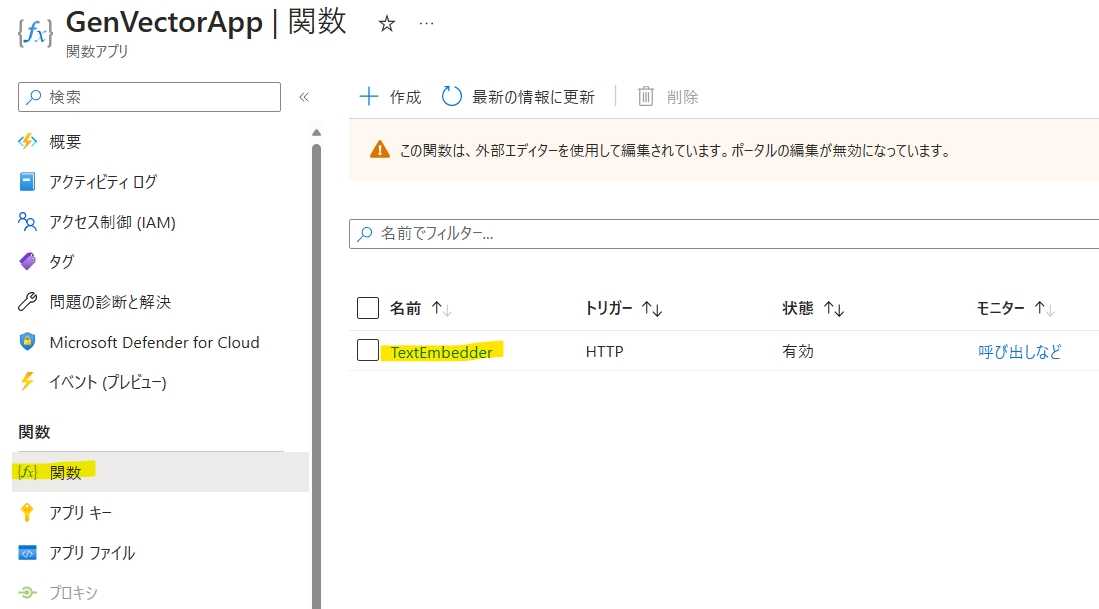
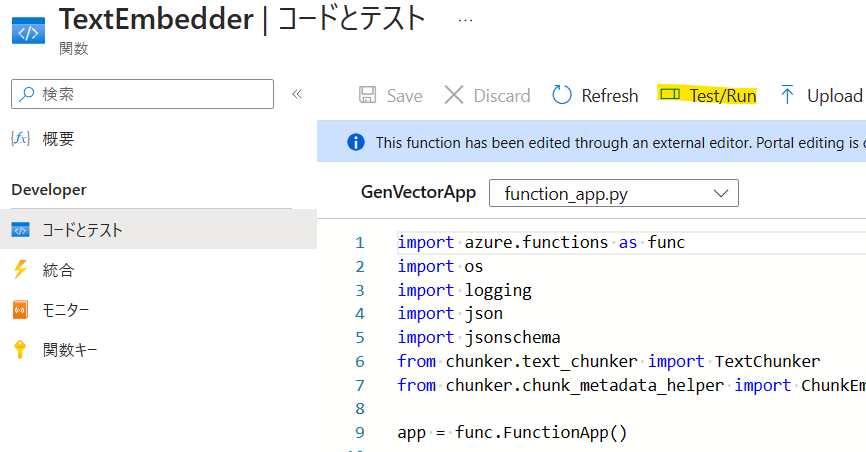
[関数]から「TextEmbedder」が作成することを確認します。「TextEmbedder」をクリックしましょう。
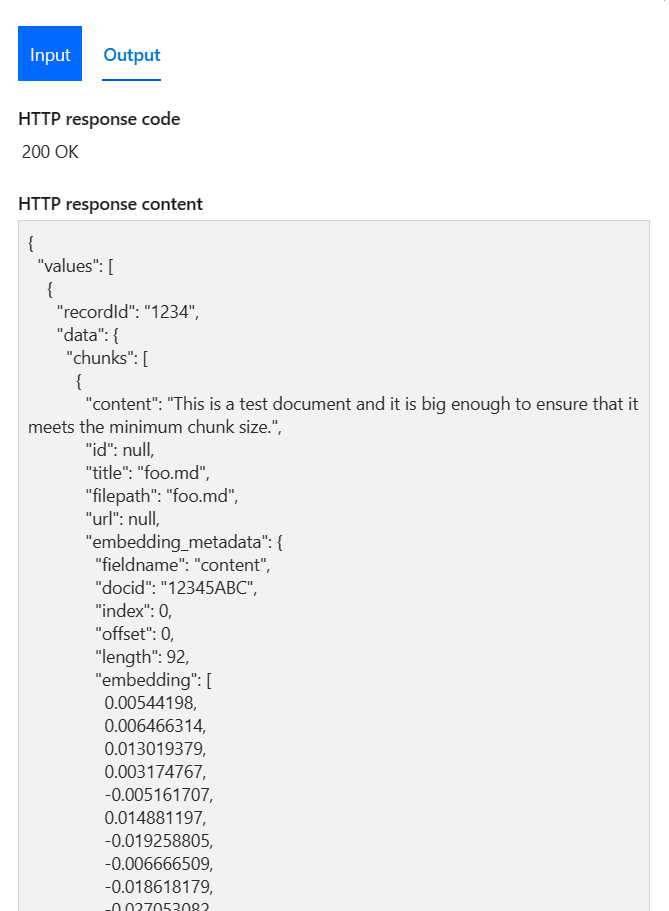
[コードとテスト]->[Test/Run]から関数のテストを実行します。
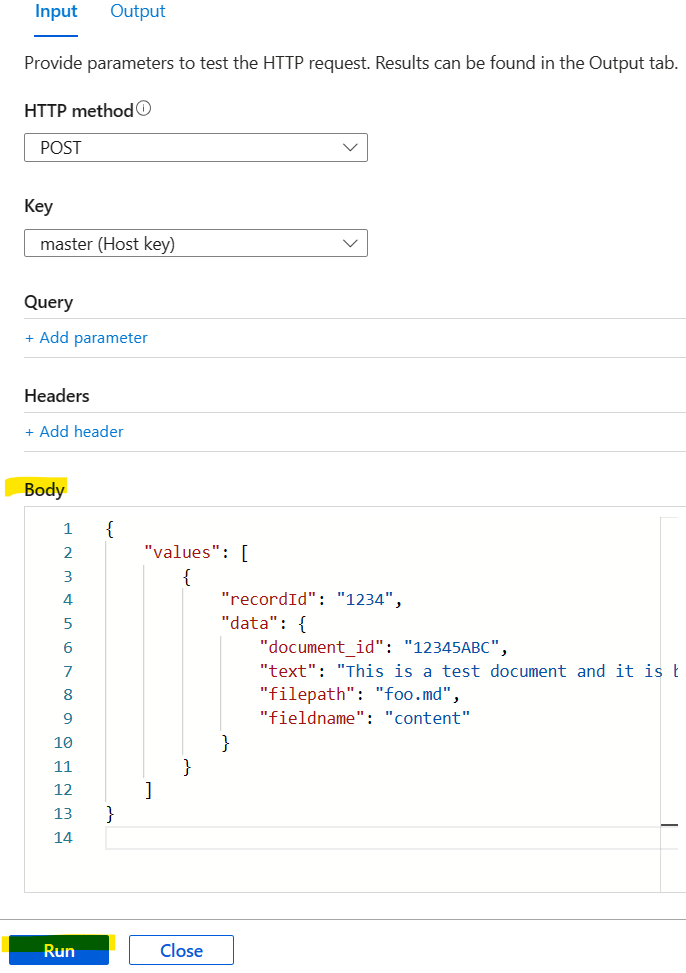
ローカルテスト時に作成したsample.jsonの内容をBodyにコピーし、[Run]で実行しましょう。
インデックス作成ツールの実行
いよいよインデックス作成ツールを実行できる環境が整いました。次にこちらのレポジトリをgit cloneします。
$ git clone https://github.com/teshi22/cognitive-search-vector-pr-ja.git
$ cd cognitive-search-vector-pr-ja/demo-python
次にdemo-python以下に.envを作成し、環境変数を設定します。.env-sample-indexerに必要な環境変数が記載されているのでコピーして必要な項目を埋めていきましょう。
$ vi .env
AZURE_SEARCH_SERVICE_ENDPOINT=YOUR-SEARCH-SERVICE-ENDPOINT
AZURE_SEARCH_API_KEY=YOUR-SEARCH-SERVICE-ADMIN-KEY
AZURE_OPENAI_SERVICE_NAME=YOUR-OPENAI-ENDPOINT
AZURE_OPENAI_API_KEY=YOUR-OPENAI-API-KEY
AZURE_OPENAI_API_VERSION=YOUR-OPENAI-API-VERSION
AZURE_OPENAI_EMBEDDING_DEPLOYMENT=YOUR-OPENAI-EMBEDDING-DEPLOYED-MODEL
AZURE_KNOWLEDGE_STORE_STORAGE_CONNECTION_STRING=YOUR-KNOWLEDGE-STORE-CONNECTION-STRING
AZURE_SEARCH_EMBEDDING_SKILL_ENDPOINT=YOUR-EMBEDDING-CUSTOM-SKILL-ENDPOINT
DOCUMENT_AZURE_STORAGE_CONNECTION_STRING=YOUR-AZURE-STORAGE-CONNECTION-STRING
DOCUMENT_AZURE_STORAGE_CONTAINER_NAME=YOUR-AZURE-STORAGE-CONTAINER-NAME
AZURE_SEARCH_SERVICE_ENDPOINTは、先ほど作成したCognitive Searchの[概要]->[URL]を入力。

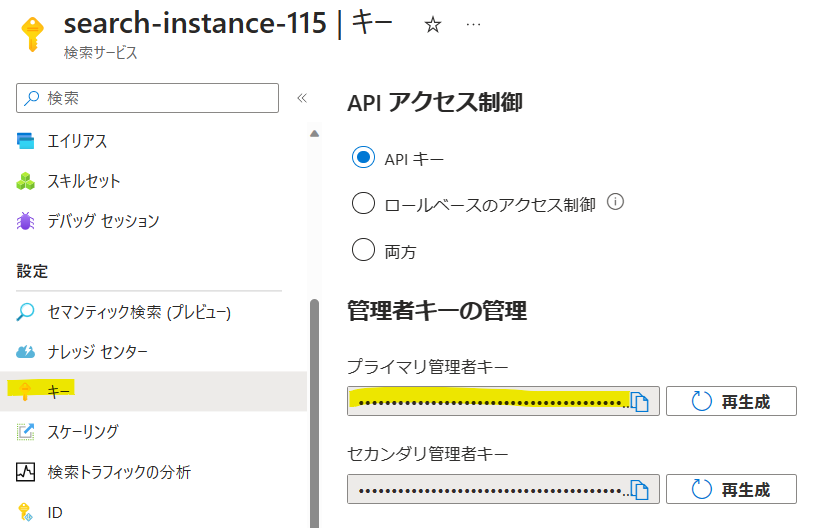
AZURE_SEARCH_API_KEYは、[キー]->[プライマリ管理者キー]を入力。
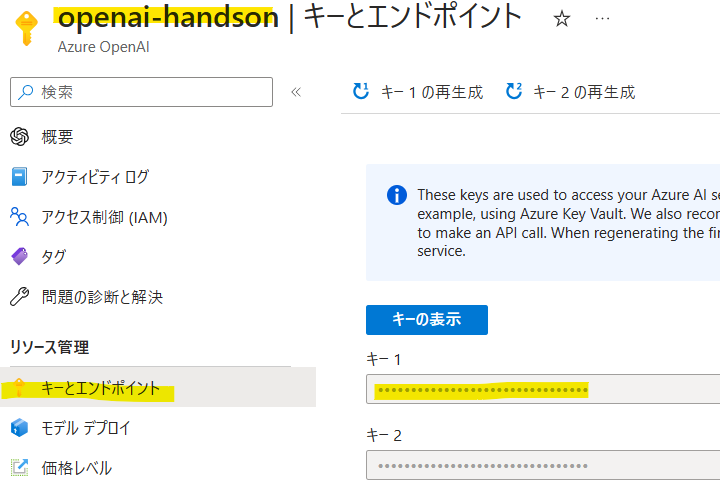
AZURE_OPENAI_SERVICE_NAMEとAZURE_OPENAI_API_KEYは、OpenAIのリソース名と[キー]から[キーとエンドポイント]を入力。
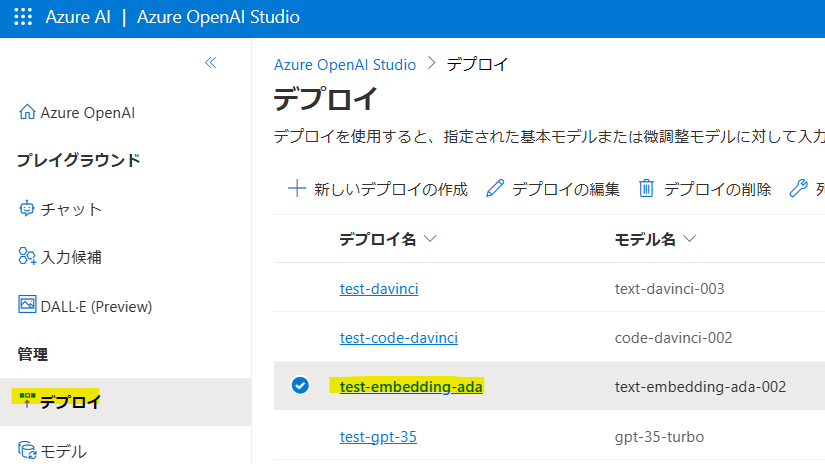
AZURE_OPENAI_API_KEYは2023-05-15、AZURE_OPENAI_EMBEDDING_DEPLOYMENTはAzure OpenAI Studioの[デプロイ]からtext-embedding-ada-002の[デプロイ名]を入力。
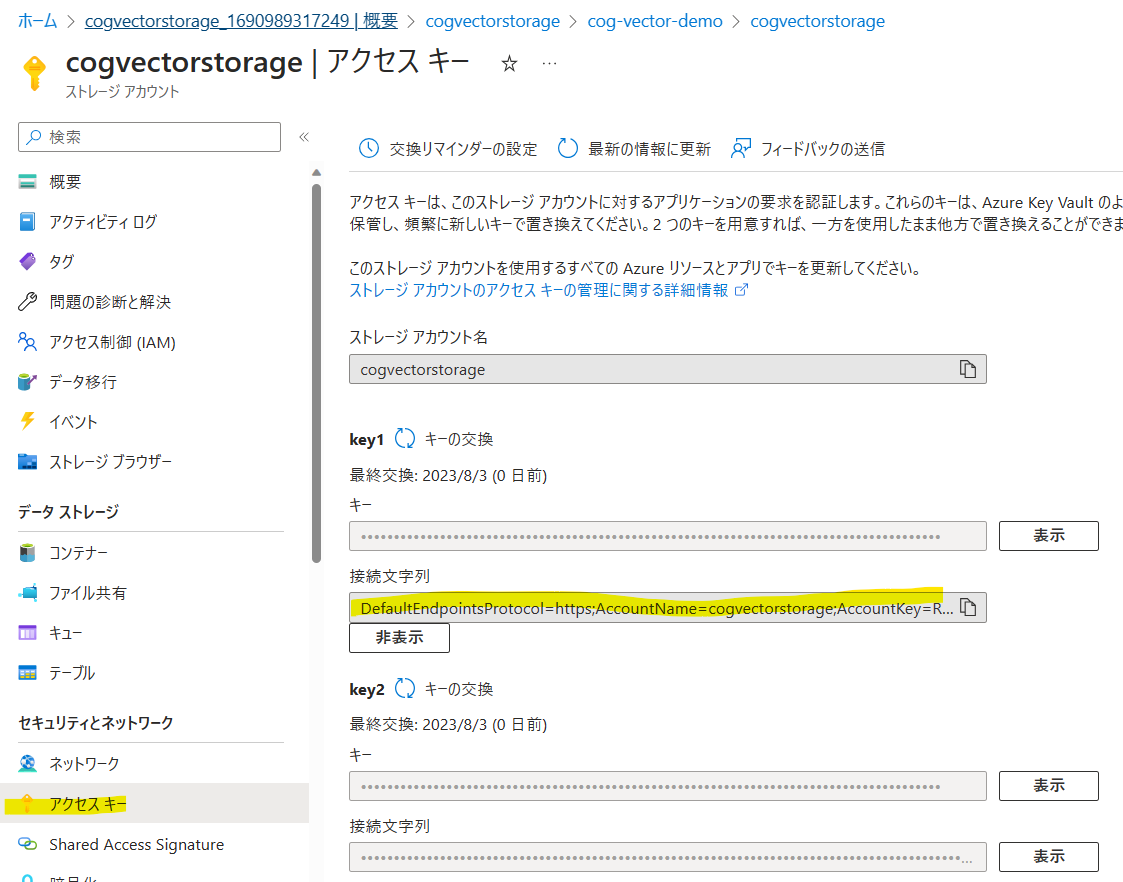
AZURE_KNOWLEDGE_STORE_STORAGE_CONNECTION_STRINGとDOCUMENT_AZURE_STORAGE_CONNECTION_STRINGは、[ストレージアカウント]から先ほど作成したリソースを選択し、[アクセスキー]の接続文字列をコピーして貼り付けます。
DOCUMENT_AZURE_STORAGE_CONTAINER_NAMEは、ドキュメントが保存されるコンテナ名を指定します。コンテナがない場合に新規で作成されます。
AZURE_SEARCH_EMBEDDING_SKILL_ENDPOINTは、[関数アプリ(Functions)]で先ほど作成したリソースを選択し、[関数]->[TextEmbedder]->[コードとテスト]->[Get function URL]を指定します。
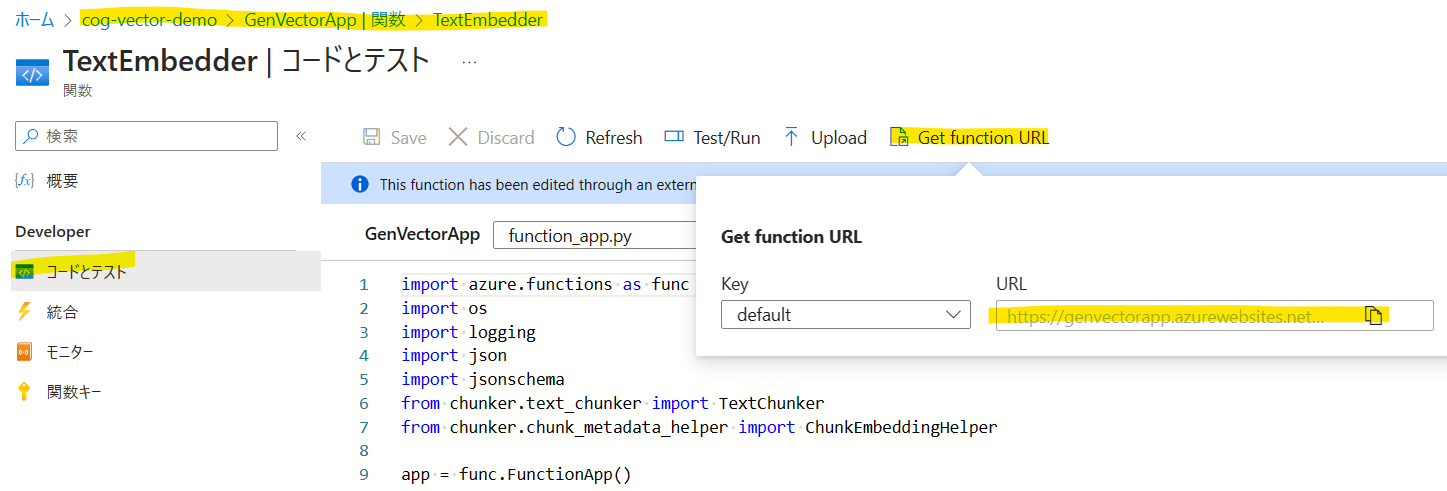
私の設定を載せておきます。
AZURE_SEARCH_SERVICE_ENDPOINT="https://cg-instance-115.search.windows.net"
AZURE_SEARCH_API_KEY="XXXX"
AZURE_OPENAI_SERVICE_NAME="openai-handson"
AZURE_OPENAI_API_KEY="XXXX"
AZURE_OPENAI_API_VERSION="2023-05-15"
AZURE_OPENAI_EMBEDDING_DEPLOYMENT="test-embedding-ada"
AZURE_KNOWLEDGE_STORE_STORAGE_CONNECTION_STRING="DefaultEndpointsProtocol=https;AccountName=cogvectorstorage;AccountKey=XXXX;EndpointSuffix=core.windows.net"
AZURE_SEARCH_EMBEDDING_SKILL_ENDPOINT="https://genvectorapp.azurewebsites.net/api/chunk-embed?code=XXXX"
DOCUMENT_AZURE_STORAGE_CONNECTION_STRING="DefaultEndpointsProtocol=https;AccountName=cogvectorstorage;AccountKey=XXXX;EndpointSuffix=core.windows.net"
DOCUMENT_AZURE_STORAGE_CONTAINER_NAME="doc"
ドキュメントは事前にcognitive-search-vector-pr-ja/demo-python/dataに格納しておきます。
インデックス作成ツールのノートブックはcognitive-search-vector-pr-ja/demo-python/code/azure-search-vector-ingestion-python-sample.ipynbとなります。このコードを上から順番に実行していけば、インデックスが作成されます。
コードの流れを順番に解説していきます。必要なライブラリは下記の通りです。今回は雑に既存のカーネルにライブラリをインストールしています。
! pip install azure-search-documents==11.4.0b6 # バージョン固定 [teshi22]
! pip install openai
! pip install openai[datalib]
! pip install python-dotenv
! pip install azure-storage-blob
セル[8]でチャンク分割後のインデックスのスキーマやベクトル検索のアルゴリズムを指定しています。VectorSearchのfields->textフィールドには言語アナライザーが日本語になる設定を追加しています。
class ChunkIndexManager():

    def _create_chunk_index(self, index_prefix):
        name = get_index_name(f"{index_prefix}-chunk")
        vector_search = VectorSearch(
            algorithm_configurations=[
                VectorSearchAlgorithmConfiguration(
                    name="my-vector-config",
                    kind="hnsw",
                    hnsw_parameters={
                        "m": 4,
                        "efConstruction": 400,
                        "efSearch": 1000,
                        "metric": "cosine"
                    }
                )
            ]
        )
        fields = [
            SimpleField(name="id", type=SearchFieldDataType.String,  filterable=True, sortable=True, key=True),
            SimpleField(name="source_document_id", type=SearchFieldDataType.String),
            SimpleField(name="source_document_filepath", type=SearchFieldDataType.String),
            SimpleField(name="source_field_name", type=SearchFieldDataType.String),
            SearchableField(name="title", type=SearchFieldDataType.String, analyzer_name="ja.lucene"), # "ja.lucene"に変更 [teshi22]
            SimpleField(name="index", type=SearchFieldDataType.Int64),
            SimpleField(name="offset", type=SearchFieldDataType.Int64),
            SimpleField(name="length", type=SearchFieldDataType.Int64),
            SimpleField(name="hash", type=SearchFieldDataType.String),
            SearchableField(name="text", type=SearchFieldDataType.String, analyzer_name="ja.lucene"), # "ja.lucene"に変更 [teshi22]
            SearchField(name="embedding", type=SearchFieldDataType.Collection(SearchFieldDataType.Single), searchable=True, vector_search_dimensions=1536, vector_search_configuration="my-vector-config")
        ]
        # vector_search_dimensions -> dimensions に変更 [teshi22]
        index = create_index(name, fields, vector_search=vector_search, semantic_title_field_name="title", semantic_content_field_names=["text"])
        return index

    def _create_chunk_datasource(self, index_prefix, storage_connection_string, container_name):
        name = get_datasource_name(f"{index_prefix}-chunk")
        return create_blob_datasource(name, storage_connection_string, container_name)

    def _create_chunk_indexer(self, index_prefix, data_source_name, index_name):
        name = get_indexer_name(f"{index_prefix}-chunk")
        parameters = IndexingParameters(configuration={"parsing_mode": "json"})
        indexer = SearchIndexer(
            name=name,
            data_source_name=data_source_name,
            target_index_name=index_name,
            parameters=parameters
        )
        indexer_client = get_indexer_client()
        return indexer_client.create_indexer(indexer)


    def create_chunk_index_resources(self, index_prefix) -> dict:
        chunk_index_storage_connection_string = get_knowledge_store_connection_string()
        chunk_index_blob_container_name = get_chunk_index_blob_container_name(index_prefix)

        index_name = self._create_chunk_index(index_prefix).name
        data_source_name = self._create_chunk_datasource(index_prefix, chunk_index_storage_connection_string, chunk_index_blob_container_name).name
        time.sleep(5)
        indexer_name = self._create_chunk_indexer(index_prefix, data_source_name, index_name).name
        wait_for_indexer_completion(indexer_name)
        return {"index_name": index_name, "data_source_name": data_source_name, "indexer_name": indexer_name}


    # delete all the resources
    def delete_chunk_index_resources(self, index_prefix):
        index_client = get_index_client()
        indexer_client = get_indexer_client()

        index_client.delete_index(index=f"{index_prefix}-chunk-index")
        indexer_client.delete_indexer(indexer=f"{index_prefix}-chunk-indexer")
        indexer_client.delete_data_source_connection(data_source_connection=f"{index_prefix}-chunk-datasource")
セル[11]tenant ='pythonsample'は、インデックスを区別するために使用されるので、必ず変更しておきましょう。
tenant ='pythonsample'

customer_storage_connection_string = os.getenv("DOCUMENT_AZURE_STORAGE_CONNECTION_STRING")
container_name = os.getenv("DOCUMENT_AZURE_STORAGE_CONTAINER_NAME")

prefix = f"{tenant}-{container_name}"

# Delete any existing Azure Cognitive Search resources
delete_indexes(prefix)

blob_service_client = BlobServiceClient.from_connection_string(customer_storage_connection_string)
container_client = blob_service_client.get_container_client(container=container_name)

if not container_client.exists():
    container_client.create_container()

# Upload sample documents to blob storage
for root, dirs, files in os.walk("../data/documents/"):
    for file in files:
        with open(os.path.join(root, file), "rb") as data:
            container_client.upload_blob(file, data, overwrite=True)
セル[12]でインデックス作成のメイン関数を実行します。
index_resources = create_indexes(prefix, customer_storage_connection_string, container_name)
セル[13]では、簡単なベクトル検索のクエリの書き方が記載されています。キーワード検索・ベクトル検索・両方使うハイブリッド検索が可能です。
def query_vector_index(index_name, query, vector_only=False):
    embedder = TextEmbedder()
    vector = embedder.generate_embeddings(query)
    search_client = SearchClient(AZURE_SEARCH_SERVICE_ENDPOINT, index_name, AzureKeyCredential(AZURE_SEARCH_KEY))
    if vector_only:
        search_text = None
    else:
        search_text = query
    results = search_client.search(search_text=search_text, vector=vector, vector_fields="embedding", top_k=3)
    return results
セル[14]でベクトル検索を実行してみましょう。
chunk_index_name = index_resources["chunk_index_resources"]["index_name"]
results = query_vector_index(chunk_index_name, "OpenAIで使えるモデルを教えて?", vector_only=True)
for result in results:
    print("#######################")
    print(f"Title: {result['title']}")
    print(f"Score: {result['@search.score']}")
    print(f"Content: {result['text']}")
    print(f"Source Document: {result['source_document_filepath']}")
結果は下記の通りです。検索結果で一番上にヒットしてほしいチャンクが確かに取得できています。
#######################
Title: Azure OpenAI Service とは - Azure Cognitive Services _ Microsoft Learn.pdf
Score: 0.86994517
Content: Azure OpenAI Service とは
[アーティクル] • 2023/05/01

Azure OpenAI Service では、GPT-3、Codex、Embeddings モデル シリーズなど
OpenAI の強⼒な⾔語モデルを REST API として使⽤できます。 さらに、新しい GPT-4
および ChatGPT (gpt-35-turbo) モデル シリーズがプレビューで利⽤可能になりまし
た。 これらのモデルは、特定のタスクに合わせて簡単に調整できます。たとえば、コ
ンテンツの⽣成、まとめ、セマンティック検索、⾃然⾔語からコードへの翻訳などで
す。 ユーザーは、REST API、Python SDK、または Azure OpenAI Studio の Web ベース
のインターフェイスを介してサービスにアクセスできます。

機能 Azure OpenAI

使⽤できるモデル 新しい GPT-4 シリーズ (プレビュー)
GPT-3 ベース シリーズ
新しい ChatGPT (gpt-35-turbo) (プレビュー)
Codex シリーズ
埋め込みシリーズ
詳細については、モデルに関するページを参照してください。

微調整 Ada
Babbage
Curie
Cushman*
Davinci*
* 現在は利⽤できません。 ** ⽶国東部と⻄ヨーロッパでは、現在新
規のお客様は微調整を利⽤できません。 ⽶国ベースのトレーニング
には、⽶国中南部をご利⽤ください

Price こちらで⼊⼿可能

仮想ネットワークのサポ
ート & プライベート リン
クのサポート

はい

マネージド ID はい、Azure Active Directory 経由

UI エクスペリエンス アカウントとリソースの管理には Azure Portal、
モデルの探索と微調整には Azure OpenAI Service Studio

リージョン別の提供状況 ⽶国東部
⽶国中南部
⻄ヨーロッパ

機能の概要

pageimage0.jpg


https://learn.microsoft.com/ja-jp/azure/cognitive-services/openai/concepts/models
https://azure.microsoft
Source Document: Azure OpenAI Service とは - Azure Cognitive Services _ Microsoft Learn.pdf
#######################
Title: Azure OpenAI Service とは - Azure Cognitive Services _ Microsoft Learn.pdf
Score: 0.8694692
Content: jpg


https://learn.microsoft.com/ja-jp/azure/cognitive-services/openai/how-to/create-resource
https://learn.microsoft.com/ja-jp/azure/azure-resource-manager/management/overview


Azure OpenAI リソースを作成したら、API 呼び出しを開始してテキストを⽣成する前
に、モデルをデプロイする必要があります。 このアクションは、Deployment API を使
⽤して実⾏できます。 これらの API を使⽤すると、使⽤するモデルを指定できます。

Azure OpenAI で使⽤されるモデルでは、⽣成の呼び出しで提供される⾃然⾔語での指
⽰と例を使⽤して、要求されているタスクと必要なスキルを識別しています。 この⽅
法を使⽤する場合、プロンプトの最初の部分には、⾃然⾔語の指⽰や、必要な特定の
タスクの例が含まれます。 次に、最も可能性の⾼い次のテキスト部分を予測すること
で、モデルによってタスクが完了します。 この⼿法は、"コンテキスト内" 学習と呼ば
れます。 これらのモデルは、この⼿順では再トレーニングされませんが、代わりにプ
ロンプトに含めるコンテキストに基づいて予測を⾏います。

コンテキスト内学習には、主に 3 つのアプローチがあります。少数ショット、ワンシ
ョット、ゼロショットです。 これらの⽅法は、モデルに与えられるタスク固有のデー
タの量によって異なります。

少数ショット: この場合、ユーザーは、期待される応答形式と内容を⽰すいくつかの例
を通話プロンプトに含めます。 次の例は、複数の例を提供する数個のプロンプトを⽰
しています (最後の答えはモデルによって⽣成されます)。

コンテキスト内学習

    Convert the questions to a command:
    Q: Ask Constance if we need some bread.
    A: send-msg `find constance` Do we need some bread?
    Q: Send a message to Greg to figure out if things are ready for
Wednesday.
    A: send-msg `find greg` Is everything ready for Wednesday?
    Q: Ask Ilya if we're still having our meeting this evening.
    A: send-msg `find ilya` Are we still having a meeting this evening?
    Q: Contact the ski store and figure out if I can get my skis fixed
before I leave on Thursday
Source Document: Azure OpenAI Service とは - Azure Cognitive Services _ Microsoft Learn.pdf
#######################
Title: Azure OpenAI Service とは - Azure Cognitive Services _ Microsoft Learn.pdf
Score: 0.8660149
Content: com/pricing/details/cognitive-services/openai-service/


機能 Azure OpenAI

コンテンツのフィルター
処理

プロンプトと⼊⼒候補は、⾃動システムを使ってコンテンツ ポリシ
ーに対して評価されます。 重⼤度の⾼いコンテンツはフィルターで
除外されます。

Microsoft は、⼈を第⼀に考える原則に基づいて、AI の発展に取り組んでいます。
Azure OpenAI で使⽤できる⽣成モデルには、かなりの潜在的利益がありますが、慎重
な設計と熟考した軽減策がない場合、そのようなモデルによって、正しくない、また
は有害なコンテンツが⽣成される可能性があります。 Microsoft は、悪⽤や意図しない
損害から保護するために多⼤な投資を⾏っています。たとえば、明確に定義したユー
ス ケースを⽰すことを申請者の要件とする、責任ある AI 使⽤に関する Microsoft の原
則 を取り⼊れる、顧客をサポートするコンテンツ フィルターを構築する、オンボー
ドされた顧客に対して責任ある AI 実装のガイダンスを提供するなどです。

Azure OpenAI にアクセスするにはどうすればよいですか
Source Document: Azure OpenAI Service とは - Azure Cognitive Services _ Microsoft Learn.pdf
継続的な運用
インデックスを更新したい場合は、ストレージアカウントから先ほど自動作成されたdocコンテナの中にドキュメントをアップロードします。
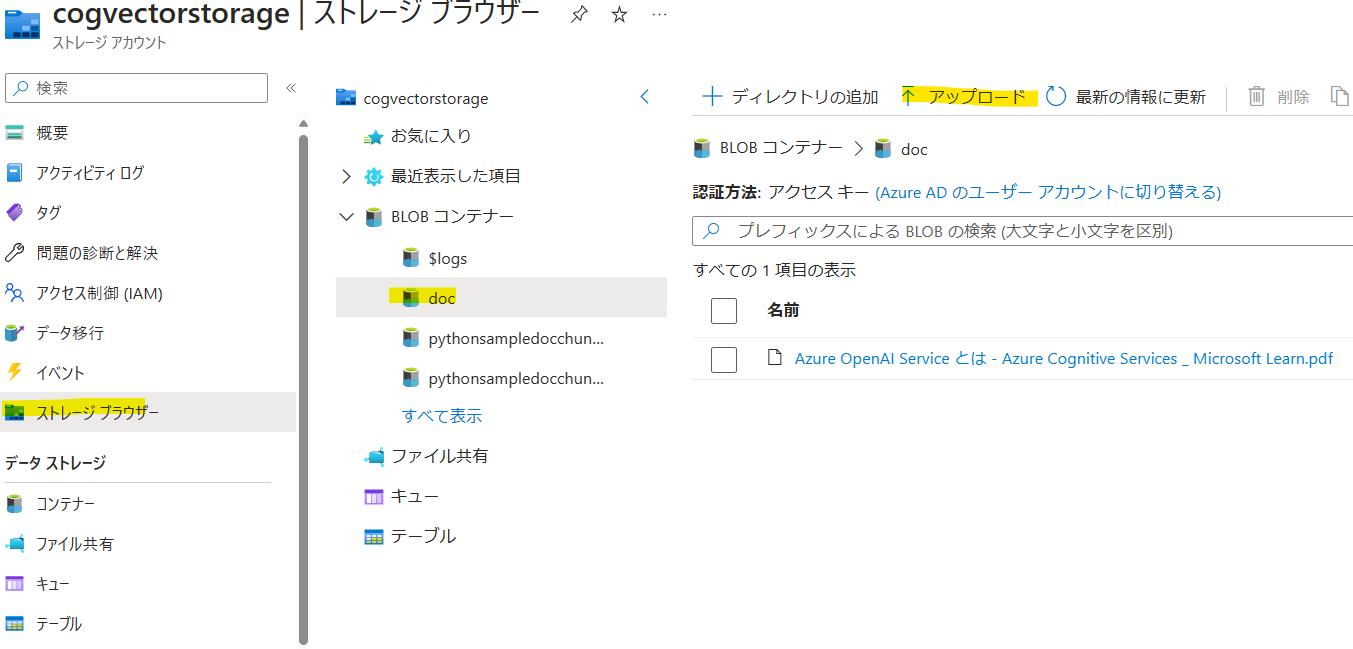

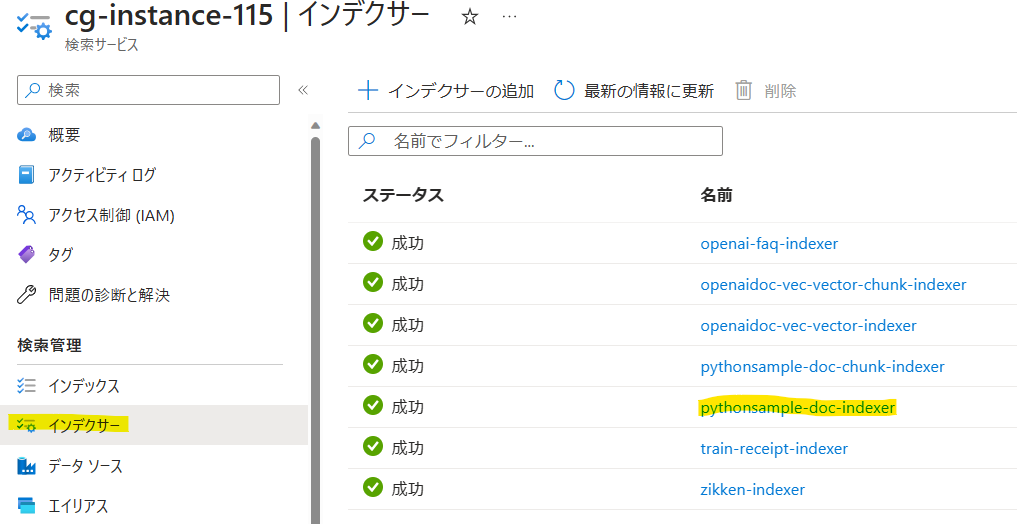
次にCognitive Searchの[インデクサー]->[pythonsample-doc-indexer]をクリックします(chunkじゃない方)。
[実行]をクリックします。
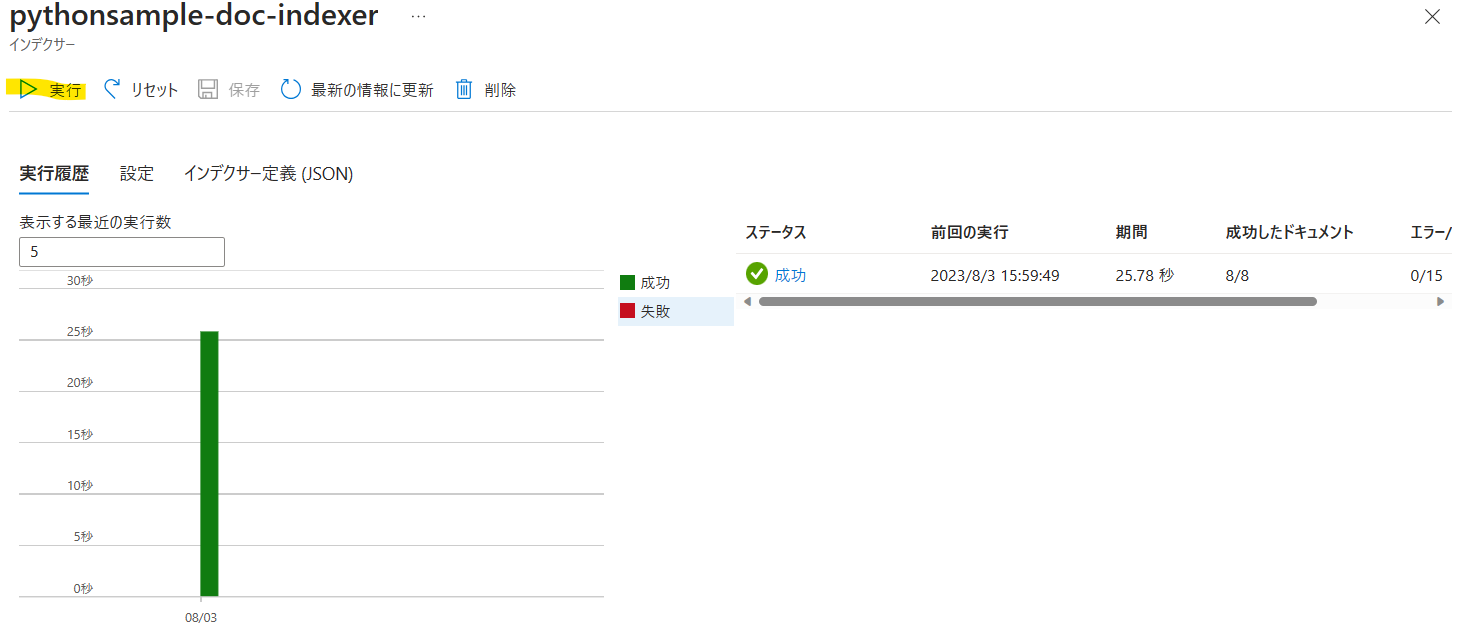
新たにドキュメントがインデックス化されていることが確認できます。

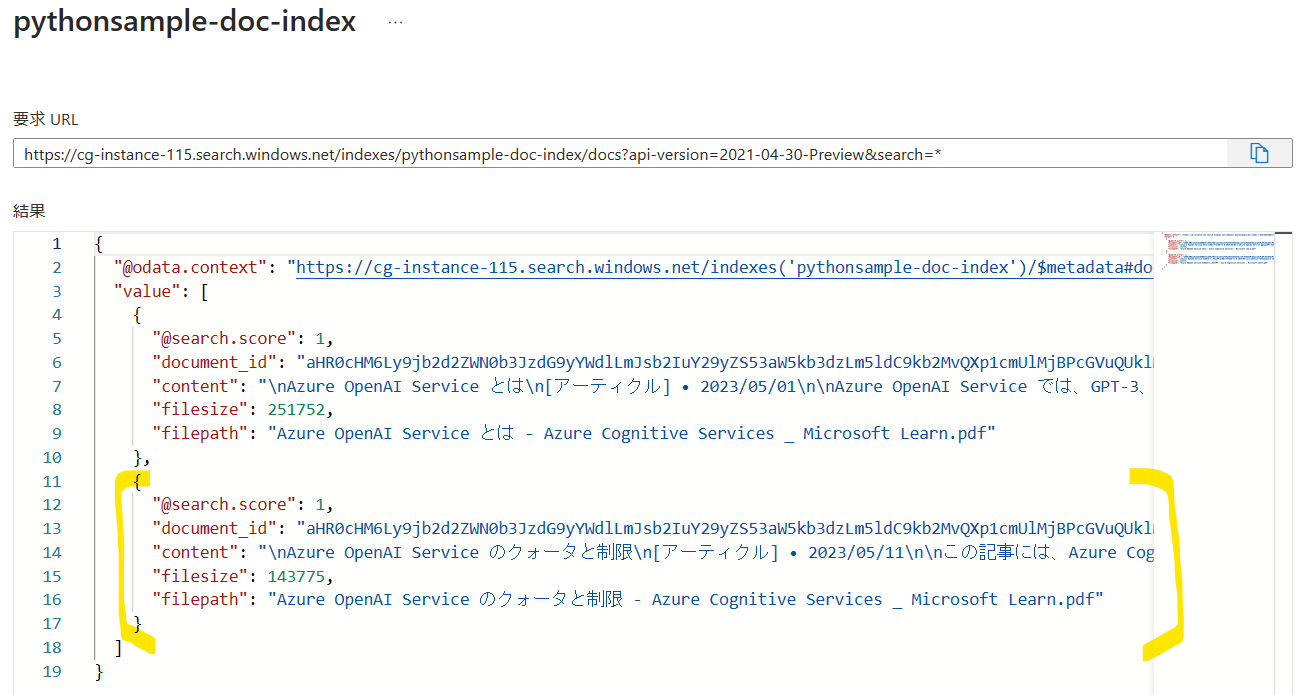
次にチャンク分割されたインデックス作成のため[インデクサー]->[pythonsample-doc-chunk-indexer]をクリックします。
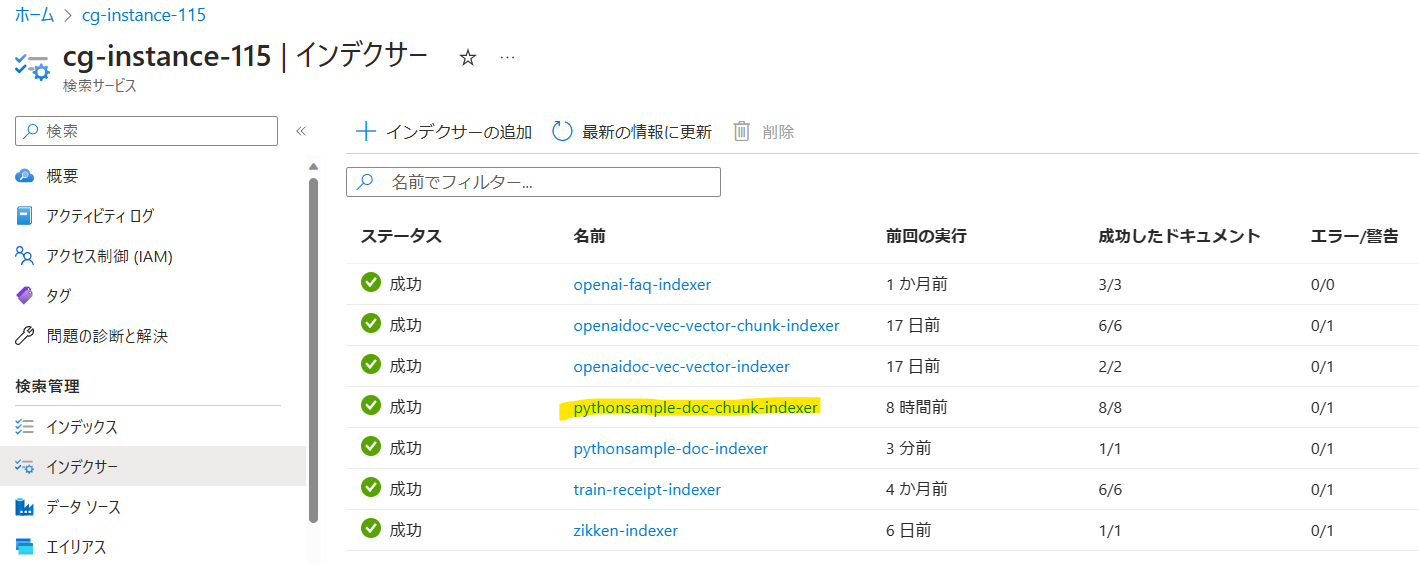
[実行]をクリックします。
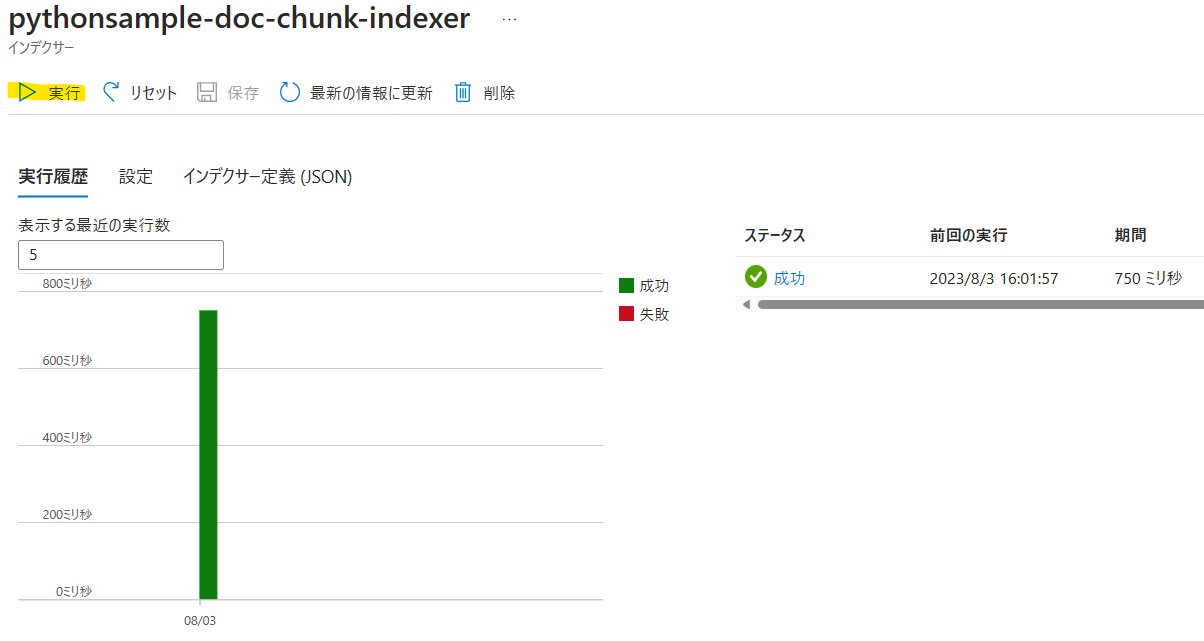
これでチャンク分割されたインデックスも作成できました。

流れをまとめると、下記の通りとなります。
- Blobにドキュメントをアップロード
- 生ドキュメントのインデクサーを実行
- チャンク分割されたドキュメントのインデクサーを実行
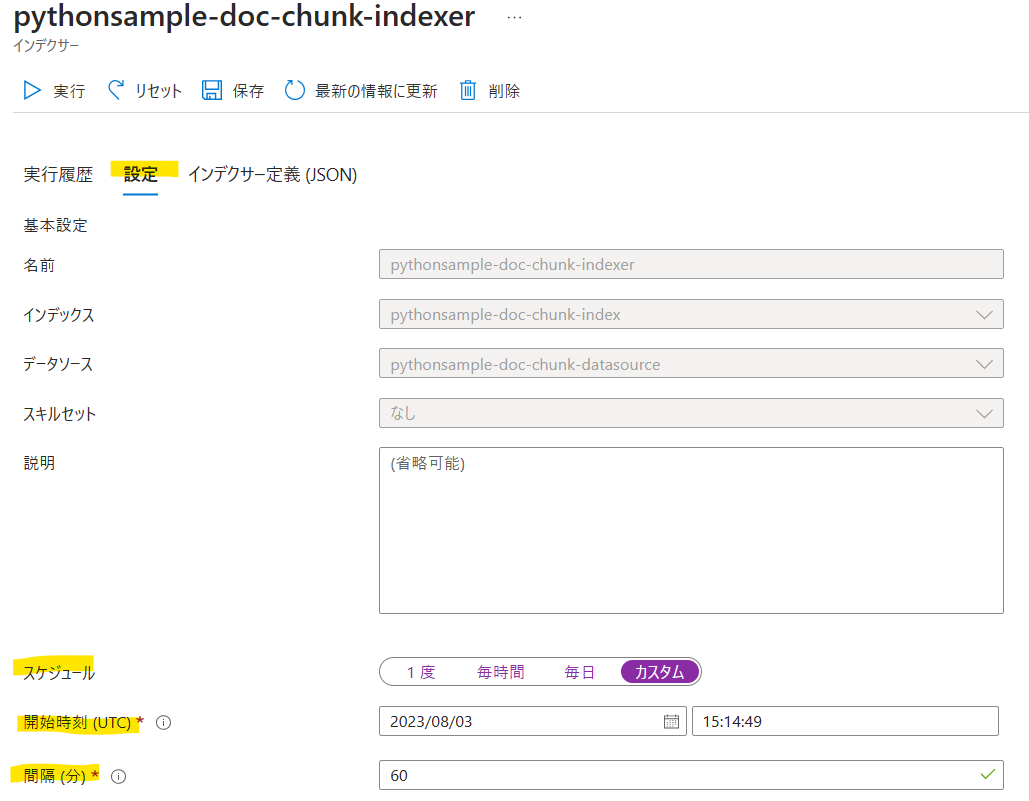
2->3のインデクサー作成の流れはスケジュール設定を行うこともできます。最初に2が実行されるようにして、何分後かに3が実行されるように設定しておけば、定期的にインデックスを自動更新することが可能です。
まとめ
プレビュー機能であるCognitive SearchのベクトルDBの構築手順に関して説明しました。事前準備は多いですが、①ベクトル検索③チャンク分割③言語アナライザーが日本語④インデクサーで自動実行の条件満たすには、23年8月時点でこの方法がベストかと思います。もっと簡単にできるようになってほしいですねー。。
