
はじめに
我がオフィスも4月よりフレックスタイム制となることになりました。8:30-17:30だったのが、±30分は始業就業を自由にしてよく、ランチタイムも11:30-13:30の間に1時間、自由となります。
問題なのが1日8時間労働は固定だということ。フレックスにありがちな週単位、月単位で規定労働時間を満たせばOKというものでは無いという点です。
イレギュラな事が発生して、8時間に満たない場合、給料が減るか有給が減ってしまいます。これを防止すべく働き始めた時間から起算するフレックスタイマーを作成しました。
ついでに時計と温度計も付けました。
Arduino Pro Micro(の互換機)でコピペキーボードで作成したコピペキーボードのアドオンというような形にしたいと思います。(アドオンといっても5V電源もらうだけですが)
構成
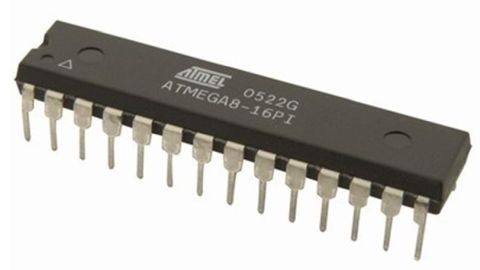
ATMEGA328P
Arduino UNOでも使用されているATMELのATMEGA328P RISCマイコンです。今回はArduino UNOプログラムを作成し、ATMEGA328P単体で使用します。
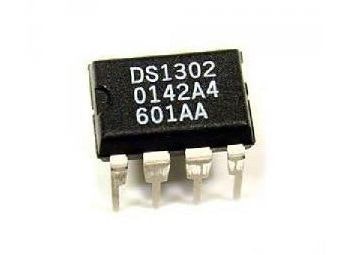
DS1302
リアルタイムクロックで、時間を管理してもらいます。PIC16F84のあたりではステップ数管理で時計を実現してたものですが、このようなチップが簡単に入手できるようになり、時刻の管理が簡単になりました。
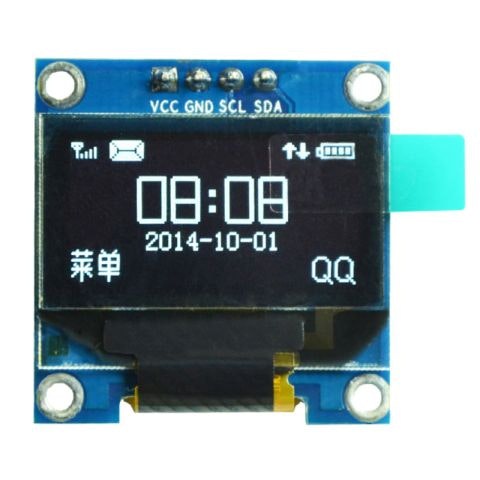
0.96"OLED (128x64)
Aliexpressで購入した0.96" 128x64単色のOLEDモジュールです。I2Cで通信します。
その他
その他、細かいものを列挙します。
- 10kΩ抵抗 x2
- NTCサーミスタ (10kΩ B=3940)
- 水晶発振子 16MHz x1
- 水晶発振子 32.768kHz x1
- MLCC 470nF x2
- MLCC 22pF x4
- タクトスイッチ x4
- Li電池&ホルダ
- 28pin ICソケット x1
- 8pin ICソケット x1
- コネクタ少々
- ユニバーサル基盤1枚
- 配線材料
- ポリイミドテープ
基盤はスルーホールの両面基盤を使用しました。
回路図
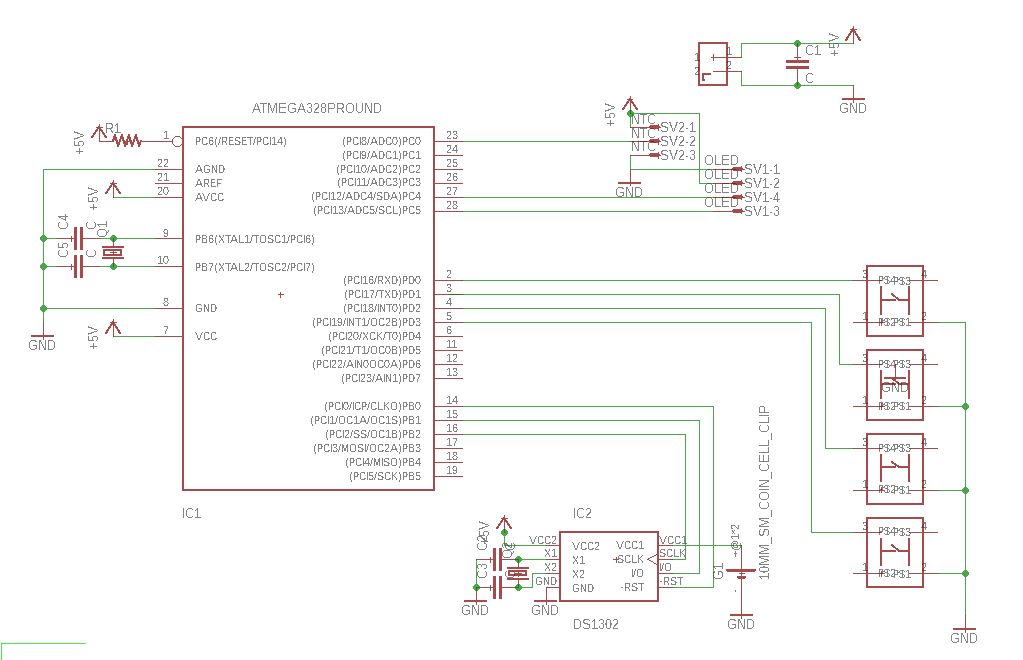
SV2がサーミスタですが、プログラム上ではA1に接続しています。
OLEDはI2CですのでA4とA5を使用します。
デバッグ
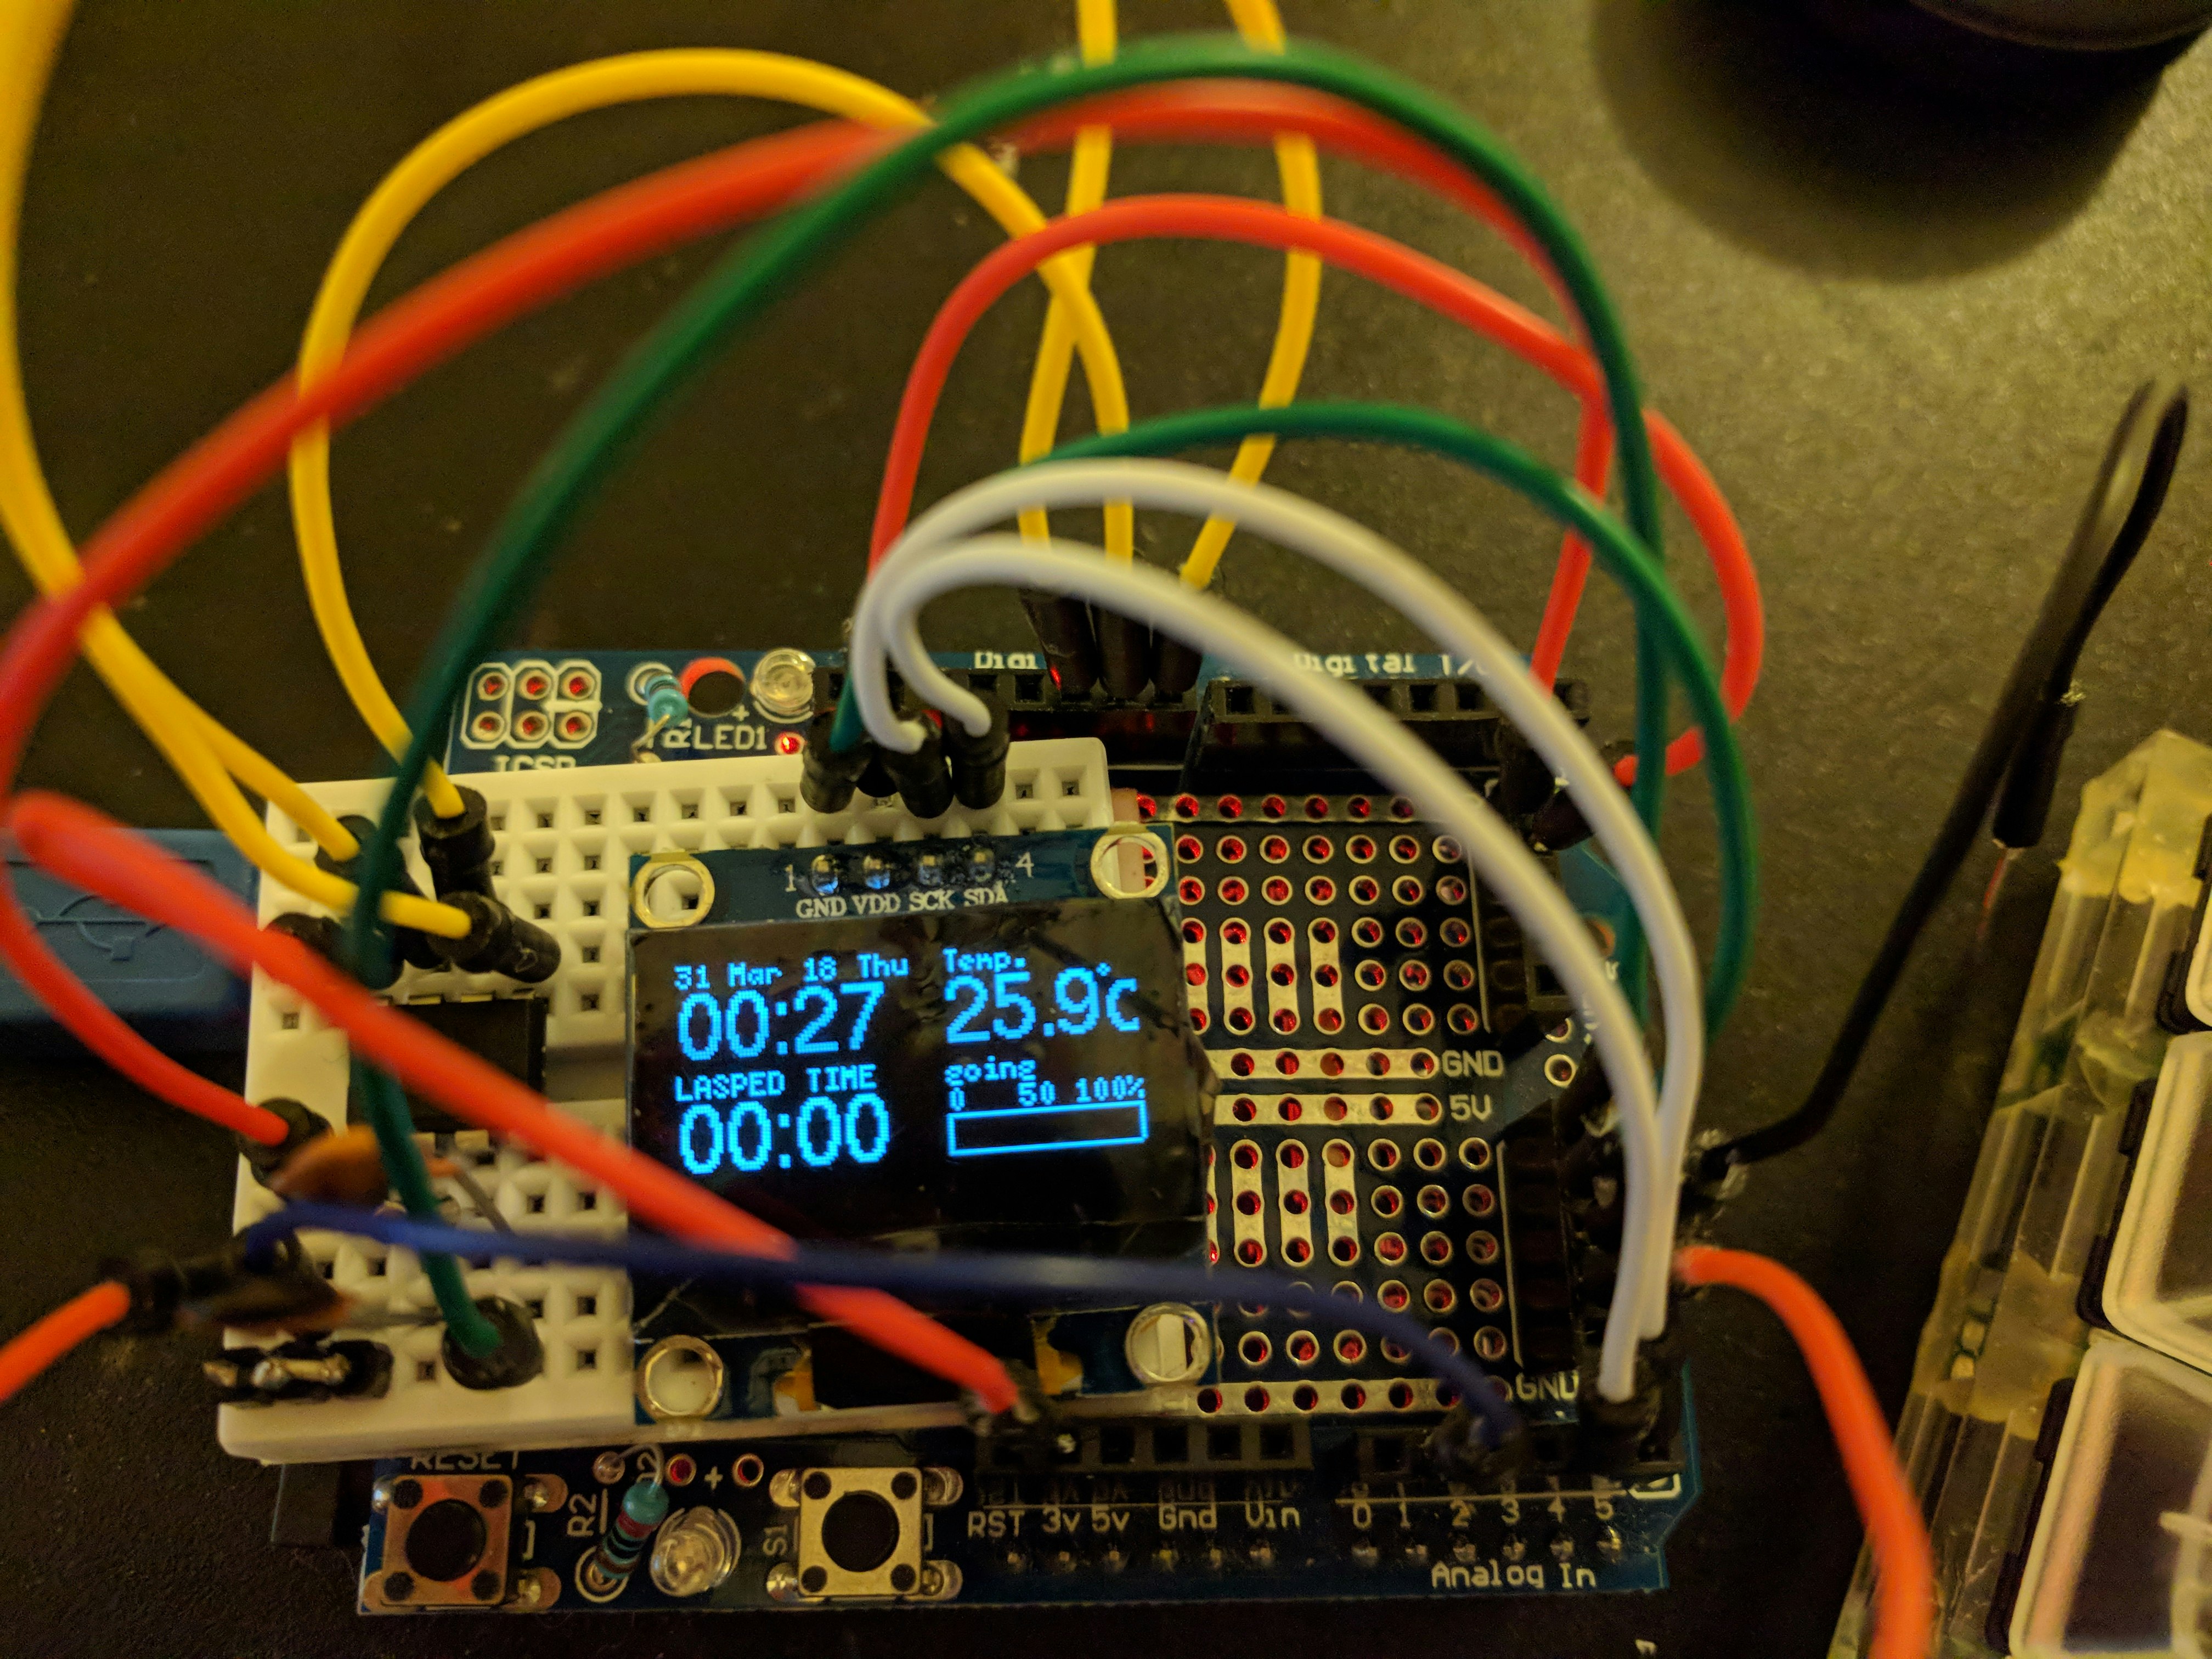
Arduino UNOとブレッドボードを使用してデバッグします。大まかに4項目で
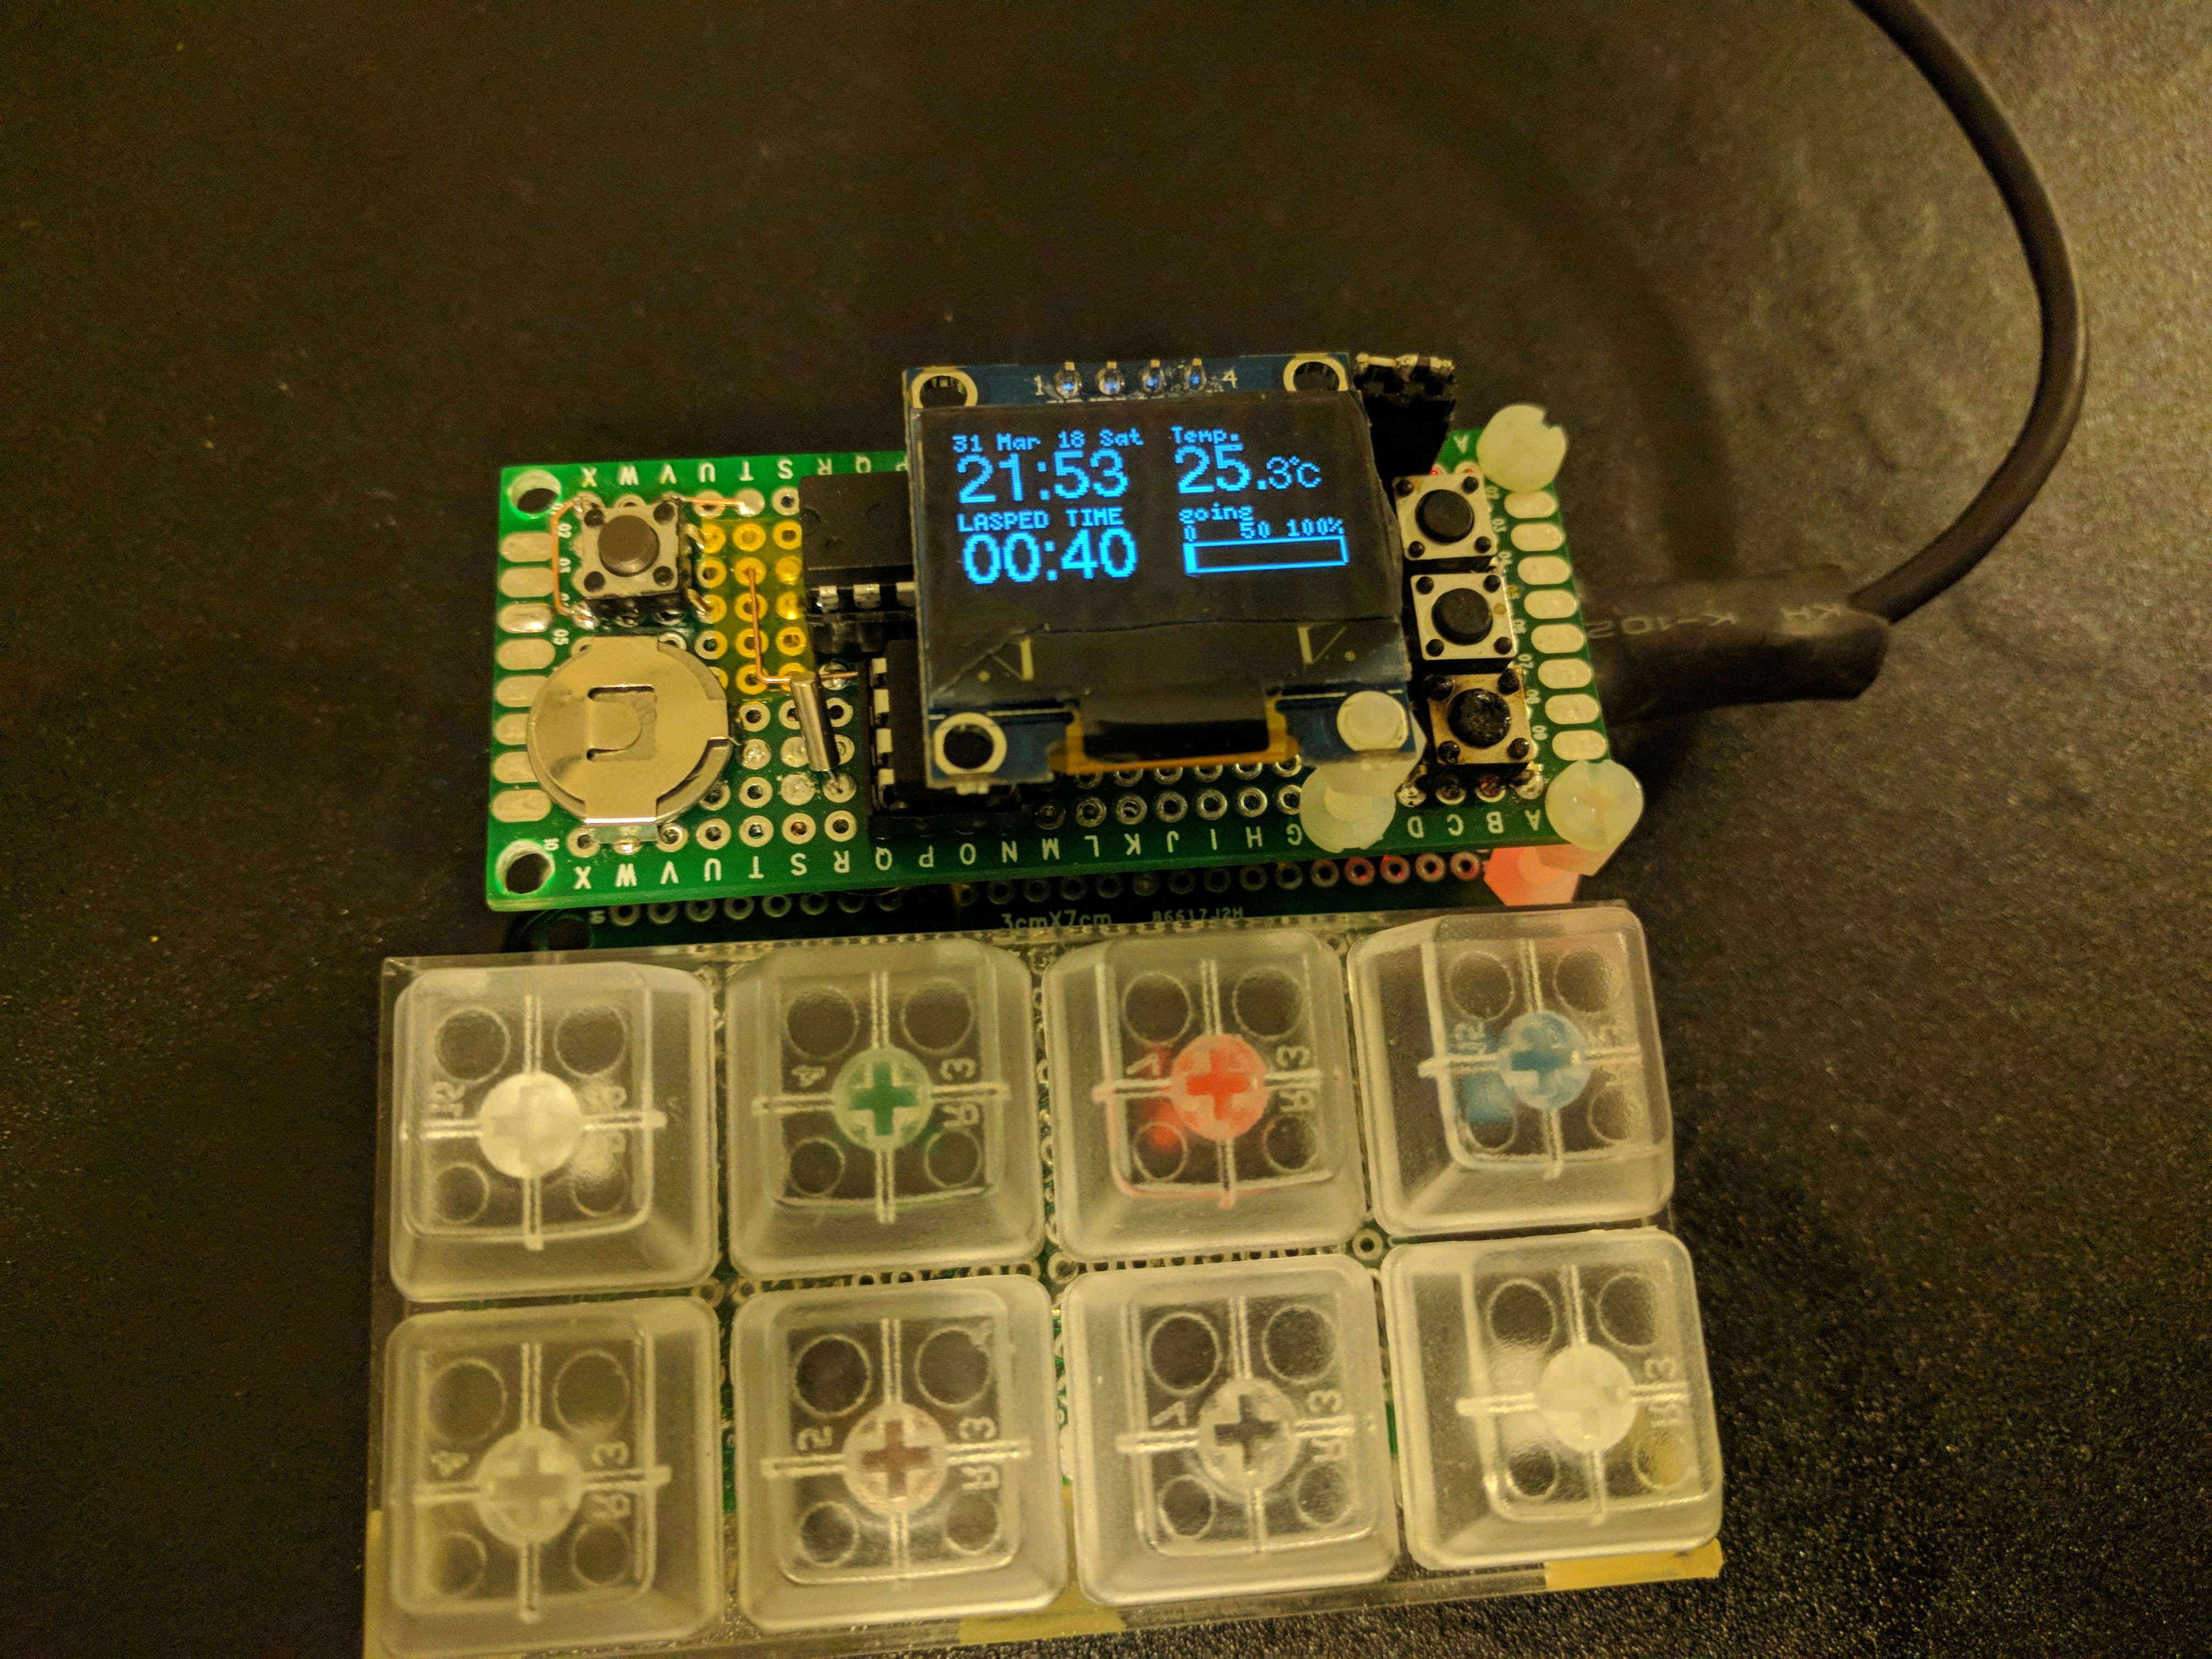
左上 : 時計
左下 : 仕事した時間(SW4でリセット可能)
右上 : 温度
右下 : 仕事した時間の100%バーグラフ
SW1押下で時計調整モードになります。
9時間経過すると家に帰ることをうながすモードになり、上記画面と下記を交互に繰替えします。SW4でキャンセルできます。
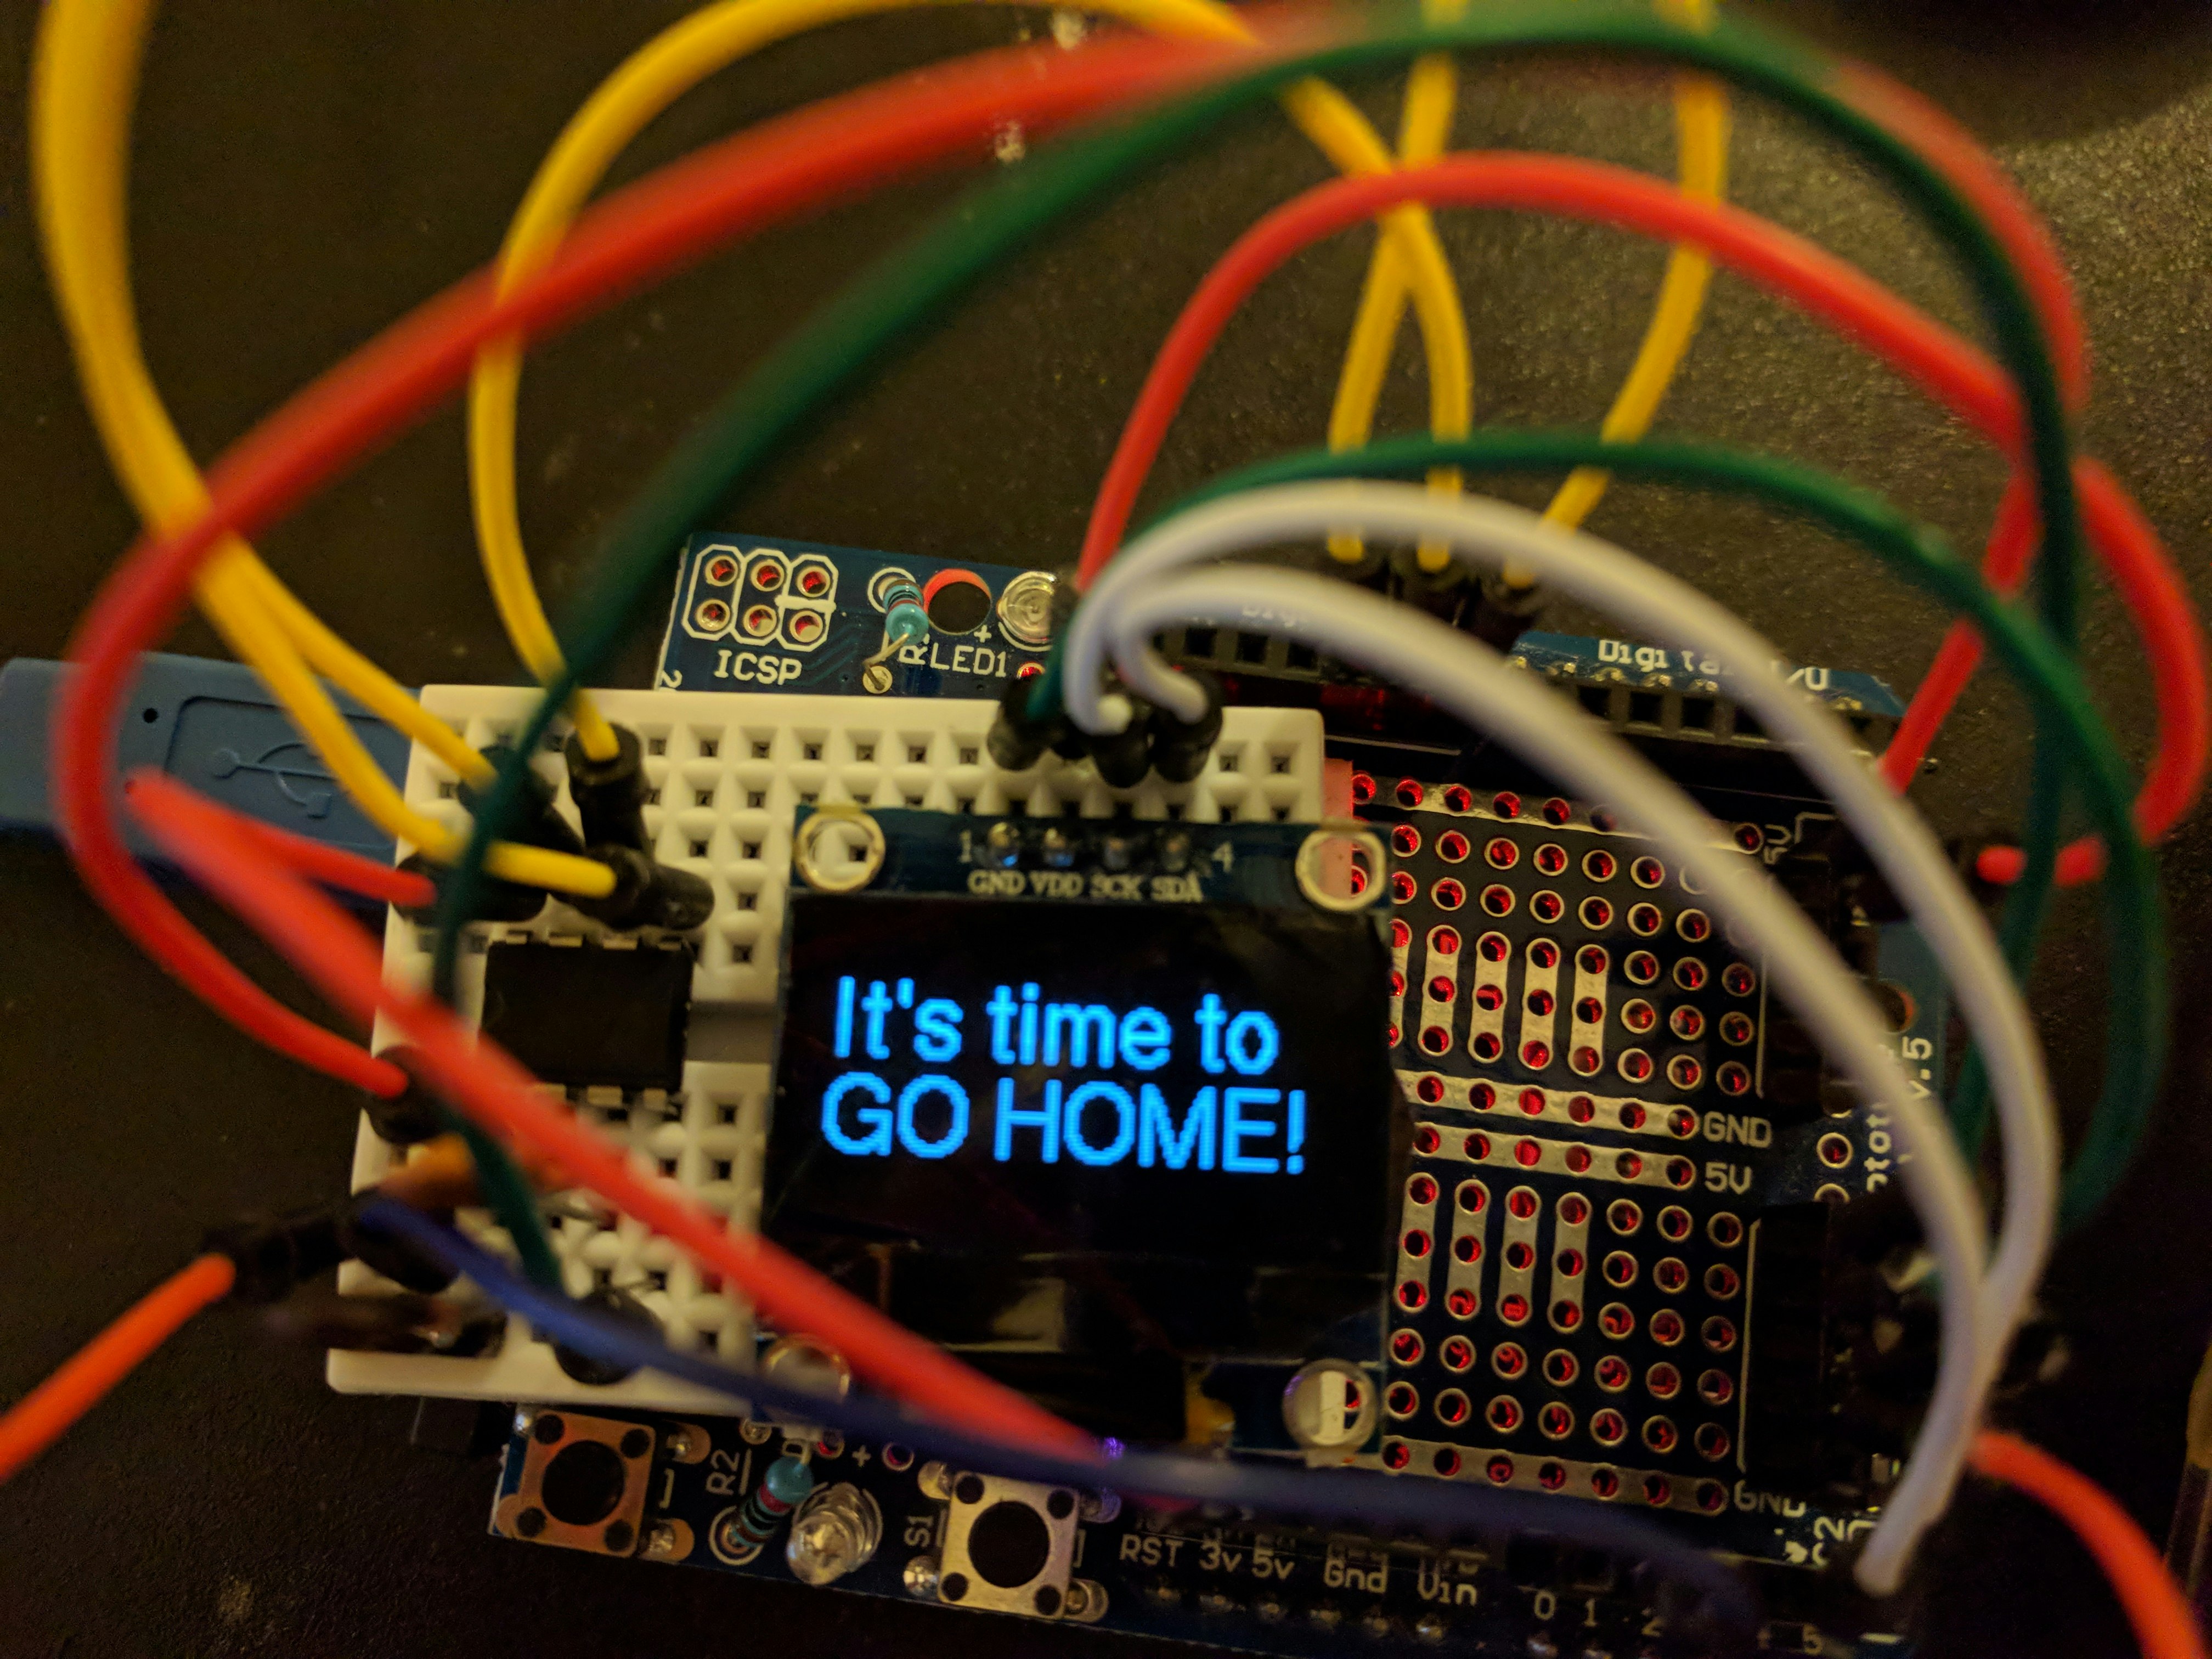
It's time or It's a time?
It's time なのか It's a time なのかわからず、嫁さんに聞いてみた。timeにaはいらんとのこと。theだとなんか意味が少々かわるらしい。よってIt's time to go home!でOKです。もっと"!"をいっぱい付けた方が感じが出るそうです。画面サイズの関係で1個のみとしています。
プログラム
全文掲載しておきます。
///////////////////////////////////////////////////////////////////////
// 2018 - OFFICE CLOCK
// DS1302 & OLED
//
// 2018.03.30 First Edition   Clock_DS1302_OLED_2LEDを改造
// 2018.04.01 R1 Work Reset(SW4)押下で仕事終了情報がリセットされないのを修正
//
///////////////////////////////////////////////////////////////////////
///////////////////////////////////////////////////////////////////////
// DESIGN
//
// NOW 01Jan Sun
//  11:00  23.3 c
// LAPSE   █G█O██
//  03:00  █HOME█
///////////////////////////////////////////////////////////////////////
///////////////////////////////////////////////////////////////////////
// RTC Module DS1302
//
// 1  VCC2  -- DEL-Backup VCC-DEL -> 5Vが正解
// 2  X1    -- XTal
// 3  X2    -- XTal
// 4  GND
// 5  CE     -- PIN 8   (2,3,4はNGだった)
// 6  I/O    -- PIN 9
// 7  SCLK   -- PIN 10
// 8  Vcc1   -- Backup VCC
// https://datasheets.maximintegrated.com/en/ds/DS1302.pdf
///////////////////////////////////////////////////////////////////////
// OLED with u8glib
//
// 1  VCC
// 2  GND
// 3  SCL  -- Pin A5 -OLD common use
// 4  SDA  -- Pin A4 -OLD common use
///////////////////////////////////////////////////////////////////////
///////////////////////////////////////////////////////////////////////
// NTC Sens
// B57421V2103J062 R:10k B3940(25/50)
// 1  VCC
// 2  NTC  -- A1 Pin
// 3  GND
///////////////////////////////////////////////////////////////////////
///////////////////////////////////////////////////////////////////////
// SWITCH
//
//   SET  -- Pin 0
//   +SW  -- Pin 1
//   -SW  -- Pin 2
//   Worktime reset -- Pin3
///////////////////////////////////////////////////////////////////////

# include <SPI.h>
# include <Time.h>         //http://www.arduino.cc/playground/Code/Time
# include <TimeLib.h>
# include <Wire.h>         //http://arduino.cc/en/Reference/Wire (included with Arduino IDE)
//We always have to include the library
# include <DS1302.h>
//We always have to include the library
# include "U8glib.h"   // OLED disp library
# include "MsTimer2.h"          // For switch reading


U8GLIB_SSD1306_128X64 u8g(U8G_I2C_OPT_DEV_0 | U8G_I2C_OPT_NO_ACK | U8G_I2C_OPT_FAST); // Fast I2C / TWI

//////////////////////////////////////////////////
// globals
int old_min_oled = -1;
short old_current = -1;
int old_temp = -999;
boolean bWorkFinished = false;
unsigned long unStartWorkingTime; // 仕事してる時間

volatile boolean b_sw0_stat = HIGH;
volatile boolean b_sw1_stat = HIGH;
volatile boolean b_sw2_stat = HIGH;
volatile boolean b_sw3_stat = HIGH;

int setup_stat = 0;   // 0: Normal mode, 1: hour 2: min, 3, year, 4, mon, 5, day

//////////////////////////////////////////////////////////////////////////////
//
// Set the appropriate digital I/O pin connections. These are the pin
// assignments for the Arduino as well for as the DS1302 chip. See the DS1302
// datasheet:
//
//   http://datasheets.maximintegrated.com/en/ds/DS1302.pdf
const int kCePin   = 8;  // Chip Enable
const int kIoPin   = 9;  // Input/Output
const int kSclkPin = 10;  // Serial Clock

// Create a DS1302 object.
DS1302 rtc(kCePin, kIoPin, kSclkPin);

int getTemp();


//////////////////////////////////////////////////////////////////////////////
// 現在時刻 global
Time g_t(2017, 1, 26, 21, 30, 50, Time::kThursday);

//////////////////////////////////////////////////////////////////////////////
// SETUP
//////////////////////////////////////////////////////////////////////////////
void setup() {
  Serial.begin(9600);

  pinMode(0, INPUT_PULLUP);   // SETUP
  pinMode(1, INPUT_PULLUP);   // + SW
  pinMode(2, INPUT_PULLUP);   // - SW
  pinMode(3, INPUT_PULLUP);   // WORKING TIME RESET

  // Wroking time reset
  unStartWorkingTime = millis();

  // RTC
  // Initialize a new chip by turning off write protection and clearing the
  // clock halt flag. These methods needn't always be called. See the DS1302
  // datasheet for details.
  rtc.writeProtect(false);
  rtc.halt(false);

  // Get the current time and date from the chip.
  g_t = rtc.time();

  // Time set TEST
  //Time t(2018, 3, 30, 21, 9, 50, Time::kFriday);
  //rtc.time(t);  // Set the time and date on the chip.

  // flip screen, if required
  // u8g.setRot180();
  u8g.setContrast(0);                  // 液晶のコントラスト設定 0:暗い, 255:明るい(あんまり変らない)

  // set SPI backup if required
  //u8g.setHardwareBackup(u8g_backup_avr_spi);

  // assign default color value
  if ( u8g.getMode() == U8G_MODE_R3G3B2 ) {
    u8g.setColorIndex(255);     // white
  }
  else if ( u8g.getMode() == U8G_MODE_GRAY2BIT ) {
    u8g.setColorIndex(3);         // max intensity
  }
  else if ( u8g.getMode() == U8G_MODE_BW ) {
    u8g.setColorIndex(1);         // pixel on
  }
  else if ( u8g.getMode() == U8G_MODE_HICOLOR ) {
    u8g.setHiColorByRGB(255, 255, 255);
  }


  MsTimer2::set(100, SwitchCheck);     // 500ms毎にSwitchCheck( )割込み関数を呼び出す様に設定
  MsTimer2::start();             // タイマー割り込み開始
}

//////////////////////////////////////////////////////////////////////////////
// MAIN
//////////////////////////////////////////////////////////////////////////////
void loop() {

  g_t = rtc.time();   // update

  if ( false == bWorkFinished )
  {
    ///////////////////////
    // Check Time update
    if (old_min_oled != g_t.min )
    {
      UpdateOledDisp(false);
      old_min_oled = g_t.min;
    }

    ///////////////////////
    // Check Working Time
    short current;
    current = GetWorkingMinutes();
    if (old_current != current )
    {
      UpdateOledDisp(false);
      old_current = current;
      if( current > 9*60 )  // 8時間働いた
        bWorkFinished = true;
    }

    ///////////////////////
    // Check Temp
    if ( old_temp != getTemp() )
    {
      UpdateOledDisp(false);
      old_temp = getTemp();
    }


    ///////////////////////
    // SETUP
    if ( LOW == b_sw0_stat ) // SETUPがACTIVEなら
    {
      setup_stat ++;
      if ( setup_stat >= 6 )
        setup_stat = 0;
      UpdateOledDisp(false);
    }
    // Adjust
    if ( setup_stat )
    {
      SetUpTime();
    }
  }
  else  // work finished)
  {
    static boolean flash = false;

    // しごと終了
    delay( 1000 );
    UpdateOledDisp( flash );
    flash = !flash;

  }
  delay(150);

}

////////////////////////////////////////////////////////
// 時間調整
void SetUpTime(void)
{
  int inc = 0;
  if ( LOW == b_sw1_stat && LOW == b_sw2_stat ) //同時おし
    ;   // なにもしない
  else if ( LOW == b_sw1_stat )
    inc = 1;
  else if ( LOW == b_sw2_stat )
    inc = -1;
  // int setup_stat = 0;   // 0: Normal mode, 1: hour 2: min, 3, year, 4, mon, 5, day,
  switch ( setup_stat )
  {
    case 1:   // Hour
      g_t.hr += inc ;
      if ( g_t.hr >= 24 ) g_t.hr = 0;
      if ( g_t.hr < 0 ) g_t.hr = 23;
      break;
    case 2:   // min
      g_t.min += inc ;
      if ( inc )g_t.sec = 0; // 秒をリセット 2018/02/04
      if ( g_t.min >= 60 ) g_t.min = 0;
      if ( g_t.min < 0 ) g_t.min = 59;
      break;
    case 3:   // year
      g_t.yr += inc ;
      if ( g_t.yr >= 2070 ) g_t.yr = 1971;
      if ( g_t.yr < 1971 ) g_t.yr = 2070;
      break;
    case 4:   // mon
      g_t.mon += inc ;
      if ( g_t.mon >= 12 ) g_t.mon = 0;
      if ( g_t.mon < 0 ) g_t.mon = 11;        break;
    case 5:   // day
      g_t.date += inc ;
      if ( g_t.date >= 32 ) g_t.date = 0;
      if ( g_t.date < 0 ) g_t.date = 31;        break;
      break;
    default:
      break;
  }

  rtc.time(g_t);
  UpdateOledDisp(false);
}
////////////////////////////////////////////////////////
// OLED 時間設定表示
void drawTimeSetSts(void)
{
  char timetext[12];
  if ( 0 != setup_stat)
  {
    const char* setupstring[] = {"HOUR", "MIN.", "YEAR", "MON.", "DAY ", "WEEK"};
    sprintf(timetext, "SET: %s(%02d)", setupstring[ setup_stat - 1 ], g_t.sec);  // 秒を表示 2018/02/04
  }
  else
    sprintf(timetext, "         ");
  u8g.setFont(u8g_font_5x7);
  u8g.drawStr(64, 63, timetext);
}
////////////////////////////////////////////////////////
// OLED 表示 Main
void UpdateOledDisp(bool bFinished)
{
  u8g.firstPage();
  do {
    if ( false == bFinished )
    {
      drawTimeDate();  // Time draw

      drawLapseTime();  // Worked time
      drawTemp();      // Temp
      drawTimeSetSts();
      drawBarGraph();
    }
    else
    {
      drawGoHome();   // 9時間過ぎたら
    }
  } while ( u8g.nextPage() );
}

/////////////////////////////////////////////////////////
// OLED 現在時刻表示
void drawTimeDate(void)
{
  char timetext[16];

  // Tite NOW DDJJJWEEK
  char str_mon[4];
  char str_day[4];
  strcpy( str_mon,  monthShortStr(g_t.mon));
  strcpy( str_day, dayShortStr( GetWeekday() ));
  sprintf(timetext, "%02d %s %02d %s", g_t.date, str_mon, g_t.yr % 2000, str_day );
  //sprintf(timetext, "%02d %s %02d%s%02d", g_t.date, str_mon, g_t.yr % 2000, str_day, g_t.sec );

  drawTitleTimeSub( &g_t, timetext, 0, 0);
}

/////////////////////////////////////////////////////////
// OLED 仕事した時間を表示
void drawLapseTime(void)
{
  char timetext[16];
  short current;
  current = GetWorkingMinutes();
  {
    Time t(2018, 1, 1, current / 60, current % 60, 0, Time::kSaturday);
    drawTitleTimeSub( &t , "LASPED TIME", 0, 31);
  }
}

/////////////////////////////////////////////////////////
// OLED 時間表示実行
//
// xpos, ypos : 描画左上のポイント
void drawTitleTimeSub(Time *DispTime, char* title, byte x, byte y)
{
  byte xpos, xorig;
  byte ypos ;
  byte hight;
  // Tite
  if ( title)
  {
    u8g.setFont(u8g_font_5x7);
    hight = u8g.getFontAscent(); // Fontのhightを取得
    xpos = x;
    ypos = y + hight;
    u8g.drawStr(xpos, ypos , title); // getFontAscent = hight
  }
  // 時間表示 ちょっと大きく表示
  if ( DispTime )
  {
    char timetext[8];
    xorig = x;
    //u8g.setScale2x2();  // 2倍表示有効
    u8g.setFont(u8g_font_helvR18);
    hight = u8g.getFontAscent();
    ypos += hight + 1;             // Fontのhightを取得

    // HOUR
    sprintf(timetext, "%02d", DispTime->hr);
    xpos = u8g.drawStr(xorig, ypos, timetext);
    xorig += xpos;

    //    u8g.setFont(u8g_font_courR14);
    xpos = u8g.drawStr( xorig , ypos - hight / 2 + u8g.getFontAscent() / 2, ":"); // ":" 中心に描画
    xorig += xpos;
    // MIN
    sprintf(timetext, "%02d", DispTime->min);
    //    u8g.setFont(u8g_font_helvR18);
    xpos = u8g.drawStr( xorig , ypos, timetext);

    // u8g.undoScale(); // reset setScale2x2();
  }

}

/////////////////////////////////////////////////////////
// OLED 右下 時間バーグラフ
/////////////////////////////////////////////////////////
void drawBarGraph(void)
{
  drawBarGraphSub( GetWorkingMinutes(), "going", 64 + 10, 31); // ちょっと時計表示から離す
}
/////////////////////////////////////////////////////////
// OLED 仕事時間バーグラフ
void drawBarGraphSub(short lapsed, char* title, byte x, byte y)
{
  byte xpos, xorig;
  byte ypos ;
  byte hight;
  // Tite
  if ( title)
  {
    u8g.setFont(u8g_font_5x7);
    hight = u8g.getFontAscent(); // Fontのhightを取得
    xpos = x;
    ypos = y + hight;
    u8g.drawStr(xpos, ypos , title); // getFontAscent = hight
    ypos += hight + 2;
  }
  // 0---50--100%
  // █████▒▒▒▒▒▒
  //
  u8g.drawStr(xpos, ypos , "0   50 100%"); // getFontAscent = hight
  // 四角表示
  ypos += 1; // 縦位置微調整
  u8g.drawHLine(xpos, ypos, 127 - x);
  u8g.drawHLine(xpos, ypos + 10, 127 - x);
  u8g.drawVLine(xpos, ypos, 10 );
  u8g.drawVLine(xpos + 127 - x, ypos, 10 );
  int per;
  per = (int)((float) (127. - (float)x) * ((float)lapsed / (9.*60.)) );
  u8g.drawBox(xpos, ypos, per, 10);

}
/////////////////////////////////////////////////////////
// OLED 家帰れ!表示 (全画面)
/////////////////////////////////////////////////////////
void drawGoHome(void)
{
  byte xpos = 0 ;
  byte ypos = 10 ;
  byte xorig;
  byte hight;

  char timetext[8];
  xorig = 0;
  //u8g.setScale2x2();  // 2倍表示有効
  u8g.setFont(u8g_font_helvR18);
  hight = u8g.getFontAscent();
  ypos += hight + 1;             // Fontのhightを取得

  // 整数部
  u8g.drawStr(xorig, ypos, "It's time to");
  u8g.drawStr(xorig, ypos + hight + 5, "GO HOME!");
}

/////////////////////////////////////////////////////////
// OLED 温度表示
void drawTemp(void)
{
  drawTempSub( getTemp(), "Temp.", 64 + 10, 0); // ちょっと時計表示から離す
}

/////////////////////////////////////////////////////////
// OLED 温度表示
//
// xpos, ypos : 描画左上のポイント
void drawTempSub(int nTemperature, char* title, byte x, byte y)
{
  byte xpos, xorig;
  byte ypos ;
  byte hight;
  // Tite
  if ( title)
  {
    u8g.setFont(u8g_font_5x7);
    hight = u8g.getFontAscent(); // Fontのhightを取得
    xpos = x;
    ypos = y + hight;
    u8g.drawStr(xpos, ypos , title); // getFontAscent = hight
  }

  // 温度表示 ちょっと大きく表示
  if ( 1 )
  {
    char timetext[8];
    xorig = x;
    //u8g.setScale2x2();  // 2倍表示有効
    u8g.setFont(u8g_font_helvR18);
    hight = u8g.getFontAscent();
    ypos += hight + 1;             // Fontのhightを取得

    // 整数部
    sprintf(timetext, "%02d.", nTemperature / 10);
    xpos = u8g.drawStr(xorig, ypos, timetext);
    xorig += xpos;

    // 少数部 (ちいさいフォント)
    u8g.setFont(u8g_font_helvR12);
    hight = u8g.getFontAscent();
    sprintf(timetext, "%01d", nTemperature % 10 );
    xpos = u8g.drawStr( xorig - 1 , ypos, timetext);
    xorig += xpos;

    u8g.drawCircle(xorig, ypos - hight + 1, 1);
    sprintf(timetext, "%c", 'c' ); //○は描画(コンパクト)
    xpos = u8g.drawStr( xorig , ypos, timetext);

    // u8g.undoScale(); // reset setScale2x2();
  }

}

/////////////////////////////////////////////////////////
// mill秒を分で返す
short Minutes(unsigned long mills)
{
  return (short)(mills / 1000 / 60);
}

/////////////////////////////////////////////////////////
// 労働時間を分で返す
short GetWorkingMinutes()
{
  return Minutes( millis() - unStartWorkingTime );
}
/////////////////////////////////////////////////////////
// 割り込み時に処理される関数
void SwitchCheck() {
  static boolean sw0 = HIGH;
  static boolean sw1 = HIGH;
  static boolean sw2 = HIGH;
  static boolean sw3 = HIGH;

  b_sw0_stat = digitalRead( 0 );
  if ( sw0 == b_sw0_stat )    b_sw0_stat = sw0;
  sw0 = b_sw0_stat;

  b_sw1_stat = digitalRead( 1 );
  if ( sw1 == b_sw1_stat )    b_sw1_stat = sw1;
  sw1 = b_sw1_stat;

  b_sw2_stat = digitalRead( 2 );
  if ( sw2 == b_sw2_stat )    b_sw2_stat = sw2;
  sw2 = b_sw2_stat;

  b_sw3_stat = digitalRead( 3 );
  if ( sw3 != b_sw3_stat && HIGH == b_sw3_stat )  // 押下してリリースしたらリセット
  {
    unStartWorkingTime = millis();
    bWorkFinished = false;  // R1 仕事完了フラグをリセット
  }
  sw3 = b_sw3_stat;
}

/////////////////////////////////////////////////////////
// 曜日を取得
// Zeller の公式で週の何日目か調べる
int subZeller( int y, int m, int d )
{
    if( m < 3 ) {
        y--; m += 12;
    }
    return ( y + y/4 - y/100 + y/400 + ( 13*m + 8 )/5 + d )%7;
}
int GetWeekday()
{
  return subZeller(g_t.yr, g_t.mon, g_t.date) + 1;
}

//*******************************************************
// NTC
//*******************************************************//
/////////////////////////////////////////////////////////
// NTC データ取得
int getTemp()
{
  int an1;
  int temp;
  an1 = analogRead(1);
  temp = calcTempA1(an1) - 0;
  return temp;
}
///////////////////////////////////////////////////////
// NTC
// for thermistor B57421V2103J062
int calcTempA1(int raw)
{
  float B = 3940; // 25-50
  //float B=3880;     // 25-80
  float T0 = 298.15;
  float R0 = 10.00; // NTC
  float R1 = 9.98; // R
  float rr1, t;
  rr1 = R1 * raw / (1024.0 - raw);
  t = 1 / (log(rr1 / R0) / B + (1 / T0));
  return (int)((t - 273.15) * 10.0); //unit 0.1 degree;
}
プログラム書き込み
デバッグ完了したのでATMEGA単体で使用できるようプログラムを書き込みます。
UNOのプログラムをATMEGA単体で使用するには、ATMEGA328にBootloaderを書き込み、プログラム転送することになります。
先人がいますのでリンクを貼ります。
Arduino UNOでATmega328 生DIPにbootloaderを書き込む
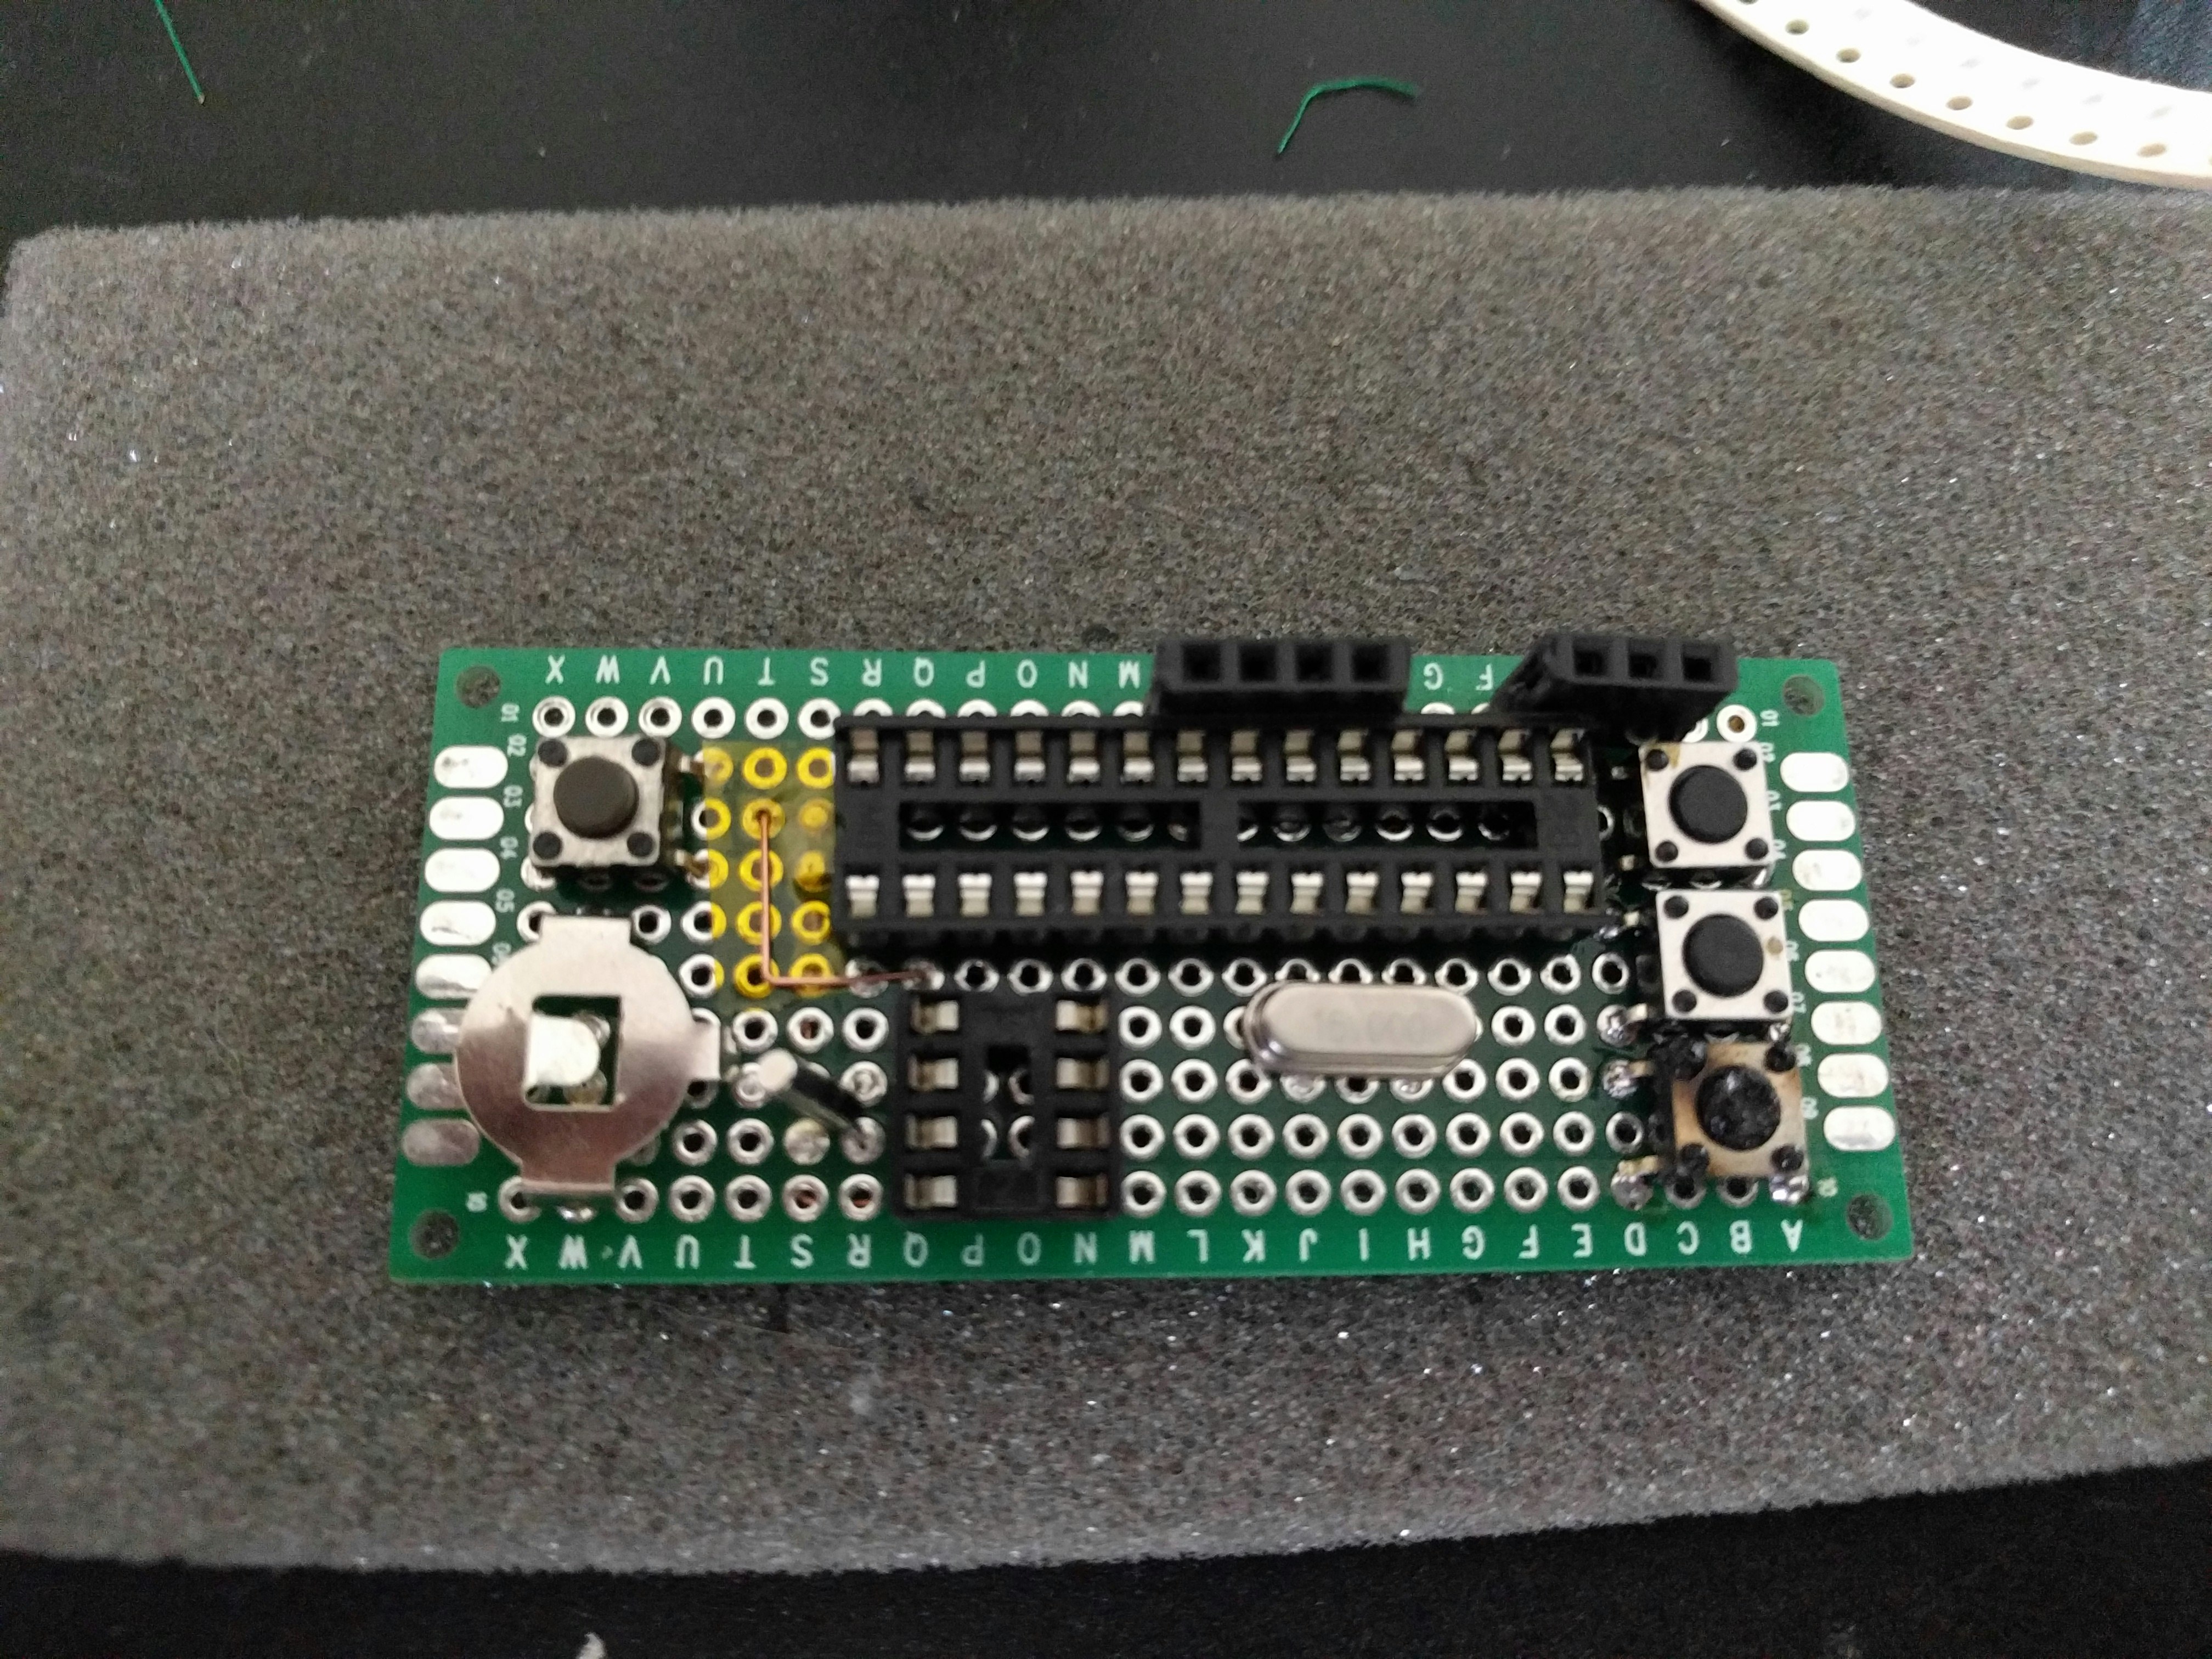
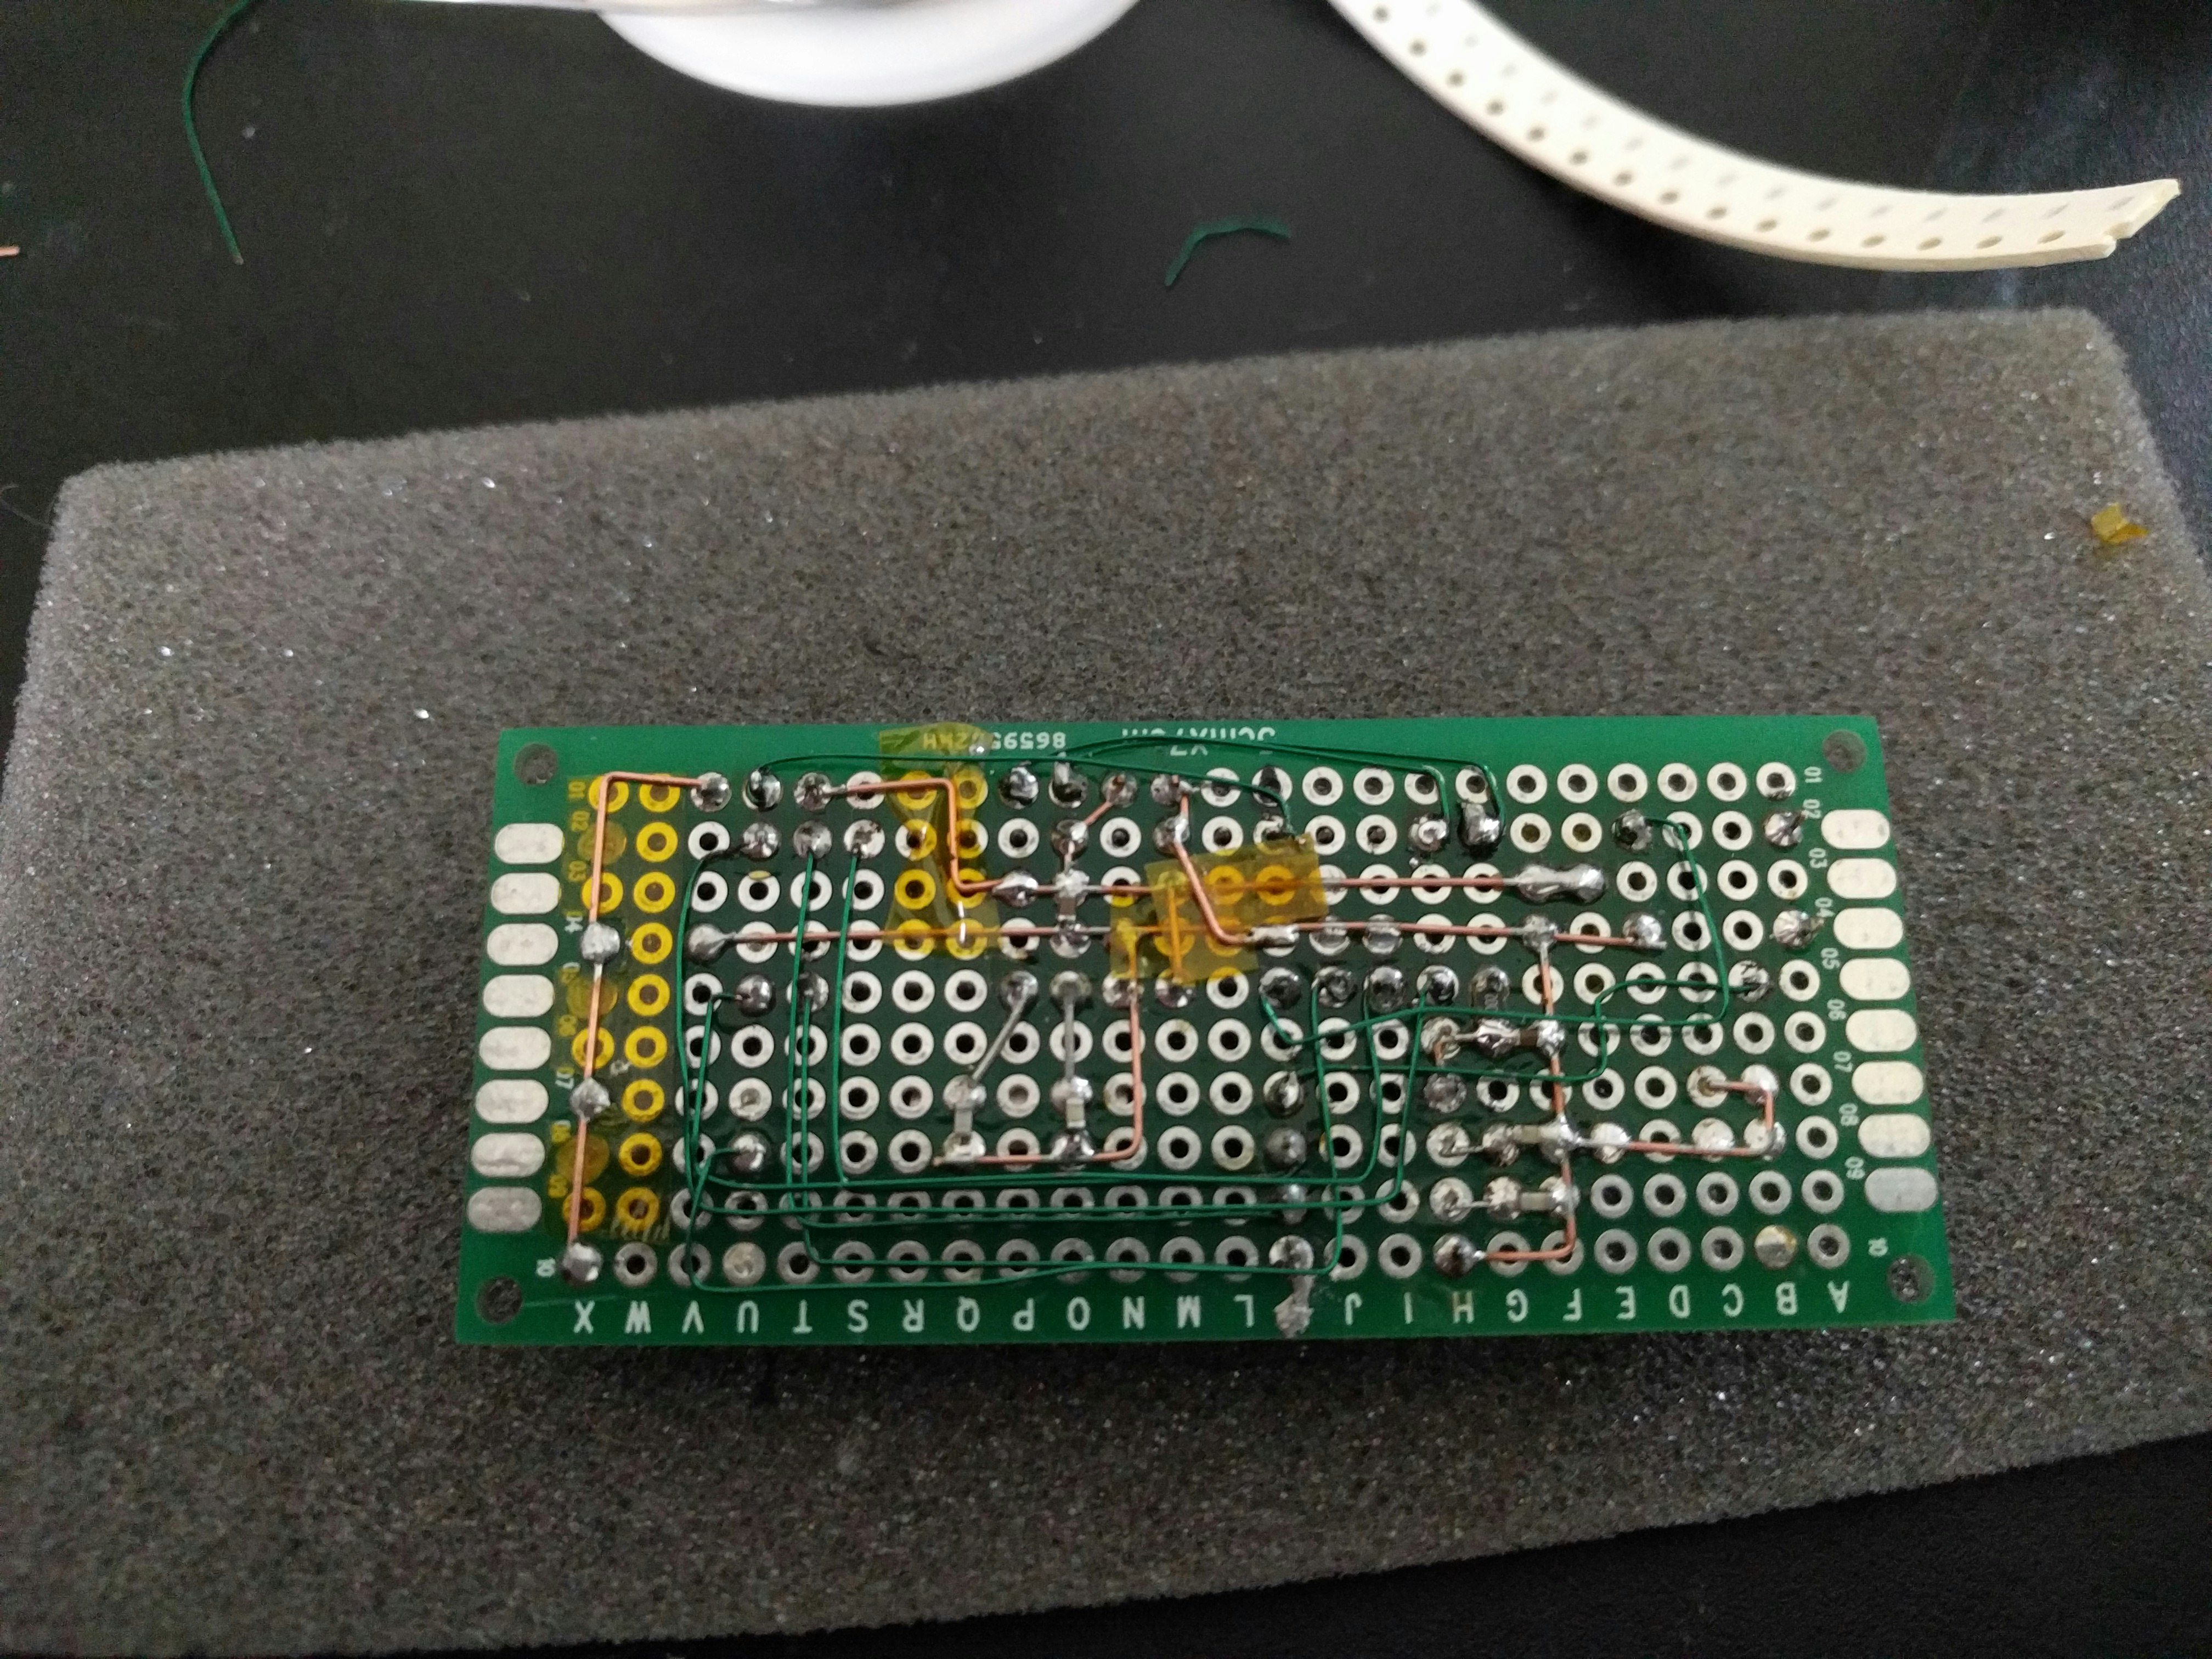
半田付け
7cm x 3cmの両面ユニバーサル基盤に実装しました。
下手くそな半田付けですが何かの参考になれば。
完成
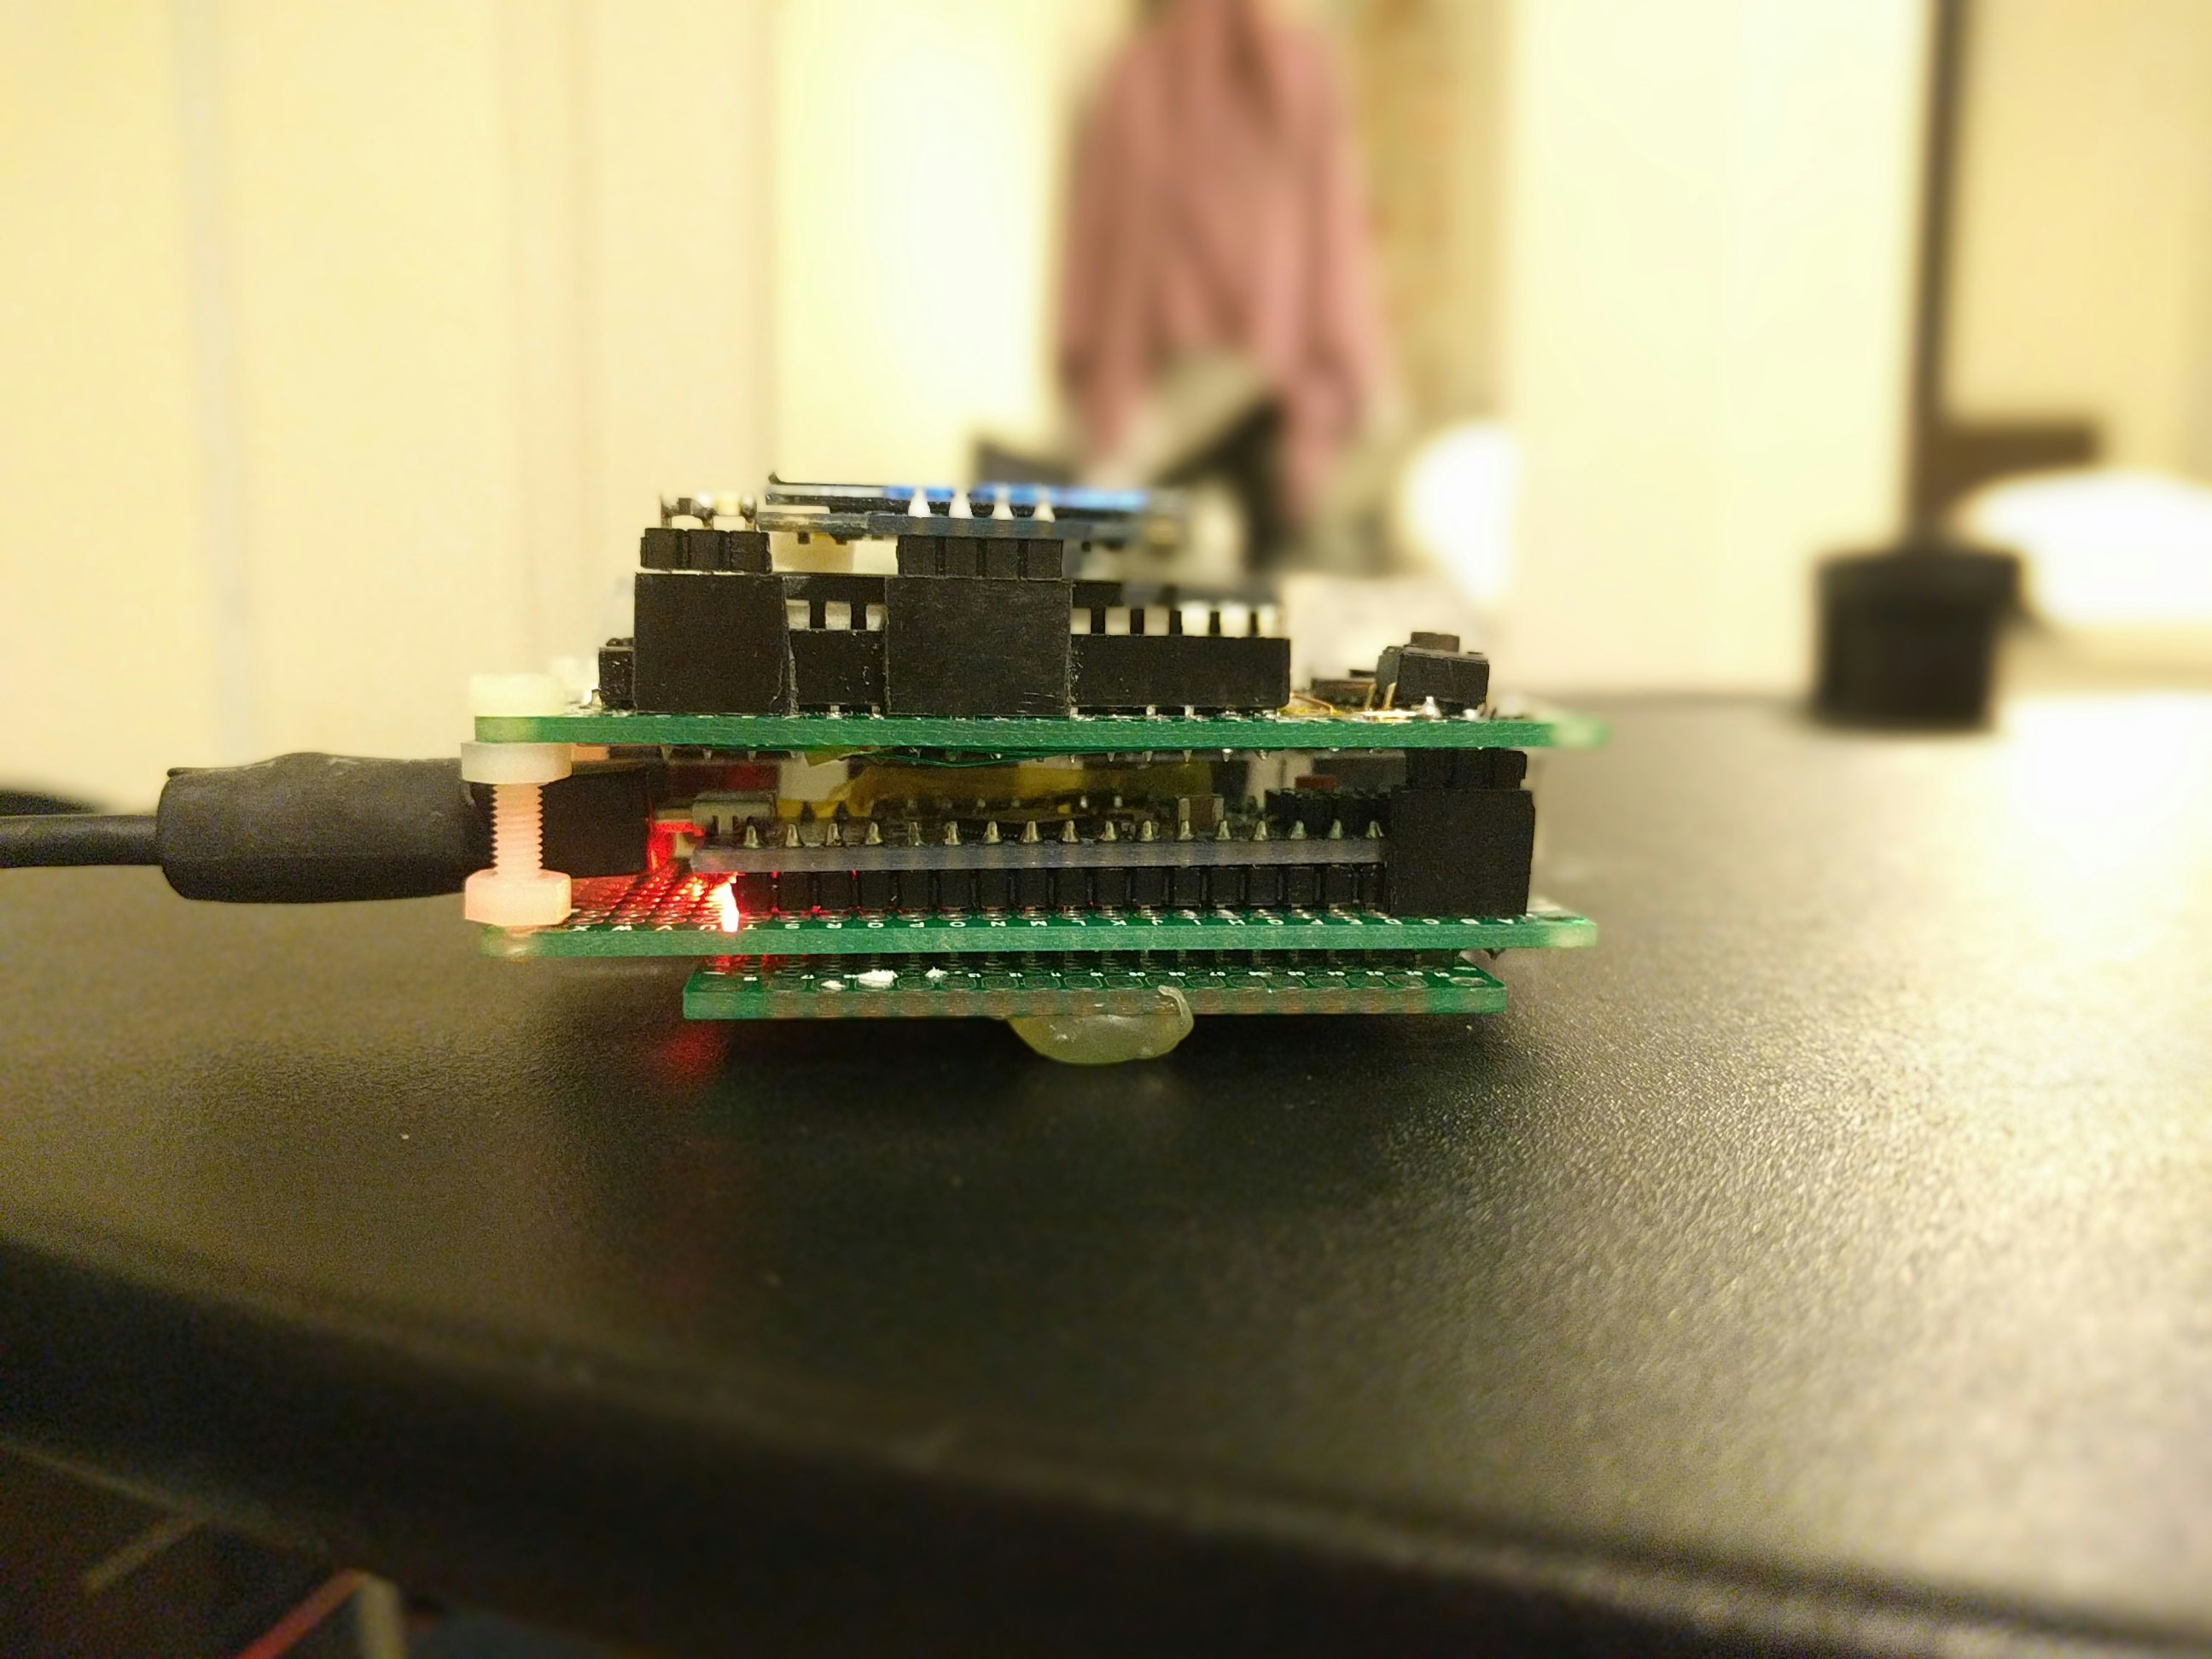
コピペキーボードにスタックして完成です。コピペキーボード用にはArduino Pro Miniを使用しているのでこちらに機能を追加することもできたのですが、会社のPCに接続して良いのはHIDデバイスのみのため、あえて2CPU体制としています。時計側は電源をもらっているのみですので、ウィルス感染の心配は無いと言い張れます。
終りに
グラフィックにはu8gライブラリを使用しています。
大きな文字のフォントは綺麗ですが、その分プログラム容量を使用します。機能が完成しても容量が残っているのであれば、フォントを追加して表示にメリハリを付けるという手順が良いと思います。温度計の小数点以下はこの手順で行いました。
2018/04/01 Ikeda