JavaScript本格入門(ISBN 978-4774184111)で基礎からJavaScriptを勉強するシリーズです。今回はChapter7から非同期処理についてです。
同期処理と非同期処理について学んだことを簡単に整理し、
同期処理と非同期処理を設計し実装したサンプルを提示します。
同期と非同期の整理
基本的に頭から順番に実行されていくので、下記のようなコードを書いた場合、
console.log('1st');
console.log('2nd');
実行結果
1st
2nd
これは直感的に理解しやすい動きです。
下記のようなコードだとどうなるでしょうか。
console.log("1st");
setTimeout(() => {console.log("2nd")}, 500);
console.log("3rd");
実行結果
1st
3rd
2nd
環境にもよりますが、このようになることが多いかと思います。
1stを出力した後、500ms待って2ndを出力したあと、3rdを出力するとはなりませんでした。
これは、setTimeout()が非同期的な動きをするためです。
身近な例として、Node.js標準のモジュールのfsには、ファイルを読み込む関数として、同期処理のものと非同期処理のものの2種類が用意されています。
readFileSyncの方は名前の通り、ファイルの読み込み処理が終わるまで次の処理を実行しない、同期処理の関数です。
readFileの方は、ファイルの読み込み中にも後続の処理を実行する、非同期処理の関数です。
同期非同期を意識して設計するには、使う関数が同期処理なのか非同期処理なのか、関数の仕様をしっかり理解しておくことが必要です。
非同期処理を行うの関数の見分け方のポイントとして、処理が終わった後に何かさせたいことが多いと思いますので、引数としてコールバック関数を受け付けるものが多いというのが、一つの特徴かと思います。
シンプルな非同期処理を実装してみる
避けては通れない知識
非同期関数の呼び出しと実装
// 非同期関数の実装 (A)
function asyncProcess(value) {
    return new Promise((resolve, reject) => {
        setTimeout(() => {
            if(value){
                resolve("非同期関数の実行に成功しました");
            }else{
                reject("非同期関数でエラーがありました");
            }
        }, 500);
    });
}

let value = true;

// 非同期関数の呼び出し (B)
asyncProcess(value).then(
    response => {
        console.log(response);
    },
    error => {
        console.log(error);
    }
);
非同期関数の実装 (A)
非同期にしたい関数(今回であればasyncProcess)内では、Promiseオブジェクトを返すようにします。Promiseコンストラクタのstatement部分に、非同期関数の処理を実装します。非同期関数内で正常に処理を終了させたい場合、resoleve関数を使用します。異常の場合、reject関数を使用します。
非同期関数の呼び出し (B)
非同期関数の結果は、thenメソッドを用いて受け取ります。
呼び出した非同期処理が正常終了した場合の処理をresponseのstatement部分に、異常終了した場合の処理をerrorのstatement部分に実装します。
実装サンプル集
サンプル1
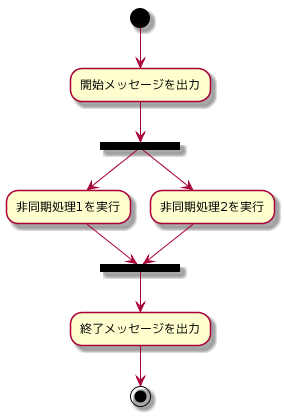
下記のような動きを実現してみます。
アクティビティ図
開始メッセージを出力した後、非同期処理1と非同期処理2を並列に処理します。
非同期処理1と非同期処理2の両方が終わったら、終了メッセージを出力します。
実装
function asyncProcess(procID) {
    return new Promise((resolve) => {
        let waitTime = Math.floor( Math.random() * 11);
        setTimeout(() => {
            resolve(`処理ID${procID}は${waitTime}msかかりました`);
        }, waitTime);
    });
}

console.log("処理開始");
Promise.all([
    asyncProcess(1)                         // (A)
    .then(
        response=>{
            console.log(response);
        }
    ),
    asyncProcess(2)                         // (B)
    .then(
        response=>{
            console.log(response);
        }
    )
]).then(
    response => {
        console.log("処理終了")
    }
);
asyncProcess()が自前で実装した非同期な関数です。
1~10msの範囲でランダムに時間を待った後、resolveする関数です。
したがって(A)と(B)はどちらが先に処理が終わるかわかりません。
この実装では(A)と(B)は並列に処理され、それぞれ非同期処理が終了すると何秒かかったかを出力します。
Promise.all([配列])は配列内のすべての非同期処理が成功した場合にコールバックするメソッドです。(A)(B)の両方がresolveを返したことを条件にthen以下を処理します。ちょうどアクティビティ図のマージノードの部分に当たります。
実行結果
1回目
処理開始
処理ID2は8msかかりました
処理ID1は10msかかりました
処理終了
2回目
処理開始
処理ID1は4msかかりました
処理ID2は6msかかりました
処理終了
サンプル2
アクティビティ図
サンプル1を少し発展させた形です。
非同期処理1と非同期処理3は並列に処理させますが、非同期処理2は非同期処理1の終了を待ってから処理させたいという動きです。
実装
function asyncProcess(procID) {
    return new Promise((resolve) => {
        let waitTime = Math.floor( Math.random() * 11);
        setTimeout(() => {
            resolve(`処理ID${procID}は${waitTime}msかかりました`);
        }, waitTime);
    });
}

console.log("処理開始");
Promise.all([
    asyncProcess(1)
    .then(
        response=>{
            console.log(response);
            return asyncProcess(2);
        }
    )
    .then(
        response => {
            console.log(response);
        }
    ),
    asyncProcess(3)
    .then(
        response=>{
            console.log(response);
        }
    )
]).then(
    response=>{
        console.log("処理終了");
    }
);
実行結果
1回目
処理開始
処理ID3は0msかかりました
処理ID1は5msかかりました
処理ID2は9msかかりました
処理終了
2回目
処理開始
処理ID1は1msかかりました
処理ID3は6msかかりました
処理ID2は9msかかりました
処理終了
非同期処理1と非同期処理3はどちらが先に処理されるか不定ですが、
非同期処理2は非同期処理1の後に実行されていることが確認できました。
おまけ
ES2017からは、asyncとawaitというものが使えるようになりました。
こちらの記事がとても分かりやすいです。
promiseとthenを使った実装は、定型文的なところが多いのでこちらを使うと実装がよりすっきりします。
サンプル1
async function asyncProcess(procID) {
    return new Promise((resolve) => {
        let waitTime = Math.floor( Math.random() * 11);
        setTimeout(() => {
            resolve(`処理ID${procID}は${waitTime}msかかりました`);
        }, waitTime);
    });
}

async function main(){
    console.log("処理開始");
    await Promise.all([
        asyncProcess(1)                         // (A)
        .then(
            response=>{
                console.log(response);
            }
        ),
        asyncProcess(2)                         // (B)
        .then(
            response=>{
                console.log(response);
            }
        )
    ]);
    console.log("処理終了")
}

main();
サンプル2
async function asyncProcess(procID) {
    return new Promise((resolve) => {
        let waitTime = Math.floor( Math.random() * 11);
        setTimeout(() => {
            resolve(`処理ID${procID}は${waitTime}msかかりました`);
        }, waitTime);
    });
}

async function main() {
    console.log("処理開始");
    await Promise.all([
        asyncProcess(1)
        .then(
            response=>{
                console.log(response);
                return asyncProcess(2);
            }
        )
        .then(
            response => {
                console.log(response);
            }
        ),
        asyncProcess(3)
        .then(
            response=>{
                console.log(response);
            }
        )
    ]);
    console.log("処理終了");
}

main();

