はじめに
SNSを見ていると、よく音ゲーのリザルト画面の写真を撮ってアップロードしている人を見かけます。私もたまに上げたりしてますが、撮った写真何かに使えないかな...?と考えたところ、タイトルのようなアプリを思いついたので勢いで作ってみています。
この記事はそんなアプリ開発の試行錯誤あれこれを記録する意味合いも込めつつ、光学文字認識(OCR)に関しての情報をまとめておこうと思い書いています。
今回はコナミアミューズメントが開発している「SOUND VOLTEX EXCEED GEAR(以下、SDVX)」という音楽ゲームのリザルト画面から文字を抽出していきます。
SOUND VOLTEX EXCEED GEAR | KONAMI コナミアーケードゲーム製品・サービス情報サイト
ちなみに、こちらのアプリを作る際の事前調査として、以下の記事で各OCRサービス・ライブラリの比較してみ記事を書いているのでこちらもご興味あればご覧ください。
【備忘】OCRサービス・エンジンの比較
環境
今回のアプリ開発は完全にローカル環境で、以下の構成で開発していきます。
- node.js 18.17.0
- React 18.2.0
- next.js 13.4.19
- python 3.9.12
node.js ライブラリ
$ npm ls
├── @emotion/react@11.11.1
├── @emotion/styled@11.11.0
├── @mui/icons-material@5.14.13
├── @mui/material@5.14.8
├── @types/axios@0.14.0
├── @types/bcrypt@5.0.0
├── @types/cors@2.8.15
├── @types/express@4.17.20
├── @types/jsonwebtoken@9.0.3
├── @types/node@20.6.0
├── @types/pg-promise@5.4.3
├── @types/react-dom@18.2.7
├── @types/react@18.2.21
├── autoprefixer@10.4.15
├── axios@1.5.0
├── bcrypt@5.1.1
├── cors@2.8.5
├── cross-env@7.0.3
├── eslint-config-next@13.4.19
├── eslint@8.49.0
├── express@4.18.2
├── jsonwebtoken@9.0.2
├── next@13.4.19
├── pg-promise@11.5.4
├── postcss@8.4.29
├── react-dom@18.2.0
├── react@18.2.0
├── tailwindcss@3.3.3
└── typescript@5.2.2
python ライブラリ
$ pip freeze
blinker==1.6.3
cachetools==5.3.2
certifi==2023.7.22
charset-normalizer==3.3.1
click==8.1.7
colorama==0.4.6
Flask==3.0.0
Flask-Cors==4.0.0
google-api-core==2.12.0
google-auth==2.23.3
google-cloud-vision==3.4.5
googleapis-common-protos==1.61.0
grpcio==1.59.0
grpcio-status==1.59.0
idna==3.4
importlib-metadata==6.8.0
itsdangerous==2.1.2
Jinja2==3.1.2
MarkupSafe==2.1.3
Pillow==10.1.0
proto-plus==1.22.3
protobuf==4.24.4
pyasn1==0.5.0
pyasn1-modules==0.3.0
python-dotenv==1.0.0
requests==2.31.0
rsa==4.9
urllib3==2.0.7
Werkzeug==3.0.1
zipp==3.17.0
フロントエンド
フロントエンド側の解説は手短に書こうと思います。
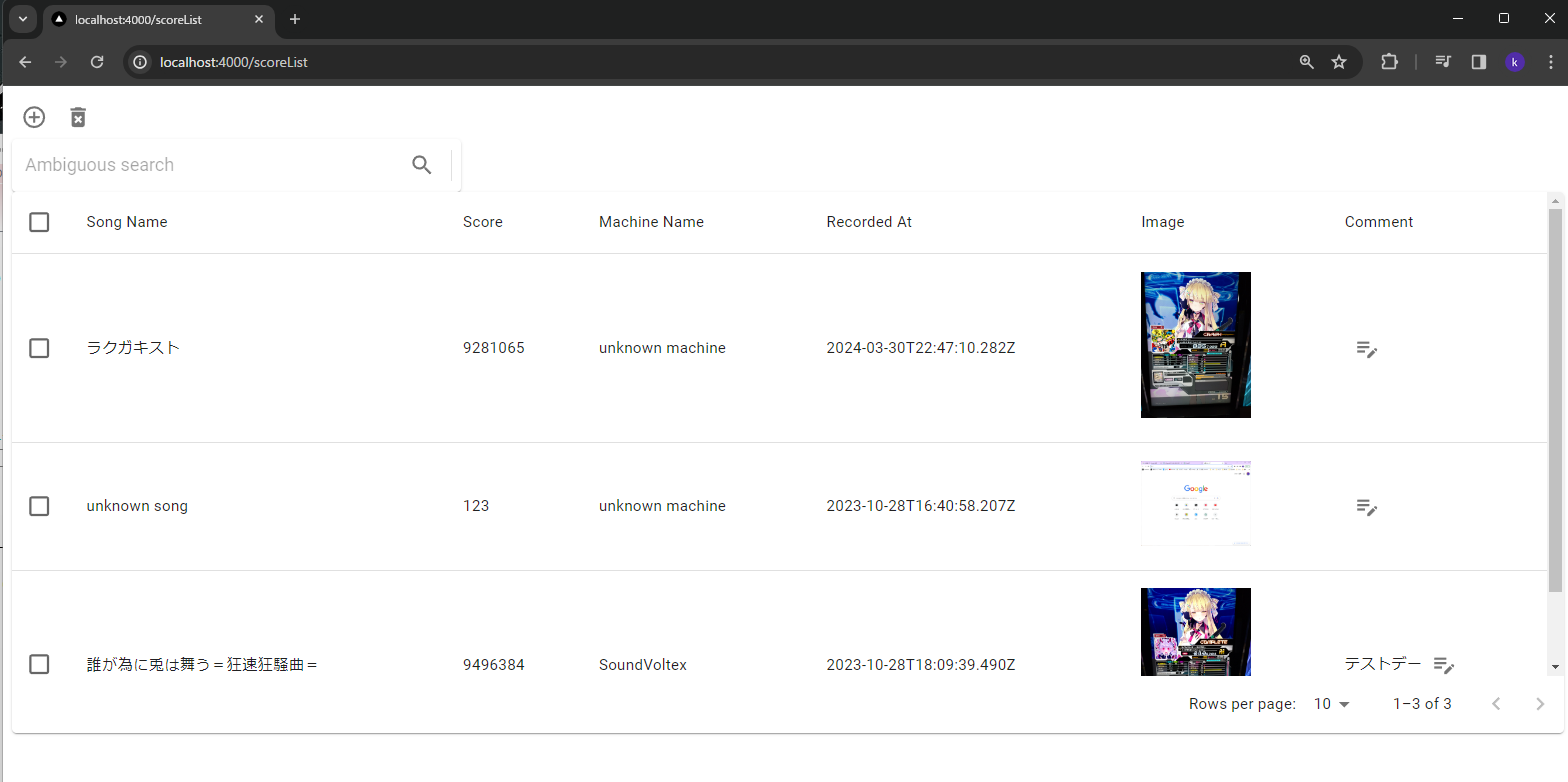
今回作ったアプリの画面は超シンプルに、真ん中に大きくテーブルを表示するレイアウトです。
周りにはデータ追加や削除、検索だったり、コメントを書き込んだりする機能を練習がてらつけてます。
データ登録時の処理だけ少し補足します。
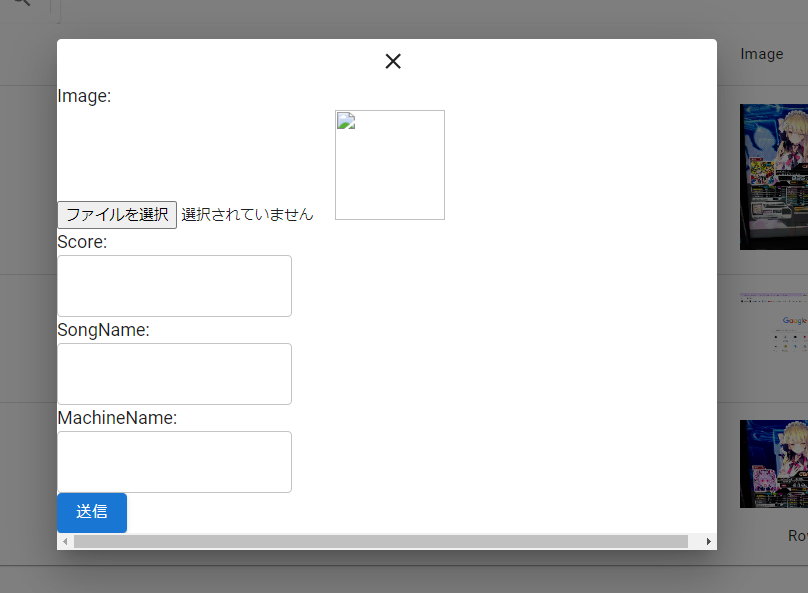
画面左上の「+」アイコンをクリックすると、以下のダイアログが表示されます。(レイアウトはあまり気にしないでください。。。)
ここで、「ファイルを選択」から画像をアップロードすると、OCRサーバへのAPIリクエストが送信される仕組みです。
(MachineNameという枠がありますが、いつかは色々な種類のゲームを対応させたいという思いで置いてあるだけで今回は何も使いません。)
アップロード処理のソースはこちら
import React, { useEffect, useState } from 'react'
import { Dialog, Box, Typography, IconButton, Button } from '@mui/material';
import UploadFormTextField from './UploadFormTextField'
import CloseIcon from '@mui/icons-material/Close'
import { arrayBuffer } from 'stream/consumers';
import axios from 'axios';
interface DialogProps {
    open: boolean;
    onClose: () => void;
}

const upload_url = 'http://localhost:4000/api/score/'

const UploadDialog: React.FC<DialogProps> = ({ open, onClose }) => {
    // スコアデータ
    const [score, setScore] = useState<string>('');
    // 楽曲名
    const [songName, setSongName] = useState<string>('');
    // 筐体名
    const [machineName, setMachineName] = useState<string>('');
    // 画像データ
    const [image, setImage] = useState<string | ArrayBuffer | null>('');

    /**
     * ファイルアップロードインプット変更時ハンドラ
     * @param e HTMLInputElement
     * @returns
     */
    const handleUploadImage = async (e: React.ChangeEvent<HTMLInputElement>) => {
        const file = e.target?.files?.[0];
        if (!file) {
            return;
        }

        if (file.type !== 'image/jpeg' && file.type !== 'image/png') {
            alert('jpeg/pngファイルを選択してください。');
            return;
        }

        await setImageBase64(file).then(async () => {

        })
    }

    const closeModal = () => {
        setSongName('')
        setScore('')
        setMachineName('')
        setImage('')
        onClose()
    }

    useEffect(() => {
        if(!image){
            return
        }
        // 画像解析APIの実行
        axios.post('http://localhost:8000/api/analyze', { 'image': image }).then((result) => {
            if(result.data.error){
                alert(result.data.error)
            } else {
                setSongName(result.data.title ? result.data.title : '')
                setScore(result.data.score ? result.data.score : 0)
            }
        }).catch((e) => {
            console.error(e)
        })
    }, [image])

    /**
     * 入力内容を送信する
     */
    const handleUploadSubmit = () => {
        const data = {
            "user": {
                "userId": "cac4f117-c394-4698-9524-819ca893cbd1",
            },
            "score": score,
            "image": image,
            "songName": songName,
            "machineName": machineName,
        }

        axios.post(upload_url, data).catch(() => {
            alert("登録に失敗しました。")
        })
        onClose();
    }

    const setImageBase64 = async (image: any) => {
        const reader = new FileReader();
        reader.readAsDataURL(image);
        reader.onload = () => {
            const data = reader.result?.toString() as string;
            setImage(data);
            return data;
        }
    }

    const handleChangeScore = (value: string) => {
        setScore(value)
    }

    const handleChangeSongName = (value: string) => {
        setSongName(value)
    }

    const handleChangeMachineName = (value: string) => {
        setMachineName(value)
    }

    return (
        <Dialog
            open={open}
            onClose={closeModal}
            PaperProps={{
                style: {
                    width: '50vw',
                    maxHeight: '90vh',
                    margin: 'auto',
                },
            }}
        >
            <IconButton color="inherit" onClick={closeModal} edge="end">
                <CloseIcon />
            </IconButton>
            <Box>
                <Typography>
                    Image:
                </Typography>
                <input type="file" onChange={handleUploadImage} />
                <img
                    src={(image as string) || ""}
                    alt=""
                    width="100px"
                    height="100px"
                />

                <Typography>
                    Score:
                </Typography>
                <UploadFormTextField value={score} onChange={handleChangeScore} />

                <Typography>
                    SongName:
                </Typography>
                <UploadFormTextField value={songName} onChange={handleChangeSongName} />

                <Typography>
                    MachineName:
                </Typography>
                <UploadFormTextField value={machineName} onChange={handleChangeMachineName} />

                <Box>
                    <Button
                        variant="contained"
                        onClick={handleUploadSubmit}
                    >
                        送信
                    </Button>
                </Box>
            </Box>
        </Dialog>
    )
}

export default UploadDialog;
バックエンド
バックエンドは、APIサーバーとOCRサーバーの2つに分けて立てました。
APIサーバーはNode.js、OCRの方はPythonのFlaskを使用しています。
APIサーバー
こちらも手短に、基本的なCRUD機能を入れているので紹介です。
- 検索機能
ページアクセス時に条件なしで全データを取得したり、コメントや曲名で検索できます。(スコアとかで検索もそのうち追加したいです。。。) - 登録機能
リザルト画像をアップしてスコアを登録できます。 - 編集機能
現状はコメントが編集できるくらいです。 - 削除機能
登録したデータを削除します。複数選択してまとめて削除もできます。
OCRサーバー
やっと本題です。
OCRサーバーでは、画像をアップロードした際にその画像からスコアと曲名をOCRで抽出する役割があります。
例えば以下のような画像をアップロードした時に、赤枠で囲った部分の文字を抽出しています。
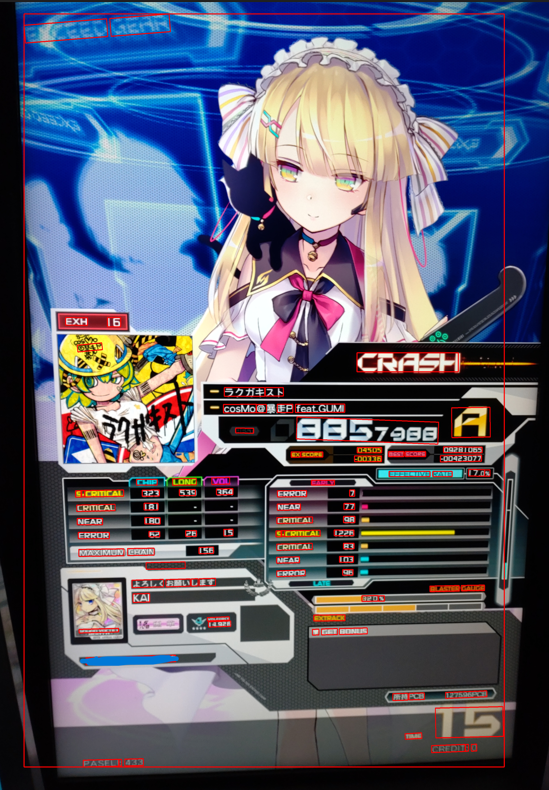
(参考:SOUND VOLTEX EXCEED GEAR リザルト画面)
スコアの抽出
スコアは画像から抽出できた全ての文字からスコアのフォーマットと一致するものを取り出します。SDVXのスコアは最大で「1000000」なので、pythonのreモジュールを使ってこれに一致する数字を全て取り出します。
リザルト画面では、今回のプレイ結果のスコアと、過去最高のスコアの2つが画面上に表示されており、上記の方法では、2つとも取り出してしまいます。そのため、今度はどちらが今回のスコアかを判定しなくてはいけません。

そこで、文字の座標データを利用して判別するようにしてみました。
抽出した文字列には、画像のどこから抽出したのかが分かるように、4点の座標データが含まれています。文字の位置を比較して、どちらが今回のスコアの位置なのかを判定します。
OCRの結果をjsonで取得した際に、以下のような文字と抽出領域を表す座標データが入っているのでこちらを活用します。
{
    "description": "9876458",
    "boundingPoly": {
        "vertices": [
            {
                "x": 1547,
                "y": 1490
            },
            {
                "x": 1586,
                "y": 835
            },
            {
                "x": 1696,
                "y": 842
            },
            {
                "x": 1657,
                "y": 1497
            }
        ]
    }
}
具体的には以下の画像のように見て、より左側にあるスコアが今回のスコアである、と判定するようにしました。

# 正規表現で取り出すパターン(スコア取る用で2つ取れる+領域で判定
score_pattern = r'\d{8}'
# 現スコアと最高スコアを取ってくる
# 全文から取ってきてるが他にもマッチする可能性がありそうなら単語ごと判定にする
match_score_list = re.findall(score_pattern, full_text, re.S)

# 現スコアの座標格納
match_score_pos = {
    'x': 0,
    'y': 0
}

# 1つもマッチしない場合はエラー
if len(match_score_list) == 0:
    raise Exception('no match score pattern')

# 0未満、10000000より大きい場合は除外
tmp_list = []
for i in range(len(match_score_list)):
    if int(match_score_list[i]) > 0:
        tmp_list.append(match_score_list[i])
match_score_list = tmp_list
print('[d] match_score_list: {}'.format(match_score_list))

# 座標を見てどっちのスコアが現スコアか判定する
# 座標は画像左上原点で考える
if len(match_score_list) == 1:
    result['score'] = int(match_score_list[0])
    print(f"score: {result['score']}")
else:
    x = 100000000
    for item in item_list:
        if item['description'] in match_score_list:
            # 含まれていたら左上のx座標を取り出して保持する
            # 次のforループで比較して、小さい場合はスコアと座標を更新
            vertices = item['boundingPoly']['vertices']
            print('[d] description: {}, vertices: {}'.format(item['description'], vertices[0]))
            if x > vertices[0]['x']:
                x = vertices[0]['x']
                result['score'] = item['description']
曲名の抽出
次に曲名を取ってくることを考えたのですが、曲名にはフォーマットがありません。なので、これだ!という風に絞り込んだりができません。
じゃあどうしようか、というわけなのですが、ここでも座標データをうまく使って抽出しようと思います。
# 抽出スコアの左上の座標を取得
for item in item_list:
    print(f"if result['score']: {result['score']}:type:{type(result['score'])}, item: {item['description']}:type:{type(item['description'])}.")
    if str(result['score']) == item['description']:
        print(f"matched description: {item['description']}")
        match_score_pos['x'] = item['boundingPoly']['vertices'][0]['x']
        match_score_pos['y'] = item['boundingPoly']['vertices'][0]['y']

# スコアのXより小さい かつ スコアのZより大きい場所の文字何があるか出力してみる
print(f"result pos: {match_score_pos}")

# x座標がmatch_score_pos['x'] -200 の間、かつy座標がmatch_score_pos['y'] +400 までの間
match_title_list = []
for item in item_list:
    if 'x' not in item['boundingPoly']['vertices'][0]:
        # 左上の座標がない場合はスキップ
        print(f"[0]番目の座標なし:{item}")
        continue

    title_x = item['boundingPoly']['vertices'][0]['x']
    title_y = item['boundingPoly']['vertices'][0]['y']
    print(f"「{item['description']}」title(x, y)=({title_x}, {title_y}), score(x, y)=({match_score_pos['x']}, {match_score_pos['y']})")
    if match_score_pos['x'] -200 <= title_x and match_score_pos['x'] > title_x and match_score_pos['y'] + 400 >= title_y:
        match_title_list.append({
            'description': item['description'],
            'x': item['boundingPoly']['vertices'][0]['x'],
            'y': item['boundingPoly']['vertices'][0]['y']
        })

print(f"タイトル座標候補と文字列:{match_title_list}")

# x座標が小さいものかつ差が50以内のものを抽出
title = ''
min_pos_x = 1000000
for item in match_title_list:
    if min_pos_x > item['x']:
        min_pos_x = item['x']

for item in match_title_list:
    if min_pos_x + 50 >= item['x'] and min_pos_x -50 <= item['x']:
        title += item['description'] + " "
ここまでで、スコアと曲名を抽出できたので、最後にこのデータをまとめて辞書型データに入れてレスポンスデータに入れています。
@app.route('/api/analyze', methods=["GET", "POST"])
def analyze():
    body = request.json

    # 画像データがあるか判定
    if 'image' in body:
        image_base64 = body['image']
        extract_data = analyzer.google_vision(image_base64)
        print('[d] google vision response: {}'.format(extract_data))
        # 処理結果を返却
        if 'error' in extract_data:
            return {
                'error': ''
            }
        return {
            'title': extract_data['title'] if extract_data is not None else '',
            'score': extract_data['score'] if extract_data is not None else 0
        }, 200

    else:
        return jsonify({'message': 'no image data'}), 500
動作確認
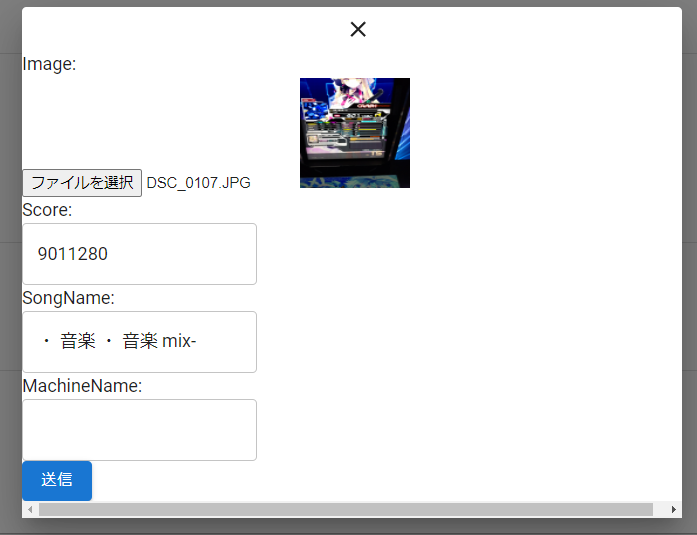
実際にアクセスしてスコアを登録する流れをgifで作りました。
画像をエクスプローラーから選択すると、しばらくたってからOCRの結果が自動でテキストボックスに入力されています。

今後の展望
まず解決したい課題として、精度の問題があります。今回のOCR抽出は、文字の検出部分の精度はGoogleのものを使用しているのでとてもいいのですが、スコアと曲名の判定をゴリ押ししているので、少し画像が斜めだったり、撮影位置が遠かったりすると判定する座標がずれて文字が取り出せないことが結構あります。(正しくは「音楽・壊音楽 mix-」。おしい、、、)
これを解決するために2つほど案を考えました。
- 撮影するときにフォーマットを固定する
これはいわゆる運用でどうにかするパターンです。
アプリの方をカメラと連携させて、クレジットカードを読み取る感覚でスコアの位置を合わせるようガイドを表示させます。それでスキャンしたものを画像として取り込んで登録する流れです。 - AIでフォーマットを学習させる
どう実現するか全然考えてないですが、例えば車のナンバープレートを検出して文字を取り出すようなことはできるみたいなので、同じようにリザルト画面のフォーマット(もしくはスコア部分のフォーマットに限定して学習)させてOCRにかけるというのもありかもしれません。
次に、懸念点ですが、当然ながらゲームのバージョンが変わるとリザルト画面も変わるため、このアプリケーションは機能しなくなります。
こればっかりはどうしようもない気がするので、都度ロジックを変えたり学習させなおしたりする必要はあると思います。
おわりに
OCRサーバの全ソースは以下になります。時々確認用の出力が挟まってますが気にしないでください。(フロント側は長くなるので省略させてもらいます。。。整理できたらgithubに上げるかもしれません。)
Flaskサーバー側(app.py)
from flask import Flask, jsonify, request
from flask_cors import CORS
from dotenv import load_dotenv
import analyzer

load_dotenv()

app=Flask(__name__)
CORS(app, resources={r"/api/*": {"origins": "*"}})

@app.route('/api/analyze', methods=["GET", "POST"])
def analyze():
    body = request.json

    if 'image' in body:
        image_base64 = body['image']
        extract_data = analyzer.google_vision(image_base64)
        print('[d] google vision response: {}'.format(extract_data))
        if 'error' in extract_data:
            return {
                'error': ''
            }
        return {
            'title': extract_data['title'] if extract_data is not None else '',
            'score': extract_data['score'] if extract_data is not None else 0
        }, 200

    else:
        return jsonify({'message': 'no image data'}), 500

app.run(port=8000, debug=True)
OCR処理(analyzer.py)
from google.cloud import vision

import requests
import json
import re
import os
import base64
from PIL import Image, ImageDraw
import io
import traceback

GOOGLE_VISION_API_URL = "https://vision.googleapis.com/v1/images:annotate?key="
GOOGLE_API_KEY = os.getenv('GOOGLE_API_KEY')

def google_vision(image):
    result = {}
    try:
        api_url = GOOGLE_VISION_API_URL + GOOGLE_API_KEY
        body = json.dumps({
            "requests": [{
                "image": {
                    "content": re.sub("data:image/.+;base64,", "", image)
                },
                "features": [{
                    "type": "DOCUMENT_TEXT_DETECTION",
                }]
            }]
        })

        res = requests.post(api_url, data=body)

        # ログ出力(確認用)
        with open('log.json', mode='w', errors="ignore", encoding="utf-8") as f:
            f.write(json.dumps(res.json()))
        with open('log.txt', mode='w', errors="ignore", encoding="utf-8") as f:
            f.write(res.json()["responses"][0]["fullTextAnnotation"]["text"]) # フルテキスト取り出し
            ocr_text = res.json()["responses"][0]["fullTextAnnotation"]["text"]
            ocr_item_list = res.json()['responses'][0]['textAnnotations']

        # 矩形描画してローカルに画像保存(確認用)
        draw_ocr_text_area(image, res.json())

        # テキスト抽出した結果を返却
        result = extract_data(ocr_text, ocr_item_list)
    except Exception as e:
        print("error: ", e)
        result['error'] = e
    finally:
        return result


def extract_data(full_text, item_list):
    """
    Args:
    full_text: ocr response full text
    item_list: ocr response text coordinate list

    Returns:
    dict: include 'score'(int), 'title'(str) keys
    None: if error occured.
    """
    result = {
        'title': '',
        'score': ''
    }

    try:
        # 正規表現で取り出すパターン(スコア取る用で2つ取れる+領域で判定)
        score_pattern = r'\d{8}'
        # 現スコアと最高スコアを取得
        match_score_list = re.findall(score_pattern, full_text, re.S)

        # 現スコアの座標格納
        match_score_pos = {
            'x': 0,
            'y': 0
        }

        # 1つもマッチしない場合はエラー
        if len(match_score_list) == 0:
            raise Exception('no match score pattern')

        # 0未満、10000000より大きい場合は除外
        tmp_list = []
        for i in range(len(match_score_list)):
            if int(match_score_list[i]) > 0:
                tmp_list.append(match_score_list[i])
        match_score_list = tmp_list
        print('[d] match_score_list: {}'.format(match_score_list))

        # 座標を見てどっちのスコアが現スコアか判定する
        # 座標は画像左上原点で考える

        if len(match_score_list) == 1:
            result['score'] = int(match_score_list[0])
            print(f"score: {result['score']}")
        else:
            x = 100000000
            for item in item_list:
                if item['description'] in match_score_list:
                    # 含まれていたら左上のx座標を取り出して保持する
                    # 次のforループで比較して、小さい場合はスコアと座標を更新
                    vertices = item['boundingPoly']['vertices']
                    print('[d] description: {}, vertices: {}'.format(item['description'], vertices[0]))
                    if x > vertices[0]['x']:
                        x = vertices[0]['x']
                        result['score'] = item['description']

        # 領域抽出するパターン
        # パターンでマッチできない場合の取り出し方
        # 抽出スコアの左上の座標を取得
        for item in item_list:
            print(f"if result['score']: {result['score']}:type:{type(result['score'])}, item: {item['description']}:type:{type(item['description'])}.")
            if str(result['score']) == item['description']:
                print(f"matched description: {item['description']}")
                match_score_pos['x'] = item['boundingPoly']['vertices'][0]['x']
                match_score_pos['y'] = item['boundingPoly']['vertices'][0]['y']

        # スコアのXより小さい かつ スコアのZより大きい場所の文字何があるか出力してみる
        print(f"result pos: {match_score_pos}")

        # x座標がmatch_score_pos['x'] -200 の間、かつy座標がmatch_score_pos['y'] +400 までの間
        match_title_list = []
        for item in item_list:
            if 'x' not in item['boundingPoly']['vertices'][0]:
                # 左上の座標がない場合はスキップ
                print(f"[0]番目の座標なし:{item}")
                continue

            title_x = item['boundingPoly']['vertices'][0]['x']
            title_y = item['boundingPoly']['vertices'][0]['y']
            print(f"「{item['description']}」title(x, y)=({title_x}, {title_y}), score(x, y)=({match_score_pos['x']}, {match_score_pos['y']})")
            if match_score_pos['x'] -200 <= title_x and match_score_pos['x'] > title_x and match_score_pos['y'] + 400 >= title_y:
                print(f"条件を満たす文字:{item[('description')]}")
                match_title_list.append({
                    'description': item['description'],
                    'x': item['boundingPoly']['vertices'][0]['x'],
                    'y': item['boundingPoly']['vertices'][0]['y']
                })

        print(f"タイトル座標候補と文字列:{match_title_list}")
        # x座標が小さいものかつ差が50以内のものを抽出
        title = ''
        min_pos_x = 1000000
        for item in match_title_list:
            if min_pos_x > item['x']:
                min_pos_x = item['x']

        for item in match_title_list:
            if min_pos_x + 50 >= item['x'] and min_pos_x -50 <= item['x']:
                title += item['description'] + " "

        result['title'] = title.rstrip(" ")
        result['score'] = int(result['score'])

    except Exception as e:
        print('error', traceback.format_exc())
        result['error'] = e

    finally:
        return result


def draw_ocr_text_area(img, response):
    try:
        # ヘッダー情報があれば削除
        if "," in img:
            img = img.split(",")[1]

        # base64データのデコード
        image_data = base64.b64decode(img)
        # バイナリデータから画像オブジェクトを生成
        image = Image.open(io.BytesIO(image_data))
        draw = ImageDraw.Draw(image)

        ocr_list = response['responses'][0]['textAnnotations']

        for item in ocr_list:
            vertices = item['boundingPoly']['vertices']
            # 四角の描画
            n = len(vertices)
            for i in range(n):
                start = vertices[i]
                end = vertices[(i + 1) % n]
                draw.line((start['x'], start['y'], end['x'], end['y']), fill="red", width=5)

        image.save('output.png')
    except Exception as e:
        print(traceback.format_exc())