はじめに
リサイクラービューでセルをクリックしたときの処理を実装した際に学んだことを記事に残します。
この記事は以前書いた記事(↓↓)に続く内容となっております。
【Android / Kotlin】RecyclerView で一覧画面を実装
サンプルアプリの概要
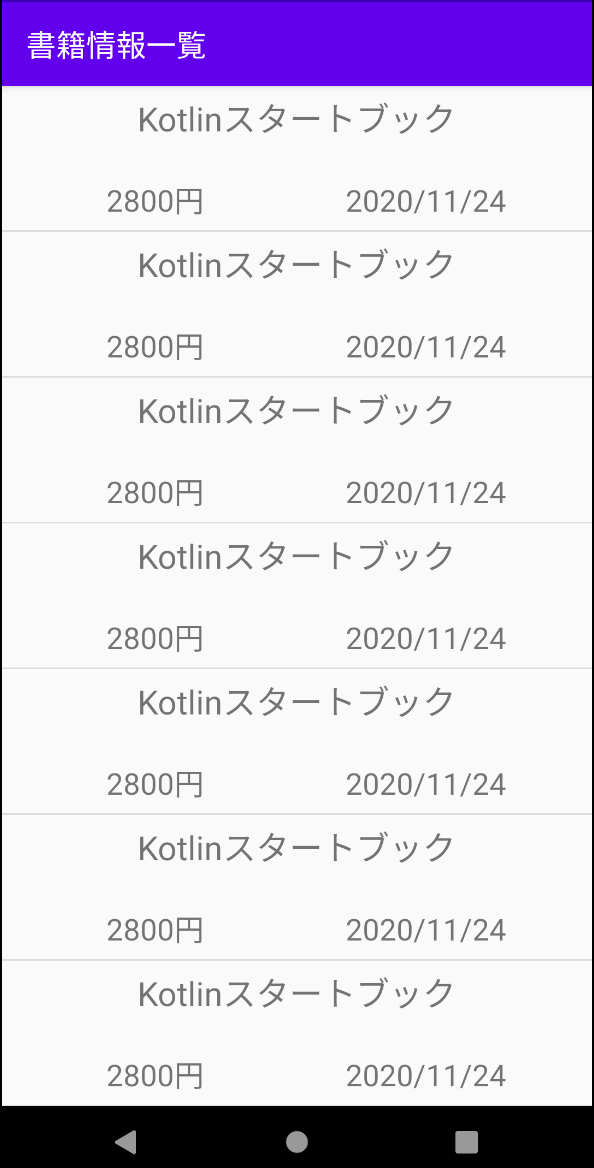
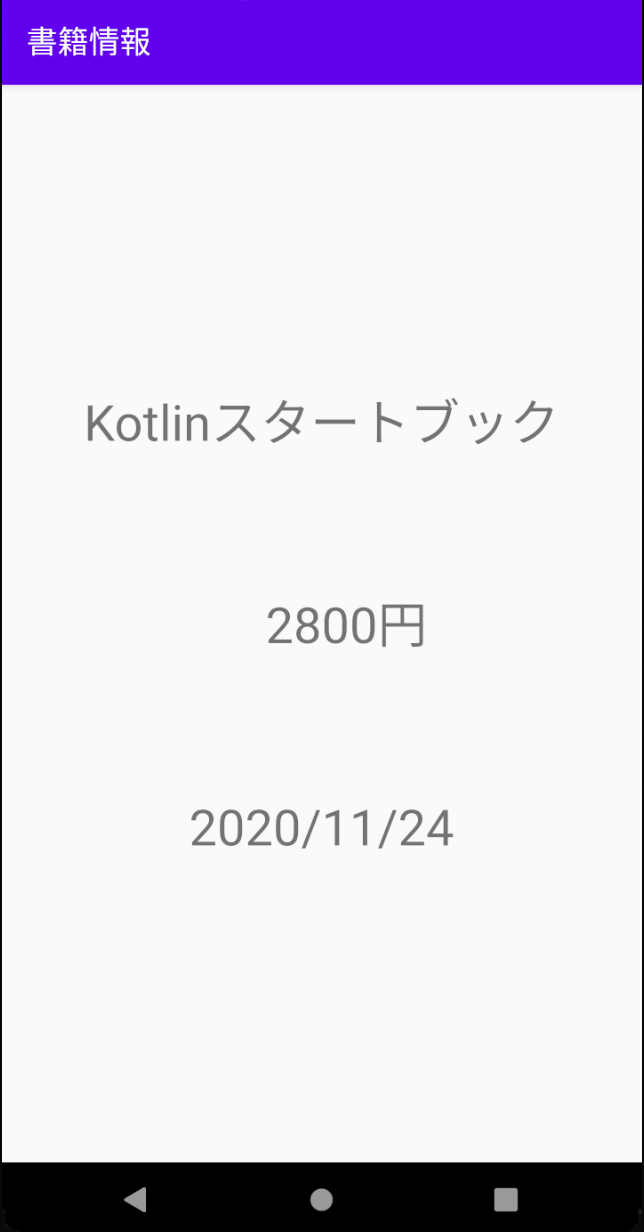
以前の記事で作成した書籍一覧画面のセル(行)をクリックすると書籍情報を表示する画面に遷移させるというもの。
※ 一覧に全て同じサンプルデータを表示していることと、同じ要素を異なるフラグメントで少し表示を変えているだけです。あくまで学習用のサンプルアプリ作成しただけなので各所至らない部分がありますがお許しください。
実装
注意点
前回の記事で導入したライブラリを導入していないと後述するsetFragmentResult()やsetFragmentResultListener()が利用できないので注意。
dependencies {
    // これを必ず記述しておく
    implementation 'androidx.fragment:fragment-ktx:1.3.0-alpha04'
}
リサイクラービューアダプターにクリックリスナインターフェースを定義する
- リスナ変数を定義
- インターフェースを作成
- リスナーをセットする関数を定義
- onBindViewHolderの中にセルのクリックリスナをセット
// コンストラクタにBookクラスを持つMutableListをセット
class BookListRecyclerViewAdapter (
    private val bookListData: MutableList<Book>)
    : RecyclerView.Adapter<BookListRecyclerViewAdapter.BookListRecyclerViewHolder>() {

    // 1. リスナを格納する変数を定義(lateinitで初期化を遅らせている)
    private lateinit var listener: OnBookCellClickListener

    // 2. インターフェースを作成
    interface  OnBookCellClickListener {
        fun onItemClick(book: Book)
    }

    // 3. リスナーをセット
    fun setOnBookCellClickListener(listener: OnBookCellClickListener) {
        // 定義した変数listenerに実行したい処理を引数で渡す(BookListFragmentで渡している)
        this.listener = listener
    }
// BookListRecyclerViewHolder内の各画面部品に表示したいデータを割り当てるメソッド
override fun onBindViewHolder(holder: BookListRecyclerViewHolder, position: Int) {

    // ・・・省略

    // 4. セルのクリックイベントにリスナをセット
    holder.itemView.setOnClickListener {
        // セルがクリックされた時にインターフェースの処理が実行される
        listener.onItemClick(book)
    }
}
ファイル全体の記述
// コンストラクタにBookクラスを持つMutableListをセット
class BookListRecyclerViewAdapter (
    private val bookListData: MutableList<Book>)
    : RecyclerView.Adapter<BookListRecyclerViewAdapter.BookListRecyclerViewHolder>() {

    // リスナを格納する変数を定義(lateinitで初期化を遅らせている)
    private lateinit var listener: OnBookCellClickListener

    // インターフェースを作成
    interface  OnBookCellClickListener {
        fun onItemClick(book: Book)
    }

    // リスナーをセット
    fun setOnBookCellClickListener(listener: OnBookCellClickListener) {
        // 定義した変数listenerに実行したい処理を引数で渡す(BookListFragmentで渡している)
        this.listener = listener
    }

    // 画面部品要素を構成するクラスを定義
    // innerを付けないことでstaticなclassとして定義できる(非staticな内部クラスは非推奨)
    class BookListRecyclerViewHolder(itemView: View) : RecyclerView.ViewHolder(itemView) {
        // ここではcell_book_list.xmlより各レイアウト要素を取得して変数に格納している
        var bookName: TextView = itemView.findViewById(R.id.tv_book_name)
        var bookPrice: TextView = itemView.findViewById(R.id.tv_book_price)
        var bookPurchaseDate: TextView = itemView.findViewById(R.id.tv_book_purchase_date)
    }

    // 画面部品を保持する自作クラスであるBookListRecyclerViewHolderのオブジェクトを生成するメソッド
    override fun onCreateViewHolder(parent: ViewGroup, viewType: Int) : BookListRecyclerViewHolder {
        val inflater = LayoutInflater.from(parent.context)
        val view = inflater.inflate(R.layout.cell_book_list, parent, false)
        return BookListRecyclerViewHolder(view)
    }

    // BookListRecyclerViewHolder内の各画面部品に表示したいデータを割り当てるメソッド
    override fun onBindViewHolder(holder: BookListRecyclerViewHolder, position: Int) {
        // positionは表示するリストbookListDataのインデックス番号のようなもの
        val book = bookListData[position]

        // BookListRecyclerViewHolderより取得したレイアウト要素に書籍情報を格納
        holder.bookName.text = book.name
        holder.bookPrice.text = book.price.toString()
        holder.bookPurchaseDate.text = book.date

        // セルのクリックイベントにリスナをセット
        holder.itemView.setOnClickListener {
            // セルがクリックされた時にインターフェースの処理が実行される
            listener.onItemClick(book)
        }
    }

    // データ件数を返すメソッド
    override fun getItemCount() : Int = bookListData.size
}
一覧画面にクリック処理を実装
onCreateViewの中にインターフェースを実装し、セルがクリックされたときの処理を定義する
// 一部記述を抜粋

override fun onCreateView(
      inflater: LayoutInflater, container: ViewGroup?,
      savedInstanceState: Bundle?): View? {

    // ダミーデータをセットしたアダプターを作成
    val adapter = BookListRecyclerViewAdapter(createDummyBookList())

    // 書籍情報セルのクリック処理
    adapter.setOnBookCellClickListener(
        object : BookListRecyclerViewAdapter.OnBookCellClickListener {
            override fun onItemClick(book: Book) {
                // 書籍データを渡す処理
                setFragmentResult("bookData", bundleOf(
                    "bookName" to book.name,
                    "bookPrice" to book.price,
                    "bookPurchaseDate" to book.date
                ))

                // 画面遷移処理
                parentFragmentManager
                    .beginTransaction()
                    .replace(R.id.fl_activity_main, BookFragment())
                    .addToBackStack(null)
                    .commit()
            }
        }
    )

    return view
}
クリックイベントではここでしか利用をしないため object式 でインターフェースを実装
adapter.setOnBookCellClickListener(
    //  object : インターフェース { 処理 }
        object : BookListRecyclerViewAdapter.OnBookCellClickListener {
            override fun onItemClick(book: Book) {
                // セルがクリックされたときの処理
            }
        }
    )
ファイル全体の記述
class BookListFragment : Fragment() {

    override fun onCreateView(
        inflater: LayoutInflater, container: ViewGroup?,
        savedInstanceState: Bundle?): View? {

        val view = inflater.inflate(R.layout.fragment_book_list, container, false)

        // タイトルをセット
        activity?.title = "書籍情報一覧"

        // レイアウト要素RecyclerViewを取得
        val bookListRecyclerView = view.findViewById<RecyclerView>(R.id.recycler_view)
        // LayoutManagerを取得
        val linearLayoutManager = LinearLayoutManager(view.context)
        // ダミーデータをセットしたアダプターを作成
        val adapter = BookListRecyclerViewAdapter(createDummyBookList())

        // linearLayoutManager と adapter をRecyclerViewにセット
        bookListRecyclerView.layoutManager = linearLayoutManager
        bookListRecyclerView.adapter = adapter

        // 一覧画面の各セルの区切り線を作成
        bookListRecyclerView.addItemDecoration(DividerItemDecoration(view.context, linearLayoutManager.orientation))

        // 書籍情報セルのクリック処理
        adapter.setOnBookCellClickListener(
            // インターフェースの再利用は想定しておらず、その場限りでしか使わないためobject式として宣言
            object : BookListRecyclerViewAdapter.OnBookCellClickListener {
                override fun onItemClick(book: Book) {
                    // 書籍データを渡す処理
                    setFragmentResult("bookData", bundleOf(
                        "bookName" to book.name,
                        "bookPrice" to book.price,
                        "bookPurchaseDate" to book.date
                    ))

                    // 画面遷移処理
                    parentFragmentManager
                        .beginTransaction()
                        .replace(R.id.fl_activity_main, BookFragment())
                        .addToBackStack(null)
                        .commit()
                }
            }
        )

        return view
    }

    // サンプルデータ作成メソッド
    private fun createDummyBookList(): MutableList<Book> {
        var bookList: MutableList<Book> = ArrayList()
        var book = Book("Kotlinスタートブック", 2800, "2020/11/24")

        // 20件のダミーデータを登録
        var i = 0
        while (i < 20) {
            i++
            bookList.add(book)
        }
        return bookList
    }
}
遷移後画面を用意し、データを受け取り表示させる
新たに書籍情報を表示させるFragmentを作成し、渡されたデータを画面に表示させる
class BookFragment : Fragment() {

    override fun onCreateView(
        inflater: LayoutInflater, container: ViewGroup?, savedInstanceState: Bundle?): View? {
        val view =  inflater.inflate(R.layout.fragment_book, container, false)
        activity?.title = "書籍情報"

        // 一覧画面から渡されたデータをviewに表示する
        setFragmentResultListener("bookData") { _, bundle ->
            tv_book_name.text = bundle.getString("bookName")
            tv_book_price.text = bundle.getInt("bookPrice").toString()
            tv_book_purchase_date.text = bundle.getString("bookPurchaseDate")
        }

        return view
    }
}
BookFragmentのレイアウトファイルはこんな感じ
<androidx.constraintlayout.widget.ConstraintLayout
    xmlns:android="http://schemas.android.com/apk/res/android"
    xmlns:app="http://schemas.android.com/apk/res-auto"
    android:id="@+id/layout_book"
    android:layout_width="match_parent"
    android:layout_height="match_parent">

    <TextView
        android:id="@+id/tv_book_name"
        android:textSize="32dp"
        android:layout_width="wrap_content"
        android:layout_height="wrap_content"
        app:layout_constraintStart_toStartOf="parent"
        app:layout_constraintEnd_toEndOf="parent"
        app:layout_constraintBottom_toBottomOf="parent"
        app:layout_constraintTop_toTopOf="parent"
        app:layout_constraintVertical_bias="0.3"/>

    <TextView
        android:id="@+id/tv_book_price"
        android:textSize="32dp"
        android:layout_width="wrap_content"
        android:layout_height="wrap_content"
        app:layout_constraintStart_toStartOf="parent"
        app:layout_constraintEnd_toEndOf="parent"
        app:layout_constraintBottom_toBottomOf="parent"
        app:layout_constraintTop_toTopOf="parent"
        app:layout_constraintVertical_bias="0.5" />

    <TextView
        android:textSize="32dp"
        android:layout_width="wrap_content"
        android:layout_height="wrap_content"
        app:layout_constraintTop_toTopOf="@id/tv_book_price"
        app:layout_constraintStart_toEndOf="@id/tv_book_price"
        android:text="円"/>

    <TextView
        android:id="@+id/tv_book_purchase_date"
        android:textSize="32dp"
        android:layout_width="wrap_content"
        android:layout_height="wrap_content"
        app:layout_constraintStart_toStartOf="parent"
        app:layout_constraintEnd_toEndOf="parent"
        app:layout_constraintBottom_toBottomOf="parent"
        app:layout_constraintTop_toTopOf="parent"
        app:layout_constraintVertical_bias="0.7" />

</androidx.constraintlayout.widget.ConstraintLayout>
最後に
インターフェースの実装や Kotlin の構文など理解し切れていない部分が多々ありますが、Androidを Kotlin で開発するのは書いていて楽しいです。
今後も学習アウトプットなど積極的に発信していきます。
誤りご指摘などあれば気軽にコメントください。

