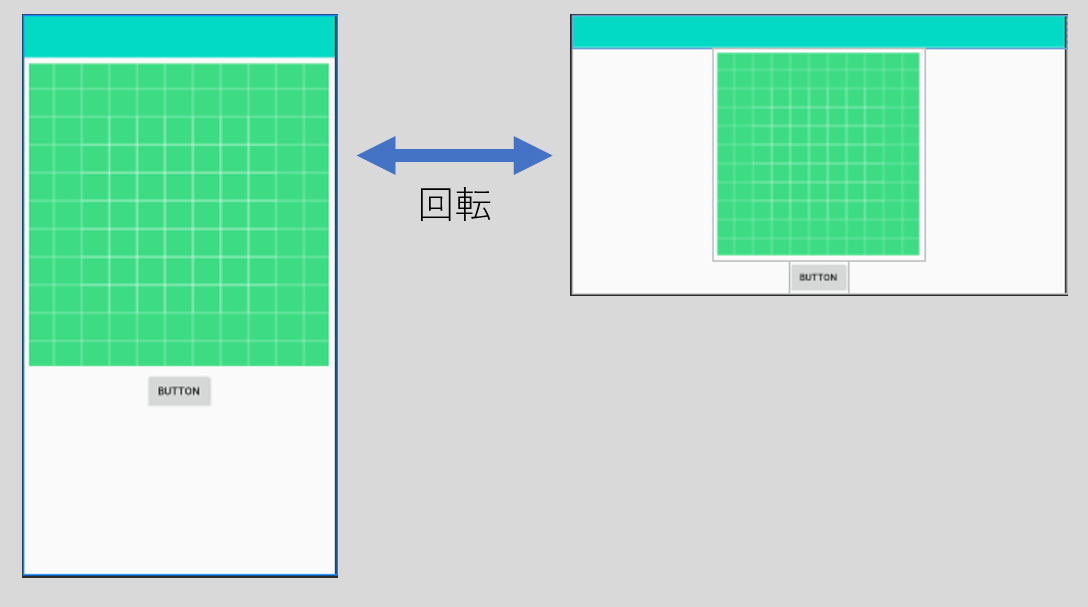
やりたかったこと
ImageViewの画像を画面いっぱい(アスペクト比はそのまま)に表示してかつ、ボタンを真下に置きたかったのですが、、、

横回転するとボタンが隠れてしまうし、横画面に合わせてレイアウト変えると縦回転したときにボタンの位置がずれてしまってました。
レイアウト用のxmlは1つだけにしたかったので、ソース内で動的にImageViewのサイズを変えることにしました。
やったこと
レイアウト
- レイアウトはConstraintLayoutを使う
- ImageViewの設定:
- サイズ(縦向き時):
- height: wrap_content
- width: 0dp(match constraint)
- サイズ(横向き時):
- height: 0dp(match constraint)
- width: wrap_content
- 描画の縦横比を維持するために
android:adjustViewBounds = trueを指定 - ボタンをくっつけるために
app:layout_constraintVertical_chainStyle="packed"を指定
- サイズ(縦向き時):
Activity
- マニフェストで、Activityに
android:configChanges="orientation|screenSize"を追加。縦横の回転を検出できるようにする。 - 縦横の向きが変わると
onConfigurationChangedがコールされる。その中で、ImageViewのレイアウトを更新。
ソース
activity_main.xml
<?xml version="1.0" encoding="utf-8"?>
<androidx.constraintlayout.widget.ConstraintLayout xmlns:android="http://schemas.android.com/apk/res/android"
    xmlns:app="http://schemas.android.com/apk/res-auto"
    xmlns:tools="http://schemas.android.com/tools"
    android:layout_width="match_parent"
    android:layout_height="match_parent"
    tools:context=".MainActivity">

    <ImageView
        android:id="@+id/imageView"
        android:layout_width="0dp"
        android:layout_height="wrap_content"
        android:adjustViewBounds="true"
        android:padding="8dp"
        app:layout_constraintBottom_toTopOf="@+id/button"
        app:layout_constraintEnd_toEndOf="parent"
        app:layout_constraintStart_toStartOf="parent"
        app:layout_constraintTop_toTopOf="parent"
        app:layout_constraintVertical_bias="0.0"
        app:layout_constraintVertical_chainStyle="packed"
        app:srcCompat="@drawable/ic_launcher_background" />

    <Button
        android:id="@+id/button"
        android:layout_width="wrap_content"
        android:layout_height="wrap_content"
        android:padding="8dp"
        android:text="Button"
        app:layout_constraintBottom_toBottomOf="parent"
        app:layout_constraintEnd_toEndOf="parent"
        app:layout_constraintStart_toStartOf="parent"
        app:layout_constraintTop_toBottomOf="@+id/imageView" />

</androidx.constraintlayout.widget.ConstraintLayout>
MainActivity.java
public class MainActivity extends AppCompatActivity {
    ImageView imageView;
    Button button;

    @Override
    protected void onCreate(Bundle savedInstanceState) {
        super.onCreate(savedInstanceState);
        setContentView(R.layout.activity_main);
        //UI取得
        imageView = findViewById(R.id.imageView);
        button = findViewById(R.id.button);
        //一応、起動時の向き取得
        int orientation = getResources().getConfiguration().orientation;
        UpdateLayout(orientation); //レイアウト更新
    }

    @Override
    public void onConfigurationChanged(Configuration newConfig) {
        super.onConfigurationChanged(newConfig);
        int orientation = newConfig.orientation; //向き取得
        UpdateLayout(orientation); //レイアウト更新
    }

    /**
     * レイアウト更新
     * @param orientation 向き
     */
    protected void UpdateLayout(int orientation){
        //ImageViewのLayoutParam取得
        LayoutParams param = imageView.getLayoutParams();
        if (orientation == Configuration.ORIENTATION_PORTRAIT) {
            // 縦向きの場合
            Log.d("UpdateLayout", "縦向き");
            param.height = LayoutParams.WRAP_CONTENT;
            param.width = 0;
        }
        else if (orientation == Configuration.ORIENTATION_LANDSCAPE) {
            // 横向きの場合
            Log.d("UpdateLayout", "横向き");
            param.height = 0;
            param.width = LayoutParams.WRAP_CONTENT;
        }
        imageView.setLayoutParams(param);
    }
}
参考記事
Androidで横向きか縦向きかを判定する
Androidで画像の縦横比を保ったまま画面幅いっぱいに表示する
https://techblog.zozo.com/entry/constraint_layout