RecyclerViewを使うと簡単に画像をカルーセル表示することができます。
ですが、ImageViewの扱いでハマった部分があったので、その際に調査した内容をまとめました。
TL;DR
ImageViewの**AdjustViewBoundsにtrueをセットする**ことで、ImageViewのサイズを画像サイズに合わせて調整することができます。
前提条件
カルーセル、画像のサイズおよび表示方法に関する条件は以下の通りです。
- カルーセルの高さは固定とする
- カルーセルに表示する各画像のサイズはすべて異なる可能性がある
- 各画像の高さはカルーセルの高さと一致するように拡大縮小する
- 各画像のアスペクト比は維持する
- 各画像はクロップしない
ハマった内容
以前作成したScaleTypeと表示画像の対応表を参考に、ScaleTypeは一旦FIT_CENTER(デフォルト値のためxml上の指定なし)、またlayout_widthはwrap_content、layout_heightは100dpとしました。
RecyclerViewの各要素に表示する画面のxmlは以下の通りです。
<?xml version="1.0" encoding="utf-8"?>
<ImageView
  xmlns:android="http://schemas.android.com/apk/res/android"
  android:id="@+id/imageView"
  android:layout_width="wrap_content"
  android:layout_height="100dp" />
正直どのScaleTypeも今回の条件を満たさないと感じつつも、layout_widthをwrap_contentにすることで、FIT_CENTERであれば画像の高さをカルーセルの高さと一致させ、それに合わせて画像全体が含まれるようにアスペクト比を維持しながら幅を調整してくれるのでは?というわずかな希望を抱きながら試してみました。
結果は以下のようになりました。案の定、希望通りの表示になりませんでした。
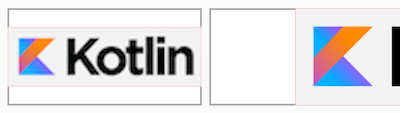
これを見て、画像が小さいときの結果(左)は納得できるのですが、画像が大きいときの結果(右)に関しては何で左右に余白ができるのかが理解できませんでした。
解決方法
冒頭でも触れましたが、ImageViewのAdjustViewBoundsをtrueにすることで解決できました。これは文字通り「Viewの境界を調整する」ための属性です。
公式ドキュメントはこちらにあります。
AdjustViewBoundsをtrueにすると、結果は以下のようになりました。上が先ほどの結果(デフォルト値はfalse)で、下が今回の結果です。
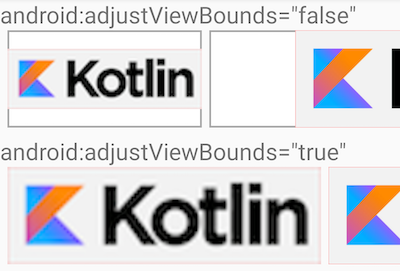
これで、ImageViewのサイズを画像サイズに合わせて調整することができました。
AdjustViewBoundsをセットしたときの内部処理
結果としてはこれで問題ないのですが、画像が大きいときの結果に関してはこれだけでは理解ができなかったので、ImageViewの処理を追ってみました。
ImageView.javaのソースコードはこちらにあります。
Androidにおいて、Viewが表示されるまでの大まかな流れは以下の通りになります。今回の肝となるのは1.のonMeasure()です。
- サイズを決める(
onMeasure()) - 場所を決める(
onLayout()) - 描画する(
onDraw())
これに関してはこちらの記事を参考にさせていただきました。
では、ここからはImageViewのonMeasure()の処理を追っていきます。
最初は各変数を宣言しているだけだったので割愛します。
以下の処理が1つ目のポイントになります。
final int widthSpecMode = MeasureSpec.getMode(widthMeasureSpec);
final int heightSpecMode = MeasureSpec.getMode(heightMeasureSpec);
widthMeasureSpecとheightMeasureSpecはonMeasure()の引数で、そこからMeasureSpecのModeを取得しています。
ただ、widthMeasureSpecとheightMeasureSpecがどのように決定されるのかは正直よく分かりませんでした。
MeasureSpecは親Viewから子Viewに対して課される制約を表しており、以下の3種類のModeがあります。公式ドキュメントはこちらにあります。
| MeasureSpec.Mode | 制約条件 |
|---|---|
| UNSPECIFIED | 親Viewによって子Viewのサイズが決定されない |
| EXACTLY | 親Viewによって子Viewの正確なサイズが決定される |
| AT_MOST | 親Viewによって子Viewの最大のサイズが決定される |
したがって、widthSpecModeはMeasureSpec.UNSPECIFIED、heightSpecModeはMeasureSpec.EXACTLYとなります。
そして、以下の処理が2つ目のポイントになります。 `AdjustViewBounds`が`true`の場合のみ以下の処理が行われます。
if (mAdjustViewBounds) {
  resizeWidth = widthSpecMode != MeasureSpec.EXACTLY;
  resizeHeight = heightSpecMode != MeasureSpec.EXACTLY;
  desiredAspect = (float) w / (float) h;
}
resizeWidthとresizeHeightは幅・高さのリサイズを行うか否かを制御する変数です。
desiredAspectは画像のアスペクト比(wは幅、hは高さ)を表す変数です。
今回の場合、widthSpecModeはMeasureSpec.UNSPECIFIED、heightSpecModeはMeasureSpec.EXACTLYなので、AdjustViewBoundsがtrueのときはresizeWidthのみがtrueとなります。
そして、以下の処理が3つ目のポイントになります。 長いので詳細は省略しますが、おおむね以下のような処理が行われています。
-
AdjustViewBoundsがtrueのとき
ImageViewのサイズを画像サイズに合わせて調整する -
AdjustViewBoundsがfalseのとき
ImageViewの幅を画像の幅と一致するよう調整する
int widthSize;
int heightSize;
if (resizeWidth || resizeHeight) {
  // Get the max possible width given our constraints
  widthSize = resolveAdjustedSize(w + pleft + pright, mMaxWidth, widthMeasureSpec);
  // Get the max possible height given our constraints
  heightSize = resolveAdjustedSize(h + ptop + pbottom, mMaxHeight, heightMeasureSpec);
  if (desiredAspect != 0.0f) {
    // See what our actual aspect ratio is
    final float actualAspect = (float)(widthSize - pleft - pright) / (heightSize - ptop - pbottom);
    if (Math.abs(actualAspect - desiredAspect) > 0.0000001) {
      boolean done = false;
      // Try adjusting width to be proportional to height
      if (resizeWidth) {
        int newWidth = (int)(desiredAspect * (heightSize - ptop - pbottom)) + pleft + pright;
        // Allow the width to outgrow its original estimate if height is fixed.
        if (!resizeHeight && !sCompatAdjustViewBounds) {
          widthSize = resolveAdjustedSize(newWidth, mMaxWidth, widthMeasureSpec);
        }
        if (newWidth <= widthSize) {
          widthSize = newWidth;
          done = true;
        }
      }
      // Try adjusting height to be proportional to width
      if (!done && resizeHeight) {
        ...
      }
    }
  }
} else {
  w += pleft + pright;
  h += ptop + pbottom;
  w = Math.max(w, getSuggestedMinimumWidth());
  h = Math.max(h, getSuggestedMinimumHeight());
  widthSize = resolveSizeAndState(w, widthMeasureSpec, 0);
  heightSize = resolveSizeAndState(h, heightMeasureSpec, 0);
}
setMeasuredDimension(widthSize, heightSize);
ここで、else句の最後にある`resolveSizeAndState()`が**`MeasureSpec.UNSPECIFIED`のときは引数に指定した画像サイズそのものを返していた**ので、ImageViewの幅が画像の幅と同じサイズで表示されるということが分かりました。スッキリ。 View.javaのソースコードは[こちら](https://android.googlesource.com/platform/frameworks/base/+/master/core/java/android/view/View.java)にあります。
public static int resolveSizeAndState(int size, int measureSpec, int childMeasuredState) {
  final int specMode = MeasureSpec.getMode(measureSpec);
  final int specSize = MeasureSpec.getSize(measureSpec);
  final int result;
  switch (specMode) {
    case MeasureSpec.AT_MOST:
      if (specSize < size) {
        result = specSize | MEASURED_STATE_TOO_SMALL;
      } else {
        result = size;
      }
      break;
    case MeasureSpec.EXACTLY:
      result = specSize;
      break;
    case MeasureSpec.UNSPECIFIED:
    default:
      result = size;
  }
  return result | (childMeasuredState & MEASURED_STATE_MASK);
}
サンプルアプリ
上記の画像キャプチャを撮影したアプリです。
GitHub - AdjustViewBoundsChecker