概要
BOT API Trial Account がまだ登録出来たので、遊んでみました。
http://linecorp.com/ja/pr/news/ja/2016/1320
発言すると、内容がなんであろうとおいしそうなご飯の画像を返してくる BOT を作成しました。
自鯖に BOT と画像を仕込んでいます。
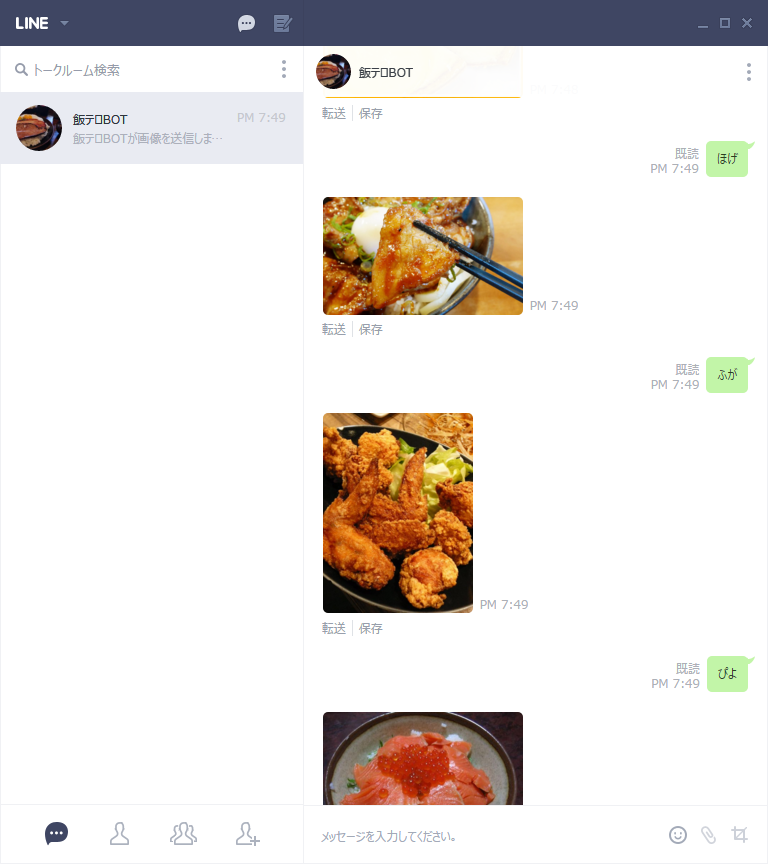
動作イメージ
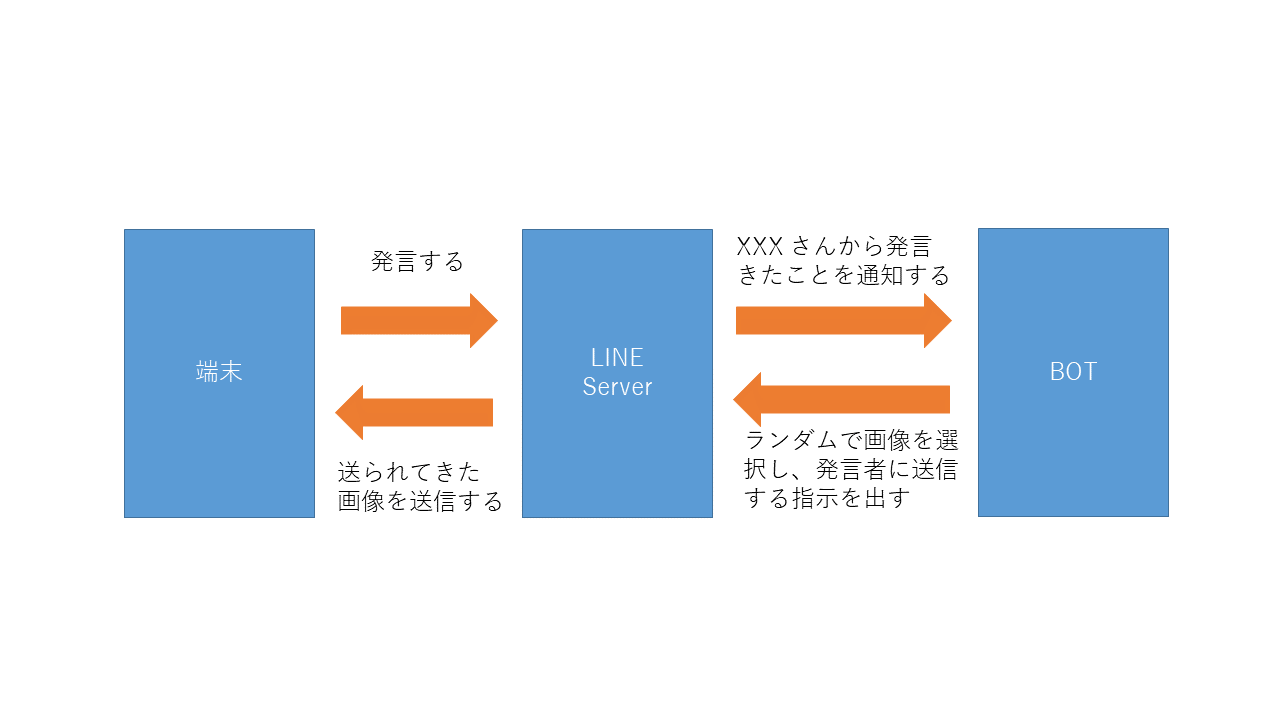
処理イメージ
必要なもの
- Line developers アカウント
- PHP が動作し 443番ポートで https がお話しできるサーバ
- オレオレ証明書は NG
- Let's Encrypt は OK でした
アカウント登録
LINE Business Center から BOT API Trial Account を取得しましょう。
先着1万人限定とのことですが 2016/05/05 でもアカウント登録出来ました。
LINE developers で以下のように登録されます。
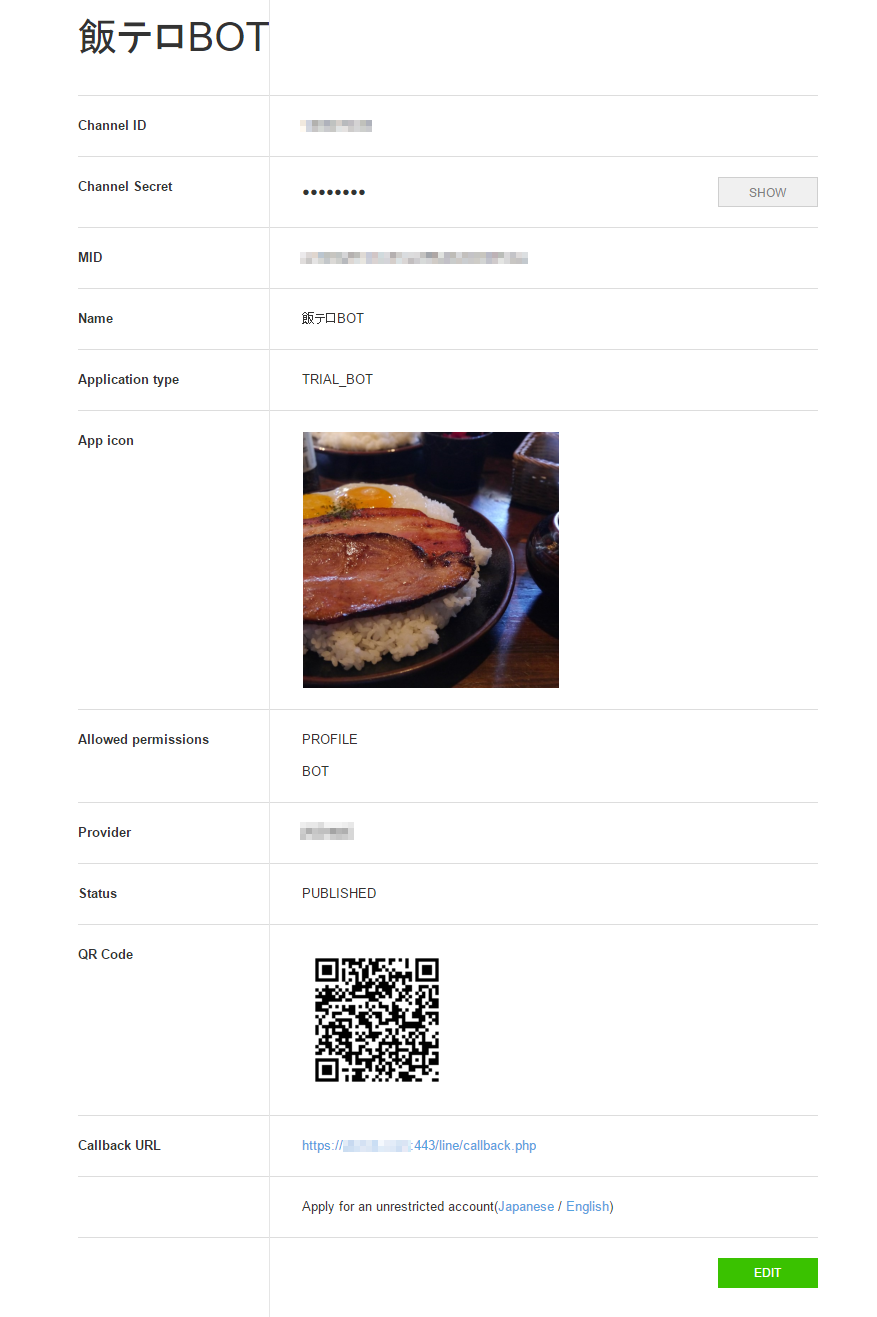
アカウント情報の確認
作成したアカウントの Channel ID, Channel Secret, MID を確認しましょう。
後々利用しますので、控えておいてください。
Callback URL の設定
アカウント情報画面右下の EDIT をクリックして Callback URL を設定します。
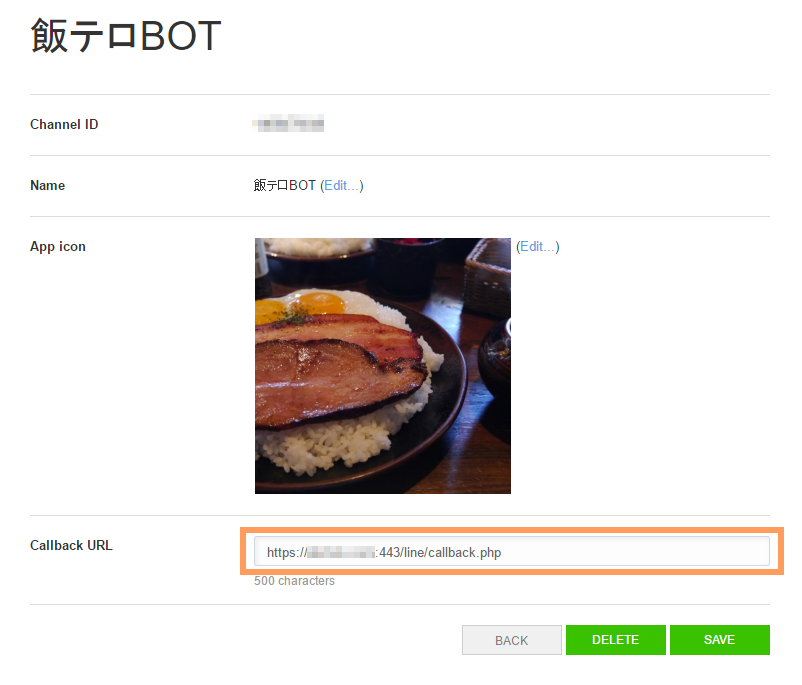
この時 https にすることはもちろん、ポート番号 443 も忘れずに入れてください。
入れないと URL or port number not sepcified. となるらしいです(未検証)。
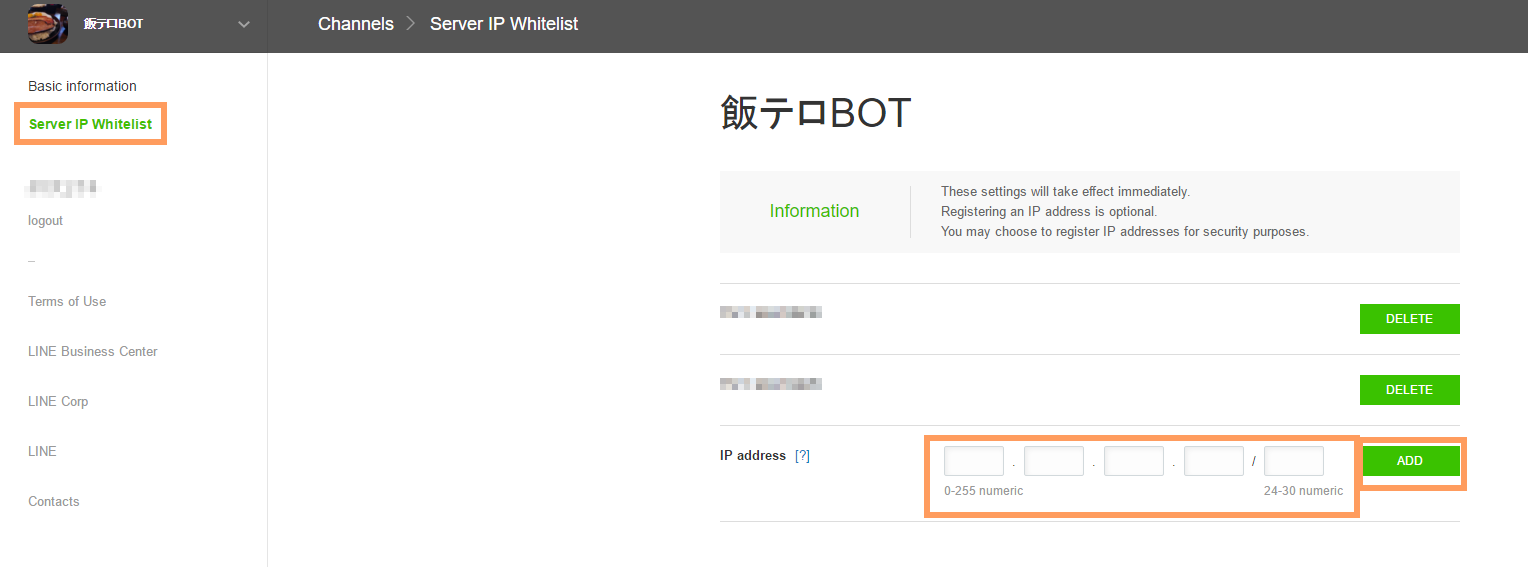
Server IP Whitelist の設定
左ペインから Server IP Whitelist をクリックし API を呼び出す時、特定ソースIPのみ許可する設定を入れます。
入れないと弾かれます。
BOT の作成
<?php
// BOT の Channel ID, Channel Secret, MID を入力
$channel_id = "< Channel ID >";
$channel_secret = "< Channel Secret >";
$bot_mid = "< MID >";

//変数群
$log_file = "< ログファイルのパス && ファイル名 >";
$server_url = "< ServerName >";
$document_root = "< Documentroot >";
$pic_dir = "$document_root" . "< 画像が格納されているディレクトリ >";

//time zone
date_default_timezone_set('Asia/Tokyo');

// 関数群
//ユーザ情報取得する関数
function getDisplayName($to_mid){
    global $channel_id;
    global $channel_secret;
    global $bot_mid;
    $user_profiles_url = curl_init("https://trialbot-api.line.me/v1/profiles?mids=${to_mid}");
    curl_setopt($user_profiles_url, CURLOPT_RETURNTRANSFER, true);
    curl_setopt($user_profiles_url, CURLOPT_HTTPHEADER, array(
        "X-Line-ChannelID: $channel_id",
        "X-Line-ChannelSecret: $channel_secret",
        "X-Line-Trusted-User-With-ACL: $bot_mid"
    ));
    $user_profiles_output = curl_exec($user_profiles_url);
    $user_json_obj = json_decode($user_profiles_output);
    global $displayname;
    $displayname = $user_json_obj->contacts{0}->displayName;
    curl_close($user_profiles_url);
}

//POSTするデータを作成する関数
function create_post_data($to_mid, $post_content){
    // toChannelとeventTypeは固定値なので、変更不要。
    global $post_data;
    $post_data = [
        "to"=>[$to_mid],
        "toChannel"=>"1383378250",
        "eventType"=>"138311608800106203",
        "content"=>$post_content
    ];
}

//相手に会話する内容をPOSTする関数
function post($post_data){
    global $channel_id;
    global $channel_secret;
    global $bot_mid;
    $post_url = curl_init("https://trialbot-api.line.me/v1/events");
    curl_setopt($post_url, CURLOPT_POST, true);
    curl_setopt($post_url, CURLOPT_CUSTOMREQUEST, 'POST');
    curl_setopt($post_url, CURLOPT_RETURNTRANSFER, true);
    curl_setopt($post_url, CURLOPT_POSTFIELDS, json_encode($post_data));
    curl_setopt($post_url, CURLOPT_HTTPHEADER, array(
        'Content-Type: application/json; charser=UTF-8',
        "X-Line-ChannelID: $channel_id",
        "X-Line-ChannelSecret: $channel_secret",
        "X-Line-Trusted-User-With-ACL: $bot_mid"
    ));
    $result = curl_exec($post_url);
    curl_close($post_url);
}

// 相手からメッセージ受信
$recieve_json_string = file_get_contents('php://input');
$recieve_jsonObj = json_decode($recieve_json_string);
$to = $recieve_jsonObj->{"result"}[0]->{"content"}->{"from"};
$text = $recieve_jsonObj->{"result"}[0]->{"content"}->{"text"};
$content_type = $recieve_jsonObj->{"result"}[0]->{"content"}->{"contentType"};
$location = $recieve_jsonObj->{"result"}[0]->{"content"}->{"location"};
$op_type = $recieve_jsonObj->{"result"}[0]->{"content"}->{"opType"};
$params = $recieve_jsonObj->{"result"}[0]->{"content"}->{"params"};

//DisplayName 取得
//date, mid, displayName, text, contentType をログ出力
getDisplayName($to);
file_put_contents($log_file, date("Y/m/d H:i:s") . " mid:${to}, displayName:${displayname}, text:${text}, contentType:${content_type}" . PHP_EOL, FILE_APPEND);

//会話処理
if( $op_type === 4 ){
    // 友達登録時に会話する
    getDisplayName($params[0]);
    $response_format_text = ['contentType'=>1,"toType"=>1,"text"=>"飯テロ BOT の登録ありがとうございます, ${displayname}さん."];
    create_post_data($params[0], $response_format_text);
    post($post_data);
} else if( $op_type === 8 ){
    // ブロック時はなにもせず正常終了する
    exit(0);
} else {
    // 送信する画像をランダムで選ぶ
    // glob で取得した画像総数を max に代入し、ランダムで選ばれた配列番号を num_list に代入
    // パスを変換し、末尾に画像ファイル名を追加
    $pic_array  = glob ("${pic_dir}*.jpg");
    $max = count($pic_array);
    $num_list = array_rand(range(1,$max),1);
    $pic = str_replace($document_root,"$server_url",$pic_array[$num_list]);

    $response_format_image = ['contentType'=>2,"toType"=>1,'originalContentUrl'=>"$pic","previewImageUrl"=>"$pic"];
    create_post_data($to, $response_format_image);
    post($post_data);
}
BOT 作成時のハマりポイント
ハマったポイントがありましたので紹介します。
- callback URL を設定したのに BOT が応答してくれない
- callback URL 登録後、数時間経たないと反映されないようです。待ちましょう。
- Server IP Whitelist を設定したのに BOT が応答してくれない
- callback URL ほどではありませんでしたが、時間経過しないと反映されないようです。待ちましょう。
それでもダメなら API のレスポンスをチェックしましょう。コードの $result 変数の中身を見るとか。
- callback URL ほどではありませんでしたが、時間経過しないと反映されないようです。待ちましょう。
拡張したくなったら
BOT API を参照ください。
最後に
ただ単にランダムで画像を返す BOT なので、あまり面白みがありませんでした。
しかし PHP を初めて触るには手頃な難易度でした。
今後は対話相手の情報や、時期に応じた内容を加味し対話するような BOT が作成できると思います。
スタンプが送られてきたら、それに近い XXX の画像を返す!とか出来たら、自分だったら面白がって何度も遊んでそうです。
また作成にあたり、下記ページを参考にさせていただきました。