NNVMがKerasの学習済みモデルのインポートに対応したとのことなので、試してみました。
実験用のコードは短いので全て記事中に記載していますが、tkat0/keras-nnvm-exampleにも公開しています。
開発者のTianqi Chen氏のツイート。
thanks to yuwei hu, NNVM compiler now deploys keras models directly https://t.co/aTS96roOYN to the hardware backends
— Tianqi Chen (@tqchenml) 2017年12月23日
- nnvm.frontend.from_mxnet
- nnvm.frontend.from_onnx
- nnvm.frontend.from_coreml
- nnvm.frontend.from_keras ★ 今回これが追加
では早速動かしてみます! 環境構築は最後に記載しています。
NNVMのKeras向けチュートリアル
NNVM公式のチュートリアルに、Kerasからのモデルのインポートに関する記事が追加されました。Kerasの学習済みモデル(ImageNetで学習済みのResnet-50)で画像認識をするデモです。なるほど簡単そう。
Kerasの学習済モデルをNNVMで動かしてみよう
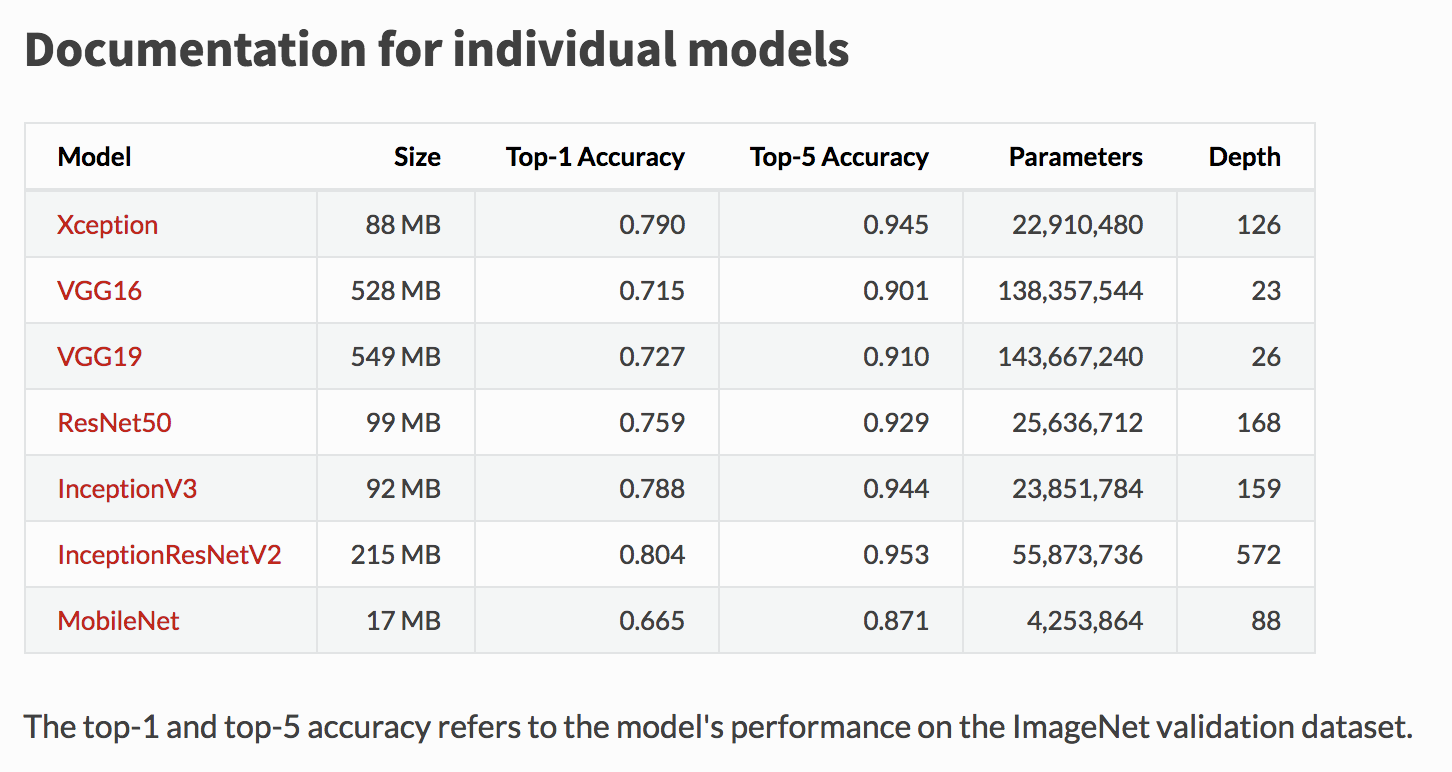
KerasはImageNetの画像認識タスクを学習したモデルが簡単に使えます。以下の図は公式ドキュメントからの転載ですが、これらのモデルに対応しています(最新のmasterブランチだと、さらにNASNetも追加されていました)
MobileNetを動かしたかったのですが、今のnnvm.frontend.from_kerasはMobileNetが含むReLU6を未サポートでしたので、Resnet-50を動かしてみます。
モデル定義から実行までの全てのコードは以下になります。短い。
from time import time
from PIL import Image
import nnvm
import tvm
from tvm.contrib import graph_runtime
import keras
import numpy as np

from keras.applications.resnet50 import ResNet50, preprocess_input

USE_GPU = True # True: GPU, False: CPU

# Kerasの学習済みモデルのロード
model = ResNet50(include_top=True, weights='imagenet', input_tensor=None, input_shape=None)

# 入力画像の前処理
img = Image.open('cat.png').resize((224, 224))
data = np.array(img)[np.newaxis, :].astype('float32')
data = preprocess_input(data).transpose([0, 3, 1, 2]) # NHWC -> NCHW
print('data', data.shape)

# KerasのモデルをNNVMで読み込む
sym, params = nnvm.frontend.from_keras(model)

# モデルのコンパイル
if USE_GPU:
    target = 'opencl'
else:
    target = 'llvm'
shape_dict = {'data': data.shape}
with nnvm.compiler.build_config(opt_level=3):
    graph, lib, params = nnvm.compiler.build(sym, target, shape_dict, params=params)

ctx = tvm.context(target, 0)
m = graph_runtime.create(graph, lib, ctx)

# 入力データのセット
m.set_input('data', tvm.nd.array(data.astype('float32')))
m.set_input(**params)
m.run() # 推論実行

# 計算結果を取得し、推論結果を確認
out_shape = (1000,)
tvm_out = m.get_output(0, tvm.nd.empty(out_shape, 'float32')).asnumpy()
top1_tvm = np.argmax(tvm_out)

with open('imagenet1000_clsid_to_human.txt') as f:
    synset = eval(f.read())
print('NNVM top-1 id: {}, class name: {}'.format(top1_tvm, synset[top1_tvm]))

# Kerasでも同じ入力に対して推論し、結果を出力
keras_out = model.predict(data.transpose([0, 2, 3, 1]))
top1_keras = np.argmax(keras_out)
print('Keras top-1 id: {}, class name: {}'.format(top1_keras, synset[top1_keras]))

# Benchmark of NNVM
num_iter = 100
ftimer = m.module.time_evaluator("run", ctx, num_iter)
prof_res = ftimer()
print(prof_res)

# Benchmark of Keras
x = data.transpose([0, 2, 3, 1])
start = time()
for i in range(0, num_iter):
    model.predict(x)
end = time()
print((end-start)/num_iter)
事前にテスト用の猫画像と、ImageNetのラベルをダウンロードして、
$ wget https://github.com/dmlc/mxnet.js/blob/master/data/cat.png?raw=true -O cat.png
$ wget https://gist.githubusercontent.com/yrevar/942d3a0ac09ec9e5eb3a/raw/c2c91c8e767d04621020c30ed31192724b863041/imagenet1000_clsid_to_human.txt -O imagenet1000_clsid_to_human.txt
スクリプトを実行すると、自動で学習済みモデルのダウンロードが始まり…
$ python keras-nnvm-example.py
Downloading data from https://github.com/fchollet/deep-learning-models/releases/download/v0.2/resnet50_weights_tf_dim_ordering_tf_kernels.h5
  1155072/102853048 [..............................] - ETA: 6:10
計算が完了し、結果が標準出力されました。Kerasの結果とも一致していますね。
NNVM top-1 id: 282, class name: tiger cat
Keras top-1 id: 282, class name: tiger cat
100回forwardした平均時間の計測結果は以下のようになりました。
NNVM(GPU) > Keras(CPU) > NNVM(CPU)
最適化次第でもっと高速化できるのだろうか。
| フレームワーク | ターゲット | 実行時間[sec] |
|---|---|---|
| Keras | CPU | 0.38 |
| NNVM/TVM | CPU | 2.09 |
| NNVM/TVM | GPU | 0.16 |
まとめ
NNVMがKerasからのインポートに対応したとのことで、早速試してみました。
先日は Chainer → ONNX → NNVM (そしてAndroidで動かす) という記事を書いたのですが、レイヤーによってはONNX → NNVMの制限があったりして難航しました。フレームワーク間のモデル変換はめんどいですね…
今回試したKerasは直接NNVMへ変換できるのでハマりどころが少なくて良さそうです。Kerasで学習してNNVMで各種デバイスデプロイするのは簡単で良いなあ。
その他
ハマりどころや環境構築など。
nnvm.frontend.from_kerasでNameError: name 'unicode' is not defined
いきなりモデルのインポートに失敗して泣きそうになった。
どうやらnnvm/python/nnvm/frontend/keras.py#L20でstrかunicodeか見ているようで…unicode型はPython3では削除されてるので参照エラーとなったわけです。NNVMはPython2推奨ってこと?えー…
def _convert_activation(insym, keras_layer, _):
    if isinstance(keras_layer, (str, unicode)):
        act_type = keras_layer
    else:
今日は祝日だし何もかもがめんどくさかったので、以下のように暫定対応したら動きました。
unicode=str # work around

def _convert_activation(insym, keras_layer, _):
    if isinstance(keras_layer, (str, unicode)):
        act_type = keras_layer
    else:
環境構築
最後に、私の環境でのインストール手順を記載します。
- MacBook Pro (13-inch, 2017)
- macOS Sierra 10.12.6
- Python 3.6.2 (anaconda3-5.0.0)
- NNVM/TVM 0aa9541
- TensorFlow 1.4.0
- Keras 2.1.2
NNVM/TVM
NNVMのリビジョンは、0aa9541を使いました。
$ git clone --recursive https://github.com/dmlc/nnvm.git
$ pushd nnvm/tvm
$ vim make/config.mk # USE_OPENCL = 1, LLVM_CONFIG = llvm-configをコメントアウト
$ make -j8
$ cd python; python setup.py build; cd ../
$ cd topi/python; python setup.py build; cd ../
$ popd
$ pushd nnvm
$ make -j8
$ cd python; python setup.py build; cd ../
私はデバッグ目的でnnvm/tvmを修正したいので、python setup.py installはせずbuildのみしています。
nnvm/tvmのPythonモジュールのパスを通すために、以下をbashrcに追記してsource ~/.bashrc
NNVM_ROOT=/path/to/nnvm
export PYTHONPATH=$NNVM_ROOT/python:${PYTHONPATH}
export PYTHONPATH=$NNVM_ROOT/tvm/python:${PYTHONPATH}
export PYTHONPATH=$NNVM_ROOT/tvm/topi/python:${PYTHONPATH}
インストールできたことを確認
$ python
>>> import nnvm
>>> nnvm.__version__
'0.8.0'
>>> import tvm
>>> tvm.__version__
'0.1.0'
>>> nnvm.__file__
'/path/to/nnvm/python/nnvm/__init__.py'
>>> tvm.__file__
'/path/to/nnvm/tvm/python/tvm/__init__.py'
Tensorflow
公式のインストール手順はここ。
$ pip install tensorflow
$ python
>>> import tensorflow
>>> tensorflow.__version__
'1.4.0'
私の環境では、インストール後にpythonでimport tensorflowしたときにKeyError: "Couldn't find field google.protobuf.EnumDescriptorProto.EnumReservedRange.start"というエラーが出たため、StackOverFlowのこの記事を参考に、protobufをアップグレードした。
Keras
公式のインストール手順はここ
$ pip insall keras
$ python
>>> import keras
>>> keras.__version__
'2.1.2'