◇目的
SpringCloudを使用して簡単なマイクロサービスを構築する。
◇ゴール
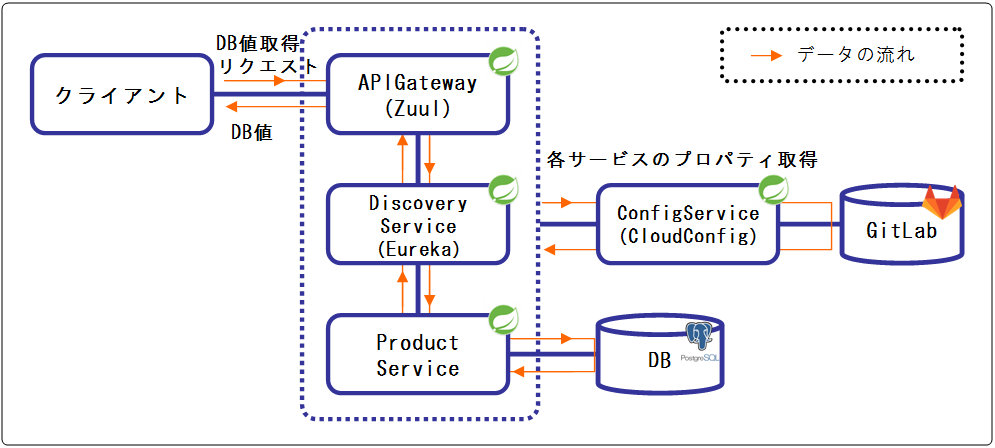
クライアントからリクエストするとDBから取得(SELECT)した値を返すサービスを作成する。
【ゴール】全体像
| 構成要素名 | 役割 |
|---|---|
| APIGateway | リバースプロキシの役割を担う。Zuulを使用。 |
| DiscoveryService | サービスの登録/検索/呼出の役割を担う。Eurekaを使用。 |
| ConfigService | 各サービスのプロパティをGitLabから取得し、返却する。Spring Cloud Configを使用。 |
| GitLab | 各サービスのプロパティを管理する。(ポート番号/DBのURL・ユーザ・パスワード等) |
| ProductService | リクエストされたDB値をJSONで返却する。 |
【ゴール】補足
各サービスの構築・連携方法を話のメインにしたいため、HA構成にはしない。
※HA構成の場合、各サービスを冗長化し、前にLoadBalancerを立てるイメージ。
◇前提
- Windows7 64bit環境のローカルマシン上でサービスを動かす。
- DBはPostgreSQLをローカルマシンにインストールして使用。
- GitLabはGitLab.comを使用。
- Spring Boot 2.0.0.RELEASE、Spring Cloud Finchley.M8を使用。
- IDEは↓で構築したSTSを使用。
Spring Tool Suite(STS)のインストール&日本語化&Gradleプラグイン追加の手順
◇完成したソース
こちら。
https://gitlab.com/tk_230to/spring-cloud-msa-sample
◇参考
Spring Cloudのリファレンスはこちら。
https://spring.io/docs/reference
◇概要
準備
- 【準備】PostgerSQLインストール&DB作成
- 【準備】GitLabリポジトリ作成
構築
- ConfigService作成
- DiscoveryService作成
- ProductService作成
- APIGateway作成
◇準備
1. 【準備】PostgerSQLインストール&DB作成
ProductServiceが接続するDBをローカルに用意する。
今回はPostgreSQLを使用する。
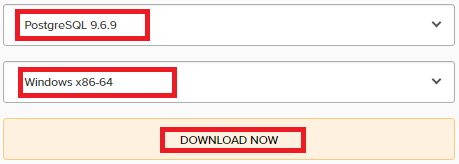
1.1 ダウンロード
ダウンロードリンクからPostgreSQLのバージョンとOSを選択してダウンロード。
1.2 インストール
ダウンロードしたインストーラを実行して↓以外はデフォルトでポチポチ。
・Password:「postgres」(好きなパスワードで)
・Locale:「Japanese, Japan」
・スタックビルダ:無し
1.3 テーブル作成
商品ID(item_id)/商品名(item_name)を持つ簡単な商品テーブルを作成。
1.3.1 作成する商品テーブル
| No | カラム名 | 型 | NotNull | PK |
|---|---|---|---|---|
| 1 | item_id | integer | ○ | ○ |
| 2 | item_name | character varying(255) | ○ |
1.3.2 テーブル作成手順
(1)「スタート」→「pgadmin」で検索→「pgAdmin 4」を実行。
(2)「pgAdmin 4」画面の「Tools」→「Query Tool」
(3) ↓のSQL文を貼り付けて「F5」で実行。
-- item_idのシーケンス作成
CREATE SEQUENCE item_id_seq;

-- テーブル作成
CREATE TABLE public.item
(
    item_id integer PRIMARY KEY DEFAULT nextval('item_id_seq'),
    item_name character varying(255) COLLATE pg_catalog."default" NOT NULL
)
WITH (
    OIDS = FALSE
)
TABLESPACE pg_default;

ALTER TABLE public.item
    OWNER to postgres;
1.4 データ登録
(1) ↓のSQL文を貼り付けて「F5」で実行。
INSERT INTO item (item_name) VALUES ('商品1');
2. 【準備】GitLabリポジトリ作成
プロパティを管理するためのGitLabリポジトリを作成する。
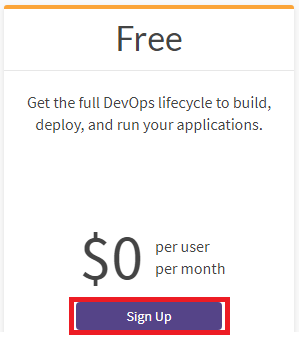
2.1 GitLab.comの無料アカウントを作成
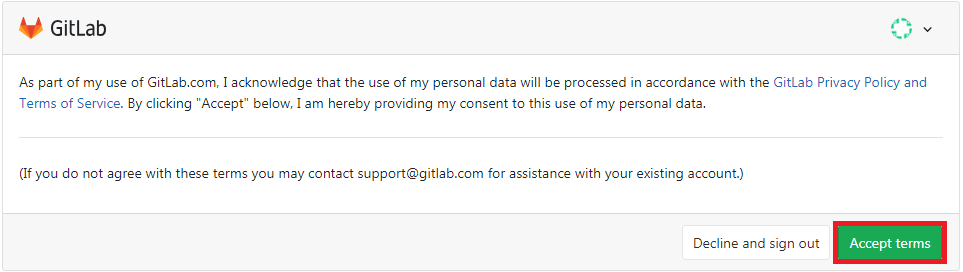
(1) GitLab.comを表示して、赤枠をポチポチ。
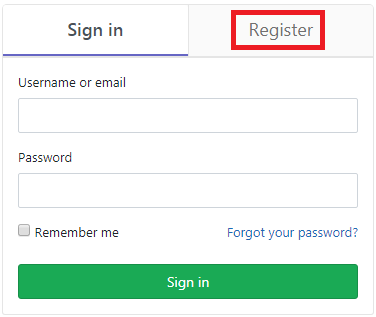
(2) 「Register」を選択してユーザー名等を入力して「Register」。
(3) 確認メールが届くので「Confirm your account」で確認。
(4) プライバシーポリシーを確認して問題なければ「Accept terms」
2.2 リポジトリ作成
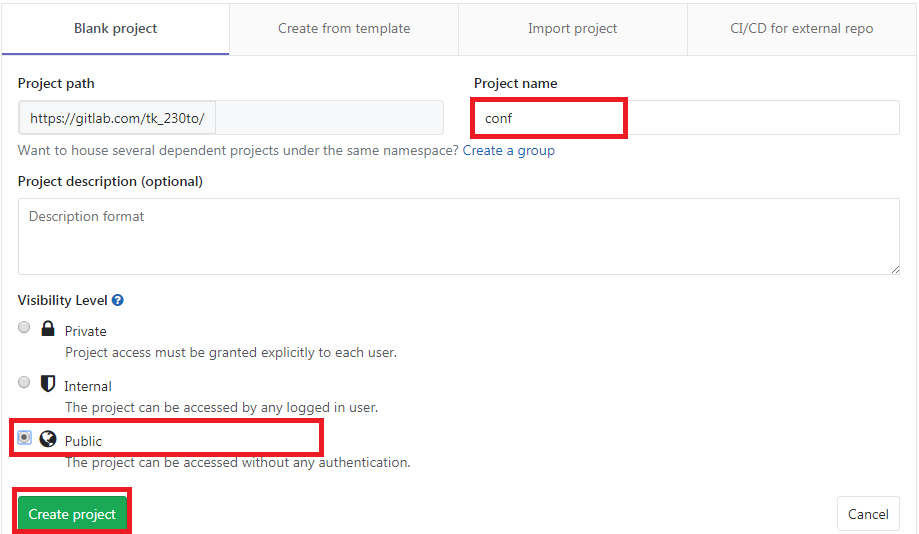
GitLabアカウントが登録できたら、リポジトリを作成。
プロジェクト名は、プロパティファイルの管理が目的なので「conf」。
公開範囲はサンプルなので「Public」。
2.3 masterブランチ作成
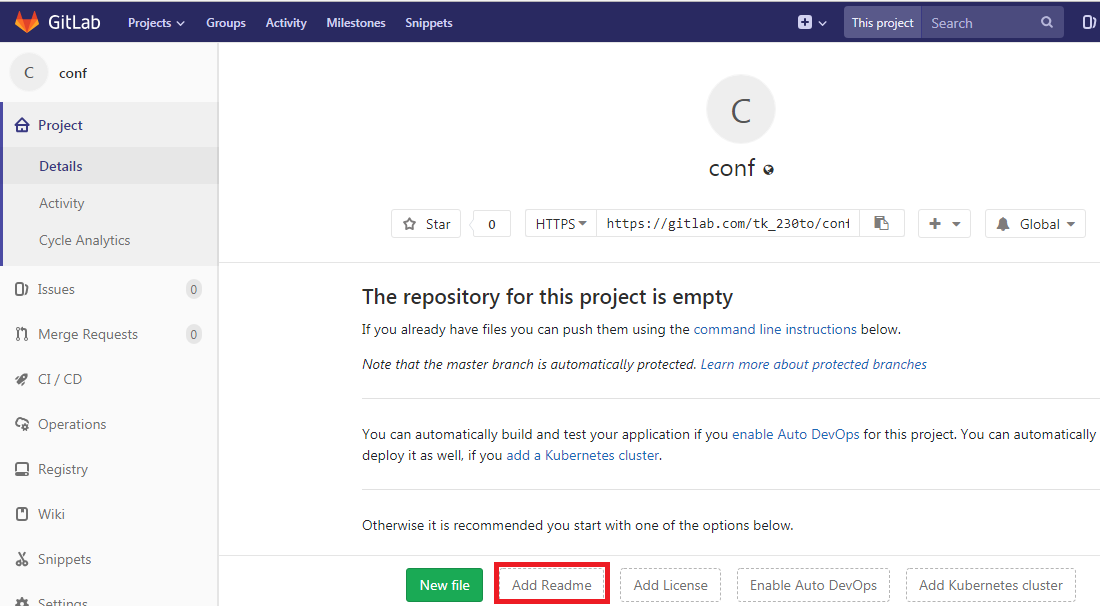
何でも良いのでファイルを登録するとmasterブランチが作成される。
「Add Readme」で「README.md」を登録する。
◇構築
PostgreSQLとGitLabの準備が整ったので、サービスを作成する。
1. ConfigService作成
各サービスのプロパティはConfigServiceから取得するので、
ConfigServiceが完成していないと各サービスを動かせない。
そのため、最初にConfigServiceを作成する。
手順概要
| 手順 | 概要 |
|---|---|
| 1.1 プロジェクト作成 | 「Springスターター・プロジェクト」でプロジェクトの雛形を作成 |
| 1.2 Javaアプリケーション作成 | 「@EnableConfigServer」にて、私はConfigServiceですよと宣言 |
| 1.3 build.gradleファイル作成 | 動作するSpringのバージョンを設定 |
| 1.4 プロパティファイル作成 | GitLabのURIや起動ポート番号を設定 |
| 1.5 動作確認 | 実行してみる |
1.1 プロジェクト作成
1.1.1 新規プロジェクト作成
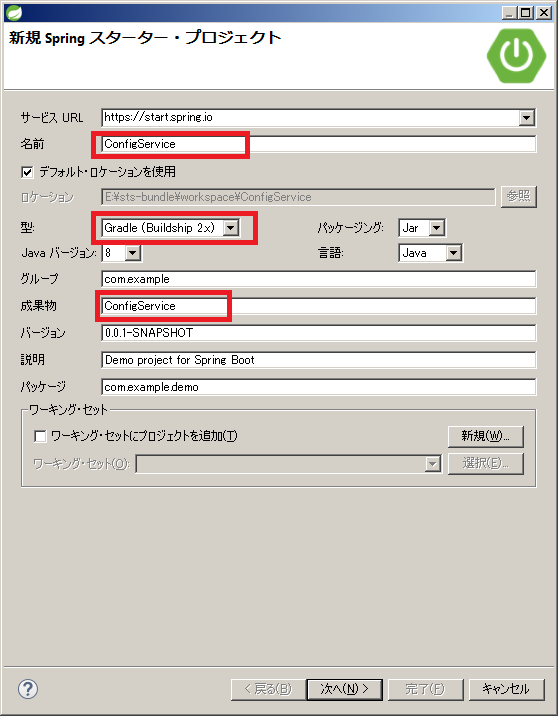
STSを起動して、「ファイル」→「新規」→「Spring スターター・プロジェクト」。
1.1.2 プロジェクト名等を設定
プロジェクト名=「ConfigService」、型=「Gradle (Buildship 2.x)」。
1.1.3 依存関係を設定
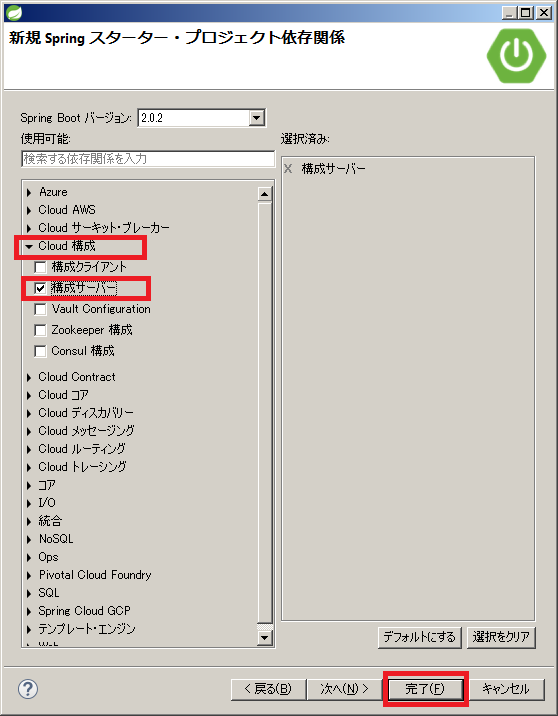
依存関係に「Config Server」(「構成サーバ」)を選択して完了。
バージョンはここでは変更できないので「1.3 build.gradleファイル作成」にて後で変更。
1.2 Javaアプリケーション作成
src/main/javaのConfigServiceApplication.javaに「@EnableConfigServer」を付与。
package com.example.demo;

import org.springframework.boot.SpringApplication;
import org.springframework.boot.autoconfigure.SpringBootApplication;
import org.springframework.cloud.config.server.EnableConfigServer;

@SpringBootApplication
@EnableConfigServer // ←付与
public class ConfigServiceApplication {

    public static void main(String[] args) {
        SpringApplication.run(ConfigServiceApplication.class, args);
    }
}
1.3 build.gradleファイル作成
動作するバージョンに変更する。
・springBootVersion = '2.0.0.RELEASE'に変更
・springCloudVersion = 'Finchley.M8'に変更
buildscript {
    ext {
        springBootVersion = '2.0.0.RELEASE' // 変更
    }
    repositories {
        mavenCentral()
    }
    dependencies {
        classpath("org.springframework.boot:spring-boot-gradle-plugin:${springBootVersion}")
    }
}

apply plugin: 'java'
apply plugin: 'eclipse'
apply plugin: 'org.springframework.boot'
apply plugin: 'io.spring.dependency-management'

group = 'com.example'
version = '0.0.1-SNAPSHOT'
sourceCompatibility = 1.8

repositories {
    mavenCentral()
    maven { url "https://repo.spring.io/milestone" }
}


ext {
    springCloudVersion = 'Finchley.M8' // 変更
}

dependencies {
    compile('org.springframework.cloud:spring-cloud-config-server')
    testCompile('org.springframework.boot:spring-boot-starter-test')
}

dependencyManagement {
    imports {
        mavenBom "org.springframework.cloud:spring-cloud-dependencies:${springCloudVersion}"
    }
}
1.4 プロパティファイル作成
1.4.1 bootstrap.yml作成
src/main/resourcesのapplication.propertiesをbootstrap.ymlにリネームして編集。
bootstarp.ymlはSpringBootで最優先に取得されるプロパティファイル。
# サービス名
spring.application.name: ConfigService

# 使用するポート番号
server.port: 8888

# GitリポジトリURI (「2. 【準備】GitLabリポジトリ作成」で作成したGitLabのURIに変えてください)
spring.cloud.config.server.git.uri: https://gitlab.com/tk_230to/conf.git
1.5 動作確認
1.5.1 Gradleの依存関係を最新化
「ConfigService」を右クリック→「Gradle」→「Gradleプロジェクトのリフレッシュ」
1.5.2 サービス起動
「ConfigService」を右クリック→「実行」→「Spring Bootアプリケーション」
1.5.3 アクセスしてみる
http://localhost:8888/admin/env にアクセスしてみて、JSONレスポンスが返ってきたらOK。
綺麗に見たければDHC REST Client等を使う。

2. DiscoveryService作成
手順概要
| 手順 | 概要 |
|---|---|
| 2.1 プロジェクト作成 | 「Springスターター・プロジェクト」でプロジェクトの雛形を作成 |
| 2.2 Javaアプリケーション作成 | 「@EnableEurekaServer」にて、私はEurekaですよと宣言 |
| 2.3 build.gradleファイル作成 | 動作するSpringのバージョンを設定 |
| 2.4 プロパティファイル作成 | (1)ConfigServiceのURIと自サービス名を教える(bootstrap.yml) |
| (2)自身のプロパティをGitLabに登録(DiscoveryService.yml) | |
| 2.5 動作確認 | 実行してみる |
2.1 プロジェクト作成
「1. ConfigService作成」と同様で、違うところは太字。
・プロジェクト名=「DiscoveryService」、型=「Gradle (Buildship 2.x)」。
・依存関係に「Eureka サーバー」「構成クライアント」を選択して完了。
2.2 Javaアプリケーション作成
src/main/javaのDiscoveryServiceApplication.javaに「@EnableEurekaServer」「@RefreshScope」を付与。
package com.example.demo;

import org.springframework.boot.SpringApplication;
import org.springframework.boot.autoconfigure.SpringBootApplication;
import org.springframework.cloud.context.config.annotation.RefreshScope;
import org.springframework.cloud.netflix.eureka.server.EnableEurekaServer;

@SpringBootApplication
@EnableEurekaServer // ←追加
@RefreshScope // ←追加
public class DiscoveryServiceApplication {

    public static void main(String[] args) {
        SpringApplication.run(DiscoveryServiceApplication.class, args);
    }
}
2.3 build.gradleファイル作成
1.3と同様。
buildscript {
    ext {
        springBootVersion = '2.0.0.RELEASE' // 変更
    }
    repositories {
        mavenCentral()
    }
    dependencies {
        classpath("org.springframework.boot:spring-boot-gradle-plugin:${springBootVersion}")
    }
}

apply plugin: 'java'
apply plugin: 'eclipse'
apply plugin: 'org.springframework.boot'
apply plugin: 'io.spring.dependency-management'

group = 'com.example'
version = '0.0.1-SNAPSHOT'
sourceCompatibility = 1.8

repositories {
    mavenCentral()
    maven { url "https://repo.spring.io/milestone" }
}


ext {
    springCloudVersion = 'Finchley.M8' // 変更
}

dependencies {
    compile('org.springframework.cloud:spring-cloud-starter-config')
    compile('org.springframework.cloud:spring-cloud-starter-netflix-eureka-server')
    testCompile('org.springframework.boot:spring-boot-starter-test')
}

dependencyManagement {
    imports {
        mavenBom "org.springframework.cloud:spring-cloud-dependencies:${springCloudVersion}"
    }
}
2.4 プロパティファイル作成
bootstrap.ymlとDiscoveryService.ymlの2種類を作成する。
| 種類 | 説明 |
|---|---|
| bootstrap.yml | ConfigServiceに関するプロパティを保持。それ以外のプロパティは↓に保持。 |
| DiscoveryService.yml | GitLabに外出しするプロパティ。ConfigServiceから取得される。 |
2.4.1 bootstrap.yml作成
src/main/resourcesのapplication.propertiesをbootstrap.ymlにリネームして編集。
ConfigServiceから「{サービス名}.yml」(DiscoveryService.yml) が取得されるようになる。
※正確には「{サービス名}-{プロファイル名}.yml」。
プロファイル名は、product/development/default。
今回はややこしくならないようプロファイル名は省略。
# サービス名
spring.application.name: DiscoveryService

# ConfigServiceのURI
spring.cloud.config.uri: http://localhost:8888
2.4.2 DiscoveryService.yml作成
GitLabのリポジトリにDiscoveryService.ymlを作成。
# 使用するポート番号(デフォルト8761だが分かりやすく明示)
server.port: 8761

# 自分自身をEurekaのレジストリに登録しない
eureka.client.registerWithEureka: false
eureka.client.fetchRegistry: false

2.5 動作確認
1.5と同様。ただし、ConfigServiceからプロパティを取得するので、
先にConfigServiceを起動してから、DiscoveryServiceを起動する順序。
(1) Gradleの依存関係を最新化
(2) ConfigService起動
(3) DiscoveryService起動
(4) アクセスしてみる
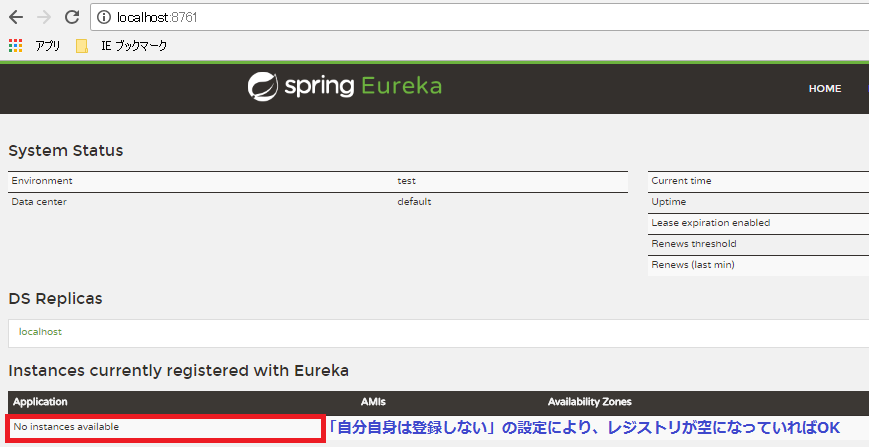
http://localhost:8761 にアクセスしてみて、Eurekaの画面が表示されたらOK。
3. ProductService作成
手順概要
| 手順 | 概要 |
|---|---|
| 3.1 プロジェクト作成 | 「Springスターター・プロジェクト」でプロジェクトの雛形を作成 |
| 3.2 Javaアプリケーション作成 | 「@EnableEurekaClient」でEurekaクライアント宣言 |
| 3.3 Entityクラス作成 | 商品テーブルの情報を保持するクラスを作成 |
| 3.4 Repositoryクラス作成 | 商品テーブルのCRUDクラスを作成 |
| 3.5 build.gradleファイル作成 | 動作するSpringのバージョンを設定 |
| 3.6 プロパティファイル作成 | (1)ConfigServiceのURIと自サービス名を教える(bootstrap.yml) |
| (2)自身のプロパティをGitLabに登録(ProductService.yml) | |
| 3.7 動作確認 | 実行してみる |
3.1 プロジェクト作成
「1. ConfigService作成」と同様で、違うところは太字。
・プロジェクト名=「ProductService」、型=「Gradle (Buildship 2.x)」。
・依存関係に「Eureka ディスカバリー」「構成クライアント」「JPA」「Rest リポジトリー」「PostgreSQL」を選択して完了。
3.2 Javaアプリケーション作成
src/main/javaのProductServiceApplication.javaに「@EnableEurekaClient」「@RefreshScope」を付与。
package com.example.demo;

import org.springframework.boot.SpringApplication;
import org.springframework.boot.autoconfigure.SpringBootApplication;
import org.springframework.cloud.context.config.annotation.RefreshScope;
import org.springframework.cloud.netflix.eureka.EnableEurekaClient;

@SpringBootApplication
@EnableEurekaClient // ←追加
@RefreshScope // ←追加
public class ProductServiceApplication {

    public static void main(String[] args) {
        SpringApplication.run(ProductServiceApplication.class, args);
    }
}
3.3 Entityクラス作成
src/main/javaに商品テーブルのEntityクラスを作成。
package com.example.demo;

import java.io.Serializable;

import javax.persistence.Column;
import javax.persistence.Entity;
import javax.persistence.Id;
import javax.persistence.Table;

@Entity
@Table(name="item")
public class Item implements Serializable {
    private static final long serialVersionUID = 1L;

    @Id
    @Column(name="item_id")
    private Integer itemId;

    @Column(name="item_name")
    private String itemName;

    public Integer getItemId() {
        return itemId;
    }

    public void setItemId(Integer itemId) {
        this.itemId = itemId;
    }

    public String getItemName() {
        return itemName;
    }

    public void setItemName(String itemName) {
        this.itemName = itemName;
    }
}
※lombokを使うとGETレスポンスに商品名が出力されなかったため、getter/setterを直接記述した。
3.4 Repositoryクラス作成
src/main/javaに商品テーブルのCRUDを操作するRepositoryクラスを作成。
「JpaRepository」を使用しているので、Rest URIのエンドポイントも作成される。
package com.example.demo;
import org.springframework.data.jpa.repository.JpaRepository;
import org.springframework.stereotype.Repository;

@Repository
public interface ItemRepository extends JpaRepository<Item, Integer> {
}
3.5 build.gradleファイル作成
1.3と同様。
buildscript {
    ext {
        springBootVersion = '2.0.0.RELEASE' // 変更
    }
    repositories {
        mavenCentral()
    }
    dependencies {
        classpath("org.springframework.boot:spring-boot-gradle-plugin:${springBootVersion}")
    }
}

apply plugin: 'java'
apply plugin: 'eclipse'
apply plugin: 'org.springframework.boot'
apply plugin: 'io.spring.dependency-management'

group = 'com.example'
version = '0.0.1-SNAPSHOT'
sourceCompatibility = 1.8

repositories {
    mavenCentral()
    maven { url "https://repo.spring.io/milestone" }
}


ext {
    springCloudVersion = 'Finchley.M8' // 変更
}

dependencies {
    compile('org.springframework.boot:spring-boot-starter-data-jpa')
    compile('org.springframework.boot:spring-boot-starter-data-rest')
    compile('org.springframework.cloud:spring-cloud-starter-config')
    compile('org.springframework.cloud:spring-cloud-starter-netflix-eureka-client')
    runtime('org.postgresql:postgresql')
    testCompile('org.springframework.boot:spring-boot-starter-test')
}

dependencyManagement {
    imports {
        mavenBom "org.springframework.cloud:spring-cloud-dependencies:${springCloudVersion}"
    }
}
3.6 プロパティファイル作成
2.4と同様。bootstrap.ymlとProductService.ymlの2種類を作成する。
3.6.1 bootstrap.yml作成
src/main/resourcesのapplication.propertiesをbootstrap.ymlにリネームして編集。
# サービス名
spring.application.name: ProductService

# ConfigServiceのURI
spring.cloud.config.uri: http://localhost:8888
3.6.2 ProductService.yml作成
GitLabのリポジトリにProductService.ymlを作成。
# 使用するポート番号
server:
  port: 8081

# DB接続情報
spring:
  datasource:
    driver-class-name: org.postgresql.Driver
    url: jdbc:postgresql://localhost:5432/postgres
    username: postgres
    password: postgres

# Eurekaの情報
eureka:
  client:
    serviceUrl:
      defaultZone: http://localhost:8761/eureka/
3.7 動作確認
2.5と同様。ConfigService→DiscoveryService→ProductServiceの順番で起動する。
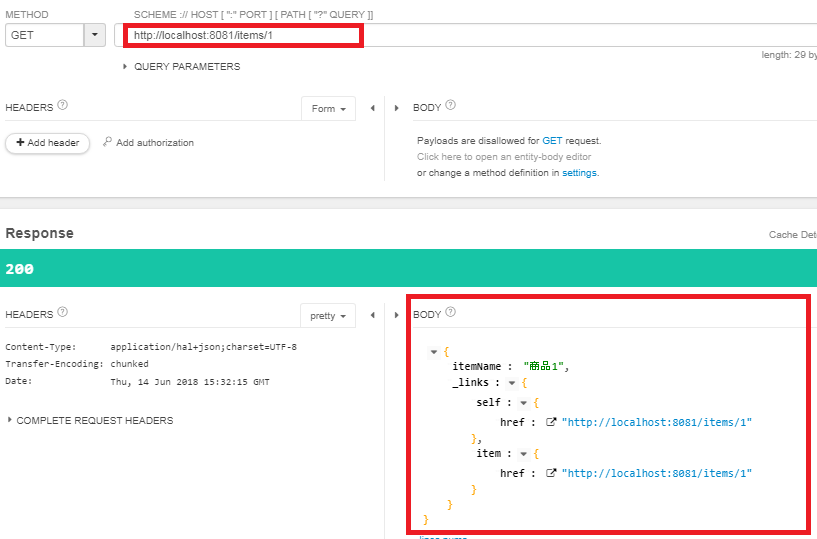
http://localhost:8081/items/1 にアクセスしてみて、"商品1"が返却されたらOK。
4. API Gateway作成
手順概要
| 手順 | 概要 |
|---|---|
| 4.1 プロジェクト作成 | 「Springスターター・プロジェクト」でプロジェクトの雛形を作成 |
| 4.2 Javaアプリケーション作成 | 「@EnableZuulProxy」にて、Zuul Proxyを有効化 |
| 4.3 build.gradleファイル作成 | 動作するSpringのバージョンを設定 |
| 4.4 プロパティファイル作成 | (1)ConfigServiceのURIと自サービス名を教える(bootstrap.yml) |
| (2)自身のプロパティをGitLabに登録(APIGateway.yml) | |
| 4.5 動作確認 | 実行してみる |
4.1 プロジェクト作成
「1. ConfigService作成」と同様で、違うところは太字。
・プロジェクト名=「APIGateway」、型=「Gradle (Buildship 2.x)」。
・依存関係に「Eureka ディスカバリー」「構成クライアント」「Zuul」を選択して完了。
4.2 Javaアプリケーション作成
src/main/javaのAPIGatewayApplication.javaに「@EnableZuulProxy」「@EnableEurekaClient」「@RefreshScope」を付与。
package com.example.demo;

import org.springframework.boot.SpringApplication;
import org.springframework.boot.autoconfigure.SpringBootApplication;
import org.springframework.cloud.context.config.annotation.RefreshScope;
import org.springframework.cloud.netflix.eureka.EnableEurekaClient;
import org.springframework.cloud.netflix.zuul.EnableZuulProxy;

@SpringBootApplication
@EnableEurekaClient // ←追加
@RefreshScope // ←追加
@EnableZuulProxy // ←追加
public class ApiGatewayApplication {

    public static void main(String[] args) {
        SpringApplication.run(ApiGatewayApplication.class, args);
    }
}
4.3 build.gradleファイル作成
1.3と同様。
buildscript {
    ext {
        springBootVersion = '2.0.0.RELEASE' // 変更
    }
    repositories {
        mavenCentral()
    }
    dependencies {
        classpath("org.springframework.boot:spring-boot-gradle-plugin:${springBootVersion}")
    }
}

apply plugin: 'java'
apply plugin: 'eclipse'
apply plugin: 'org.springframework.boot'
apply plugin: 'io.spring.dependency-management'

group = 'com.example'
version = '0.0.1-SNAPSHOT'
sourceCompatibility = 1.8

repositories {
    mavenCentral()
    maven { url "https://repo.spring.io/milestone" }
}


ext {
    springCloudVersion = 'Finchley.M8' // 変更
}

dependencies {
    compile('org.springframework.cloud:spring-cloud-starter-config')
    compile('org.springframework.cloud:spring-cloud-starter-netflix-eureka-client')
    compile('org.springframework.cloud:spring-cloud-starter-netflix-zuul')
    testCompile('org.springframework.boot:spring-boot-starter-test')
}

dependencyManagement {
    imports {
        mavenBom "org.springframework.cloud:spring-cloud-dependencies:${springCloudVersion}"
    }
}
4.4 プロパティファイル作成
2.4と同様。bootstrap.ymlとAPIGateway.ymlの2種類を作成する。
4.4.1 bootstrap.yml作成
src/main/resourcesのapplication.propertiesをbootstrap.ymlにリネームして編集。
# サービス名
spring.application.name: APIGateway

# ConfigServiceのURI
spring.cloud.config.uri: http://localhost:8888
4.4.2 APIGateway.yml作成
GitLabのリポジトリにAPIGateway.ymlを作成。
# 使用するポート番号
server:
  port: 8000

# Eurekaの情報
eureka:
  client:
    serviceUrl:
      defaultZone: http://localhost:8761/eureka/

# ProductServiceのルート情報
zuul:
  routes:
    users:
      path: /items/**
      serviceId: ProductService
      stripPrefix: false
4.5 動作確認
2.5と同様。ConfigService→DiscoveryService→ProductService→APIGatewayの順番で起動する。
http://localhost:8000/items/1 にアクセスしてみて、"商品1"が返却されたらOK。