使ったもの
Ruby on Rrails 5.2.3
haml 5.1.1
SCSS 3.7.4
jQuery 1.12.4
(すでにMVC等の設定は済ませているものとします)
作ったきっかけ
あるスクールでメルカリのクローンサイトをチーム開発で作っています。そのメルカリのヘッダーに「多段階ナビゲーションバー」があり、結構つまづきました。
↓これ!
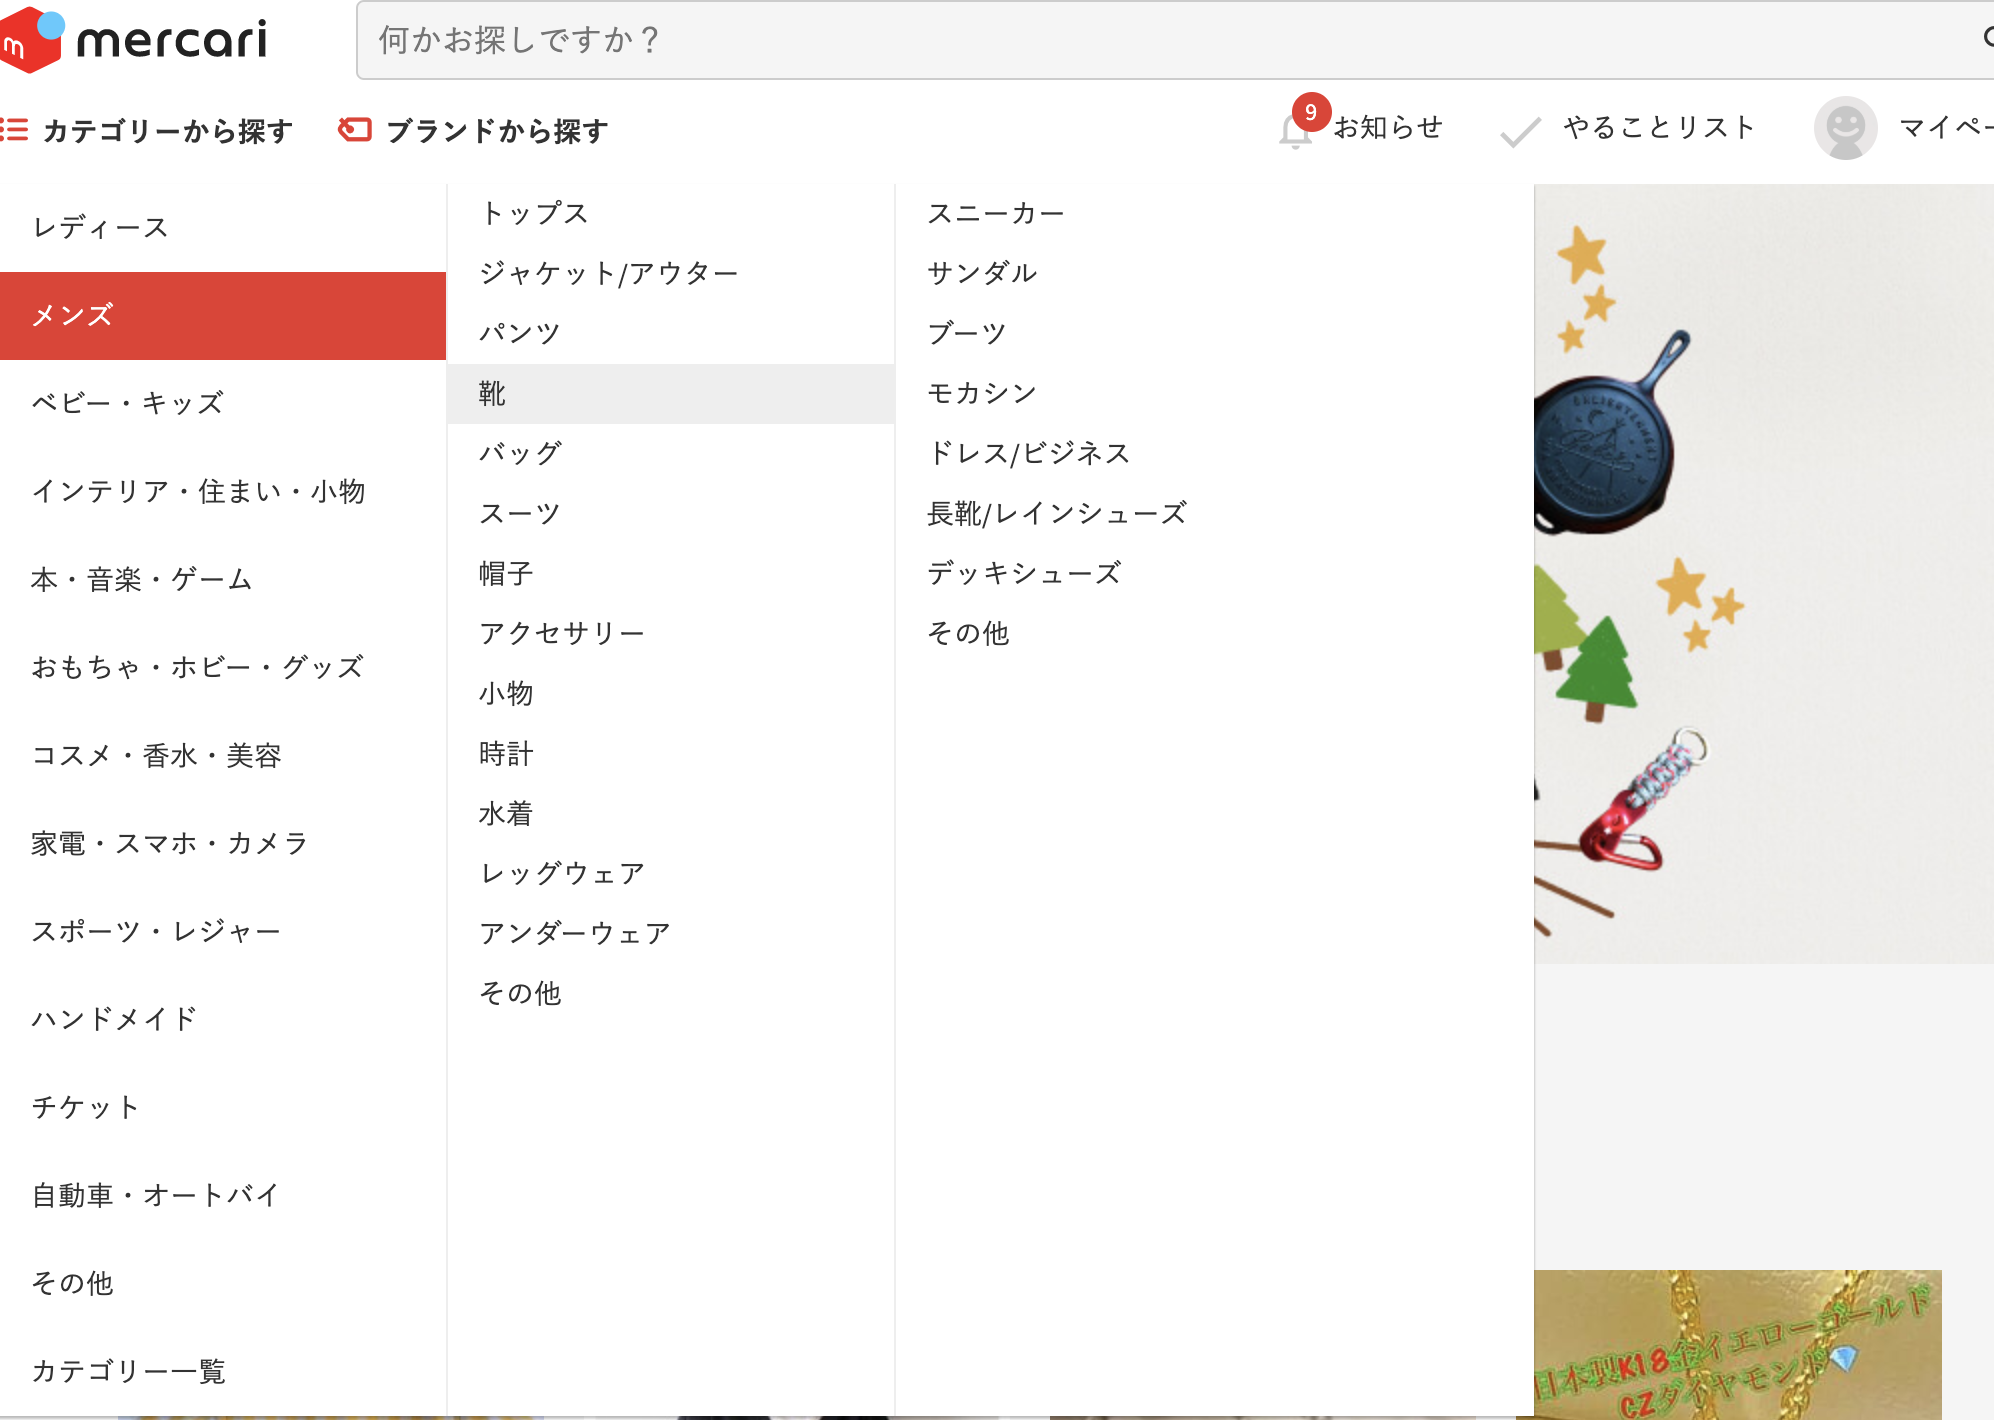
作ってみると意外とシンプルなもので、慣れれば30分もしないでカンタンに作れそうです!
実際にミニアプリで再現してみた!
メルカリで実装できたので、復習用でミニアプリでも似た多段階ナビゲーションバーを作ってみました。
今回この記事で作っていくもののサンプルはこれです。
hamlでリストを作る
%header
  .header
    %ul.parent-wrap
      %li.parent
        %h3
          =link_to '/' do
            %spna リスト1
        %ul.child-wrap
          %li.child
            =link_to '/' do
              %span 1-1
            %ul.grand-child-wrap
              %li.grand-child
                =link_to '/' do
                  %span 1-1-1
              %li.grand-child
                =link_to '/' do
                  %span 1-1-2
              %li.grand-child
                =link_to '/' do
                  %span 1-1-3
          %li.child
            =link_to '/' do
              %span 1-2

          %li.child
            =link_to '/' do
              %span 1-3

      %li.parent
        %h3
          =link_to '/' do
            %span リスト2
        %ul.child-wrap
          %li.child
            =link_to '/' do
              %span 2-1
            %ul.grand-child-wrap
              %li.grand-child
                =link_to '/' do
                  %span 2-1-1
              %li.grand-child
                =link_to '/' do
                  %span 2-1-2
              %li.grand-child
                =link_to '/' do
                  %span 2-1-3
          %li.child
            =link_to '/' do
              %span 2-2
          %li.child
            =link_to '/' do
              %span 2-3

      %li.parent
        %h3
          =link_to '/' do
            %span リスト3
        %ul.child-wrap
          %li.child
            =link_to '/' do
              %span 3-1
          %li.child
            =link_to '/' do
              %span 3-2
          %li.child
            =link_to '/' do
              %span 3-3

      %li.parent
        %h3
          =link_to '/' do
            %spna リスト4
        %ul.child-wrap
          %li.child
            =link_to '/' do
              %span 4-1
          %li.child
            =link_to '/' do
              %span 4-2
          %li.child
            =link_to '/' do
              %span 4-3
このようにかくと
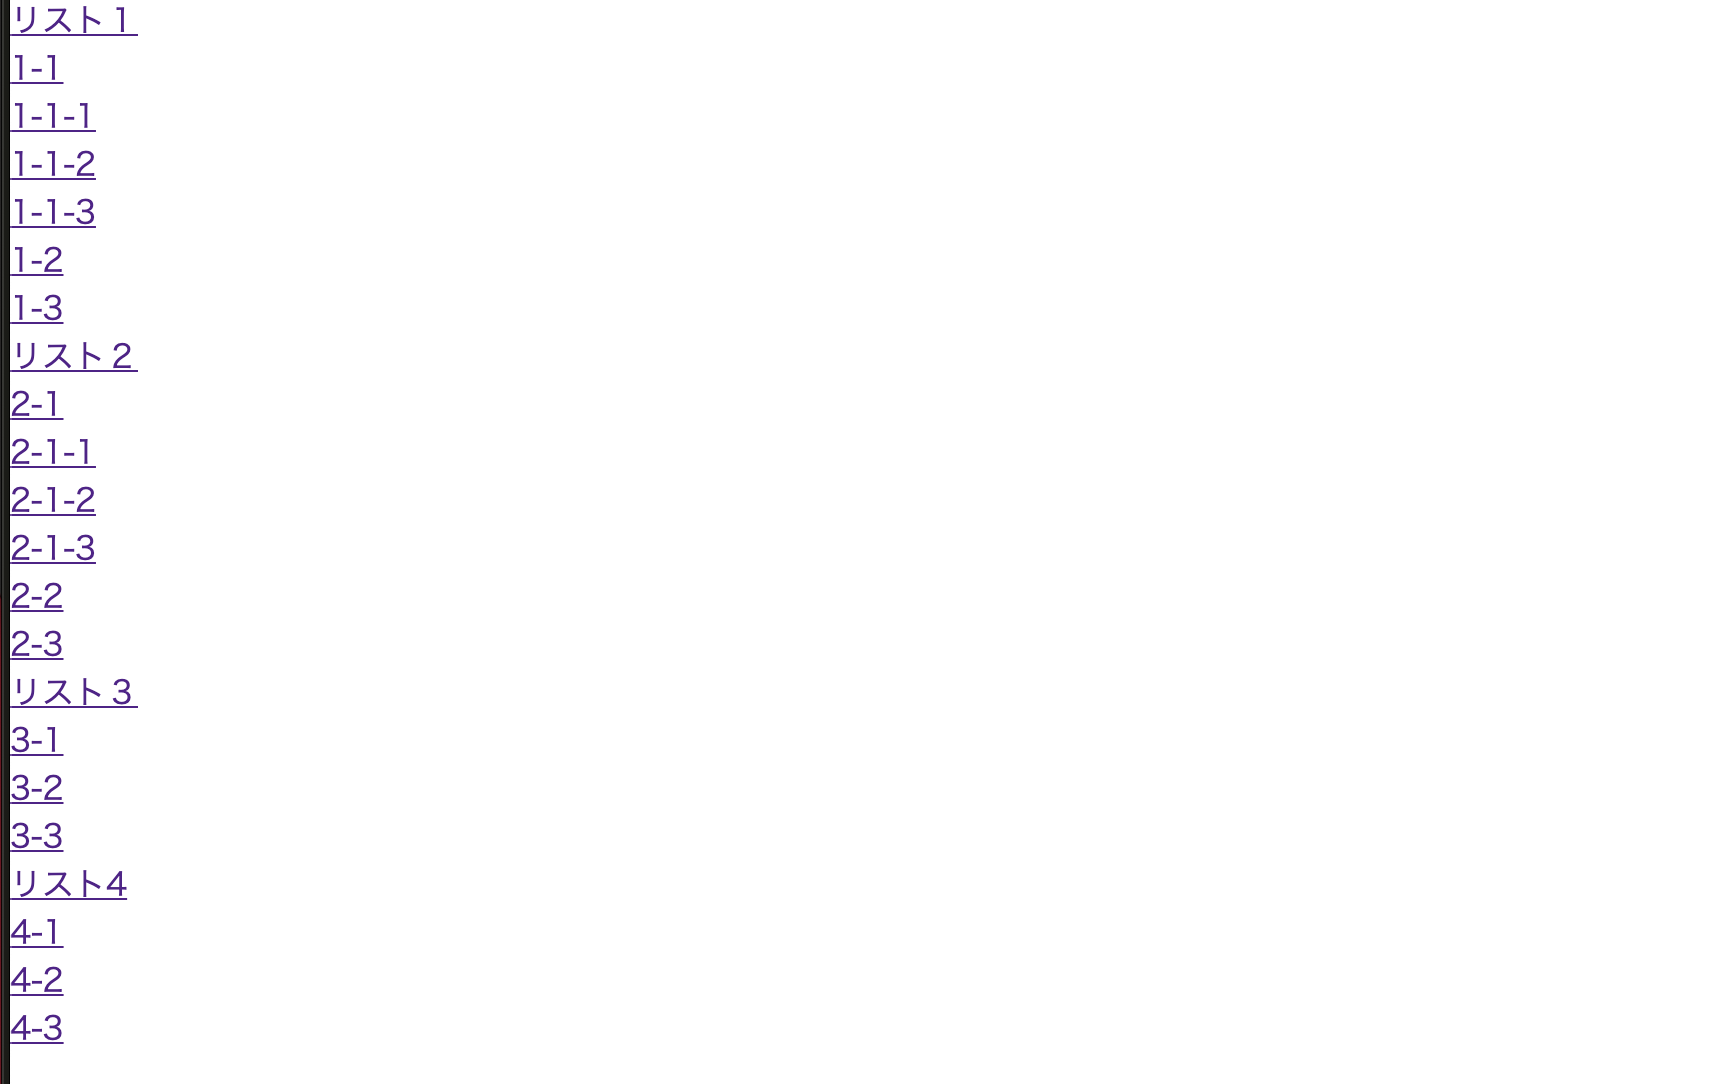
ul,liで書いている順番通りに、縦一直線に並んでいきます。
(本来ならばrenderやeach文で短縮します。)
こうみると長いコードで同じことの繰り返しなので、混乱すると思います。しかし、実際はかなりシンプルな構造になっています。
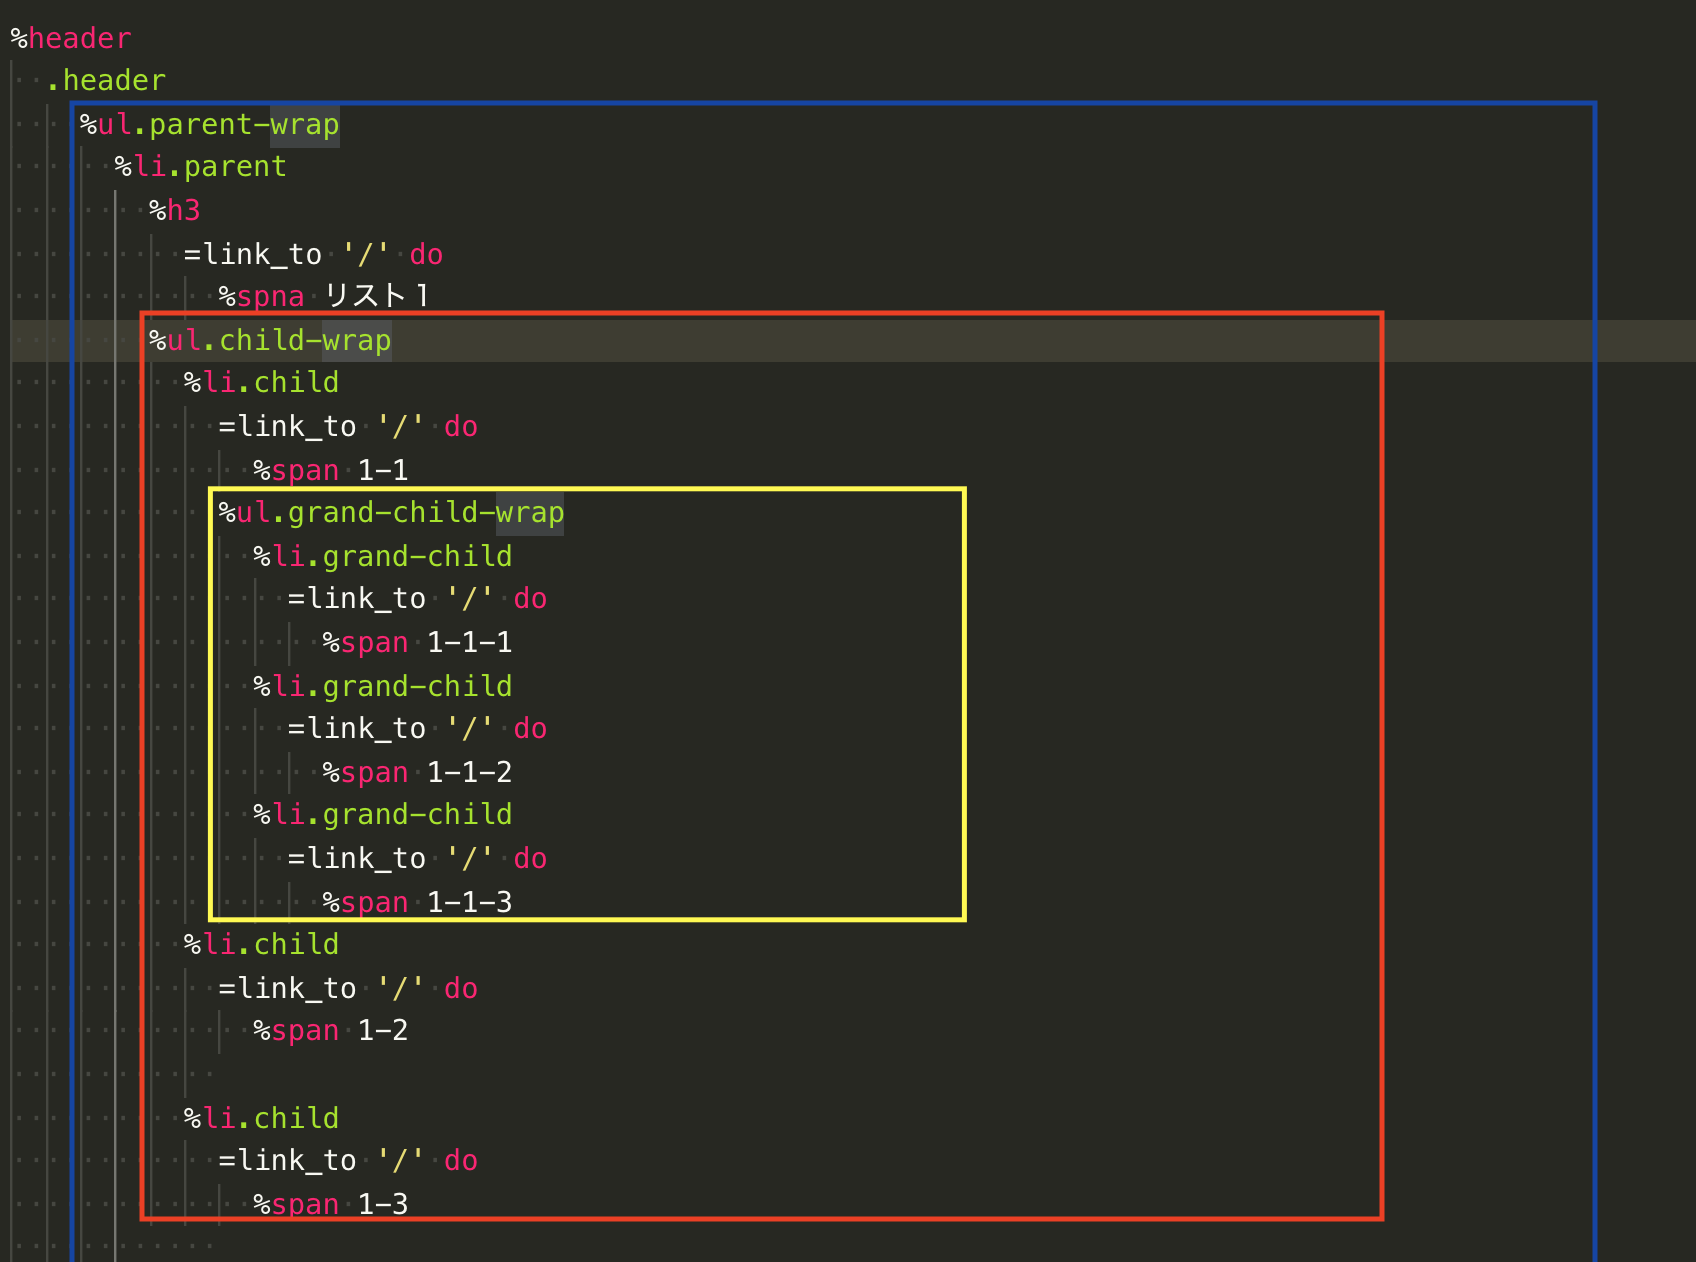
黄色枠 = 「孫」要素
赤色枠 = 「子」要素
青色枠 = 「親」要素
ulが親要素だったり子、孫要素の大きなハコ。
liが親、子や孫の1つ1つのハコになっています。
SCSSで見た目を整える
SCSSでは、hamlで作ったハコを整えていきます。確認のためにdisplay:block;にしておきます。
//active,active2はjQueryで使います
.active{
  display: block;
}
.active2{
  display: block;
}

header{
  width:100vw;
  height: 100vh;
  a{
    color:black;
    text-decoration: none;
  }
}
.header{
  width:80%;
  height: 100px;
  margin: 0 auto;
  background-color:grey;
  display: flex;
}

//親カテゴリー
.parent-wrap{
  display: flex;
  width: 100%;
  height: 100px;
  .parent{
    width: 25%;
    height: 100px;
    h3{
      line-height: 100px;
      text-align: center;
      &:hover{
        background-color:yellow;
      }
    }
  }
}

//子カテゴリー
.child-wrap{
  display: block; //のちにdisplay:none;にします
  background-color:white;
  width:auto;
  position: absolute;
  .child{
    width:279px;
    height: 70px;
    line-height: 70px;
    &:hover{
      background-color: red;
    }
    span{
      font-size: 14px;
      padding:8px 16px;
      text-decoration: none;
      color:black;
    }
  }
}

//孫カテゴリー
.grand-child-wrap{
  display: block; //のちにdisplay:none;にします
  width:auto;
  position: absolute;
  top:0;
  left:279px;
  bottom:0;
  background: #fff;

  .grand-child{
    width:279px;
    height: 70px;
    line-height: 70px;
    &:hover{
      background-color: red;
    }

  }
}
だいぶ長いコードですがこちらも@mixinと@includeを使えばかなり短くできます。
すると、下の画像のようになると思います。

(hoverしてみると色がつきます)
縦にul,li、横にabsolute
hamlだけだと縦一直線でした。それをscssで横に並べるべきものを横に並べました。
それを実現しているのは、
.child{
    width:279px;
}

.grand-child-wrap{
  position: absolute;
  top:0;
  left:279px;
  bottom:0;
}
このコードです。position:absolute;で位置を固定し、top/left/bottomで位置を調整しています。leftが279と微妙なのは、その上にある.childのwidthの幅を合わせているためですね。
jQueryで動きをつける
ここからはjQueryで動きをつけていきます。ここがかなり難しいと踏んでいたんですが、hoverしたときの動きを書いていけばいいだけなので、コード自体もかなりシンプルです。
$(document).ready(function(){

  $('.parent').hover(function(){
    $(this).addClass('active');
    var children = $('.active').children('.child-wrap');
    children.show();
  },function(){
    $(this).removeClass('active');
    $(this).children('.child-wrap').hide();
  });

  $('.child').hover(function(){
    $(this).addClass('active2');
    var grandChild = $('.active2').children('.grand-child-wrap');
    grandChild.show();
  },function(){
    $(this).removeClass('active2');
    $(this).children('.grand-child-wrap').hide();

  });
});
jQueryをRailsで使えるようにするためには、「jQueryをrailsで使えるようにする」の記事を参考にしました。
.parentをhoverしたとき、つまり親のli要素をhoverしたときに発火させます。さらにaddClassを使い、activeクラスをつけてあげることで、display:block;がつくようになります。(css参照)
ここではvar childrenとしているのですが、変数をつかわなくても大丈夫です。
.activeをつけたクラスの子要素を取得(childrenメソッド)しています。.child-wrapとは、子要素の大きなハコ、つまりul要素です。
hoverの話を少しすると、hoverの第一引数はhoverしている時のアクションで、第二引数はhoverが外れた時のアクションです。なので、第二引数部分にはremoveClassとhideメソッドを使っています。
$('.parent').hover(function(){
//第一引数。ここにaddClass,show
},function(){
//第二引数 ここにremoveClass.hide
});
忘れないdisplay:none;
jQueryで動きをつけたら、cssでdisplay:block;にしていた部分をdisplay:none;にします。
すると、サンプル通り動きがつくと思います。
あとがき
だいぶ長くなってしまいました。記事内でなんども言ってはいますが、本来は部分テンプレートや@mixin等で共通部分の書き出しをするので、もっと短くなります。
実装前は「なにこれ、難しそう。てかhtmlどうなってんの???」という感じでしたが、一個ずつ細かく分解して見ていくことで、多段階ナビゲーションバーの構成が理解できました。だいぶ時間かかったけど・・・
もっと深いナビゲーションバーにしたい!という場合でも孫要素からは同じことの繰り返しなので、他にも応用できそうですね。
誤字脱字、記述ミスなどありましたら、よろしくお願いします。
参考サイト
JavaScript逆引きリファレンス
jQueryで多階層のナビゲーションメニューを実装する
【jQuery入門】 addClass()でクラス属性を操作する方法まとめ!