概要
Laravelでのカレンダー機能実装の記録。(実装編)
Fullcalendarの実装の理解については(理解編)にて。
仕様
まずはカレンダーに関して、仕様を記しておく。
- 縦型、横型を指定して表示できる
- 予定が人毎に分かれて表示される
- 人は事業所ごとにグループ分けできる
縦横の表示をユーザが選択でき、予定は人毎に分かれて表示されるようにしたい。
現状のgoogleカレンダーなどは人毎に分割して表示することができないため、
そちらの解決したい目的。
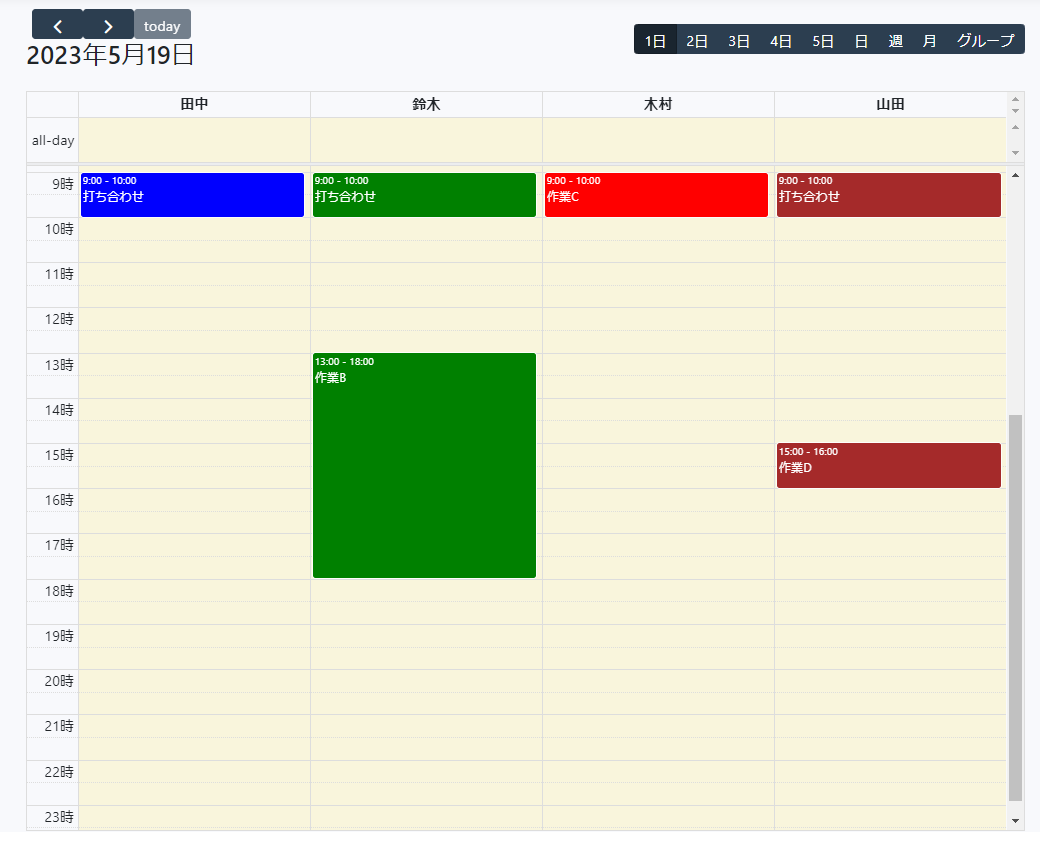
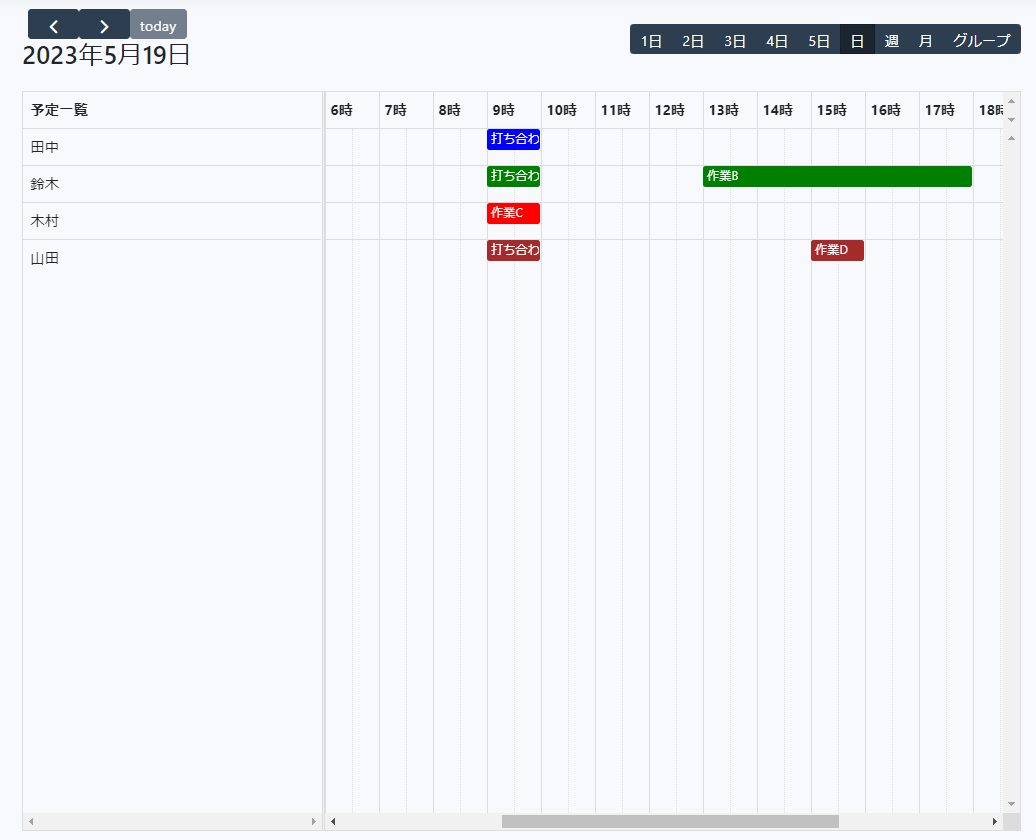
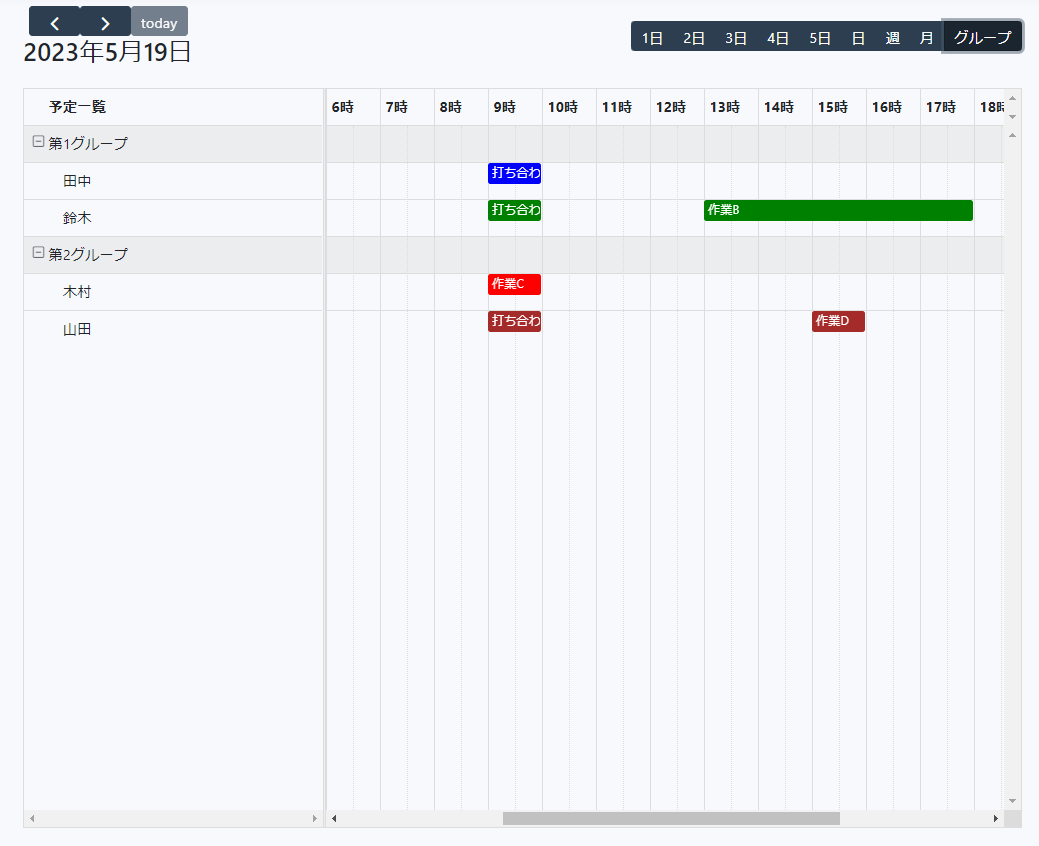
完成イメージ
次に、完成イメージを載せる。
画面右上にボタンが大量に並んでいるが、あくまでサンプルとして作成し、運用に合わせて必要なもののみにするイメージ。
※人(リソース)毎に表示部分が分けるのが、今回の仕様の肝である。
1.縦型のイメージ:人単位で縦表示する
2.横型のイメージ:人単位で横表示
3.グループのイメージ:人単位で横表示かつ、人をまとめられる
実装
ES6 + vite で実装を行う。こちらの説明は別記事(理解編)参照。
実装の手順としては目次を参照してほしい。
実装イメージ
全体フロー
全体の流れを絵に書いてみるとこんな感じだろうか。
(ほぼLaravelの話で今回に限った話でないが、イメージとして)
DB設計
DBに関しては今回使用するFullCalendarの公式から構造を決めておく。
(参考) 公式 - カレンダーの構造
公式の情報を元にサンプルとしたデータ構造がこちら。
var calendar = new Calendar(calendarEl, {
  resources: [
    { id: "a", building: '第1グループ', title: "田中", eventColor: "blue" },
  ],
  events: [
    {
        resourceId: "a",
        title: "打ち合わせ",
        start: "2023-05-19T09:00:00",
        end: "2023-05-19T10:00:00",
    },
  ]
});
resourceのテーブルとeventのテーブルに対して、
resources.id = events.resourceId で紐づいている形となるため、以下のイメージ。
こちらを前提として、実装へ。
1. ライブラリインストール
npmを利用してインストールを行う。
今回は横型(Timeline View)も縦型(Vertical Resource View)も使う前提でまとめてインストールする。
npm install --save
@fullcalendar/core
@fullcalendar/resource
@fullcalendar/resource-timeline
@fullcalendar/resource-timegrid
(参考) 公式 - 横型(Timeline View)
(参考) 公式 - 縦型(Vertical Resource View)
2. viewの作成(カレンダー表示ページ)
(参考) 公式 - viewサンプルを元にcalendar.blade.phpを作成。
いったんid = calendarのdivだけ準備しておく。
<!DOCTYPE html>
<html>
  <head>
    <meta charset='utf-8' />
  </head>
  <body>
    <div id='calendar'></div>
  </body>
</html>
3. jsの作成
3-1. jsの作成
(参考) 公式 - jsサンプルを元に、今回の要件ようにカスタマイズしたものがこちら。
resources/js/calendar.js(全文)
import { Calendar } from "@fullcalendar/core";
import interactionPlugin from "@fullcalendar/interaction";
import resourceTimelinePlugin from "@fullcalendar/resource-timeline";
import resourceTimeGridPlugin from "@fullcalendar/resource-timegrid";
import dayGridPlugin from "@fullcalendar/daygrid";
import timeGridPlugin from "@fullcalendar/timegrid";
import listPlugin from "@fullcalendar/list";
import axios from 'axios';

var calendarEl = document.getElementById("calendar");

let calendar = new Calendar(calendarEl, {
    plugins: [interactionPlugin, resourceTimelinePlugin, resourceTimeGridPlugin  , dayGridPlugin, timeGridPlugin, listPlugin ],
    schedulerLicenseKey: 'CC-Attribution-NonCommercial-NoDerivatives',
    initialView: 'resourceTimeGridOneDay',
    datesAboveResources: true,  // true:日付サマリ、false:リソースサマリ
    resourceAreaHeaderContent: "予定一覧",
    locale: "ja",
    editable: true,
    headerToolbar: {
        left: 'prev,next,today,title',
        right: 'resourceTimeGridOneDay,resourceTimeGridTwoDay,resourceTimeGridThreeDay,resourceTimeGridFourDay,resourceTimeGridFiveDay,resourceTimelineDay,resourceTimelineWeek,resourceTimelineMonth,resourceTimelineDayGroup'
    },

    views: {
        resourceTimeGridOneDay: {
            type: 'resourceTimeGrid',
            duration: { days: 1 },
            buttonText: '1日'
        },
        resourceTimeGridTwoDay: {
            type: 'resourceTimeGrid',
            duration: { days: 2 },
            buttonText: '2日'
        },
        resourceTimeGridThreeDay: {
            type: 'resourceTimeGrid',
            duration: { days: 3 },
            buttonText: '3日'
        },
        resourceTimeGridFourDay: {
            type: 'resourceTimeGrid',
            duration: { days: 4 },
            buttonText: '4日'
        },
        resourceTimeGridFiveDay: {
            type: 'resourceTimeGrid',
            duration: { days: 5 },
            buttonText: '5日'
        },

        resourceTimelineDay:{
            type: 'resourceTimelineDay',
            buttonText: '日'
        },
        resourceTimelineWeek:{
            type: 'resourceTimelineWeek',
            buttonText: '週'
        },
        resourceTimelineMonth:{
            type: 'resourceTimelineMonth',
            buttonText: '月'
        },
        resourceTimelineDayGroup:{
            type: 'resourceTimelineDay',
            resourceGroupField: 'building',
            buttonText: 'グループ'
        },
    },
    resources: function (info, successCallback, failureCallback) {
        axios
            .post("/calendar/resourceGet", {
            })
            .then((response) => {
                successCallback(response.data);
            })
            .catch(() => {
            });
    },
    events: function (info, successCallback, failureCallback) {
        axios
            .post("/calendar/eventGet", {
            })
            .then((response) => {
                calendar.removeAllEvents();
                successCallback(response.data);
            })
            .catch(() => {
            });
    },
});
calendar.render();
カスタマイズポイントとしては下記。
1.(参考) 公式 - datesAboveResourcesオプション
日付優先でサマリするか、人(resource)毎優先でサマリするか設定する。
datesAboveResources: true, // true:日付サマリ、false:リソースサマリ
    views: {
        resourceTimeGridOneDay: {
            type: 'resourceTimeGrid',
            duration: { days: 1 },
            buttonText: '1日'
        },
        ・・・
3.(参考) 公式 - グルーピングの条件設定
今回は部署ごとに分けるという想定で。
        resourceTimelineDayGroup:{
            type: 'resourceTimelineDay',
            resourceGroupField: 'building',
            buttonText: 'グループ'
        },
4.データの取得方法
DB連携したデータの取得方法について、こちら参考にさせていただきました。
非常にわかりやすくまとめていただいていますので、確認オススメします。
ソースのポイントとしてはaxiosにてpost通信しており、
resourceGetとeventGetというルーティングでデータを取得するようにしている。
    resources: function (info, successCallback, failureCallback) {
        axios
            .post("resourceGet", {
        ・・・
    },
    events: function (info, successCallback, failureCallback) {
        axios
            .post("eventGet", {
        ・・・
    },
3-2. 作成したjsのimport設定
作成したjsをapp.jsにてimportする。
import './bootstrap';
import './calendar'; // 追加
3-3. viteにて読み込ませる
表示ページのheadタグの中に、viteを利用してjsを読み込ませる。
  <head>
    <meta charset='utf-8' />
   @vite('resources/js/app.js')
  </head>
4. route設定(表示ページへのパス設定)
それぞれの画面・データ取得処理へのルーティングを設定する。
    Route::group(['prefix'=>'calendar'], function () {
        Route::get('index', [CalendarController::class, 'index']);
        Route::post('resourceGet', [CalendarController::class, 'resourceGet']);
        Route::post('eventGet', [CalendarController::class, 'eventGet']);
    });
なおルーティングはgurupでまとめられるとのこと。(Laravel9.xから?)
(参考) 公式 - ルーティング
こうしておくと、calendar/index・calendar/resourceGet・calendar/eventGet とすることが可能。
各説明としては下記。
index:カレンダー表示ページへ遷移するルーティング
resourceGet:リソース(今回は人単位を想定)データを取得するPOST通信のルーティング
eventGet:イベントデータを取得するPOST通信のルーティング
5. controllerの設定
5-1. コントローラー等の作成
続いてコントローラーを作成する。
私はいつも「aオプション」で一式作っているので、コマンドをのせておくがお好きな方法で作ってほしい。
(参考) 公式 - モデルの作成
rem カレンダーデータ(event)
php artisan make:model calendar -a
rem 従業員データ(resource)
php artisan make:model employee -a
5-2. コントローラーの内容
コントローラーの内容としては下記。
index:表示画面の設定
resourceGet:リソース取得のSQL
eventGet:イベント取得のSQL
<?php
namespace App\Http\Controllers;

use App\Models\calendar;
use App\Models\employee;

class EventController extends Controller
{
    public function index()
    {
        return view('calendar');
    }
    /**
     * リソースを取得
     */
    public function resourceGet()
    {
        return employee::query()
            ->select('id' , 'building' , 'title' , 'eventColor')
            ->get();
    }
    /**
     * イベントを取得
     */
    public function eventGet()
    {
        return calendar::query()
            ->select('resourceId' , 'title' , 'start_time as start' , 'end_time as end')
            ->get();
    }
}
6. DBの設定
6-1. tableの設定
リソース(employee)テーブルの設定。
    ・・・
    public function up()
    {
        Schema::create('employees', function (Blueprint $table) {
            $table->id();
            $table->timestamps();
            $table->string('building')->nullable();
            $table->string('title')->nullable();
			$table->string('eventColor')->nullable();
        });
    }
    ・・・
イベント(calendar)テーブルの設定。
    ・・・
    public function up()
    {
        Schema::create('employees', function (Blueprint $table) {
            $table->id();
            $table->timestamps();
			$table->integer('resourceId')->nullable();
            $table->string('building')->nullable();
            $table->timestamp('start_time')->nullable();
			$table->timestamp('end_time')->nullable();
        });
    }
    ・・・
6-2. seederの設定
リソース(employee)テーブルのシーダーの設定。
    ・・・
    public function run()
    {
        \DB::table('employees')->truncate();

        $obj = new employee;
        $obj->building = '第1グループ';
        $obj->title = '田中';
        $obj->eventColor = 'blue';
        $obj->save();
    }
    ・・・
イベント(calendar)テーブルのシーダーの設定。
    ・・・
    public function run()
    {
        \DB::table('calendars')->truncate();

        $obj = new calendar;
        $obj->title = '打ち合わせ';
        $obj->start_time = '2023/05/19 09:00:00';
        $obj->end_time = '2023/05/19 10:00:00';
        $obj->save();
    }
    ・・・
データベースシーダーの設定。
・・・
    public function run()
    {
        ・・・
        $this->call(EmployeeSeeder::class);
        $this->call(CalendarSeeder::class);
        ・・・
    }
・・・
6-3. migrationの実行
コマンドにてDB最新化&データ登録。
cmd php artisan migrate:refresh --seed
7. 動作確認
7-1. サーバ起動
コマンドにてサーバを起動する。
(※Laravel9.xからはsailというのが使える模様)
cmd php -S localhost:8000 -t public
7-2. vite起動
またvite利用のためviteを起動する。
公式 - Viteの実行
cmd npm run dev
7-3. ローカル環境動作確認
http://localhost:8000/calendar/index に接続し、動作確認。
8. リリース
問題なければリリース作業となる。
リリース前としてビルド作業をしておく。
cmd npm run build
ビルド作業によって、public\build\assets直下のjsが更新される模様。
こちらによってpublicの下のjsにファイルを配置する必要がなくなっている。
課題
- jsのpost通信がroute記述が使用できない
現在の課題として、js内のpost通信する際のパスが設定できない。
    ・・・
    resources: function (info, successCallback, failureCallback) {
        axios
            .post("/calendar/resourceGet", {
            })
            .then((response) => {
                successCallback(response.data);
            })
            .catch(() => {
            });
    },
    ・・・
このようにハードコーティングになってしまっている状態となっている。
本番環境/検証環境/開発環境等リリース先のベースとなるURLが異なる場合、うまくいかない原因となっている。
環境変数から値を取得したいのだが、ローカル環境だとうまくいくのだが、
私の場合、サクラのレンタルサーバにアップロードするとうまく取得できていない状態。
まとめ・所感
今回、Fullcalendarを利用したカスタマイズについて検討してみた。
色々と記事を見漁ったのだが、最終的には公式を参照するのが最善と思われる。
(やりたいことがあるのであれば。)
公式HPのトップ にイメージがついているので、そこから選択できる。
その中にdemoがついているので、そちらを見つつ良さそうであれば、組み込むといった流れがよいと思う。
DB連携については、結局のところデータを画面に表示する仕組みは同じであると感じた。
ただし、課題に記載したがjsのルーティングについては改良したい。
(何か情報あればいただけると嬉しいです!)