はじめに
前回は、こんな記事を書きました。
swift初心者がSmartNews風ニュースアプリを作ってみる過程を晒す(2) - 横スクロールするメニューバーを実装 - Qiita
現在の進捗
現在の進捗はこんな感じです。
メニューバーの外観を、SmartNewsライクなものに変更してみます。
ここまでのソースコードは下記コマンドで取得できます。
git clone --branch v1.1 https://github.com/tjnet/NewsAppWithSwift.git
今回、作るもの
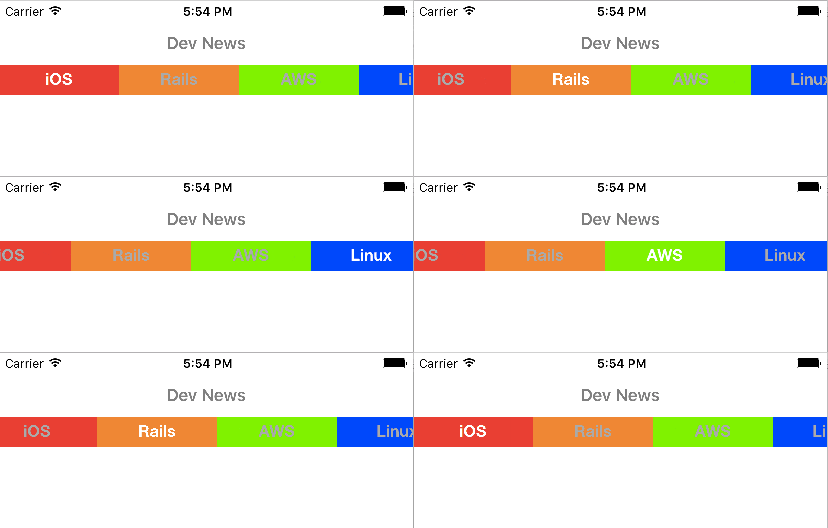
今回は、以下のようなメニューバーを作成してみます。
開発環境
iOS9、Xcode7、swift2で開発を行っています。
Navigation Controllerの導入
Storyboard 上で、ViewController を選択して、メニューから以下を実行します。
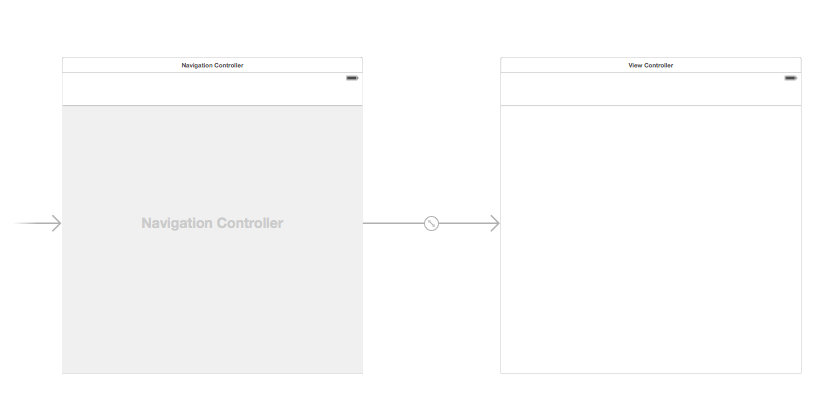
Editor | Embed In | Navigation Controller
Storyboard 上にNavigation Controllerが挿入されます。
参考
ios - When I should use Navigation Controller? - Stack Overflow
Navigation Barを表示する
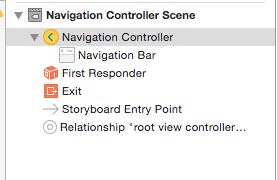
Navigation Controllerを選択します。
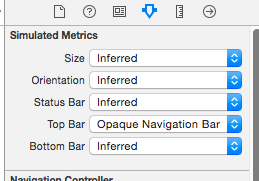
Top Barを'None'から'Opaque Navigation Bar'に変更します。

ライブラリ(PageMenu)を読む
ここまでで、Navigation Barの表示は行えていることと思います。
次に、以下のように、各ニュースカテゴリに、それぞれ異なる背景色を設定したいと思います。

PageMenu/CAPSPageMenu.swift at master · uacaps/PageMenuをもう少し、しっかり読んでみましょう。
class MenuItemView: UIView {
    // MARK: - Menu item view

    var titleLabel : UILabel?
    var menuItemSeparator : UIView?

    func setUpMenuItemView(menuItemWidth: CGFloat, menuScrollViewHeight: CGFloat, indicatorHeight: CGFloat, separatorPercentageHeight: CGFloat, separatorWidth: CGFloat, separatorRoundEdges: Bool, menuItemSeparatorColor: UIColor) {
        titleLabel = UILabel(frame: CGRectMake(0.0, 0.0, menuItemWidth, menuScrollViewHeight - indicatorHeight))

        menuItemSeparator = UIView(frame: CGRectMake(menuItemWidth - (separatorWidth / 2), floor(menuScrollViewHeight * ((1.0 - separatorPercentageHeight) / 2.0)), separatorWidth, floor(menuScrollViewHeight * separatorPercentageHeight)))
        menuItemSeparator!.backgroundColor = menuItemSeparatorColor

        if separatorRoundEdges {
            menuItemSeparator!.layer.cornerRadius = menuItemSeparator!.frame.width / 2
        }

        menuItemSeparator!.hidden = true
        self.addSubview(menuItemSeparator!)

        self.addSubview(titleLabel!)
    }

    func setTitleText(text: NSString) {
        if titleLabel != nil {
            titleLabel!.text = text as String
            titleLabel!.numberOfLines = 0
            titleLabel!.sizeToFit()
        }
    }
}
MenuItemViewクラスが、各メニュー要素の外観(titleLabel, backgroundColor)を管理しているようです。
一通りソースを読んでみましたが、MenuItemViewのbackgroundColorを個別に設定するメソッドは存在しないようです。
どうすれば良いのでしょう...?
ここではライブラリに手を入れて、対応することにしました。
CAPSPageMenu.swiftを編集する
func setUpMenuItemViewでMenuItemViewのsetupを行っているので、まずは引数でbackgroundColorを指定できるようにします。
    func setUpMenuItemView(menuItemWidth: CGFloat, menuScrollViewHeight: CGFloat, indicatorHeight: CGFloat, separatorPercentageHeight: CGFloat, separatorWidth: CGFloat, separatorRoundEdges: Bool, menuItemSeparatorColor: UIColor, menuItemBackgroundColor: UIColor) { //引数menuItemBackgroundColorを追加
        titleLabel = UILabel(frame: CGRectMake(0.0, 0.0, menuItemWidth, menuScrollViewHeight - indicatorHeight))

        menuItemSeparator = UIView(frame: CGRectMake(menuItemWidth - (separatorWidth / 2), floor(menuScrollViewHeight * ((1.0 - separatorPercentageHeight) / 2.0)), separatorWidth, floor(menuScrollViewHeight * separatorPercentageHeight)))
        menuItemSeparator!.backgroundColor = menuItemSeparatorColor
        backgroundColor = menuItemBackgroundColor//ここでbackgroundColorを設定

        if separatorRoundEdges {
            menuItemSeparator!.layer.cornerRadius = menuItemSeparator!.frame.width / 2
        }

        menuItemSeparator!.hidden = true
        self.addSubview(menuItemSeparator!)

        self.addSubview(titleLabel!)
    }
次に、各MenuItemViewの色を指定するメソッドを作成します。
    // MARK: - Set color per page
    func colorAtIndex(index : CGFloat) -> UIColor {
        var color = UIColor.clearColor()

        switch index % 5 {
        case 0:
            color = UIColor.redColor()
        case 1:
            color = UIColor.orangeColor()
        case 2:
            color = UIColor.greenColor()
        case 3:
            color = UIColor.blueColor()
        case 4:
            color = UIColor.purpleColor()
        default:
            break
        }
        return color
    }
最後に、setUpMenuItemViewを呼び出している箇所に引数を追加します。
            let menuItemBackgroundColor = colorAtIndex(index)

             if useMenuLikeSegmentedControl {
                //引数menuItemBackgroundColorを追加
                menuItemView.setUpMenuItemView(CGFloat(self.view.frame.width) / CGFloat(controllerArray.count), menuScrollViewHeight: menuHeight, indicatorHeight: selectionIndicatorHeight, separatorPercentageHeight: menuItemSeparatorPercentageHeight, separatorWidth: menuItemSeparatorWidth, separatorRoundEdges: menuItemSeparatorRoundEdges, menuItemSeparatorColor: menuItemSeparatorColor, menuItemBackgroundColor: menuItemBackgroundColor)
             } else {
                //引数menuItemBackgroundColorを追加
                menuItemView.setUpMenuItemView(menuItemWidth, menuScrollViewHeight: menuHeight, indicatorHeight: selectionIndicatorHeight, separatorPercentageHeight: menuItemSeparatorPercentageHeight, separatorWidth: menuItemSeparatorWidth, separatorRoundEdges: menuItemSeparatorRoundEdges, menuItemSeparatorColor: menuItemSeparatorColor, menuItemBackgroundColor: menuItemBackgroundColor)
             }
動作確認
動きました! 次回はOSSライブラリを用いて、ニュース記事の取得を行ってみます。
ソースコードは下記コマンドで取得できます。
git clone --branch v1.2 https://github.com/tjnet/NewsAppWithSwift.git
感想
今回はcolorAtIndexメソッドの中に各MenuItemViewに設定するbackgroundColorをベタ書きしてしまいました。将来的にはサーバからのレスポンスに応じて、各メニューのタイトルや色を設定したい場面があるかもしれません。
本来は各MenuItemViewのbackgroundColorはライブラリの外部から設定できるようにした方が、より柔軟に扱えそうです。この辺りの書き方は、もう少し勉強してみたいと思います。
参考
The Swift Programming Language (Swift 2.1): Enumerations
Xcode - NSAttributedStringでCSSの各プロパティの再現方法あれこれ - Qiita


