Djangoで、内部結合クエリを試します
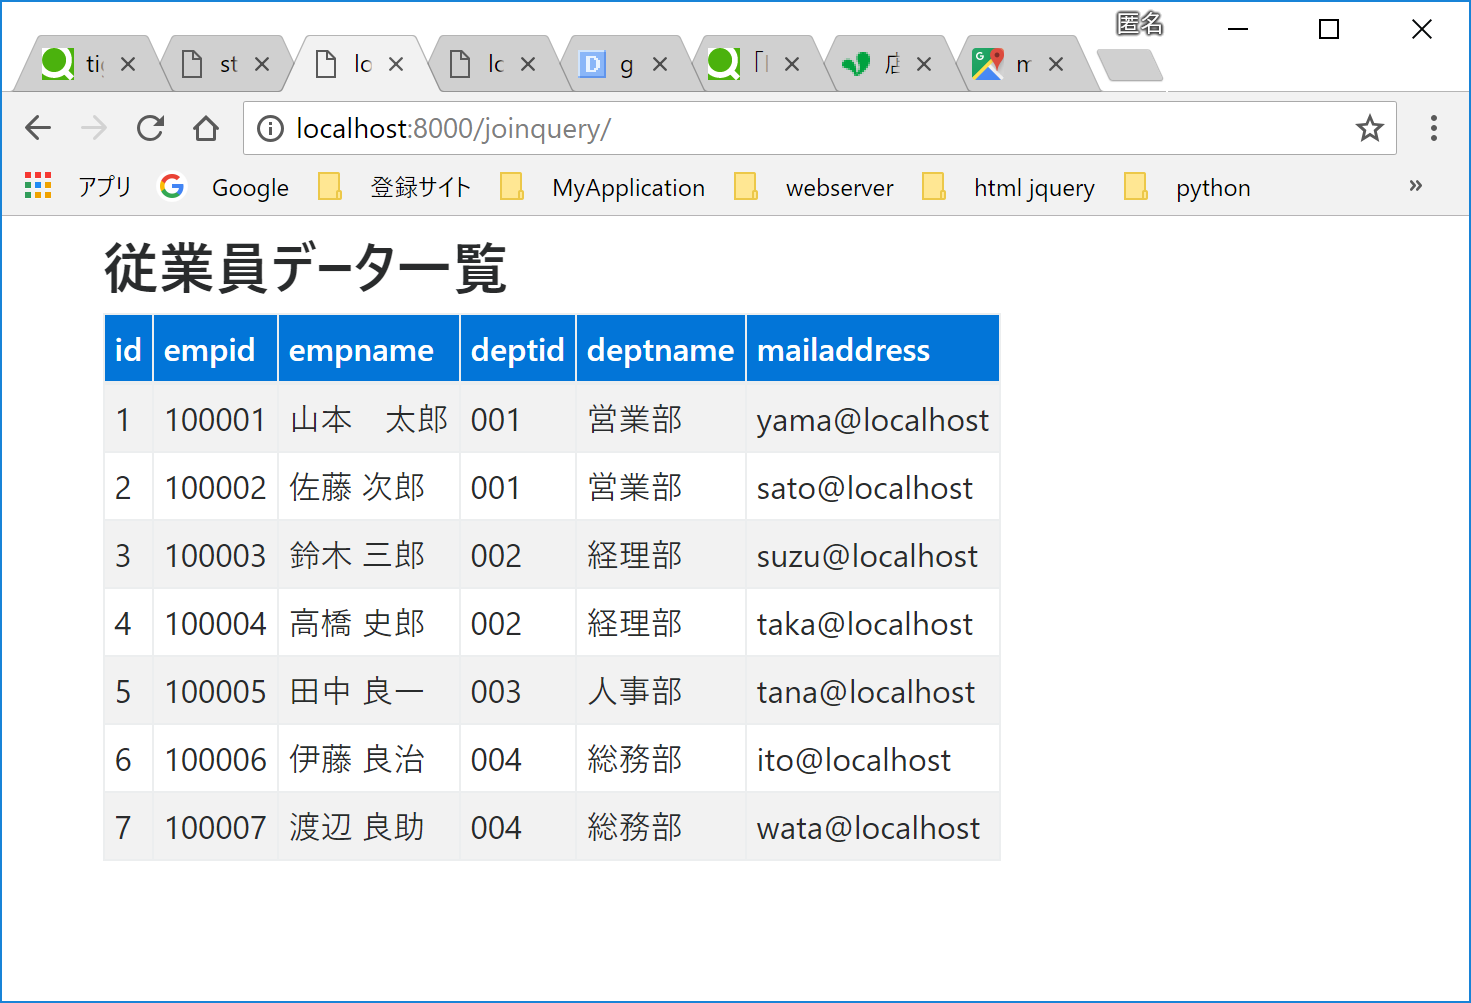
従業員マスタ(Employee)と所属マスタ(Department)を内部結合して一覧を画面に表示してみます
1.環境
windows10 64bit home
Python 3.6.5
Django                2.0.4
pip                   10.0.1
psycopg2              2.7.4
pytz                  2018.4
setuptools            39.1.0
virtualenv venv
2.アプリケーション作成
「joinquery」とします
(venv) c:\data\python\mysite>python manage.py startapp joinquery
3.mysiteを編集する
プロジェクト全体の設定を編集します
projectは「c:\data\python\mysite」に作成しています
(1)c:\data\python\mysite\settings.py
INSTALLED_APPS = [
    'django.contrib.admin',
    'django.contrib.auth',
    'django.contrib.contenttypes',
    'django.contrib.sessions',
    'django.contrib.messages',
    'django.contrib.staticfiles',
    'joinquery', #追加
]
(2)c:\data\python\mysite\urls.py
from django.conf.urls import url, include
from django.contrib import admin
urlpatterns = [
    url(r'^joinquery/', include('joinquery.urls')), #追加
    url(r'^admin/', admin.site.urls),
]
4.アプリケーション(joinquery)を編集する
(1) ファイル構成
C:\data\python\mysite\
│  db.sqlite3
│  manage.py
│
├─joinquery
│  │  admin.py
│  │  apps.py
│  │  models.py
│  │  tests.py
│  │  urls.py
│  │  views.py
│  │  __init__.py
├─mysite
│  │  settings.py
│  │  urls.py
│  │  wsgi.py
│  │  __init__.py
├─static
│  ├─css
│  │      bootstrap-grid.min.css
│  │      bootstrap-reboot.min.css
│  │      bootstrap.min.css
│  │
│  ├─js
│  │      bootstrap.min.js
│  │      jquery-3.3.1.min.js
│
├─templates
│  │  base.html
│  │
│  ├─joinquery
│  │      index.html
(2)モデル作成
- models.pyにモデルを定義します。
from django.db import models

# Register your models here
class Department(models.Model):
    deptid = models.CharField(max_length=16)
    deptname = models.CharField(max_length=64)
    upperdeptid = models.CharField(max_length=16)
    def __str__(self):
        return self.deptname

class Employee(models.Model):
    empid = models.CharField(max_length=16)
    empname = models.CharField(max_length=64)
    deptid = models.CharField(max_length=16)
    mailaddress = models.CharField(max_length=128)
    def __str__(self):
        return self.empname
- admin.pyにモデルを登録して、管理サイトで編集できるようにしておきます
from django.contrib import admin
from joinquery.models import Department, Employee

# Register your models here.
admin.site.register(Department)
admin.site.register(Employee)
admin.py,models.pyを編集したら、migrateしてpostgreSQLにテーブルを登録します
- コマンドプロンプトから、3つのコマンドを実行します
(venv) c:\data\python\mysite>python manage.py makemigrations joinquery

(venv) c:\data\python\mysite>python manage.py sqlmigrate joinquery 0001

(venv) c:\data\python\mysite>python manage.py migrate
- モデルの確認
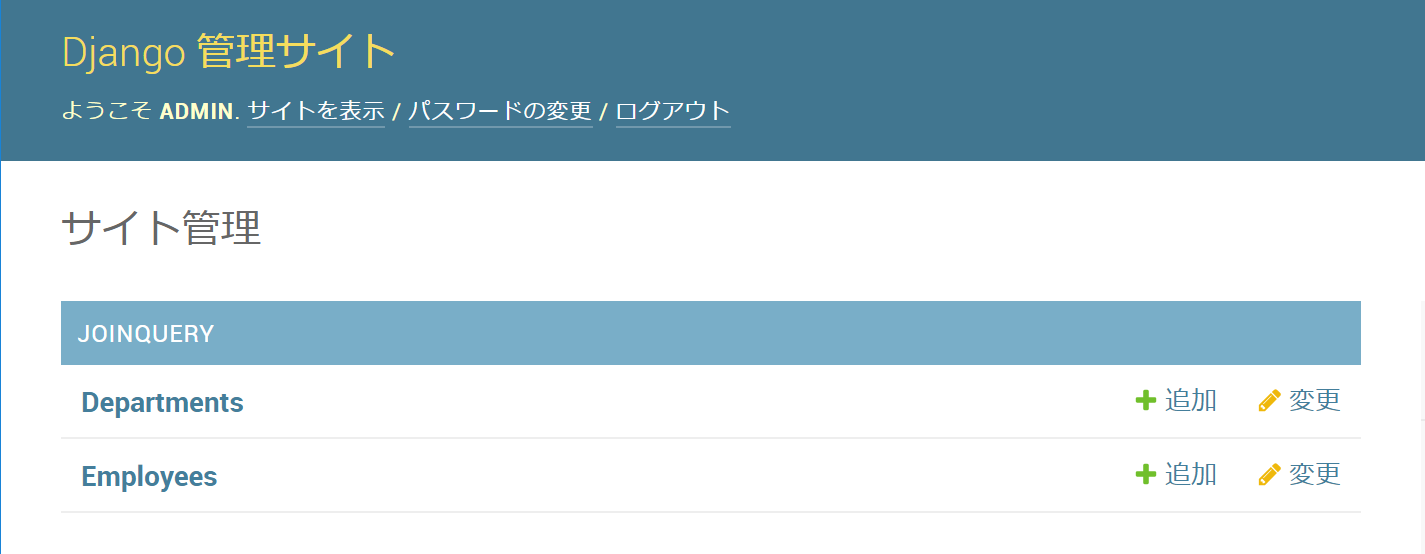
ここでモデルが作成できているか確認します
(venv) C:\data\python\mysite>python manage.py runserver
ブラウザで以下のURLにアクセスする
http://localhost:8000/admin/
モデルが表示されています。
(3)画面に表示する
- urls.py
アプリケーションのjoinquery/urls.pyは、startappコマンドでは作成されませんので新規作成します
from django.conf.urls import url
from . import views
app_name = 'samplequery'
urlpatterns = [
    url('', views.index, name='index'),
]
- views.py
from django.shortcuts import render, get_object_or_404, redirect
from django.http import HttpResponse
from django.views.generic import ListView #追加
from django.db import connection #追加

# list
def index(request):
    sqltext="""SELECT
        a.id
      , a.empid
      , a.empname
      , a.deptid
      , a.mailaddress
      , b.deptname
    FROM
      public.joinquery_employee a
    INNER JOIN
      public.joinquery_department b
      on a.deptid=b.deptid
    ORDER BY
      a.id
        ;  """
    emplist=exec_query(sqltext);
    return render(request, 'joinquery/index.html', {'emplist':emplist})

def exec_query(sql_txt):
#   cursor.descriptionでフィールド名を配列にセットして、resultsにフィールド名を付加
    with connection.cursor() as c:
        c.execute(sql_txt)
        results = c.fetchall()
        columns=[]
        for field in c.description:
            columns.append(field.name)
        values=[]
        for result in results:
            value_dic={}
            for index,field in enumerate(columns):
                value_dic[field]=result[index]
            values.append(value_dic)
        return values
exec_queryは、cursor.execute()後のfetchall()で取得したリストに項目名を追加した配列に変換して、htmlで項目名を指定できるようにしています
def exec_query(sqltext):
    with connection.cursor() as c:
        c.execute(sqltext)
        "Return all rows from a cursor as a dict"
        columns = [col[0] for col in c.description]
        return [
            dict(zip(columns, row))
            for row in c.fetchall()
        ]
正式ドキュメントに記載がありましたが、exec_queryは、このように修正できるようです。
https://docs.djangoproject.com/en/2.0/topics/db/sql/
- index.html
{% extends "base.html" %}
{% load static %}
{% block title %}
{% endblock title %}
{% block links %}
{% endblock links %}
{% block content %}
<h3>従業員データ一覧</h3>
<table class="table table-bordered table-hover table-striped table-sm">
    <thead>
        <tr class="bg-primary text-white">
            <th>id</th>
            <th>empid</th>
            <th>empname</th>
            <th>deptid</th>
            <th>deptname</th>
            <th>mailaddress</th>
        </tr>
    </thead>
    <tbody>
        {% for entity in emplist %}
        <tr>
            <td>{{ entity.id }}</td>
            <td>{{ entity.empid }}</td>
            <td>{{ entity.empname }}</td>
            <td>{{ entity.deptid }}</td>
            <td>{{ entity.deptname }}</td>
            <td>{{ entity.mailaddress }}</td>
        </tr>
        {% endfor %}
    </tbody>
</table>
{% endblock content %}

{% block script %}
<script>
    $(function(){
    })
</script>
{% endblock %}
- base.html
{% load static %}
<!DOCTYPE html>
<html lang="ja">
  <head>
    <meta http-equiv="Content-type" content="text/html; charset=utf-8" />
    <meta http-equiv="X-UA-Compatible" content="IE=edge">
    <meta name="viewport" content="width=device-width, initial-scale=1">
    <title>{% block title %}stone system{% endblock %}</title>
    <!-- Bootstrap -->
    <link href="{% static 'css/bootstrap.min.css' %}" rel="stylesheet">
    {% block links %}
        {{ links }}
    {% endblock %}
    <style>
    .container{
        background: transparent;
        padding:5px;
        margin:5px;
        display: flex;
        justify-content:center;
        align-items:center;
	}
    </style>
  </head>
  <body>
    <div class="container">
        <div class="inner-block">
          {% block content %}
            {{ content }}
          {% endblock %}
        </div>
    </div>
    <!-- jQuery (necessary for Bootstrap's JavaScript plugins) -->
    <script type="text/javascript" src="{% static 'js/jquery-3.3.1.min.js' %}"></script>
    <script type="text/javascript" src="{% static 'js/bootstrap.min.js' %}"></script>
    <!-- js -->
    {% block script %}
    {% endblock %}
  </body>
</html>
5.確認
(venv) C:\data\python\mysite>python manage.py runserver

