初めまして。Qiita初投稿です。
EC2でインスタンスを作成してDiscordのMusicBotを導入してみたのでその流れを書き残しておきます。
はじめに
きっかけ
AWSの無料枠で何かしたいと考えていて、ちょうど最近利用し始めたDiscordに音楽を流せるBotがあったのでそれを導入してみようと思った次第です。
作業の流れ
大まかな流れは以下の記事を参考にさせてもらいました。
【CentOS7 VPS】 Discord Musicbotの導入と常時オンライン化
- EC2インスタンスを作成する
- EC2インスタンスへSSH接続
- インスタンスの初期設定
- MusicBotの導入
- MusicBotの起動
環境
- Windows10 Pro
インスタンス作成
AWS EC2のインスタンスの作成は以下のサイトを参考に行いました。
AWS EC2 インスタンス作成、Webサーバ構築
ほぼ上記の記事の通りインスタンス作成まで進めました。
OSについて
EC2インスタンスのOSはUbuntu Server 16.04を選択しました。
当初はAmazon Linuxで立てていたのですが、どうもMusicBot導入の段階でいろいろと詰まってしまいました。
公式のwikiもあるためUbuntuでやりなおしたところスムーズに進められたのでそちらで進めました。
EC2インスタンスへSSH接続
無事にインスタンスが立ち上がりましたのでSSHで接続していきます。
SSHクライアントですが、いろいろ探した結果シンプルで良さそうだったRloginを使いました。
導入や基本的な使い方は以下を参照。
Windowsターミナルソフト + Rlogin が最高すぎる!!
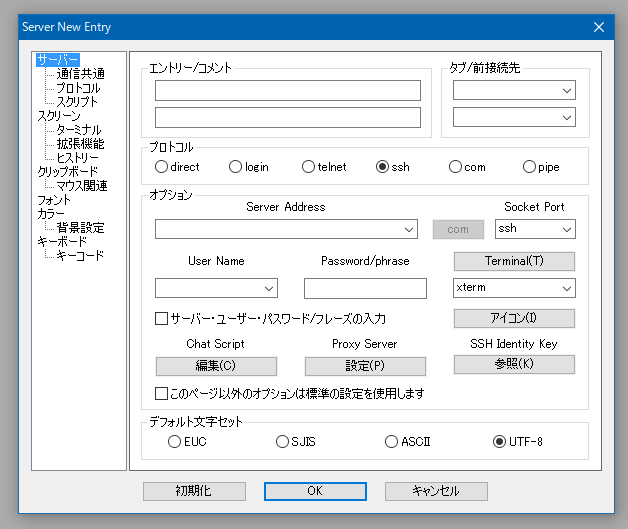
Rloginを開いたら、出てくるServer Selectのダイアログの「新規」を選択。
- エントリーに適当な名前
- プロトコルはssh
- Server AddressにEC2インスタンスのパブリックDNS
- User Nameに「ubuntu」
以上を入力し、右下の「参照」をクリックしてインスタンス作成時に保存したキーペアを選択します。
これでOKを押して接続すると無事繋がります。
Welcome to Ubuntu 16.04.3 LTS (GNU/Linux 4.4.0-1041-aws x86_64)

 * Documentation:  https://help.ubuntu.com
 * Management:     https://landscape.canonical.com
 * Support:        https://ubuntu.com/advantage

  Get cloud support with Ubuntu Advantage Cloud Guest:
    http://www.ubuntu.com/business/services/cloud
初期設定
サーバーとか立てたことがないのでやたらめったらとやるべきことを探しました。
基本的に下記の記事を参考にしました。
AWSにubuntu 14.04インストールして初期設定したメモ。
自分のユーザ作成とsudo権限の付与
デフォルトのubuntuユーザから自分で作ったユーザに変更したいので、ます新しいユーザを作成してsudo権限を付与します。
# `adduser`でユーザを作成します
# パスワードも聞かれるので設定する
$ sudo adduser my_user

# 作成したmy_userにsudo権限を付与します
$ sudo gpasswd -a my_user sudo
公開鍵の移動
先程作成したユーザでssh接続できるよう、ubuntuユーザの公開鍵を移動します。
# 公開鍵の保存するディレクトリを作成
$ mkdir /home/my_user/.ssh

# 公開鍵をコピー
$ cp /home/ubuntu/.ssh/authorized_keys /home/my_user/.ssh

# my_userの.sshディレクトリ以下の所有者、所有者グループをmy_userにする
$ sudo chown -R my_user:my_user /home/my_user/.ssh

# authorized_keysのパーミッションを適切なものに設定
$ sudo chmod 600 /home/my_user/.ssh/authorized_keys
以上が終われば、Rloginの新しいエントリで
- User Nameにmy_user
- Passwordに先程ユーザ作成時に設定したもの
を入力して接続してみます。
初期ユーザの削除
新しいユーザで接続できれば、もう必要ないのでubuntuユーザを削除します。
$ sudo userdel ubuntu
ホスト名の変更
現状 ip-~ となっているホスト名を変更します。
Ubuntu16.04でホスト名を変更する方法
MusicBotというホスト名に変えてみます。
以下の2ファイルを修正します。
/etc/hostname の修正
# 設定ファイルをviで開く
$ sudo vi /etc/hostname
内容を以下のように変更。
MusicBot
/etc/hosts の修正
# 設定ファイルをviで開く
$ sudo vi /etc/hosts
127.0.0.1 localhost
127.0.0.1 localhost
127.0.1.1 MusicBot
再接続するとホスト名が変わっています。
timezoneの設定
$ sudo timedatectl set-timezone Asia/Tokyo
MusicBotの導入
いよいよMusicBotを導入していきます。
といってもほぼ公式のwikiのとおりです。
依存パッケージのインストール
まず最初にMusicBotの依存パッケージをインストールし、パッケージの更新を行います。
$ sudo apt-get install build-essential software-properties-common unzip -y
$ sudo add-apt-repository ppa:mc3man/xerus-media -y
$ sudo apt-get update -y
$ sudo apt-get install git ffmpeg libopus-dev libffi-dev libsodium-dev python3-pip -y
$ sudo apt-get upgrade -y
リポジトリのクローン
本家のGitHubからリポジトリをクローンしてきます。
$ git clone https://github.com/Just-Some-Bots/MusicBot.git MusicBot -b master
$ cd MusicBot
botの設定
Discord開発者ページでのbotの作成手順は割愛します。
冒頭に挙げた記事を参考にしてbotを作成し、botのtokenを入手します。
【CentOS7 VPS】 Discord Musicbotの導入と常時オンライン化 #botを作成しよう
MusicBot/config/eample_options.ini を開き、下記のbot_tokenを入手したtokenに書き換えます。
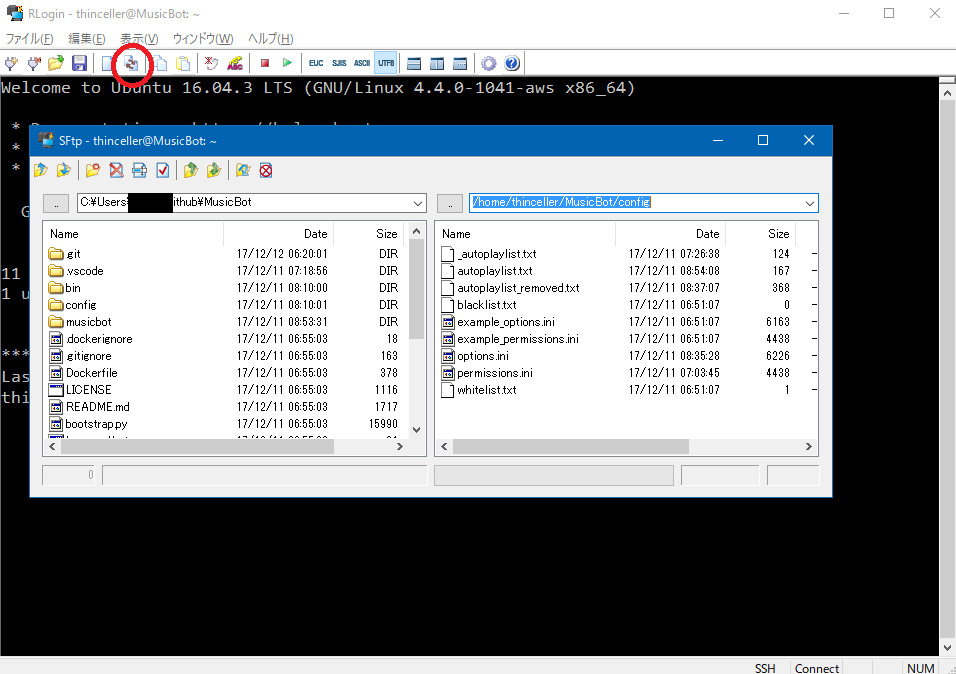
ちなみに、MusicBot内のファイルはローカルでエディタを使って変更した後にRloginのSFTP機能を使って転送しました。

;略

[Credentials]
; If you have a bot account (which you should), you can find your token here:
;     https://discordapp.com/developers/applications/me/
; Then click the button for your bot to go to the bot's page.
; Make sure "Require OAuth2 Code Grant" is unchecked.  You also do not need to
; add any "Redirect URIs" or "RPC Origins".
;
Token = bot_token
; ↑このbot_tokenを書き換える

;略
次に、OwnerIDを設定します。
Discordを開き、ユーザ設定->テーマ と進み、開発者モードをonにします。
設定を完了し、自分のアイコンを右クリックして「IDをコピー」を選択します。
コピーしたIDをexample_options.iniの OwnerIDの箇所に設定します。
;略

[Permissions]
; This option is for setting which user has full* permissions/control of the
; bot.  Only one user can be set here. Additional users can be granted
; permissions in permissions.ini, read that for more details.
;
; You can use this option two different ways:
;
;   1. If set to "auto", the bot will set the owner to the owner of the
;      application/bot account.  This can only be used with bot accounts.
;
;   2. To set the owner to another user, this should be set to the user's ID.
;      Getting a user's ID is explained above.
;
;      Example:
;         OwnerID = 998877665544332211
;
;      TLDR: enable developer mode in discord, right click a user's name in
;            discord, Copy ID, paste here.
;
; * The owner is not automatically granted dev command access (see below)
;
OwnerID = 000000000000000000
; ↑この000000000000000000をコピーしたIDに書き換える

;略
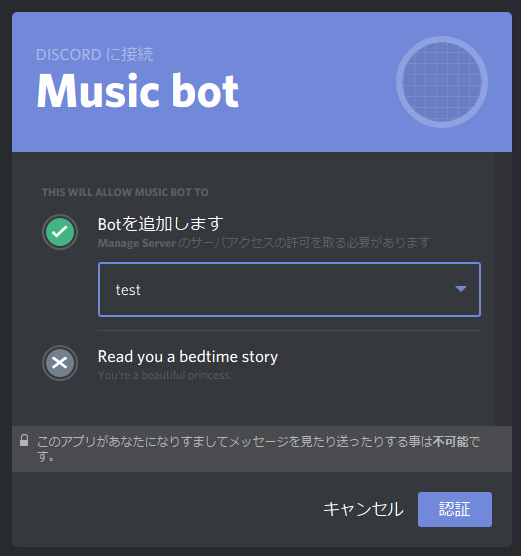
そして、botをサーバに追加します。
開発者ページでbotのClient IDをコピーし、
https://discordapp.com/oauth2/authorize?&client_id=000000000000000000&scope=bot&permissions=0
上のURLのid=のあとの数字をClient IDに書き換えてブラウザでアクセスします。
すると、サーバにbotユーザが追加されます。
MusicBotの起動
それではMusicBotを起動していきます。
まず、先程ID等書き換えたexample_options.iniですが、このままではスクリプトで読み取ってくれないので名前を変更します。
# example_options.iniは書き換えてインスタンスに転送している前提

# MusicBot/config に移動
$ cd config

$ cp example_options.ini options.ini
MusicBotディレクトリに戻って実行します。
Ubuntu Server 16.04にはPython3.5がデフォルトで入っているのでそちらを使っていきます。
$ python3 run.py
screenでbotを動かす
screenというのでセッションを作ってその中で実行すると永続的に動かしてくれる、そうなのでやってみます。
# musicbot というセッションを作ってその中でrun.pyを実行
$ screen -S musicbot

$ python3 run.py
Ctrl-A Dでscreenを抜けられます。
musicbotセッションに戻るには
$ screen -r musicbot
とします。
これで裏でMusicBotを起動するスクリプトを回し続けられます。
おわりに
MusicBotのコマンド等の解説は割愛します。
私はconfigディレクトリ以下のautoplaylist.txtに再生したいYouTubeの動画URLを貼っつけて利用しています。
わかりにくい点等指摘していただければ随時追記します。


